 GameWikiStation
 Graveyard Keeper 2
Map and places
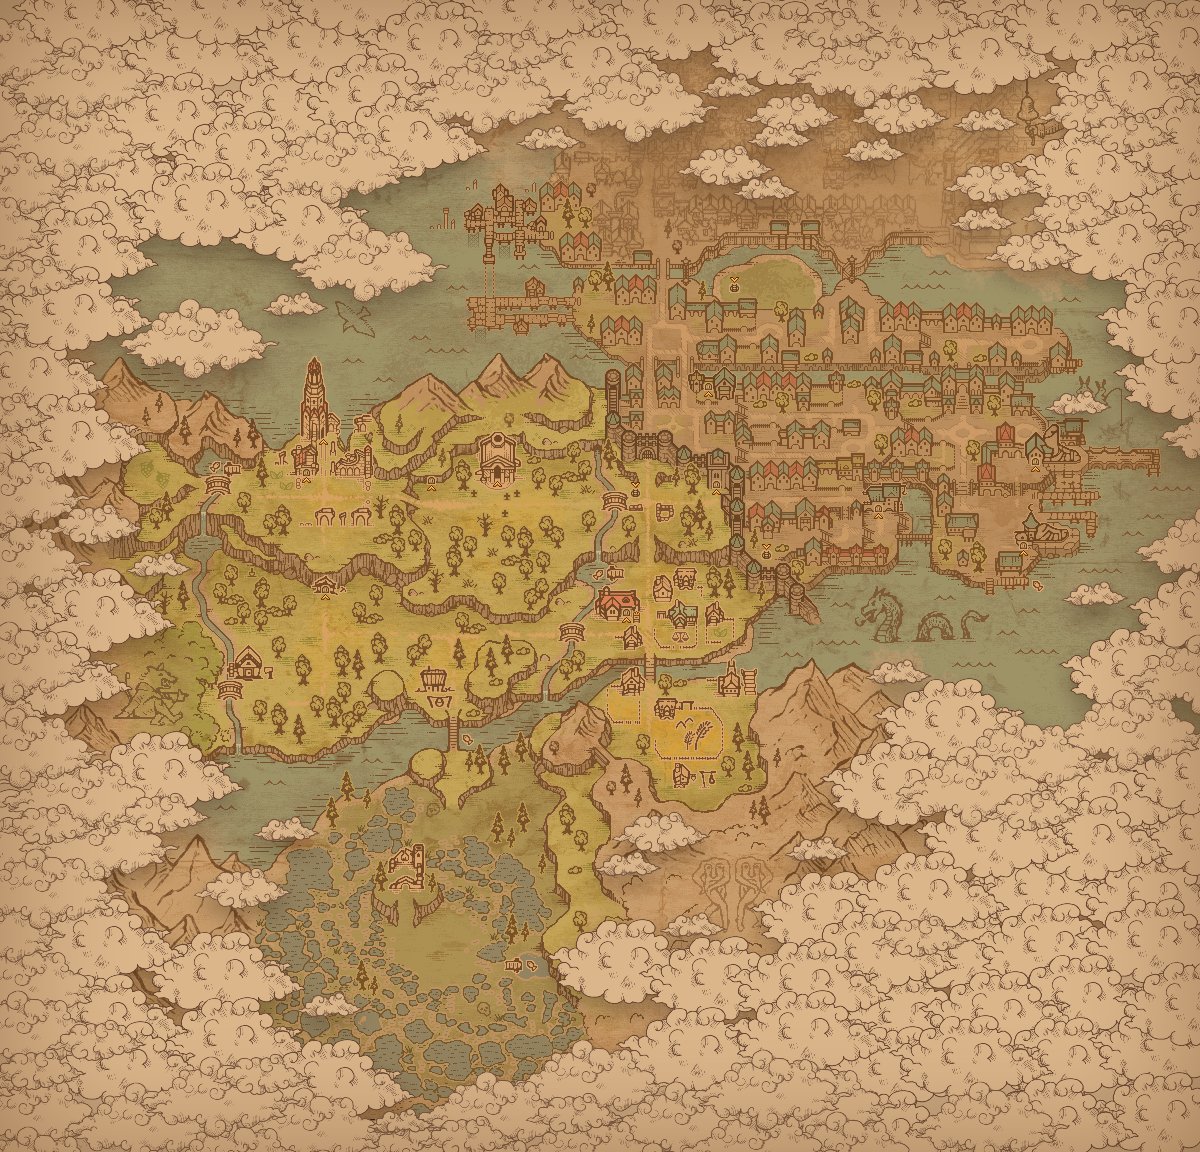
The world of Graveyard Keeper 2 is one map that never changes: every place, door and milestone is in the same spot in every game, and so are the people. This is the game’s own map picture with 64 pins on it, each placed where the in-game map would draw it. Point at a pin, or tap it, to see its name. Untick a box to hide one kind of pin, and try the links in the table below: each one jumps to its pin.
 Alchemy LabAstrologer's TowerRoyal FoundryQuarryChurchCrossroadsForestGraveyardHomePort AreaDockside ClubSluice AreaSquareStilt HousesVillage TavernBarracksVillageVineyardTown WarehouseJack's WorkshopYardBandit CampFactoryForest PostGardenHangman's HouseHeart of the SwampHerm's StoreInquisition BaseAbandoned HouseSewersMailboxMain PierOld MineMorgueInquisition DungeonRiversideSawmillSwampTwins’ LandVineyard Basement
 Larry
Larry Jack
Jack Herbert
 Januarius
 Herm
Herm Jeffry
 Heffry
 Nun
Nun Gunter
 Linda
Linda Trademaster
 HaroldMilestone: Port AreaMilestone: CrossroadsMilestone: GraveyardMilestone: VillageMilestone: YardMilestone: ForestMilestone: VineyardMilestone: Heart of the SwampMilestone: Stilt HousesMilestone: Sluice AreaMilestone: Royal Foundry
Places
Section titled “Places”| Place | Kind | Door from | Who is here |
|---|---|---|---|
| Alchemy Lab | Interior | — | — |
| Astrologer's Tower | Interior | Port Area | Gunter |
| Royal Foundry | Interior | — | — |
| Quarry | Area | — | — |
| Church | Interior | Graveyard | — |
| Crossroads | Area | — | — |
| Forest | Area | — | — |
| Graveyard | Area | — | — |
| Home | Interior | Yard | — |
| Port Area | Area | — | — |
| Dockside Club | Interior | Port Area | Linda |
| Sluice Area | Area | — | — |
| Square | Area | — | Herbert |
| Stilt Houses | Area | — | Harold |
| Village Tavern | Interior | Mailbox | Januarius · Nun |
| Barracks | Interior | Crossroads | — |
| Village | Area | — | — |
| Vineyard | Area | — | — |
| Town Warehouse | Interior | Port Area, Warehouse Cellar | Trademaster |
| Jack's Workshop | Interior | Square | Jack |
| Yard | Area | — | — |
| Bandit Camp | Area | — | — |
| Writing Basement | Interior | — | — |
| Factory | Interior | Yard | — |
| Supply Storage | Interior | — | — |
| Forest Post | Area | — | — |
| Garden | Area | — | — |
| Hangman's House | Area | — | — |
| Heart of the Swamp | Area | — | — |
| Herm's Store | Area | — | Herm |
| Inquisition Base | Area | — | — |
| Abandoned House | Interior | Sluice Area | — |
| Sewers | Interior | Sluice Area, Square | — |
| Mailbox | Area | — | — |
| Main Pier | Area | — | — |
| Old Mine | Interior | Quarry | — |
| Morgue | Interior | Graveyard | — |
| Plague Doctor's Lab | Interior | — | Albert |
| Inquisition Dungeon | Interior | — | Larry |
| Resurrection Lab | Interior | — | — |
| Riverside | Area | — | — |
| Sawmill | Area | — | — |
| Swamp | Area | — | — |
| Twins’ Land | Area | — | Jeffry · Heffry |
| Vineyard Basement | Interior | Vineyard | — |
| Warehouse Cellar | Interior | Town Warehouse | — |
No matching entries.
- Green pins are the 24 named areas of the open world, each at its signpost. Brown pins are the doors of the 17 buildings and underground rooms you can find a way into from the map. Blue diamonds are the 11 milestones. Portraits are the 12 characters who have a fixed spot.
- A room is pinned at its door, and a character inside a building is shown beside that door.
- Door from names the place a room’s door opens onto. A room with a dash there is reached through another room, or its door is in a part of the map with no name.
- Five underground rooms have no pin: you walk into them from a neighbouring room. They are listed without a link.
- A character’s name in Who is here links to the characters page, which says when they appear.
Unofficial fan wiki, not affiliated with Lazy Bear Games / tinyBuild. Game content belongs to its owners.