
 Order of the Sinking Star
Druid puzzles

These early routes pair the 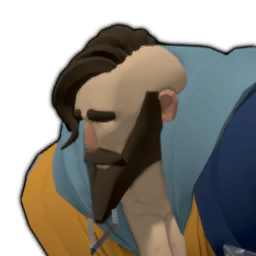 Druid with other heroes. Map labels T1, T2 and so on identify plants; when the Druid changes a plant into a crystal, it keeps the same T label. Arrows follow the displayed board. Each arrow is one directional input; when the Druid casts toward an adjacent target, he stays on his tile. In the
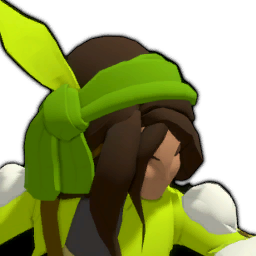 Thief room, the pink switch is A and the cyan marker is the single gate.
Thief and Druid: hold the switch while the Thief passes
Section titled “Thief and Druid: hold the switch while the Thief passes”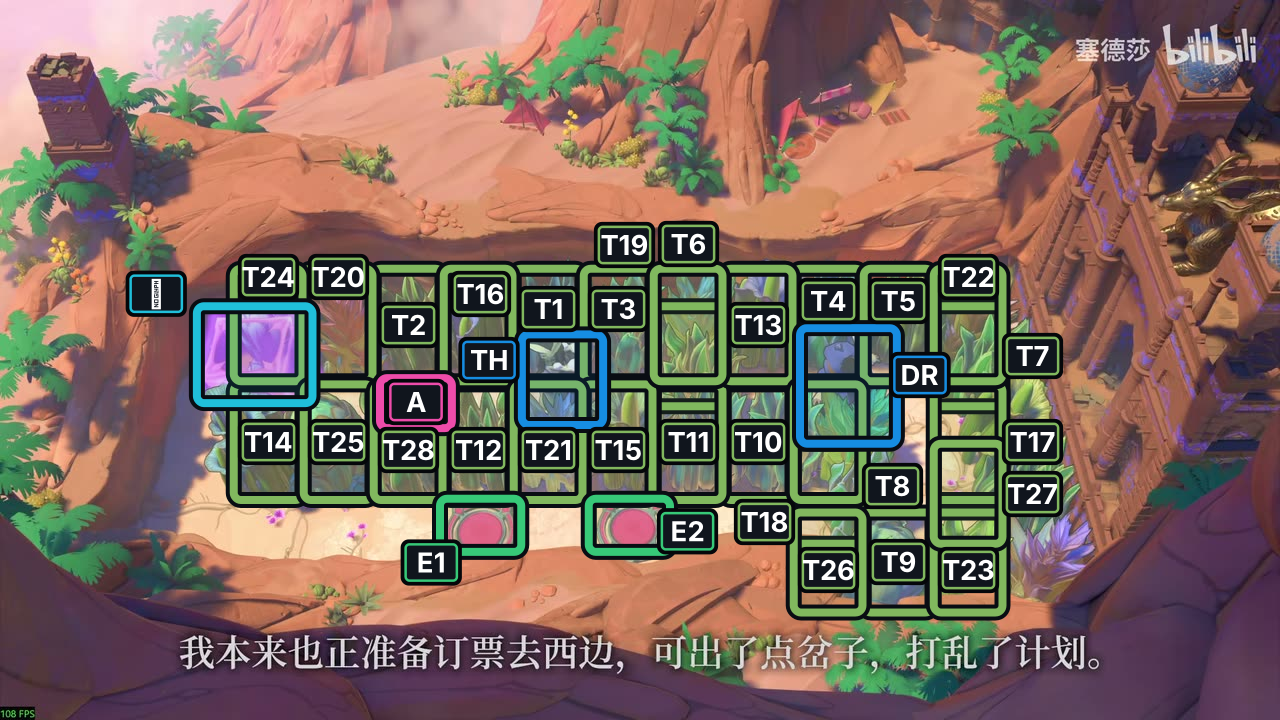
- Plants T1–T28
- Switch A
- Gate
- Exits E1–E2
- TH Thief
- DR Druid
Hint
The Thief cannot pull a plant. Turn T6 into a crystal, let the Thief pull it onto A, then restore it as a plant. That stationary plant keeps the gate open while the Thief crosses. Later, change T8 into a crystal so the Thief can pull it toward the lower exits.
Solution
- Move the Druid
←; the next leftward transmutation at step 2 changes T6 into a crystal. The Thief goes→, then pulls left four times. He stands on A at step 6, opening the gate; the fourth pull at step 7 moves T6 onto the switch. - The Druid goes
← ← ← ←and transmutes left at step 12, restoring T6 as a plant on A. The Thief takes← ← ↓ ↓through the gate. The plant stays on A and keeps the gate open. - The Druid goes
→ → → → → → ↓ ↓; at step 25, a leftward transmutation turns T8 into a crystal. The Thief walks→eight times, then pulls←four times, leaving T8 near the lower exits. The Druid finishes with←four times. At step 41 the Thief is on E1 and the Druid on E2.
If the gate closes before the Thief crosses, restore T6 as a plant on A before taking the passage. If the T8 pulls miss the lower route, undo to the first pull and realign before continuing.
Images show selected video checkpoints; the first frame is the starting position.
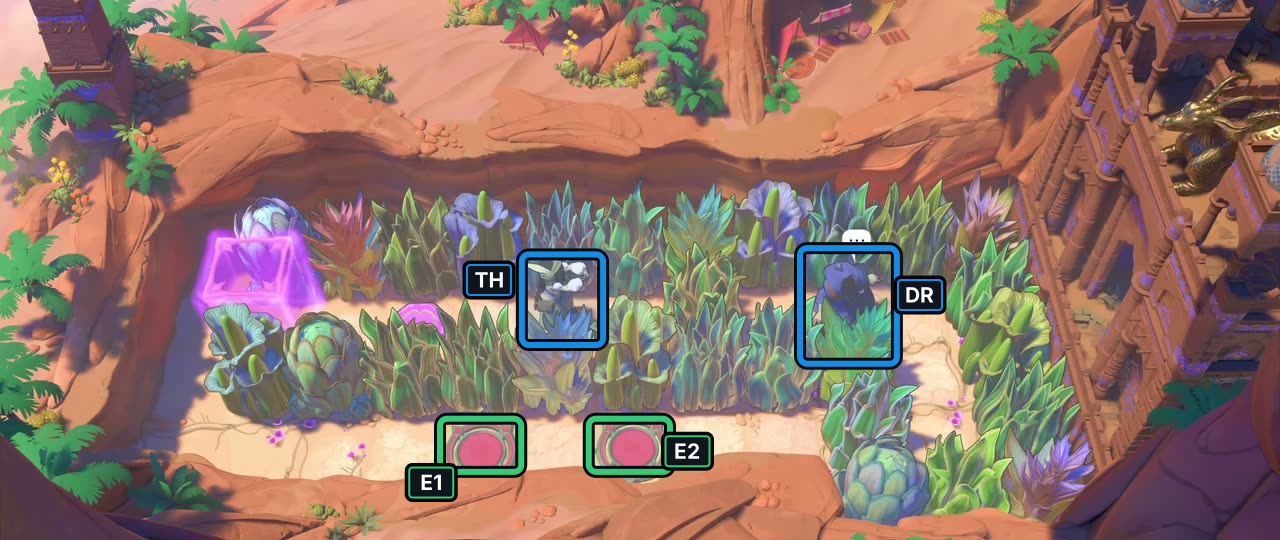
At 00:20, the selected frame shows Thief and Druid in the room’s starting layout.
Check: The markers identify the visible heroes and exits; no input sequence or later state is inferred.
Open full-size image in a new tabFull direction sequence
- DR Druid
← ← - TH Thief
→ ← ← ← ← - DR Druid
← ← ← ← ← - TH Thief
← ← ↓ ↓ - DR Druid
→ → → → → → ↓ ↓ ← - TH Thief
→ → → → → → → → ← ← ← ← - DR Druid
← ← ← ←
Druid and  Warrior: open the three-pad gate
Section titled “Druid and Warrior: open the three-pad gate”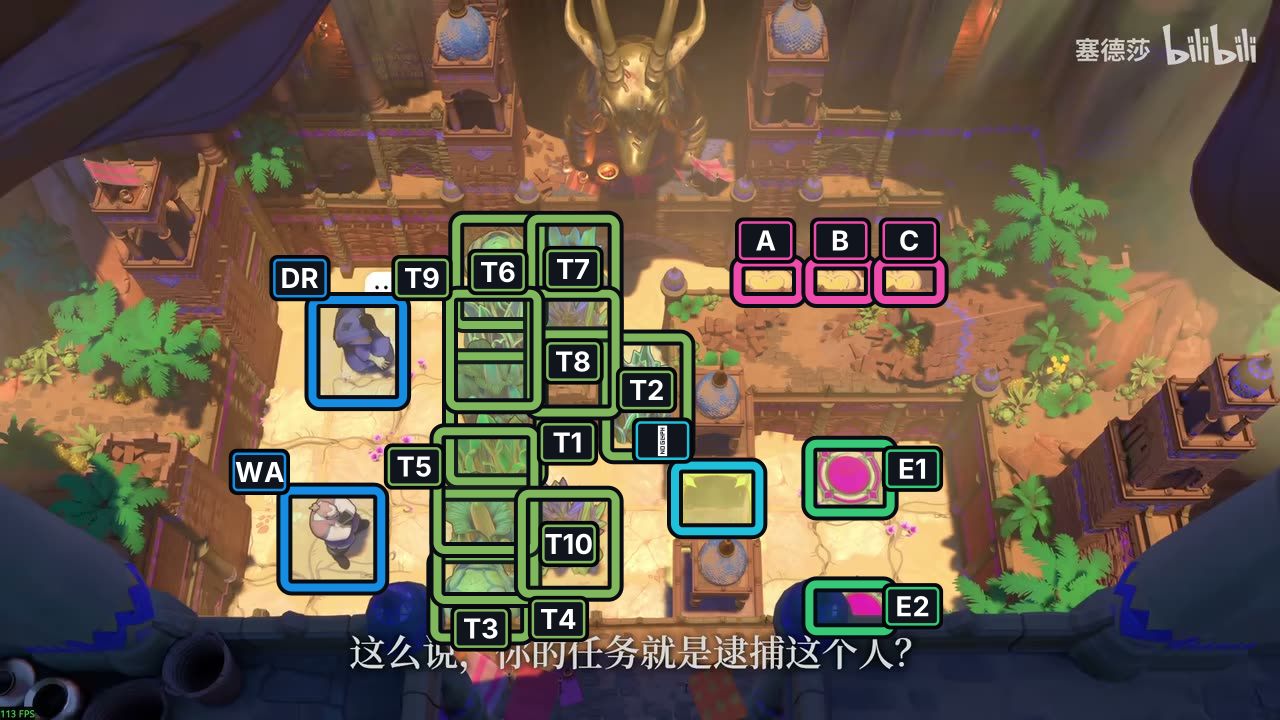
- Plants T1–T10
- Switches A–C
- Gate
- Exits E1–E2
- DR Druid
- WA Warrior
Hint
The Druid turns plants into crystals while the Warrior clears a push lane. Save T2, T6 and T7 for the last row of switches. The gate opens only after the Warrior finishes pushing those three crystals into place; then the heroes can split for the exits.
Solution
- Druid starts
↓ ↓ → → ↓ ↓ →, changing T5 at step 4 and T3 at step 7. Warrior uses↓ → →at steps 8–10 to clear the upper push lane; Druid’s↑at step 11 turns T10 into a crystal. - Continue Druid’s turns through the plant corridor: T2 becomes a crystal at step 30, T8 at 37, T9 at 51 and T6 at 53. Warrior pushes the crystal line to clear the top approach; Druid converts T7 at step 76 to finish the three-switch row.
- Warrior pushes
→ → →across the switch row at steps 80–82. T6, T7 and T2 settle on A, B and C; the gate opens at step 82. Druid takes→ ↓ ↓ ↓ → → ↑ →through the right passage to E1 by step 90. Warrior finishes← ↓ ↓ ↓ ↓ → → ↓ →at E2 on step 99.
If the gate does not open after the third switch is occupied, Undo to the Warrior’s final row push and line up T2, T6 and T7 before crossing.
Images show selected video checkpoints; the first frame is the starting position.
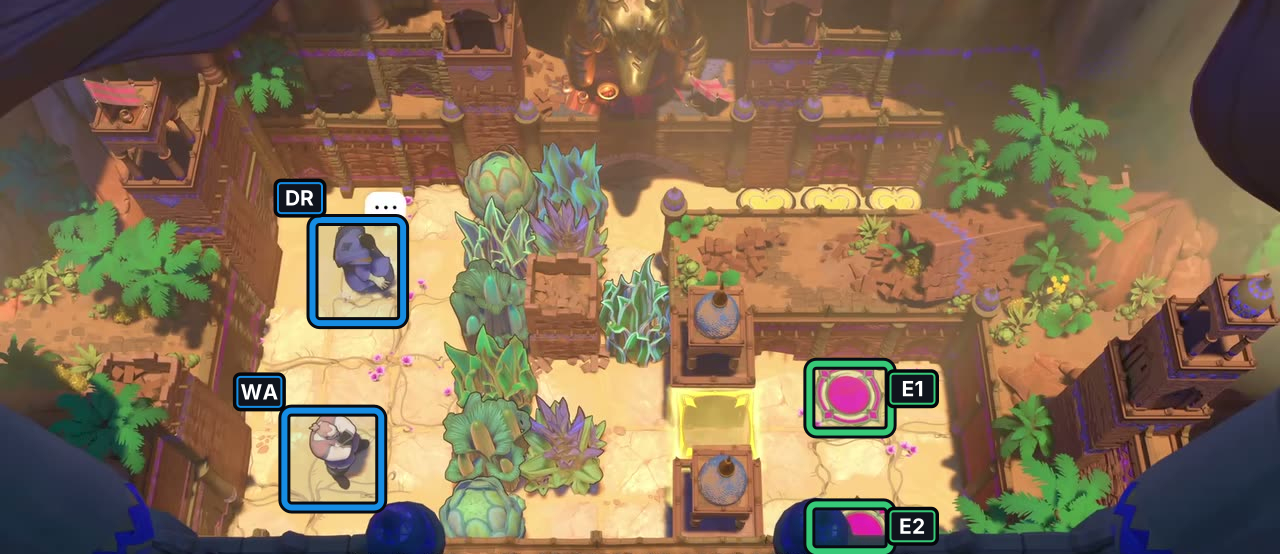
At 01:00, the selected frame shows Druid and Warrior in the room’s starting layout.
Check: The markers identify the visible heroes and exits; no input sequence or later state is inferred.
Open full-size image in a new tabFull direction sequence
- DR Druid
↓ ↓ → → ↓ ↓ → - WA Warrior
↓ → → - DR Druid
↑ - WA Warrior
← ↑ - DR Druid
← ← ← - WA Warrior
↓ → → ↑ → ↑ - DR Druid
→ → → ↑ - WA Warrior
← - DR Druid
→ ↑ ↑ - WA Warrior
↓ → ↑ ↑ ↓ ← - DR Druid
← ↓ ↓ ↓ ← ↓ ← ← ← ↑ ↑ ↑ ↑ → → ↑ → ↓ ↓ - WA Warrior
↓ → ↑ ↑ ↑ ← ← - DR Druid
← ↓ ↓ ↓ → → → ↑ → ↑ ↑ ↑ ← ↑ - WA Warrior
← ↑ → → → → - DR Druid
→ ↓ ↓ ↓ → → ↑ → - WA Warrior
← ↓ ↓ ↓ ↓ → → ↓ →
Warrior and Druid: freeze D1 and set up the final line
Section titled “Warrior and Druid: freeze D1 and set up the final line”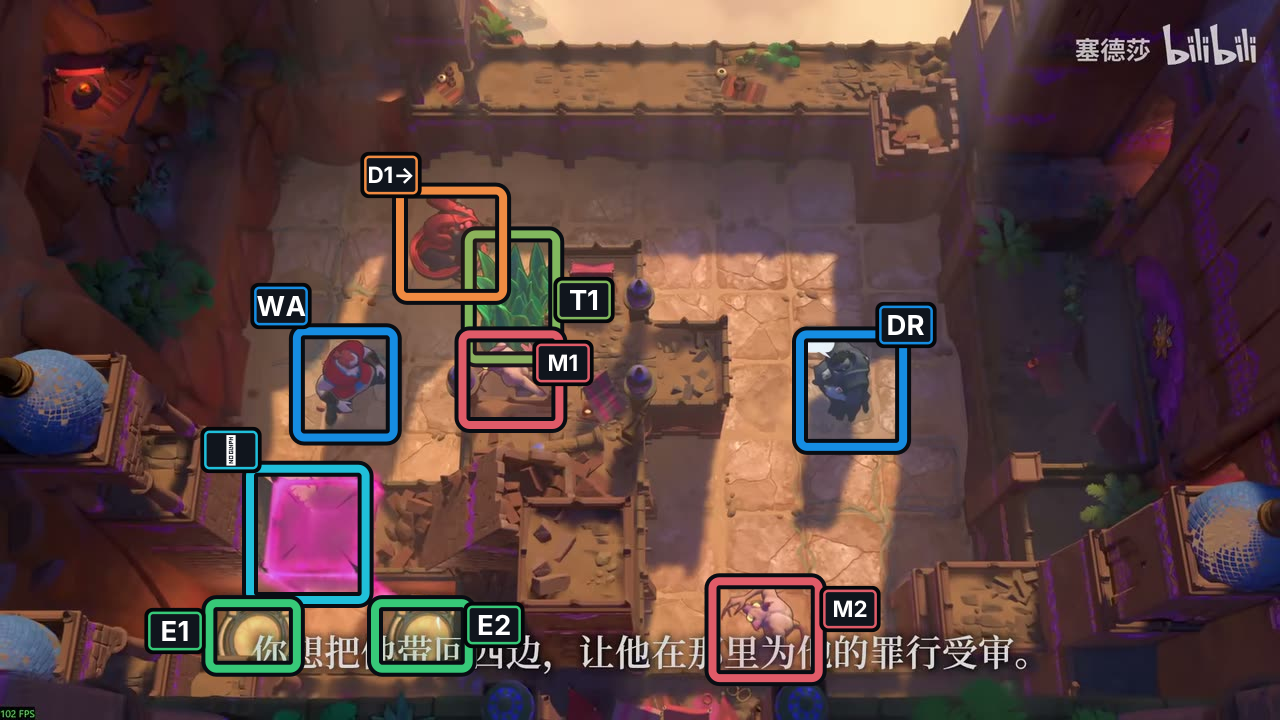
- Plant T1
- Gate
- Exits E1–E2
- DR Druid
- WA Warrior
- Goblins M1–M2
- Dragon D1; arrow shows initial fire direction
Selected source view for visual comparison.
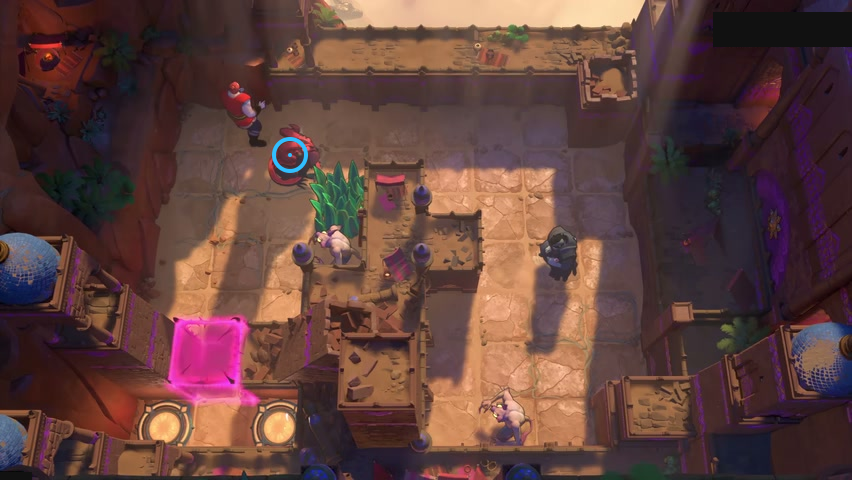
Locate the Dragon beside the plant patch.
Check: Ring marks The Dragon beside the plants.
Open full-size image in a new tabHint
Push D1 along the top lane, then have the Druid freeze it. Later, move the frozen D1 into M1’s lane with one empty tile between them. The brief thaw lets D1’s fire clear M1; refreeze immediately. For the last Goblin, move T1 into crystal form and keep it between the Warrior and D1. Do not push D1 alone toward M2.
Solution
- Warrior goes
↑ ↑ → → →, pushing D1 across the top lane. Druid takes↑ ← ← ↑; at step 9, the upward transmutation freezes D1. - Follow the frozen-Dragon route around the lower lanes. Druid uses
↓at step 36 to unfreeze D1 when one empty tile separates it from M1. D1’s fire clears M1; Druid uses↓again at step 37 to refreeze D1. - Druid changes T1 into a crystal at step 39. Warrior raises it to the upper lane with
↑at step 48, pushes it right to the far side by step 62, then pushes it down into the lower lane by step 70. Keep T1 as the buffer behind frozen D1. - At step 107, Warrior pushes
←on the train of D1 and T1. D1 moves left, T1 remains between it and the Warrior, and the Warrior ends diagonally separated from M2. Warrior’s↓at step 111 moves D1 down one tile. Druid takes← ↓ ↓ ← ↓to the tile above D1, then uses↓at step 121 to unfreeze it. D1’s fire and M2’s return attack clear both and open the gate. - Druid exits by
↑ → ↑ ↑ ↑ ← ← ← ← ← ↓ ↓ ↓ ↓ ↓ ←; Warrior follows with↑ ↑ ← ← ← ← ← ← ↓ ↓ ↓ ↓ ↓ →. The gate is open and both exits are occupied at step 151.
If T1 is not between Warrior and D1 before the step-107 push, Undo and rebuild the train rather than pushing D1 alone. Before the step-121 thaw, D1 must be beside M2; if it is not, keep D1 frozen and realign them before the Druid releases it.
Full direction sequence
- WA Warrior
↑ ↑ → → → - DR Druid
↑ ← ← ↑ → → → ↑ - WA Warrior
↑ → → ↓ ← ← - DR Druid
← - WA Warrior
← - DR Druid
← - WA Warrior
← - DR Druid
← - WA Warrior
↑ ← ↓ - DR Druid
← ← ← - WA Warrior
↓ - DR Druid
← - WA Warrior
← ↓ - DR Druid
↓ ↓ ↓ → → ↑ → ↑ - WA Warrior
↓ → → ↑ → ↑ - DR Druid
→ → → → ↓ ↓ - WA Warrior
↓ ← ↑ ↑ → → → → - DR Druid
↓ ← - WA Warrior
↑ → ↓ ↓ ↓ ↓ ↑ ↑ ↑ ↑ ← ← ← ← ← ← ← ↓ ↓ ↓ ↓ → ↑ ↑ ← ↑ → - DR Druid
→ ↑ - WA Warrior
→ → → → ↑ → ↓ ↓ ↓ ↓ → → ↓ ← ↑ ← ← ↓ ↑ → ↑ → - DR Druid
← ↓ ↓ ← ↓ ↓ ↑ → ↑ ↑ ↑ ← ← ← ← ← ↓ ↓ ↓ ↓ ↓ ← - WA Warrior
↑ ↑ ← ← ← ← ← ← ↓ ↓ ↓ ↓ ↓ →
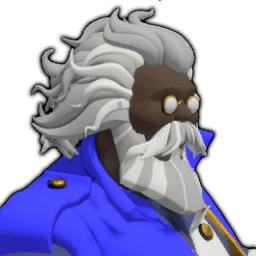 Wizard and Druid: work both switch gates
Section titled “Wizard and Druid: work both switch gates”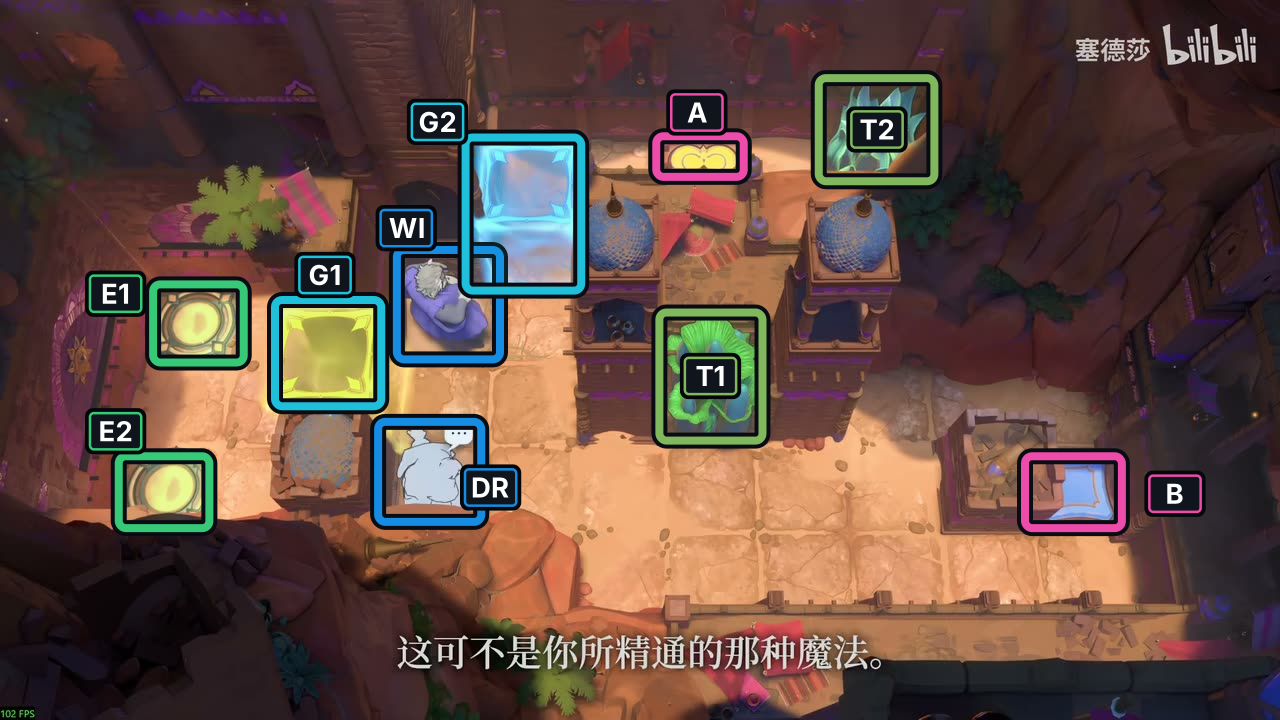
- Plants T1–T2
- Switches A–B
- Gates G1–G2
- Exits E1–E2
- DR Druid
- WI Wizard
Hint
The map is rotated, so follow the arrows as they appear on the board. The Druid changes T1 and T2 between plant and crystal forms. Wizard stands on B to open G2; later the Druid steps on A to open G1. G1 briefly closes when the Druid steps away, so continue through the T2 setup instead of undoing that expected pause.
Solution
- The Druid moves
→ → → ↑; the transmutation at step 4 turns T1 into a crystal. The Wizard takes↓ ↓ →while the Druid threads the nearby lane. - At step 25, the Druid casts right to restore T1 as a plant beside B. The Wizard steps down onto B at step 31, opening G2; the Druid’s next
→at step 32 changes T1 back into a crystal while the Wizard still holds B. - The Druid steps onto A at step 44 and opens G1. He leaves at step 45, so G1 closes briefly. At step 46, the Druid transmutes T2 into a crystal; he returns left onto A at step 47, reopening G1. The full route ends at step 82 with both switches weighted, both gates open, the Druid at E2 and the Wizard at E1.
If G1 closes at step 45, continue to the T2 transmutation and return to A at step 47. If G2 closes before the Wizard crosses, undo to the B-side setup.
Images show selected video checkpoints; the first frame is the starting position.
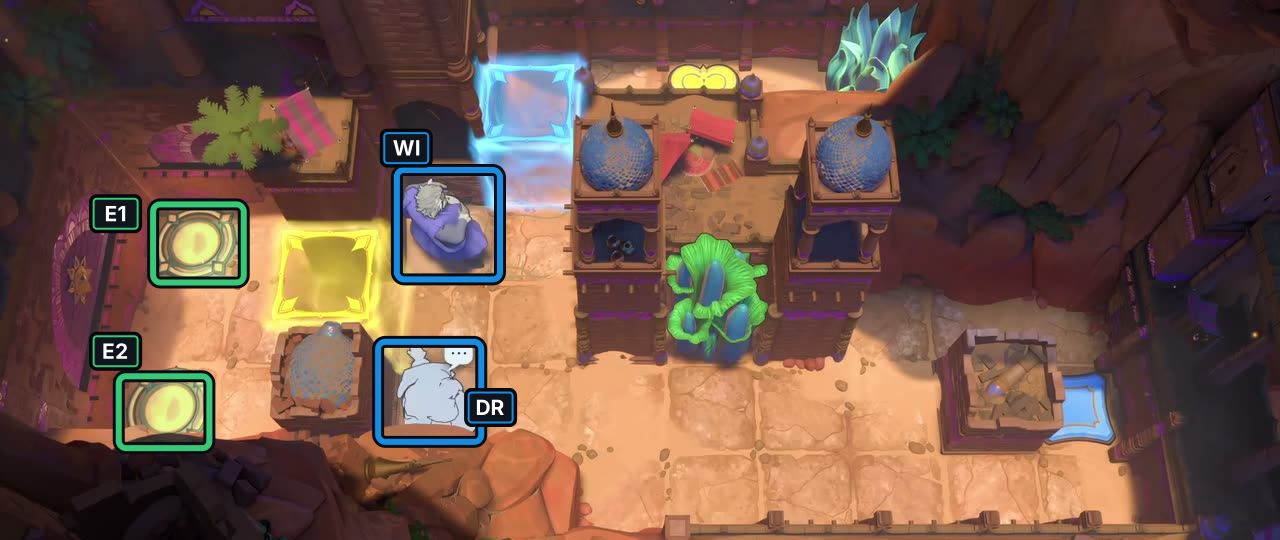
At 03:40, the selected frame shows Druid and Wizard in the room’s starting layout.
Check: The markers identify the visible heroes and exits; no input sequence or later state is inferred.
Open full-size image in a new tabFull direction sequence
- DR Druid
→ → → ↑ - WI Wizard
↓ ↓ → - DR Druid
→ → - WI Wizard
↓ ↑ - DR Druid
→ - WI Wizard
↓ → - DR Druid
↓ - WI Wizard
↓ → → → ← ↑ - DR Druid
→ → → → - WI Wizard
→ → ↑ → → ↓ - DR Druid
→ ← ↑ ← ← ← ← ↑ ↑ ↑ ↑ → → → → ← ← ← - WI Wizard
↓ ← ← ↑ ← ← ← ← ↑ - DR Druid
↑ ↑ ↑ - WI Wizard
→ - DR Druid
↑ - WI Wizard
← ← - DR Druid
↑ ↓ ↓ ← ← ← ↓ ← - WI Wizard
← ↓ ↓ ↓ ← ← ← ↑ ←
Wizard and Druid: clear the plant maze
Section titled “Wizard and Druid: clear the plant maze”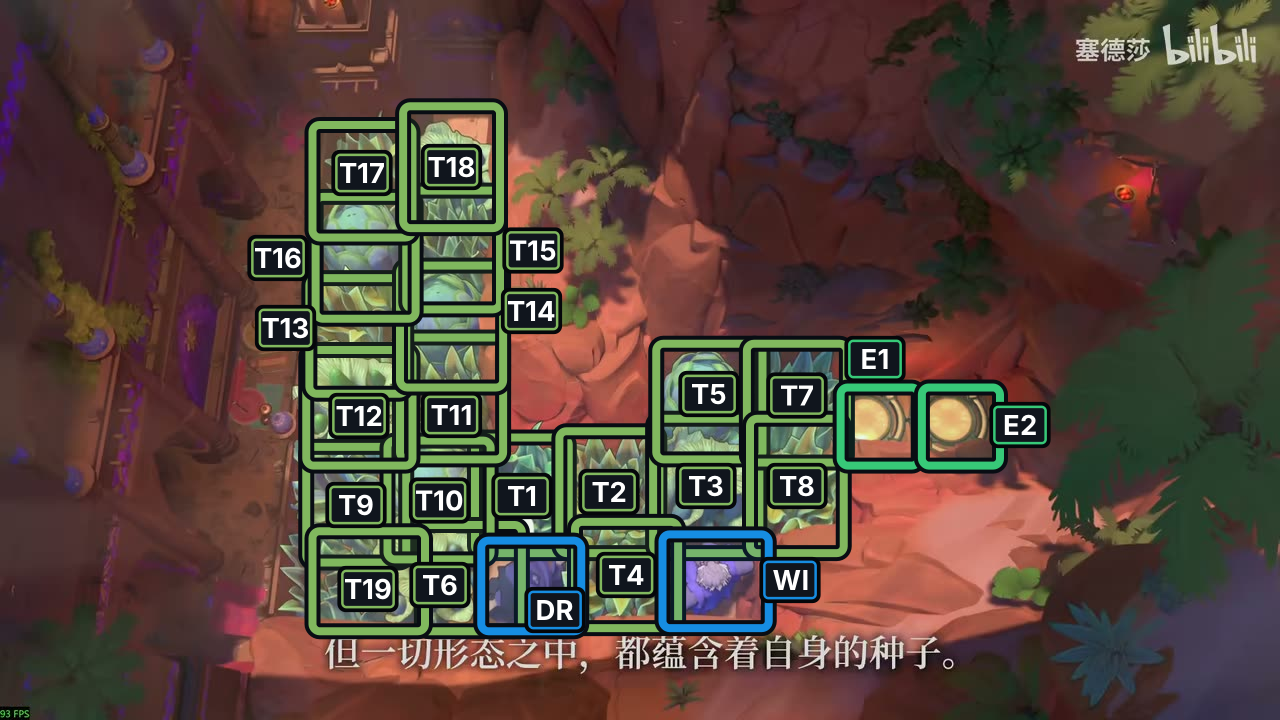
- Plants T1–T19
- Exits E1–E2
- WI Wizard
- DR Druid
Hint
Use the Druid’s short transmutations to turn plants into crystals while the Wizard makes room through the narrow columns. The label stays T1, T2 and so on after a change. Near the end, T6 briefly returns to plant form before becoming a crystal again; finish the last four plants, then take the two exits together.
Solution
- Druid changes T1 with
↑at step 1 and T4 with→at step 2. Wizard loops← ←; Druid turns T2 with↑at step 5. Continue alternating through the stacked columns: Druid has changed 15 plants by step 54, including T10 at 10, T6 at 12, T19 at 21, T9 at 24, and T17 at 54. The pair reach the upper handoff position by step 59. - Druid temporarily changes T6 back to a plant with
←at step 93, then restores it to a crystal with←at step 97. The remaining conversions are T3 at 105, T8 at 113, T5 at 114 and T7 at 122. All 19 T-labeled plants are now crystals and no plants remain. - Wizard takes the final relay
→ ↑ → →; Druid follows→ →. At step 128, Druid occupies E1 and Wizard E2.
If an early conversion blocks the next column, Undo to the previous Druid transmutation and follow the Wizard’s loop before changing another plant. Keep T6’s label when it is temporarily a plant, and restore it before the final relay.
Images show selected video checkpoints; the first frame is the starting position.
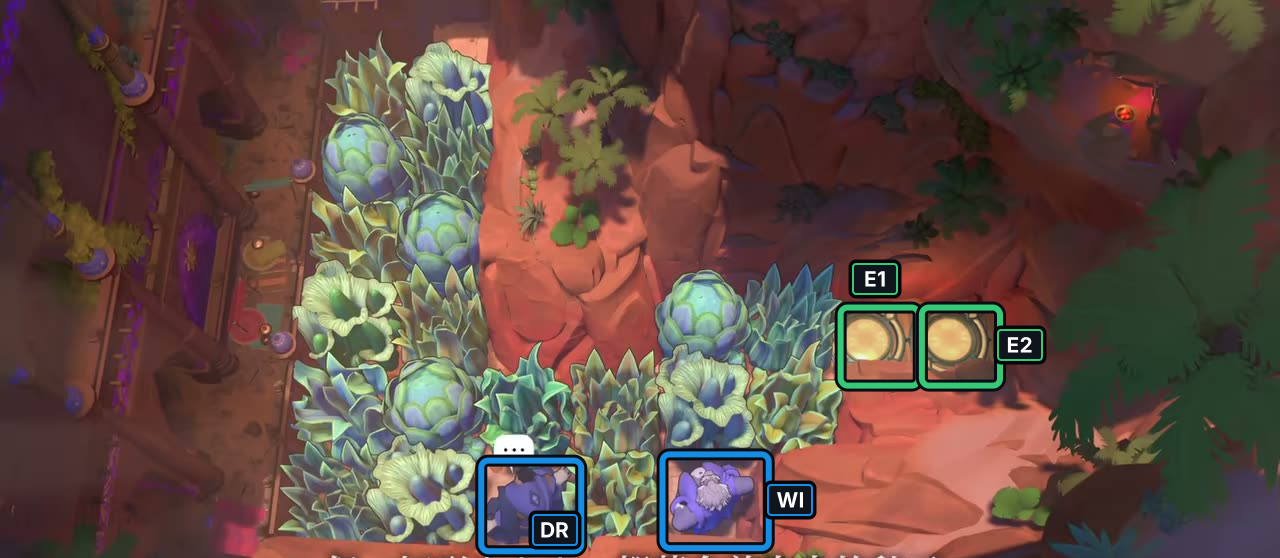
At 04:56, the selected frame shows Wizard and Druid in the room’s starting layout.
Check: The markers identify the visible heroes and exits; no input sequence or later state is inferred.
Open full-size image in a new tabFull direction sequence
- DR Druid
↑ → - WI Wizard
← ← - DR Druid
↑ - WI Wizard
→ ↑ ← ↓ - DR Druid
← - WI Wizard
↑ - DR Druid
← - WI Wizard
↓ ← ↑ → - DR Druid
↑ - WI Wizard
↓ ← ↑ - DR Druid
← - WI Wizard
↓ ← - DR Druid
← - WI Wizard
↑ → - DR Druid
↑ - WI Wizard
← ↑ → ↓ - DR Druid
↑ - WI Wizard
← ↑ → - DR Druid
↑ - WI Wizard
← ↑ → ↓ - DR Druid
↑ - WI Wizard
← ↑ → - DR Druid
↑ - WI Wizard
← ↑ → ↓ - DR Druid
↑ - WI Wizard
← ↑ → - DR Druid
↑ - WI Wizard
← ↑ → ↓ - DR Druid
↑ ↓ - WI Wizard
↑ ← ↓ ↓ → ↑ ↑ ↑ ↓ ↓ - DR Druid
↑ - WI Wizard
↑ ← ↓ ↓ ↓ → - DR Druid
↑ - WI Wizard
↑ ← ↓ ↓ ↓ - DR Druid
↑ - WI Wizard
→ ↑ ← ↓ ↓ - DR Druid
↑ - WI Wizard
→ - DR Druid
↓ ← ↑ - WI Wizard
← ↑ - DR Druid
← → - WI Wizard
↓ → - DR Druid
← - WI Wizard
→ ↑ ← - DR Druid
→ - WI Wizard
↓ → - DR Druid
← - WI Wizard
→ → ↑ ← - DR Druid
→ ↑ - WI Wizard
↓ → → - DR Druid
← - WI Wizard
↑ - DR Druid
→ - WI Wizard
↓ - DR Druid
→ - WI Wizard
→ ↑ → → - DR Druid
→ →
Sources and credits
Room layouts and entity labels: PC r67121 game files. Druid and hero interactions: official PlayStation hands-on notes and the community PuzzleScript port. Selected video: 塞德莎, Heroes 3, part 4. Board artwork: Thekla, Inc.
- Selected Heroes 3 layouts and bounded player-action traces (PC r67121) — Extracted data
- Joric's PuzzleScript movement-rule port — Documentation · commit-4e6e0784727d95c7337d50f6d5b3ef912aa0e8ae
- PlayStation Blog hands-on report — Documentation · published-2026-07-21
- [North] Heroes 3: Bard and Druid + Energy Gate Direction + Heroes Assemble [North 4 + North 3 West 1 + North 1 supplement 1 puzzle] / 【北】英雄3:吟游诗人与德鲁伊+能量门方向+英雄齐聚[北4+北3西1+北1补1题] — Observed in-game
- Character portraits and selected puzzle-board images (PC r67121) — Extracted data
- Heroes 3 heroes3_10 selected P4 starting-layout screenshot — Observed in-game · screenshots-reviewed-2026-10-21
- Heroes 3 heroes3_11_v2 selected P4 starting-layout screenshot — Observed in-game · screenshots-reviewed-2026-10-21
- Heroes 3 heroes3_15_v4 selected P4 starting-layout screenshot — Observed in-game · screenshots-reviewed-2026-10-21
- Heroes 3 wizard_and_druid_alt_5 selected P4 starting-layout screenshot — Observed in-game · screenshots-reviewed-2026-10-21
- 塞德莎 Bilibili playlist part 5 selected-view encoding — Observed in-game · playlist-part-5-cid-42574283342-selected-frames-2026-10-24
- Twelve room-display and three legacy source-view observations — Observed in-game · twelve-plus-three-video-frame-observations-2026-10-24
- Selected video views beside legacy model layouts — Observed in-game · legacy-source-views-2026-10-24-selected-third-view
Unofficial fan wiki, not affiliated with Thekla, Inc. / Arc Games / Gamirror Games. Game content belongs to its owners.
Comments & feedback
Share a tip or suggest a correction. Comments are public. Guest names are unverified; verified accounts show their account username. All language pages share this discussion. Please keep personal information private.