
 Order of the Sinking Star
Heroes and Artifacts: wand puzzles

Each room gives you one wand. The  Wizard uses a Goblin relay in the first, P1 and the Wizard work together in the second, the
 Thief uses the Wand to place Boulder B1 on switch A in the third, the
 Warrior routes Boulders around five Dragons in the fourth, and
 Bard and P1 relay four crystals onto switches in the fifth. Follow the marker labels and directions shown on each room’s map.
Wizard and the wand
Section titled “Wizard and the wand”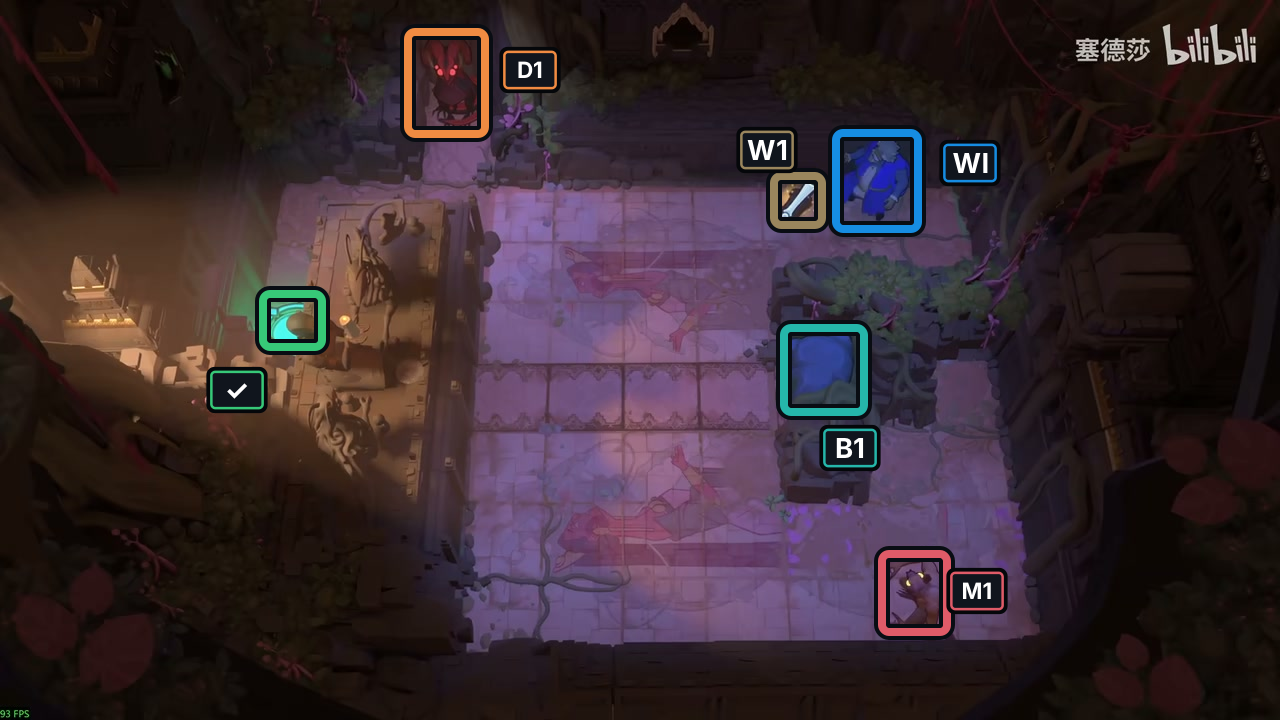
- Artifact W1
- Boulder B1
- Exit
- WI Wizard
- Goblin M1
- Dragon D1
Before the route, pick up Wand W1 with Secondary Action (PC default V). Confirm it is held and Wizard WI is back at the starting stance; pickup is not part of the 113 direction inputs below. Arrows follow the displayed map and each is one directional input, though a Wizard swap can cover more than one tile. At four checkpoints, use Primary Action (PC default X); if bindings changed, check Controls.
In this room, moving toward visible B1 swaps the Wizard with the first object on that line rather than simply turning him. Put M1 between Wizard WI and B1, then move toward B1 from the other side; swapping with M1 leaves the Wizard facing B1, ready to activate the wand.
Hint
Use M1 as a relay to get around B1 without entering D1’s fire lane. The first X transfer moves B1 beyond the right wall; the second puts it above the upper-right wall. Later, line up from the side of D1’s column for the last two transfers. Keep to the outer passages between wand checkpoints, and use the four transfers in the order shown.
Solution
- A — Relay M1 and send B1 past the right wall. Use M1 to move Wizard WI around the lower lane and return to a stance facing B1. The first wand transfer sends B1 beyond the right wall while Wizard stays put.
- B — Move B1 above the upper-right wall. Relay M1 through the lower passage and bring Wizard back below B1. The second transfer places B1 above the upper-right wall.
- C — Bring B1 into the upper corridor beside D1. Follow the side and lower passages, using swaps to reposition B1 beside the Dragon’s corridor. Stay out of the Dragon’s fire line as you move around the room.
- D — Place B1 in D1’s column. Use M1 as a relay to bring Wizard beside B1. The third transfer puts B1 into the Dragon’s column.
- E — Move B1 past D1 and reach the exit. Relay M1 out of the way, then make the fourth transfer to move B1 one position past D1’s column. Swap with B1 and follow the open route to the exit. After the swap, B1 is back on the screen-right side of D1’s column; the Wizard is on the exit side.
Exact direction sequence
- Phase A, steps 1–29:
↓ ← ← ↓ ↓ ↓ ↓ ↓ ← ← ← → ↑ ← ← ↑ ↑ ← ← ← ↓ → ↑ ↑ → → ↑ ← →; then press X. - Phase B, steps 30–56:
↓ ↓ ↓ ← ← ← ↑ → ↓ ↓ → ↓ → → → → ← ↑ → → → → → ↑ → ↓ ↑; then press X. - Phase C, steps 57–76:
← ↓ ← ← ↑ ↑ ↑ ↑ ← ← ← → ↑ ← ← ← ← ← ← ↓. - Phase D, steps 77–104:
↓ ↓ ↓ ↓ → ↓ → ↑ ← ← ← ↑ ↑ ↑ ↑ ← ← ↑ ↓ → ↑ ↑ ↑ ↑ ↑ → ↑ ←; then press X. - Phase E, steps 105–113:
↓ ← ↑ → ←; press X, then← ← ↓ ↓.
If a swap leaves the Wizard on the wrong side of B1 or M1, undo to the last relay checkpoint and repeat that short segment before casting. Between transfer checkpoints, stay on the side passages rather than crossing D1’s fire line.
Images show selected video checkpoints; the first frame is the starting position.
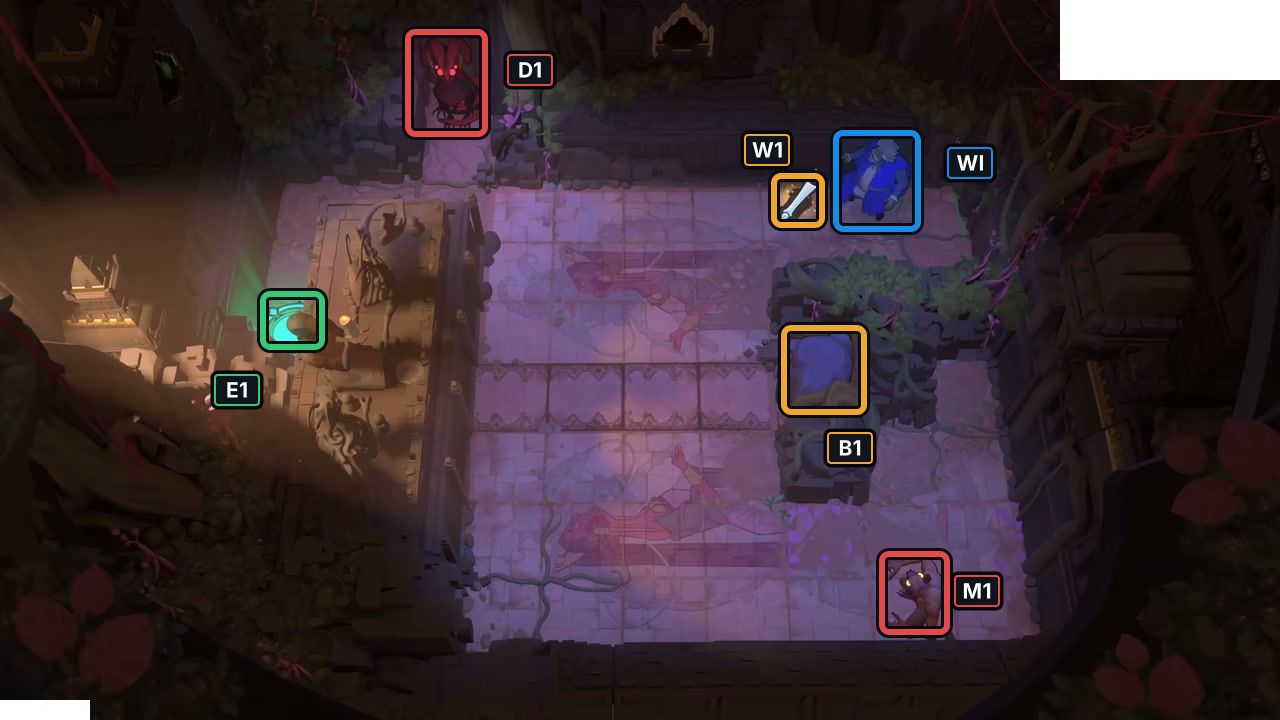
At P15 23:10.021, the selected frame matches this room’s starting layout.
Check: Markers identify WI, W1, B1, M1, D1 and E1. This frame shows no inputs or completion.
Open full-size image in a new tabTwo characters, one wand
Section titled “Two characters, one wand”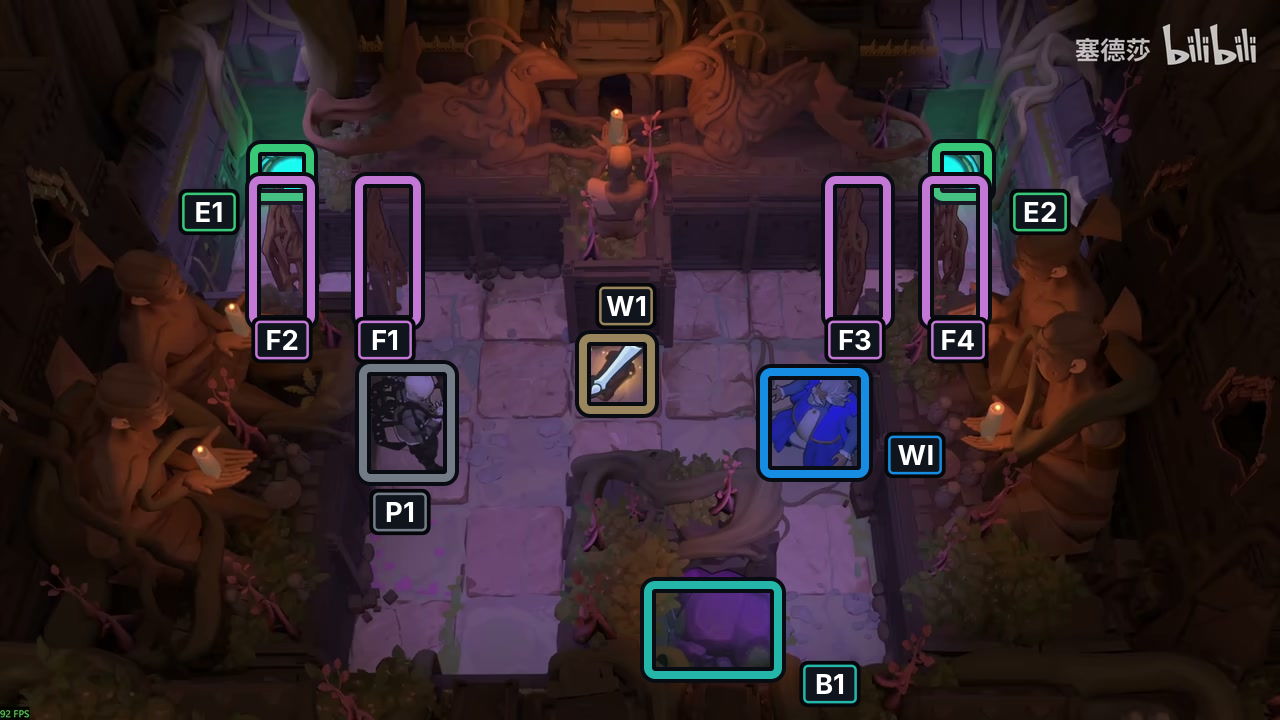
- Figure P1
- Artifact W1
- Boulder B1
- Exits E1–E2
- WI Wizard
P1 is the dark-coated figure. The map’s fence callouts mark F1/F2 at the inner and outer left fences, and F3/F4 at the inner and outer right fences. P1 keeps W1 after pickup. Wizard swaps P1 into the positions needed to face B1; switch back to P1 for each wand action.
Hint
First send B1 from the lower-right across the central bottom wall into the left pocket. Then move it past the two left fences. P1 casts through F1, steps left, and casts through F2. On the right, set P1 left of Wizard facing right; cast Wizard through F3, step right, and cast through F4. Wizard then swaps P1 into the right pocket; finish with Wizard swapping with B1 across both left fences and walking up to E1 while P1 takes E2.
Solution
- Cross the bottom wall. P1 approaches the Wand, picks up W1, then steps back left to face B1’s side of the room. Wizard relays P1 through the lower corridor to a cast pose. Cast 1 moves B1 from the lower-right through the central bottom wall into the left pocket.
- Pass the left fences. Wizard’s vertical and horizontal swaps stage B1 at the left inner fence. P1 casts B1 through F1, steps left, then casts it through F2.
- Carry Wizard across the right fences. Set P1 to the left of Wizard, facing right. P1 casts Wizard through F3, steps right, then casts Wizard through F4. Wizard swaps P1 into the right pocket; P1 moves up to E2.
- Return Wizard to the left exit. Circle Wizard under the central pillar and to the left side. Wizard swaps with B1 across both left fences, then walks up to E1.
Exact actor and direction sequence
Select the named character for each row with the current Switch Characters control shown in Controls. On this PC keymap, V is Secondary Action and X is Primary Action. Pickup and casts are separate from the 57 arrows.
- P1, directions 1–2:
↑ →; press V to pick up W1; P1, direction 3:←. - Wizard, directions 4–13:
↑ ← ↓ → → → → ↓ ↓ ↑; select P1 and press X (cast 1). - Wizard, directions 14–24:
← ← ← ↑ ↓ ← ↑ ↑ ↑ ↑ →. - P1, directions 25–29:
↑ ↑ ← ← ←; Wizard, direction 30:↓; select P1 and press X (cast 2). - P1, direction 31:
←; press X (cast 3); P1, directions 32–35:→ ↓ → →. - Wizard, directions 36–44:
→ → → ↑ ↑ ← ↓ → ↑; select P1 and press X (cast 4). - P1, direction 45:
→; press X (cast 5); Wizard, direction 46:←. - P1, directions 47–48:
↑ ↑. - Wizard, directions 49–57:
← ↓ ← ← ← ↑ ← ↑ ↑.
If P1 is facing away from the intended target or a cast leaves Wizard on the wrong side, undo to the previous checkpoint and repeat the relay. Switch back to P1 before each cast.
Images show selected video checkpoints; the first frame is the starting position.
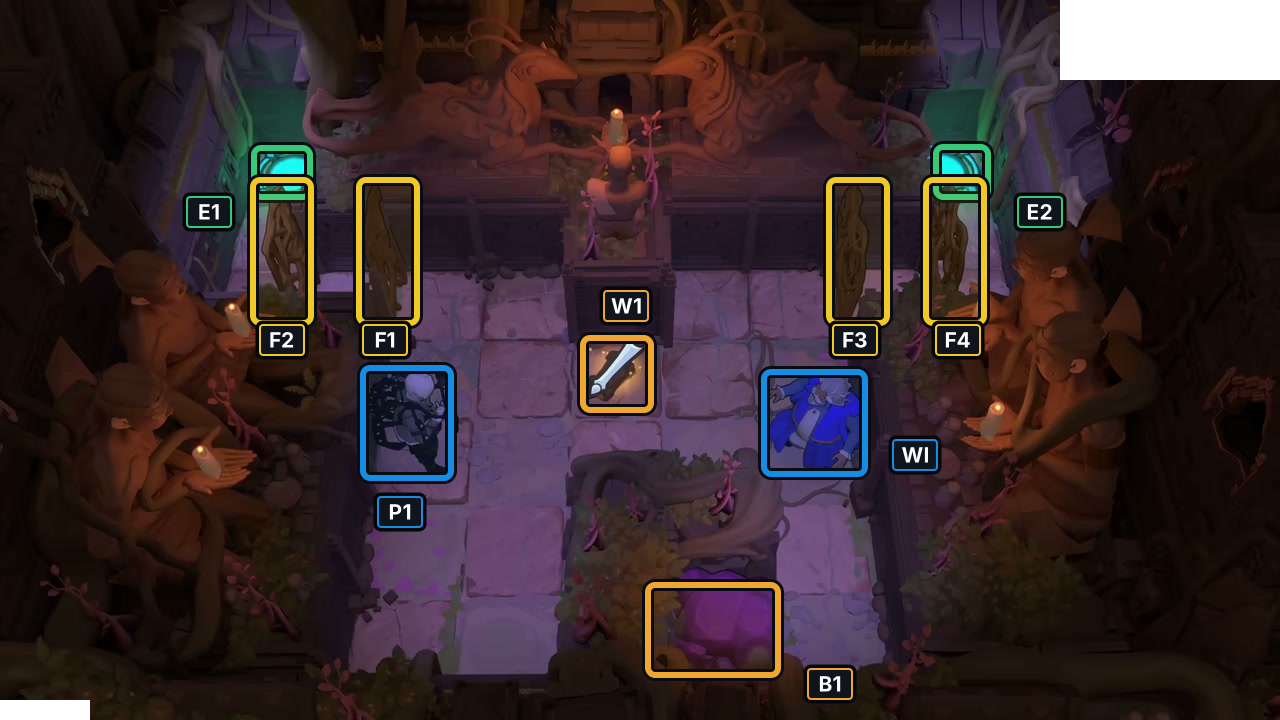
At P15 21:15.021, the selected frame matches the shared-wand room’s starting layout.
Check: P1, WI, W1, B1, fences F1–F4 and exits E1/E2 are marked; no inputs or finish are inferred.
Open full-size image in a new tabThief: pull and cast
Section titled “Thief: pull and cast”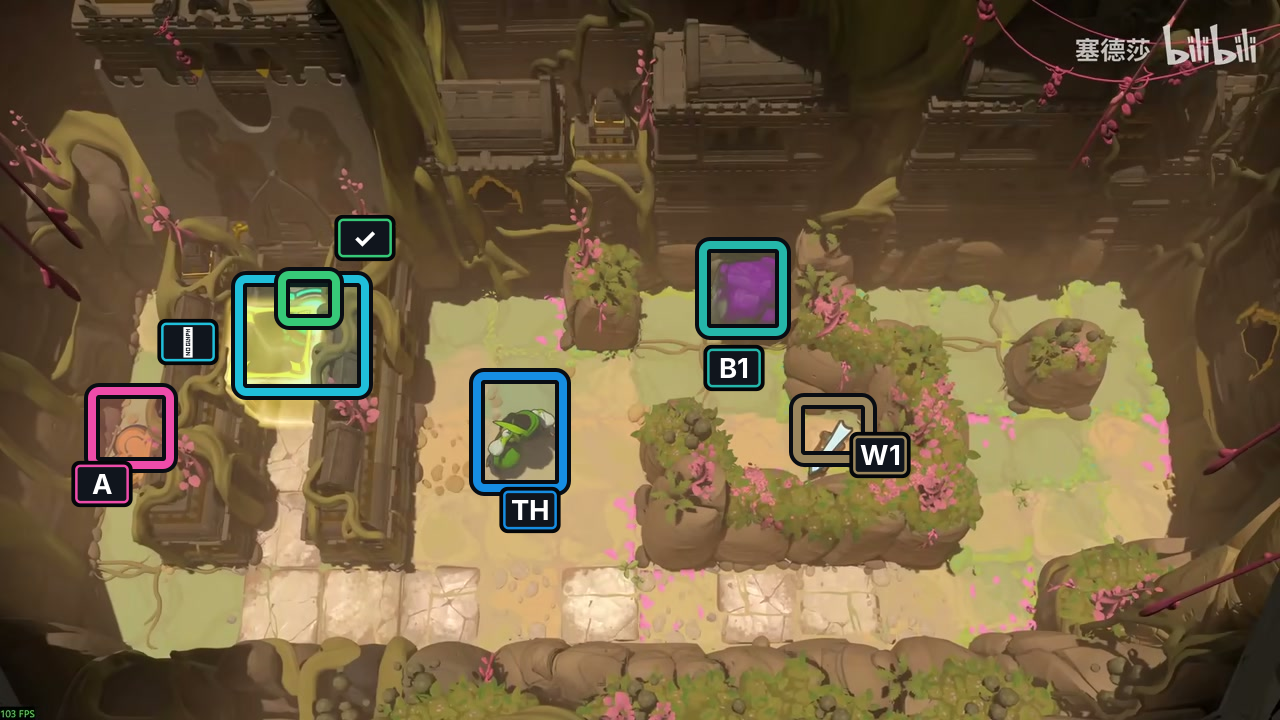
- Artifact W1
- Boulder B1
- Switch A
- Gate
- Exit
- TH Thief
This room pairs the Thief with a Wand, one Boulder, one switch and one gate. Pick up W1, guide B1 through the upper and lower passages, then leave B1 on A and take the open gate route to the exit. When the Thief steps away from an adjacent B1, it follows into the tile the Thief leaves. The arrow list includes aim inputs at blocked turns: each faces B1 without moving, then the Thief casts with Primary Action. Arrows follow the displayed map, not keyboard labels. Use the assigned controls if your PC bindings differ; see Controls.
Hint
Pick up W1 after the first five directions. Use the early casts to move B1 across the upper wall and around to the right side. Pull it along the outer passage before the leftward and downward casts, then bring it back through the gate approach. The last cast puts B1 on A; leave it there while heading to the exit.
Solution
The route has 89 directional inputs. The separate W1 pickup uses Secondary Action (PC default V); each of the eight casts uses Primary Action (PC default X). An aim arrow at a blocked turn is still one of the 89 directions.
- Pick up W1 and make the first transfer. Follow
→ ↑ → → ↓, pick up W1 with V, then use↑to face B1 at the blocked turn and press X. The first transfer moves B1 one cell up, clearing the opening lane. - Send B1 across the short upper wall. Use
↑ ← ↑ →; the last right arrow is the aim input. Press X to place B1 beyond the wall on the right. - Pull B1 from the far upper-right and recast left. Follow
↓ ← ↓ ↓ ↓ → → → → → ↑ ↑ ↑ ↑ → → ←. The Thief uses the outer passage to pull B1 into position, then faces it with the final left aim. Press X for the one-cell transfer. - Pull B1 down the right lane, loop above it, and cast one cell down. Follow
↓ ↓ ← ← ↑ ↓ ↓ → → ↑ ↑ ↑ ← ← ↓ ↓; the final down arrow aims at B1. Press X to move it one cell down through open floor. - Cast left through the lower wall. Follow
↓ → ↓ ←, using the final left arrow to aim, then press X. - Reposition B1 in the main room. Follow
← ↓ ← ← ← ← ← ← ↑ ← ↑ → ↑ ↑ ← ↓ ↓ → → ↑ ←. The final left arrow aims at B1; press X for the next one-cell transfer. - Move B1 past the gate barrier. Use
← ←; the second left arrow is the aim input. Press X to move B1 past the barrier. - Put B1 on A. Follow
↓ ↓ ↓ ← ← ← ← ← ↑ ↑ ↓ ↓ ↑, using the final up arrow to aim. Press X to place B1 on A and open the gate. - Reach the exit. Keep B1 on A and follow
→ → ↑ ↑ ↑ ↑through the open gate to the exit.
If a pull or cast leaves B1 on the wrong side of a wall, undo to the previous cast checkpoint and repeat that segment. Before each X, confirm the Thief is facing B1 from the intended side; the final cast should leave B1 on A.
Images show selected video checkpoints; the first frame is the starting position.
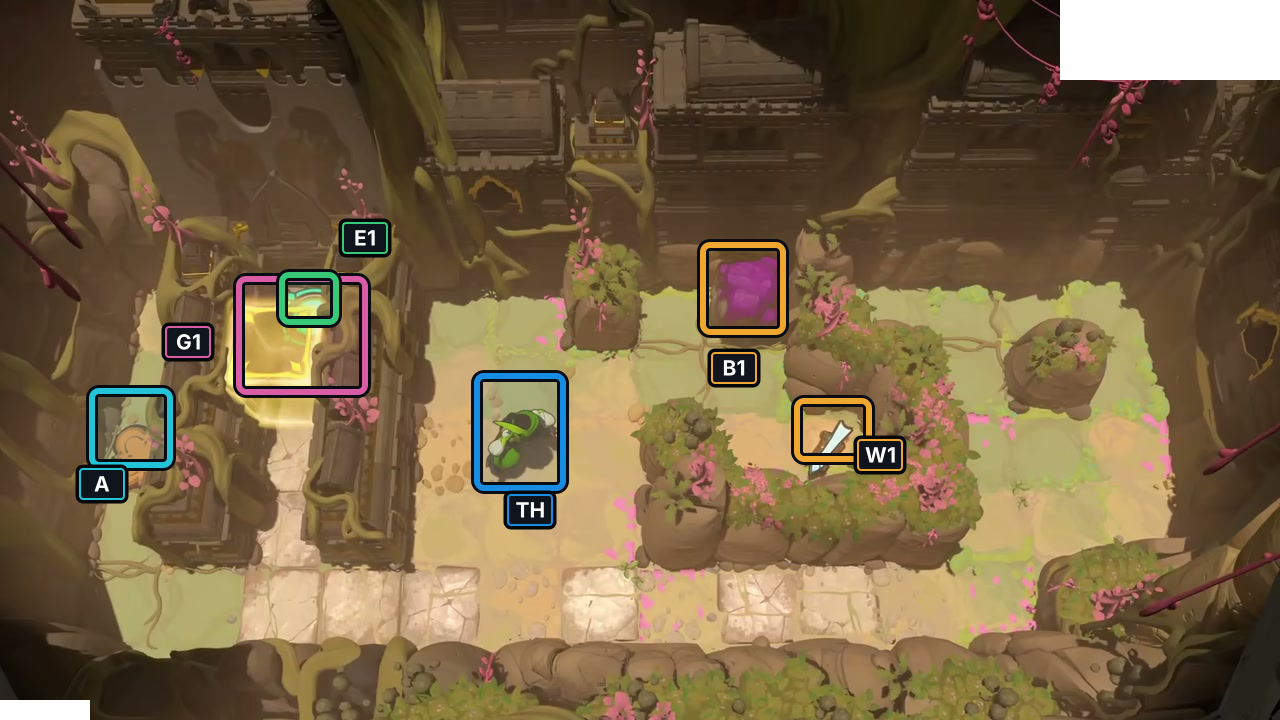
At P15 12:34.054, the selected frame matches the Thief room’s starting layout.
Check: TH, W1, B1, switch A, gate G1 and E1 are marked. The frame does not show the route or its result.
Open full-size image in a new tabWarrior: five Dragons
Section titled “Warrior: five Dragons”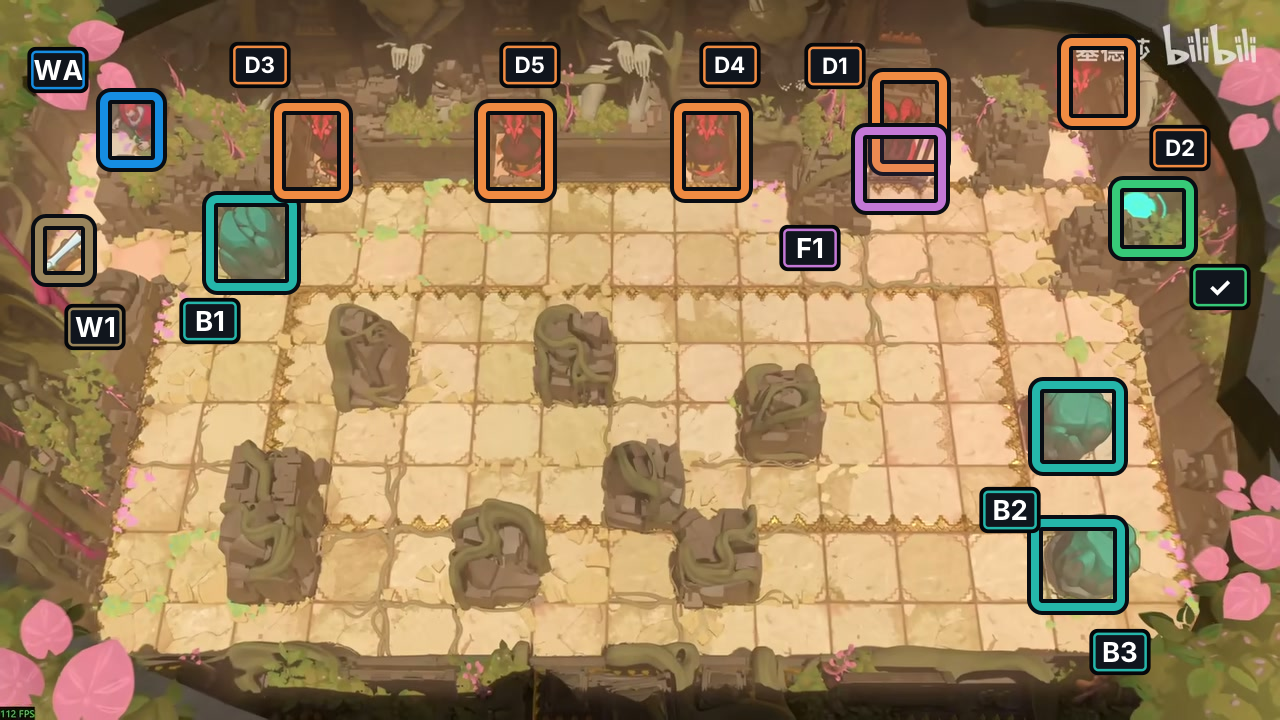
- Artifact W1
- Boulders B1–B3
- Exit
- WA Warrior
- Dragons D1–D5
This room uses one Wand, three Boulders and five Dragons. On the map, D3, D5, D4 and D1 form the upper row from left to right, while D2 is at the upper-right by the exit. F1 marks the fence below D1. B1 is the moving target; B2 and B3 are staged as shields for the final crossing.
The sequence has 229 directions. Pick up W1 with Secondary Action (PC default V) after the first two directions, and confirm it is held before continuing. Use Primary Action (PC default X) at each of ten marked casts. The final arrows before casts 4, 6, 8 and 10 are blocked-turn aims: they turn Warrior toward the Dragon or Boulder row without moving him. Ordinary pushes move Warrior with the Boulder, so check the lane before pushing. The arrows follow the displayed map; see Controls if your bindings differ.
Hint
Use casts 1–7 and 9 on B1; cast 8 shifts the four-Dragon row left, and cast 10 shifts the row and two staged Boulders right. Cast 5 sends B1 down through the lower pillar; cast 6 brings it back up through the same pillar. Push B1 up to the F1 bars, then cast up to move it past the fence. Before cast 10, bring B2 beside B1 on B1’s right in the upper nook, and leave B3 below F1 in D1’s column. Keep B3 in place for the return along the bottom route.
Solution
- Pick up W1 and move B1 past D3’s fire lane. After the first two directions, use V to pick up W1. Push B1 right, then cast right so it passes the fire lane while Warrior stays behind.
- Reposition B1 left. Go above B1, approach from its right and cast left one cell.
- Send B1 right through the left lower pillar. Line up on its left side and cast through the pillar.
- Continue right through the next pillar. Reposition B1 and make the second rightward pillar cast.
- Take B1 down through the lower pillar. Use the downward cast to move it through the lower pillar.
- Bring B1 back up through the same pillar. Turn around below it and cast upward through that passage.
- Move B1 right through the central-right pillar. Make the next rightward cast to carry it past the pillar.
- Shift the upper Dragon row left. From the upper-right nook, cast left to shift the four-Dragon row. D2 remains near the exit.
- Cross F1 with B1. Push B1 up to the purple F1 bars, then cast up to place it past the fence.
- Stage B2 and B3. Bring B2 beside B1 on B1’s right in the upper nook. Park B3 below F1 in D1’s column. These are the positions needed before the final cast.
- Return for the last rightward cast. Reach the far-left casting point and cast right. The four-Dragon row shifts back right; B2 screens D2 and B3 screens restored D1. Leave B3 where it is.
- Take the bottom return route to the exit. Follow the lower passage to the green exit ✓ without moving B3.
If a push carries Warrior toward a Dragon’s lane, undo to the previous cast checkpoint and realign B1 before pushing. Before the final cast, confirm B1 is left of B2 in the upper nook and B3 is below F1 in D1’s column; otherwise, Dragon fire cuts off the return lane.
Exact directions and casts
Directions are screen-relative. Use the named direction input for every arrow, and use X for each cast.
- Directions 1–6:
← ↓; pick up W1 with V;↓ → → →; X (cast 1). - Directions 7–27:
↓ ↓ ↓ ↓ ↓ ↓ → → ↑ ↑ ↑ → ↑ ↑ ↑ ↑ ← ↓ → ↓ ←; X (cast 2). - Directions 28–48:
→ ↓ ↓ ↓ ↓ ↓ ← ← ← ↑ ↑ ↑ ↑ ← ↑ ↑ → ↓ ← ↓ →; X (cast 3). - Directions 49–82:
↓ ↓ ↓ ↓ → → ↑ ↑ ↑ → ↑ ↑ ← ↑ ↑ → ↓ ↓ ↓ ↓ ← ↓ ↓ → ↑ ← ↑ → ↓ → ↑ ← ↑ →; X (cast 4). - Directions 83–101:
↓ ↓ ↓ ↓ → → ↑ ↑ ↑ → ↑ ↑ ← ↑ ↑ → ↓ ↓ ↓; X (cast 5). - Directions 102–108:
↓ ← ↓ ↓ ↓ → ↑; X (cast 6). - Directions 109–113:
← ↑ ↑ ↑ →; X (cast 7). - Directions 114–136:
← ↓ ↓ ↓ → → → ↑ ↑ → ↑ ↑ ↑ ← ↑ → ↓ → → ↑ ↑ ↑ ←; X (cast 8). - Directions 137–143:
↓ ↓ ↓ ↓ ← ↑ ↑; X (cast 9). - Directions 144–171:
↓ ↓ → → → ↓ ← ↓ ← ↑ ↑ ↑ ↑ ↑ ↓ ↓ ↓ ↓ ↓ ↓ ↓ → ↑ ↑ → ↑ ← ←. - Directions 172–197:
↓ ↓ ↓ ← ← ← ← ← ← ← ← ← ← ← ↑ ↑ ↑ ↑ ↑ ↑ ← ← ← ↑ ↑ →; X (cast 10). - Directions 198–229:
↓ ↓ → → ↓ ↓ ↓ ↓ ↓ ↓ → → → → → → → → → ↑ ↑ → → → ↑ ↑ ↑ ↑ ↑ → → →.
Images show selected video checkpoints; the first frame is the starting position.
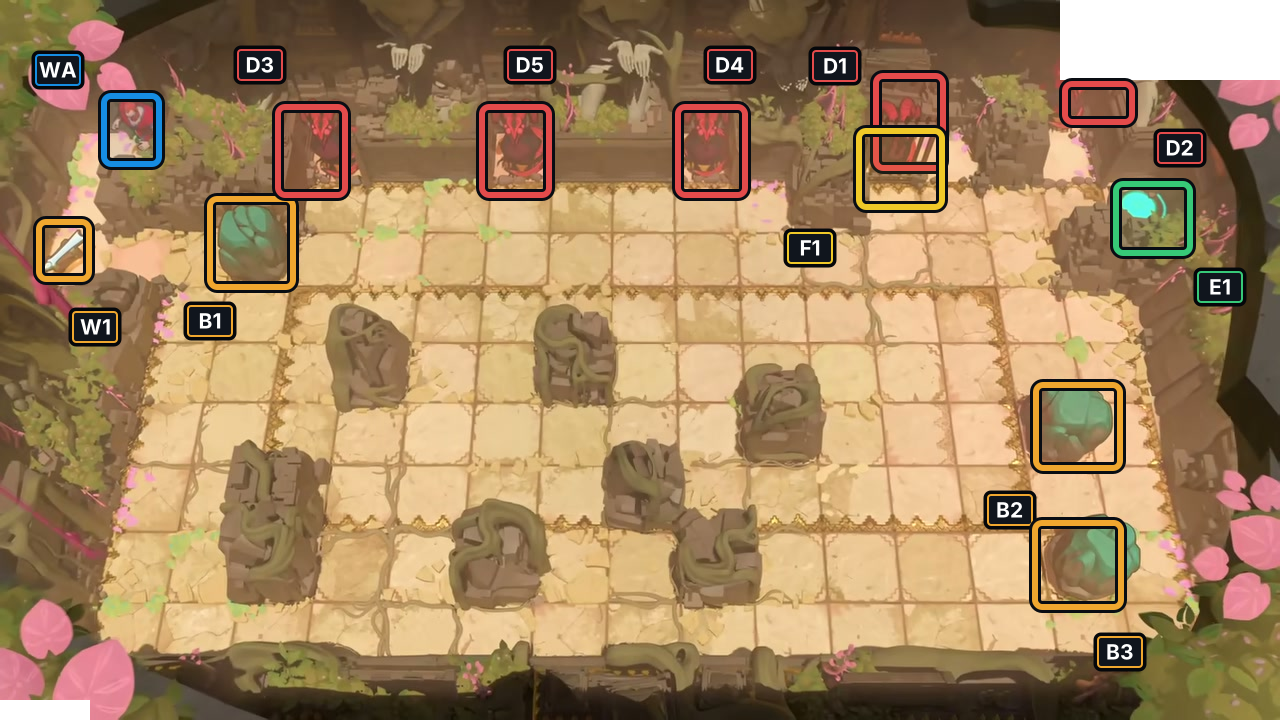
At P15 14:04.287312, the selected frame matches the five-Dragon room’s starting layout.
Check: WA, W1, B1–B3, D1–D5, F1 and E1 are marked. The logo masks part of D2, so only its visible lower portion is outlined.
Open full-size image in a new tabBard and P1: four switches
Section titled “Bard and P1: four switches”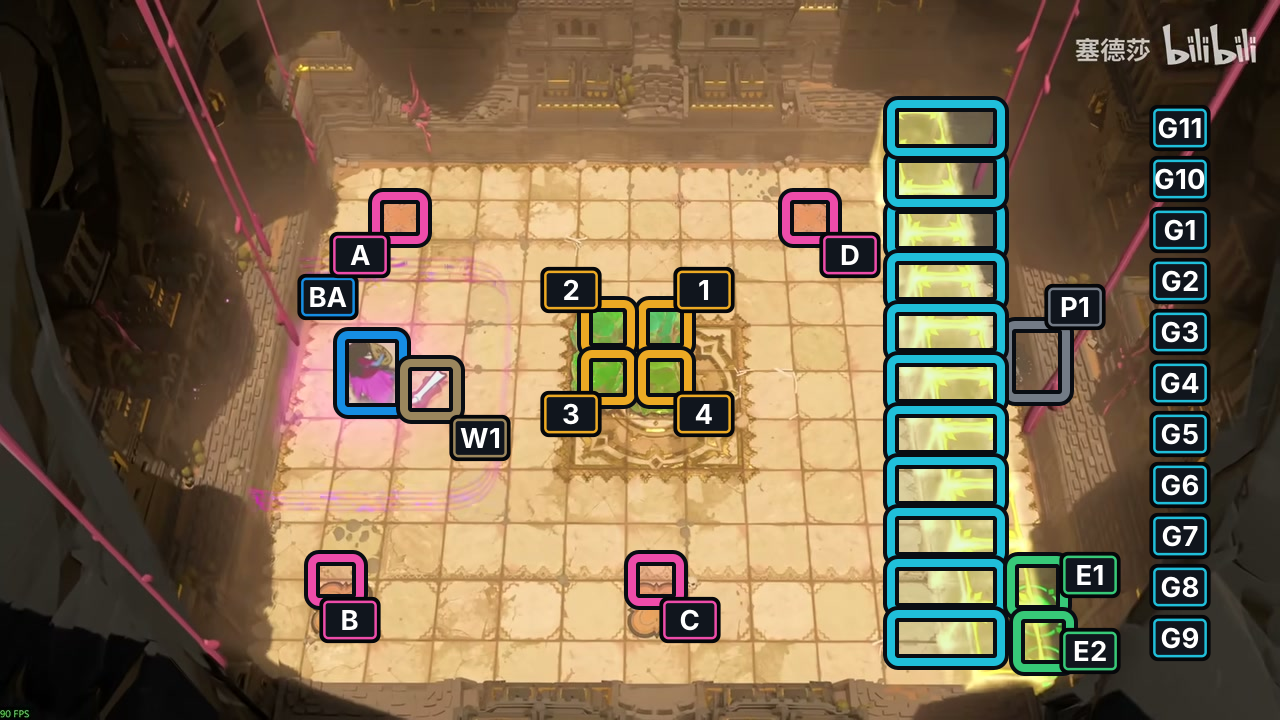
- Figure P1
- Artifact W1
- Crystals 1–4
- Switches A–D
- Gates G1–G11
- Exits E1–E2
- BA Bard
P1 is the dark-coated figure on the right. As Bard moves, nearby figures and crystals can shift with him; W1 stays with Bard, and P1 relays the last Crystal. Crystals 1–4 and switches A–D use the map labels. Each arrow is one direction input. Select the named actor with the Switch Characters control listed in Controls. On this PC keymap V is Secondary Action and X is Primary Action.
Hint
Leave Crystal 3 on C with cast 1 and put Crystal 2 on A with cast 2. Move Crystal 3 off C while preparing B; cast 3 puts Crystal 4 on B. Cast 4 separates Crystal 3 near the left edge, and cast 5 restores it to C. Keep A, B and C weighted during the last relay. Bard holds D while P1 crosses the gates, then the wand shifts P1 and Crystal 1 together. The final upward cast leaves Crystal 1 on D outside Bard’s charm field.
Solution
- Pick up W1 and set C. Pick up W1 before direction 1. Circle below the central block to its right. Get beside Crystal 4 and lead the four-Crystal train to the lower edge. Line up Crystals 3 and 4 to Bard’s left, then stand three cells right of C and cast left once; Crystal 3 lands on C.
- Put Crystal 2 on A. Lead the remaining three Crystals up the right side. Use the top edge to line up Crystals 1 and 2 with A’s row. Stand three cells right of A and cast left (cast 2); Crystal 2 lands on A.
- Put Crystal 4 on B. Lead the remaining pair down, temporarily taking Crystal 3 off C. Line up Crystals 3 and 4 with B’s row. Stand three cells right of B and cast left (cast 3); Crystal 4 lands on B.
- Restore C. Keep Crystal 2 on A and Crystal 4 on B. Take Bard up the left side, then use the left edge and the right-left loop to face Crystal 3. Cast left once; Crystal 3 moves one cell against the left edge. Use the top edge to line up Crystals 1 and 3 in the same row, bring the pair down and to the right of C, then stand three cells right of C and cast left once for cast 5; Crystal 3 returns to C.
- Hold D and bring P1 across. Move Bard onto D and keep him there, with A, B and C weighted. Select P1 and move left four, then up four through the open gate band.
- Relay P1 and Crystal 1, then finish. Select Bard and move down twice, right once and left once to face the row; cast 6 shifts P1 and Crystal 1 left. Circle Bard down three, left three and up to stop two cells below Crystal 1, leaving an empty tile between them. Select P1 and move up, then right twice into the gap. Select Bard, move right three and up, then cast upward (cast 7) to put Crystal 1 on D, three cells away and outside Bard’s charm field. Leave it there while Bard goes down three, right three and down three to the lower exit; select P1 and move down once to the other exit. The final pads hold Crystal 2 on A, Crystal 4 on B, Crystal 3 on C and Crystal 1 on D.
If a Crystal misses its pad, undo to the previous cast and realign the train. C is temporarily empty during the B setup; restore C before Bard holds D. Keep Bard on D until P1 has crossed the gate band, and keep Bard away from settled Crystals during the final relay.
Exact actor and direction sequence
The sequence contains 134 directions, seven casts and one separate W1 pickup before direction 1. Select the actor named on each row with the current Switch Characters control; the character-selection inputs are not included in the direction counts. Press X for each cast.
- Bard, pick up W1 with V before direction 1; directions 1–26:
↓ ↓ ↓ → → → → → → → → ↑ ↑ ↑ ← ← ↓ ↓ ↓ ↓ ↓ ↑ → → → ←; X (cast 1). - Bard, directions 27–41:
↑ ↑ ↑ ↑ ↑ ↑ ↑ ↑ ↑ ↓ ← ← ← ← ←; X (cast 2). - Bard, directions 42–57:
↓ ↓ ↓ ↓ ↓ → → → ↓ ↓ ↓ ↓ ↑ ← ← ←; X (cast 3). - Bard, directions 58–68:
↑ ↑ ↑ ↑ ↑ ← ← ← → → ←; X (cast 4). - Bard, directions 69–90:
→ → ↑ ↑ ↑ ↑ ↓ ↓ ↓ ↓ ↓ ↓ ↓ ↓ ↓ → → → → → → ←; X (cast 5). - Bard, directions 91–98:
↑ ↑ ↑ ↑ ↑ ↑ ↑ ↑. - P1, directions 99–106:
← ← ← ← ↑ ↑ ↑ ↑. - Bard, directions 107–110:
↓ ↓ → ←; X (cast 6). - Bard, directions 111–117:
↓ ↓ ↓ ← ← ← ↑. - P1, directions 118–120:
↑ → →. - Bard, directions 121–124:
→ → → ↑; X (cast 7). - Bard, directions 125–133:
↓ ↓ ↓ → → → ↓ ↓ ↓. - P1, direction 134:
↓.
Images show selected video checkpoints; the first frame is the starting position.
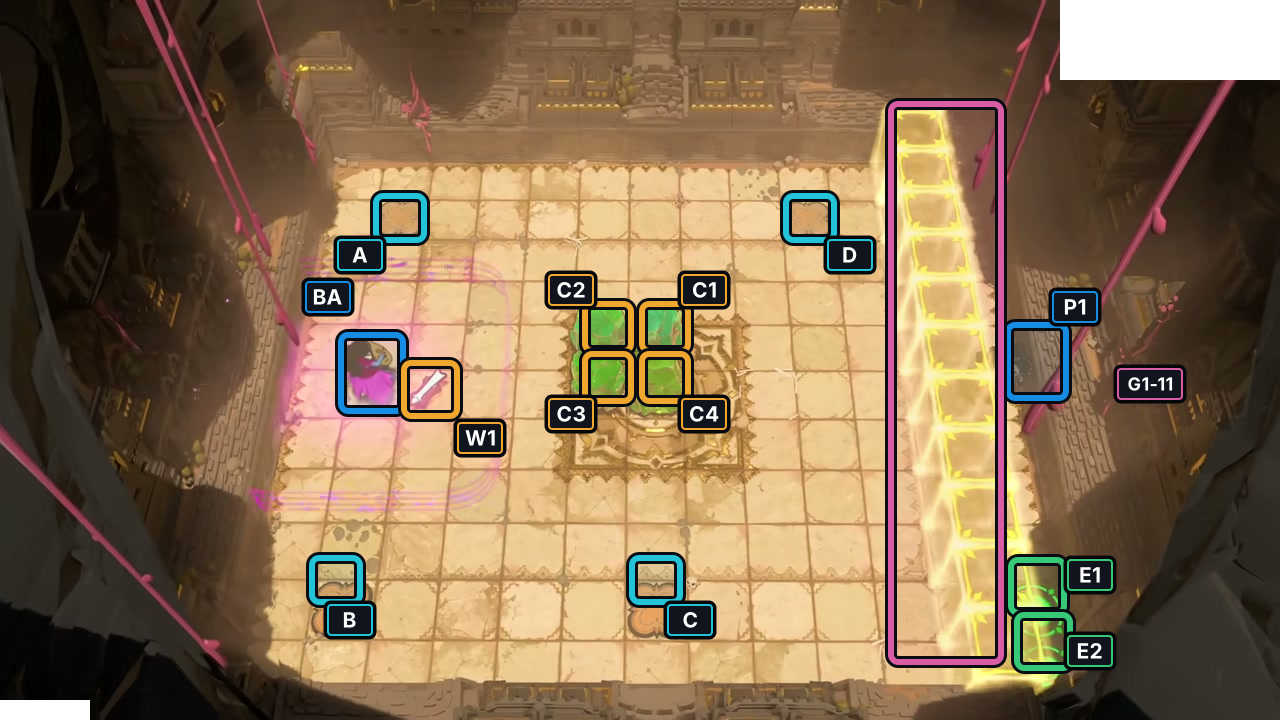
At P15 17:05.021, the selected frame matches the Bard/P1 room’s starting layout.
Check: BA, P1, W1, C1–C4, switches A–D, the G1–11 band and exits E1/E2 are marked. No gate rule or route is inferred.
Open full-size image in a new tabSources and credits
Room layouts and marker labels: PC r67121 game files. The Wizard route uses 113 directions and four transfers; the shared-wand route uses 57 directions, one pickup and five transfers; the Thief route uses 89 directions, one pickup and eight casts; the Warrior route uses 229 directions, one pickup and ten casts; the Bard/P1 route uses 134 directions, one pickup and seven casts. Each sequence follows a scoped model check, with selected P15 states as visual reference. The PC keymap labels V as Secondary Action and X as Primary Action. Video: 塞德莎, 黄金谜题+英雄与神器, part 15. Board artwork: Thekla, Inc.
- Heroes and Artifacts source-only room layouts (PC r67121) — Extracted data
- Supplemental Heroes and Artifacts Wizard route check (bounded model) — Documentation · heroes-and-artifacts-wizard-bounded-check-2026-10-17
- Supplemental Heroes and Artifacts Swap route check (bounded model) — Documentation · heroes-and-artifacts-swap-bounded-check-2026-10-17
- Supplemental Heroes and Artifacts Thief route check (bounded model) — Documentation · heroes-and-artifacts-thief-bounded-check-2026-10-17
- Supplemental Heroes and Artifacts Flame route check (bounded model) — Documentation · heroes-and-artifacts-flame-bounded-check-2026-10-17
- Joric's PuzzleScript movement-rule port — Documentation · commit-4e6e0784727d95c7337d50f6d5b3ef912aa0e8ae
- Heroes and Artifacts visual samples, part 15 / 英雄与神器画面观察,第15部分 — Observed in-game
- Heroes and Artifacts wizard_with_a_gun P15 selected start-layout screenshot — Observed in-game · screenshots-reviewed-2026-10-21
- Heroes and Artifacts swap_and_spin P15 selected start-layout screenshot — Observed in-game · screenshots-reviewed-2026-10-21
- Heroes and Artifacts thief_wand P15 selected start-layout screenshot — Observed in-game · screenshots-reviewed-2026-10-21
- Heroes and Artifacts flame_wand P15 selected start-layout screenshot — Observed in-game · screenshots-reviewed-2026-10-21
- Heroes and Artifacts bug_spray P15 selected start-layout screenshot — Observed in-game · screenshots-reviewed-2026-10-21
- Installed PC gameplay keymap (r67121 local copy) — Extracted data · sha256-3f5c1ce6b96f3d30da31548f5e93c821f2ec50d668d55571316ef1aa2ab6d544
- Character portraits and selected puzzle-board images (PC r67121) — Extracted data
- Supplemental Heroes and Artifacts Bug Spray route check (bounded model) — Documentation · heroes-and-artifacts-bug-bounded-check-2026-10-17
Unofficial fan wiki, not affiliated with Thekla, Inc. / Arc Games / Gamirror Games. Game content belongs to its owners.
Comments & feedback
Share a tip or suggest a correction. Comments are public. Guest names are unverified; verified accounts show their account username. All language pages share this discussion. Please keep personal information private.