
 Order of the Sinking Star
Druid teamwork

These four team rooms use the  Druid to freeze a Goblin or, in one room, turn the
 Wizard into a movable crystal. Plant labels T1, T2 and so on keep their labels after transmutation. In the final room, the gold 1 badge marks native crystal C1. Arrows follow the displayed board. Each arrow is one directional input; when the Druid casts toward an adjacent target, he stays on his tile. The Wizard-and-Druid room uses a rotated map.
 Priestess,
 Warrior and Druid: freeze both Goblins
Section titled “Priestess, Warrior and Druid: freeze both Goblins”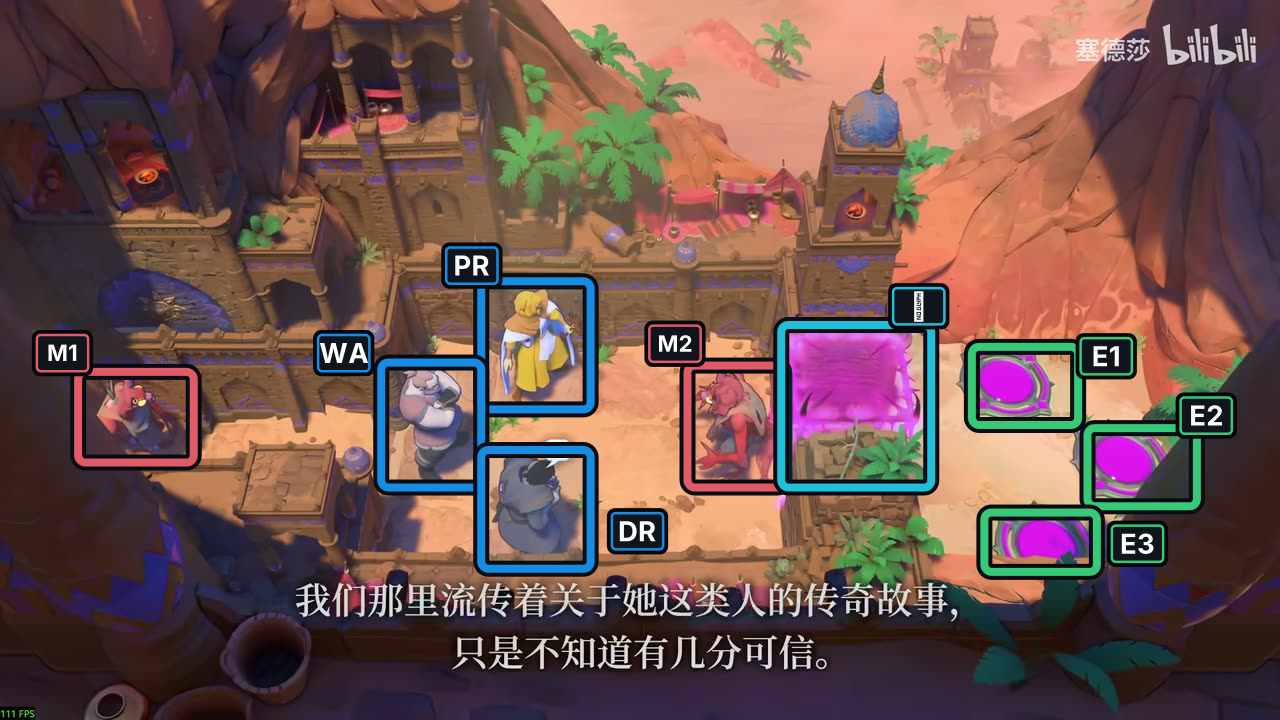
- Gate
- Exits E1–E3
- PR Priestess
- WA Warrior
- DR Druid
- Goblins M1–M2
Hint
Keep the Priestess next to the Druid during both freezes. Freeze M1 first, then move across to M2. The Warrior can push the frozen M2 to help open a path; leave both Goblins frozen until the heroes reach their exits.
Solution
- Priestess goes
←; Warrior→; Druid takes← ↑ ←. Priestess then goes↓, Warrior← ↑, and Druid←at step 9 freezes M1. - Priestess moves
→ →; Druid→ →; Warrior↓; Druid follows→ → ↑ →. The final rightward transmutation at step 18 freezes M2 and opens the gate. - Warrior pushes M2 with
→ → → →at steps 19–22. Druid moves↑at 23; Warrior takes→ ↓ → →at 24–27, Priestess moves↓at 28, and Warrior goes↑at 29. All three exits are occupied: Druid E1, Warrior E2, Priestess E3.
If the Druid is not next to the Priestess when freezing M1 or M2, Undo and bring her alongside before the transmutation.
Images show selected video checkpoints; the first frame is the starting position.
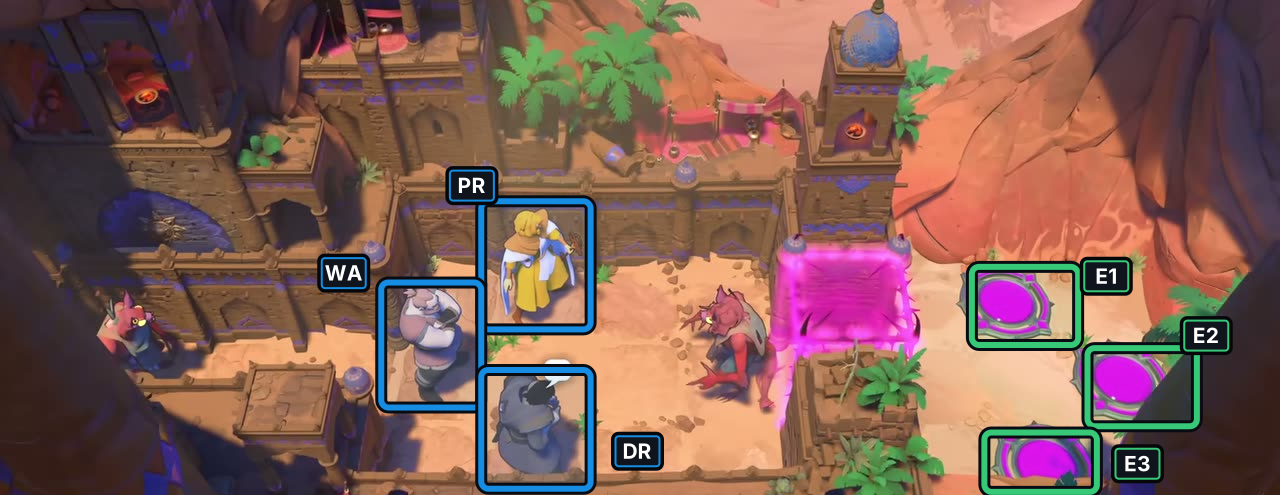
At 07:13, the selected frame shows Priestess, Warrior and Druid in the room’s starting layout.
Check: The markers identify the visible heroes and exits; no input sequence or later state is inferred.
Open full-size image in a new tabFull direction sequence
- PR Priestess
← - WA Warrior
→ - DR Druid
← ↑ ← - PR Priestess
↓ - WA Warrior
← ↑ - DR Druid
← - PR Priestess
→ → - DR Druid
→ → - WA Warrior
↓ - DR Druid
→ → ↑ → - WA Warrior
→ → → → - DR Druid
↑ - WA Warrior
→ ↓ → → - PR Priestess
↓ - WA Warrior
↑
Priestess, Warrior and Druid: release the pair after lining it up
Section titled “Priestess, Warrior and Druid: release the pair after lining it up”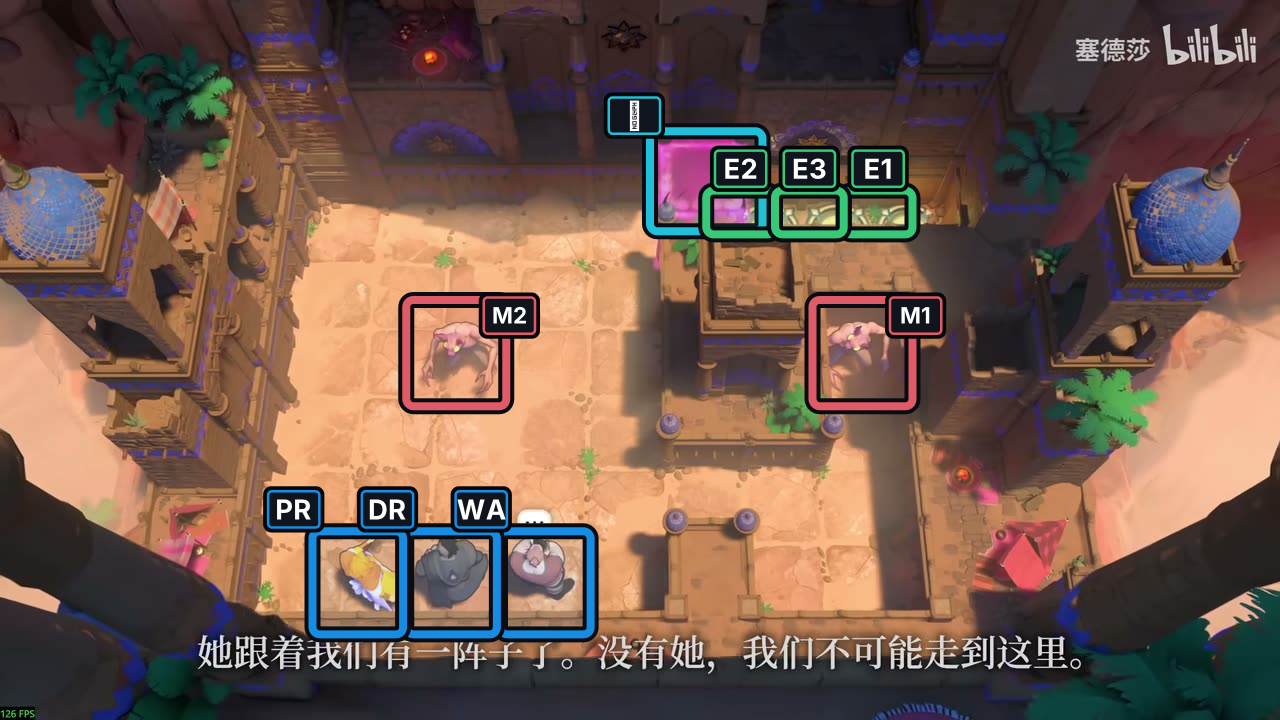
- Gate
- Exits E1–E3
- DR Druid
- PR Priestess
- WA Warrior
- Goblins M1–M2
Hint
Freeze M2 while the Priestess is alongside the Druid, then use the Warrior to move that frozen Goblin as a buffer. Do not release it until it and M1 face each other on the same lane. The pair clear each other when the Druid unfreezes M2, opening the gate.
Solution
- Priestess starts
↑ ↑; Druid goes↑ ↑ ↑and freezes M2 on step 5. Warrior takes↑ ↑ ↑ ↑ ← ↓ ↓ ← ↓ → → → → →to push frozen M2 into the right-hand lane. - Warrior continues
↓ → ↑ ↓at steps 20–23. Priestess takes→ → → → ↓ → →at steps 24–30; Druid moves→ → ↑ →at 31–34, Priestess↓at 35, Druid→ →at 36–37, then Priestess↑at 38. - Druid goes
↑on step 39 to release M2 while it is lined up with M1. M1 and M2 attack and clear each other, opening the gate. Take the exits with Priestess← ← ↑ ↑ ↑ ↑ → → → →, Druid← ← ← ↑ ↑ ↑ ↑ → → →, and Warrior← ↑ ← ← ↑ ↑ ↑ ↑ → →. All three exits are occupied by step 69.
If the two Goblins are not lined up when M2 is released, Undo to the last frozen-Goblin handoff and realign them first.
Images show selected video checkpoints; the first frame is the starting position.
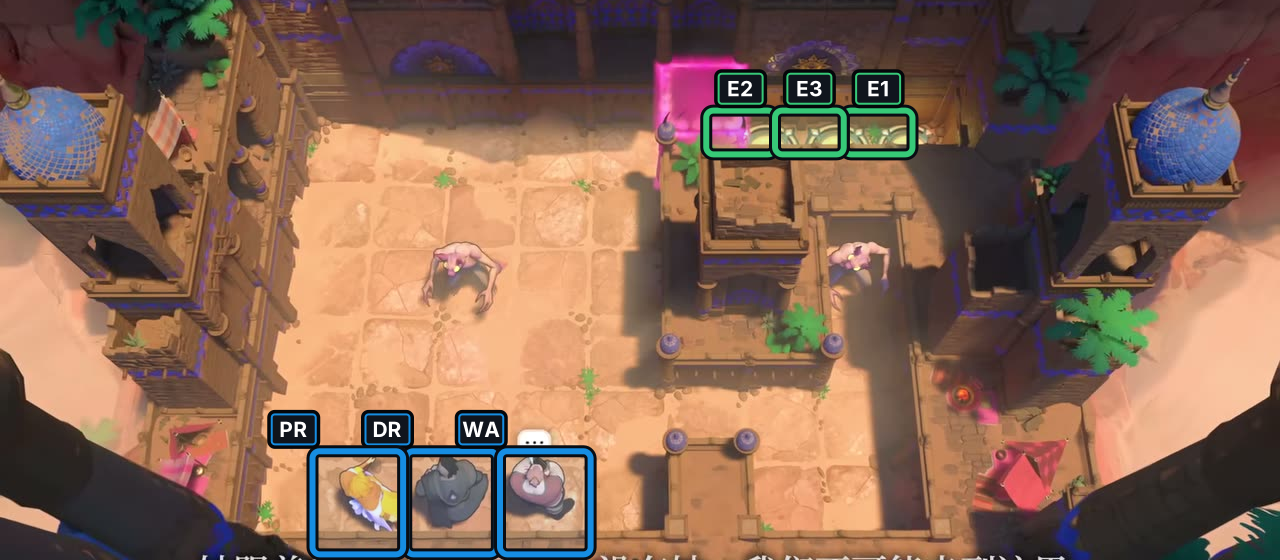
At 08:29, the selected frame shows Druid, Priestess and Warrior in the room’s starting layout.
Check: The markers identify the visible heroes and exits; no input sequence or later state is inferred.
Open full-size image in a new tabFull direction sequence
- PR Priestess
↑ ↑ - DR Druid
↑ ↑ ↑ - WA Warrior
↑ ↑ ↑ ↑ ← ↓ ↓ ← ↓ → → → → → ↓ → ↑ ↓ - PR Priestess
→ → → → ↓ → → - DR Druid
→ → ↑ → - PR Priestess
↓ - DR Druid
→ → - PR Priestess
↑ - DR Druid
↑ - PR Priestess
← ← ↑ ↑ ↑ ↑ → → → → - DR Druid
← ← ← ↑ ↑ ↑ ↑ → → → - WA Warrior
← ↑ ← ← ↑ ↑ ↑ ↑ → →
Four heroes: use the Wizard as a crystal shield
Section titled “Four heroes: use the Wizard as a crystal shield”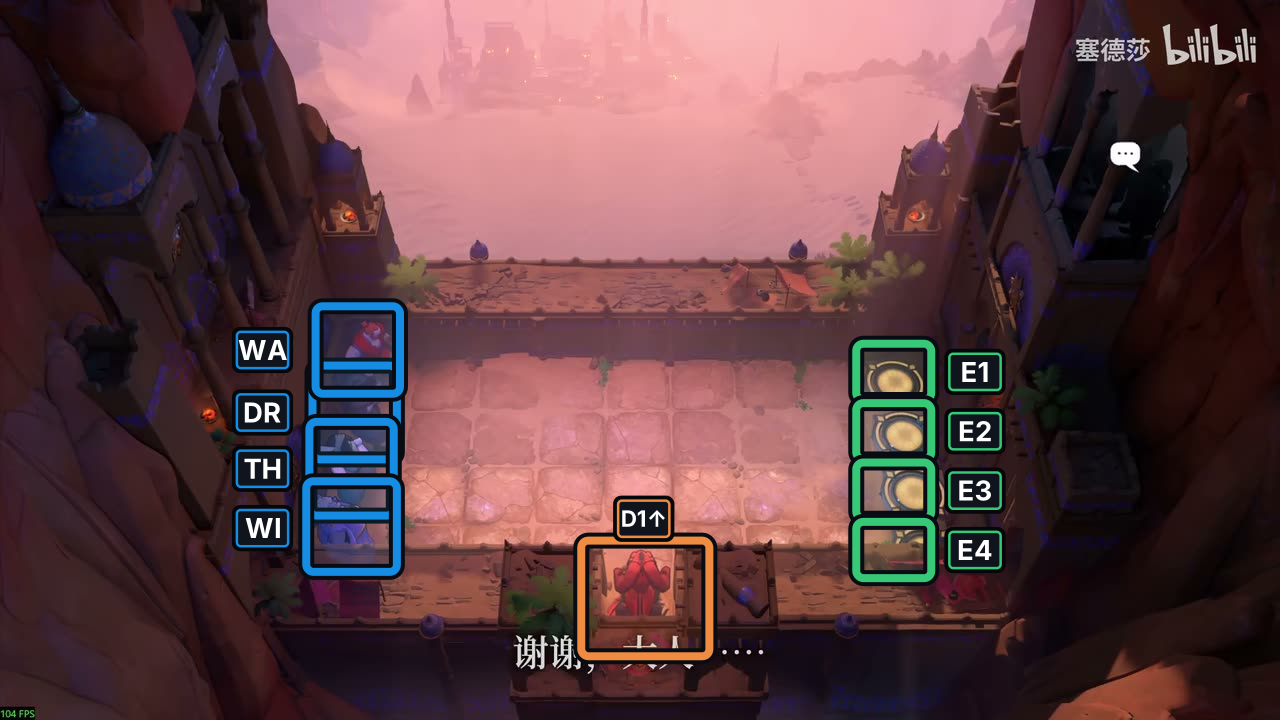
- Exits E1–E4
- DR Druid
- TH Thief
- WA Warrior
- WI Wizard
- Dragon D1; arrow shows initial fire direction
The lowest exit, E4, is partly hidden behind the foreground wall; the green box marks its position.
Hint
In this room, the Druid can turn the Wizard into a crystal. Have the Warrior push him into the Dragon’s upward line as a shield, then move the other heroes across the row below. The  Thief pulls the Wizard-crystal right twice; the Druid restores him before the team fills all four exits.
Solution
- Warrior goes
→ → ↓; Wizard takes→ → → ↑; Druid moves↑ → → → ↓ ↓. At step 13, the Druid’s final down transmutation turns the Wizard into a crystal. - Warrior moves
↓at step 14, then pushes→at 15 to move the Wizard-crystal right one tile. Druid repositions with→ → →at 16–18; Warrior then takes↑ → →at 19–21. Thief routes↑ ↑,→seven times,↓ ↓ ← ←, then→ →; those last two pulls at steps 35–36 bring the Wizard-crystal to the Druid. - Druid restores the Wizard with
↓on step 37. The Dragon remains alive in its original position; guide all four heroes to their exits by step 49.
If the Wizard is still a crystal as the group reaches the exit column, Undo to the two Thief pulls and restore him before completing the four exits.
Images show selected video checkpoints; the first frame is the starting position.
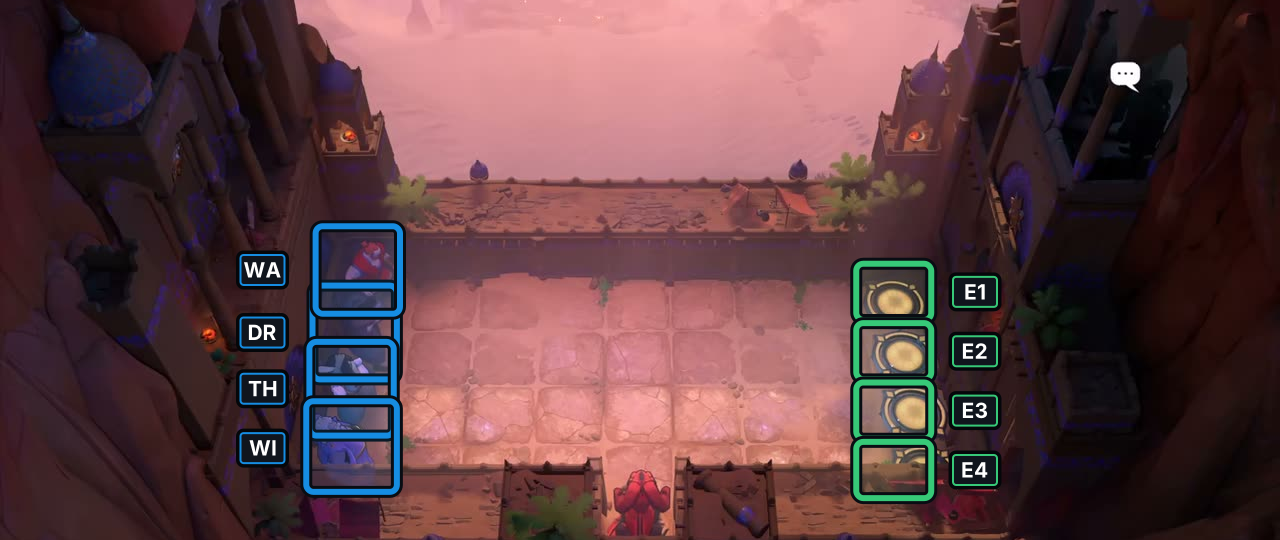
At 09:55, the selected frame shows Druid, Thief, Warrior and Wizard in the room’s starting layout.
Check: The markers identify the visible heroes and exits; no input sequence or later state is inferred.
Open full-size image in a new tabFull direction sequence
- WA Warrior
→ → ↓ - WI Wizard
→ → → ↑ - DR Druid
↑ → → → ↓ ↓ - WA Warrior
↓ → - DR Druid
→ → → - WA Warrior
↑ → → - TH Thief
↑ ↑ → → → → → → → ↓ ↓ ← ← → → - DR Druid
↓ ↑ → → - WA Warrior
↑ → → ↓ → - TH Thief
↓ → - WI Wizard
→ →
Wizard and Druid: keep T1 and C1 distinct
Section titled “Wizard and Druid: keep T1 and C1 distinct”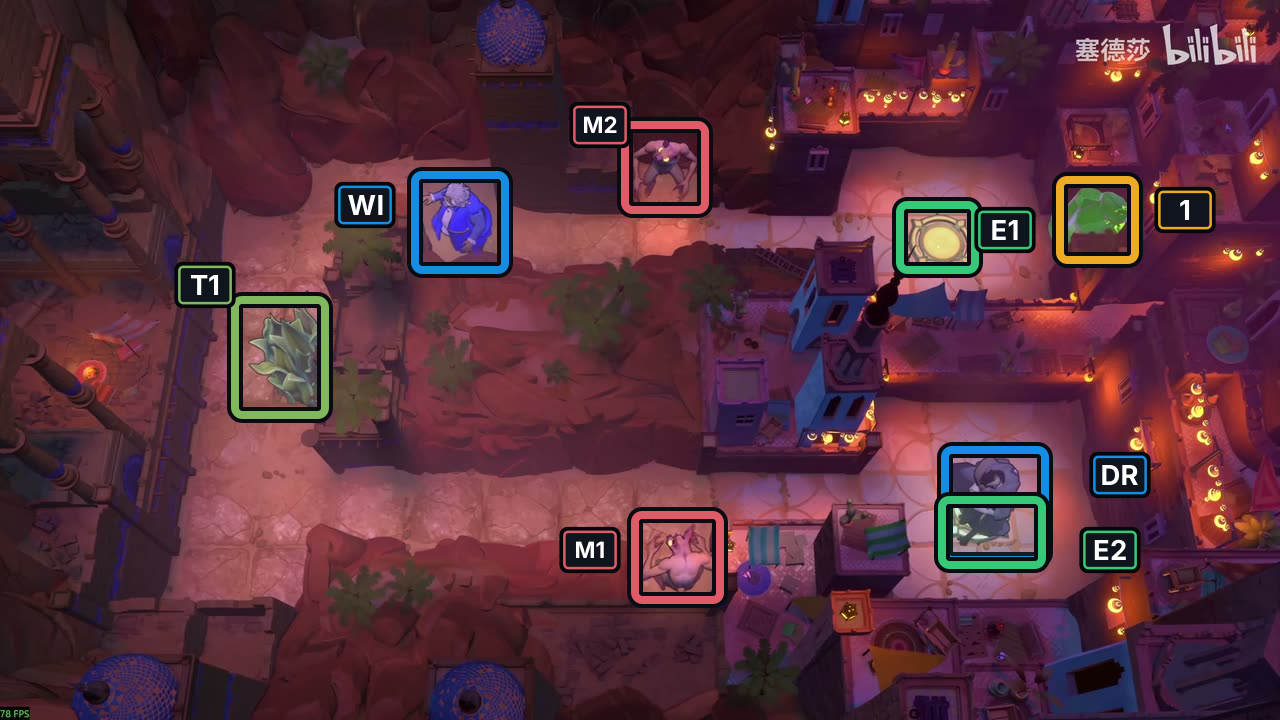
- Crystal 1
- Plant T1
- Exits E1–E2
- DR Druid
- WI Wizard
- Goblins M1–M2
Hint
There is one native crystal, C1, and one plant, T1. When the Druid turns T1 into a crystal, keep calling it T1; C1 is the only original crystal. The route changes C1 into a plant at step 39 and restores it to crystal form at step 42, then takes both heroes to separate exits. The map is rotated; follow its arrows.
Solution
- Wizard follows
← ← ↓ ↓ ← ↓ ↓ ↓ →at steps 1–9; Druid takes↑ → ↑ ↓at 10–13. The Druid’s↑at step 12 turns T1 into a crystal. - Wizard takes
← ↑ ← ↓ ↓ → →at 14–20, and Druid moves↑ ↑ ↑at 21–23. Wizard then follows← ↑ ↑ ↑ ↑ → ↑at 24–30. Through step 38, the pair continue alternating along the displayed lanes: Druid↑(31), Wizard→(32), Druid↑(33), Wizard→(34), Druid→(35), Wizard↓(36), Druid→(37), Wizard→(38). - Druid’s
↓at step 39 changes native C1 into a plant. Wizard moves← ←at 40–41; Druid’s↓at 42 restores C1 as a crystal. Druid continues← ← ↓ ↓ ↓ ↓ ↓at 43–49; Wizard takes← ↑ ← ← ↓at 50–54, then Druid moves↓ ↓ ↓ ↓at 55–58. Finish with Wizard← →, Druid↓, and Wizard← ↑ ↑ ↑ ↑ ↑ → → ↓ →. Both exits are occupied at step 71; M1 and M2 remain alive and unfrozen.
If C1 is not restored to crystal form after step 42, Undo to that transmutation before following the final Wizard route.
Images show selected video checkpoints; the first frame is the starting position.
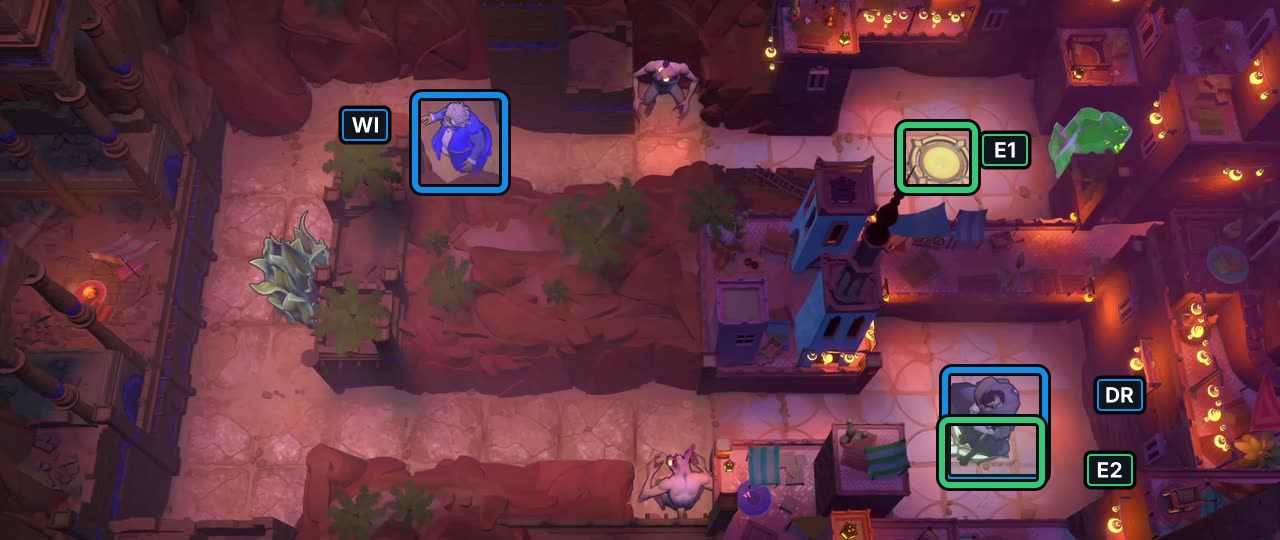
At 11:15, the selected frame shows Druid and Wizard in the room’s starting layout.
Check: The markers identify the visible heroes and exits; no input sequence or later state is inferred.
Open full-size image in a new tabFull direction sequence
- WI Wizard
← ← ↓ ↓ ← ↓ ↓ ↓ → - DR Druid
↑ → ↑ ↓ - WI Wizard
← ↑ ← ↓ ↓ → → - DR Druid
↑ ↑ ↑ - WI Wizard
← ↑ ↑ ↑ ↑ → ↑ - DR Druid
↑ - WI Wizard
→ - DR Druid
↑ - WI Wizard
→ - DR Druid
→ - WI Wizard
↓ - DR Druid
→ - WI Wizard
→ - DR Druid
↓ - WI Wizard
← ← - DR Druid
↓ ← ← ↓ ↓ ↓ ↓ ↓ - WI Wizard
← ↑ ← ← ↓ - DR Druid
↓ ↓ ↓ ↓ - WI Wizard
← → - DR Druid
↓ - WI Wizard
← ↑ ↑ ↑ ↑ ↑ → → ↓ →
Sources and credits
Room layouts and entity labels: PC r67121 game files. Druid and hero interactions: official PlayStation hands-on notes and the community PuzzleScript port. Selected video: 塞德莎, Heroes 3, part 4. Board artwork: Thekla, Inc.
- Selected Heroes 3 layouts and bounded player-action traces (PC r67121) — Extracted data
- Joric's PuzzleScript movement-rule port — Documentation · commit-4e6e0784727d95c7337d50f6d5b3ef912aa0e8ae
- PlayStation Blog hands-on report — Documentation · published-2026-07-21
- [North] Heroes 3: Bard and Druid + Energy Gate Direction + Heroes Assemble [North 4 + North 3 West 1 + North 1 supplement 1 puzzle] / 【北】英雄3:吟游诗人与德鲁伊+能量门方向+英雄齐聚[北4+北3西1+北1补1题] — Observed in-game
- Character portraits and selected puzzle-board images (PC r67121) — Extracted data
- Heroes 3 heroes3_13_v2 selected P4 starting-layout screenshot — Observed in-game · screenshots-reviewed-2026-10-21
- Heroes 3 heroes3_druid_a selected P4 starting-layout screenshot — Observed in-game · screenshots-reviewed-2026-10-21
- Heroes 3 heroes3_druid_b_v2 selected P4 starting-layout screenshot — Observed in-game · screenshots-reviewed-2026-10-21
- Heroes 3 wizard_and_druid_alt selected P4 starting-layout screenshot — Observed in-game · screenshots-reviewed-2026-10-21
Unofficial fan wiki, not affiliated with Thekla, Inc. / Arc Games / Gamirror Games. Game content belongs to its owners.
Comments & feedback
Share a tip or suggest a correction. Comments are public. Guest names are unverified; verified accounts show their account username. All language pages share this discussion. Please keep personal information private.