
 Order of the Sinking Star
Priestess puzzles

These six routes show the  Priestess alone or alongside other heroes. PR labels identify the Priestess, M labels mark Goblins, D labels mark Dragons, and crystal badges 1 and 2 are Crystal 1 (C1) and Crystal 2 (C2). Goblin attacks cannot hurt the Priestess, and she protects a hero on a directly neighboring tile—above, below, left or right. A diagonal or more distant ally is not covered; the protection does not affect monsters. Arrows follow the displayed board. In the PC default controls, Tab is bound to Overhead View.
Priestess: take the long loop to the exit
Section titled “Priestess: take the long loop to the exit”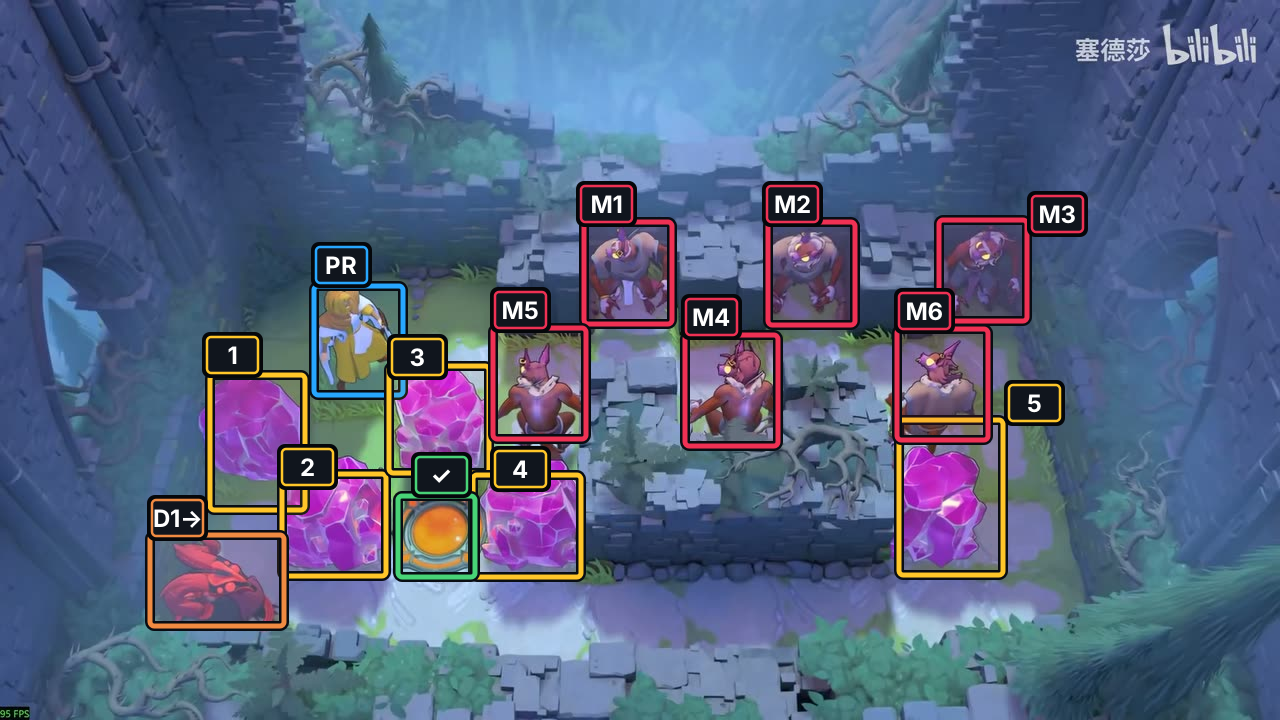
- Crystals 1–5
- Exit
- PR Priestess
- Goblins M1–M6
- Dragon D1; arrow shows initial fire direction
Hint
This room is a long walking loop. Follow the upper lane to the far bend, take the right passage down, then return left along the lower corridor and turn up into the exit. The Dragon and Goblins stay in their lanes.
Solution
- Walk
→seven tiles to the far bend, then↓three tiles through the side passage. - Go
←six tiles along the lower corridor, then↑one tile into the exit. The 17-step route leaves all six Goblins, five crystals and the Dragon in their starting cells.
If a turn takes you toward a blocked tile, Undo to the last open bend and follow the outer loop.
Images show selected video checkpoints; the first frame is the starting position.
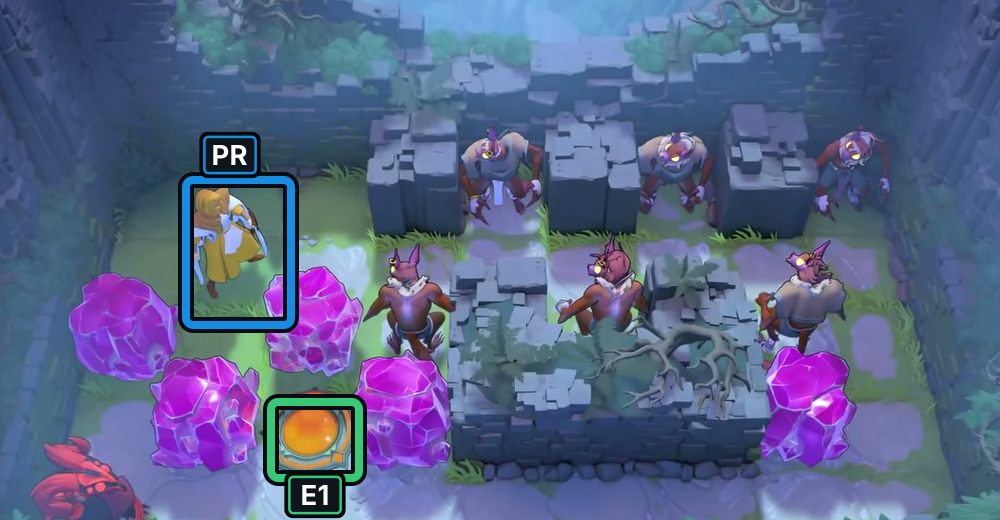
At 14:22, the Priestess is at the room start.
Check: Six Goblins, five Crystals and the Dragon are in view.
Open full-size image in a new tab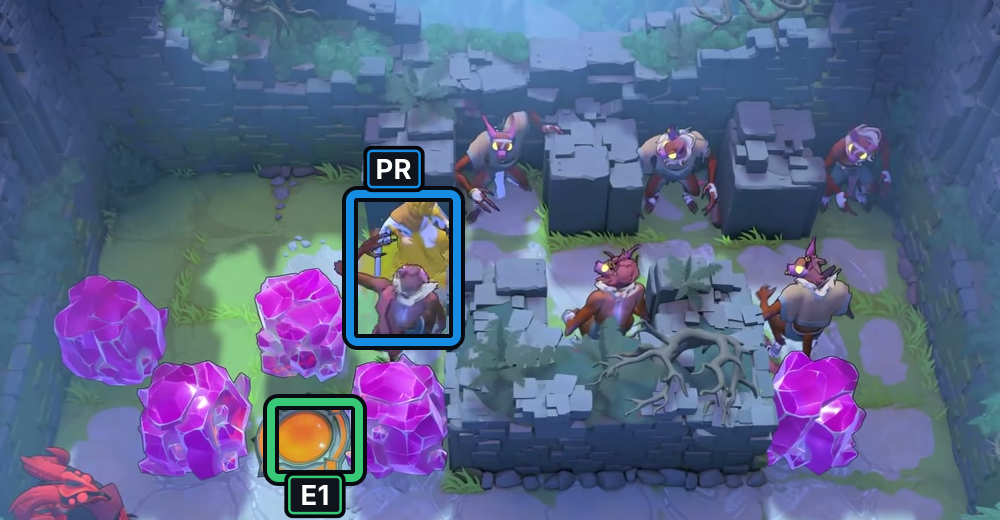
At 14:38, the Priestess is among the central Goblin lanes.
Check: This selected frame shows her beside a Goblin; inputs are not visible.
Open full-size image in a new tab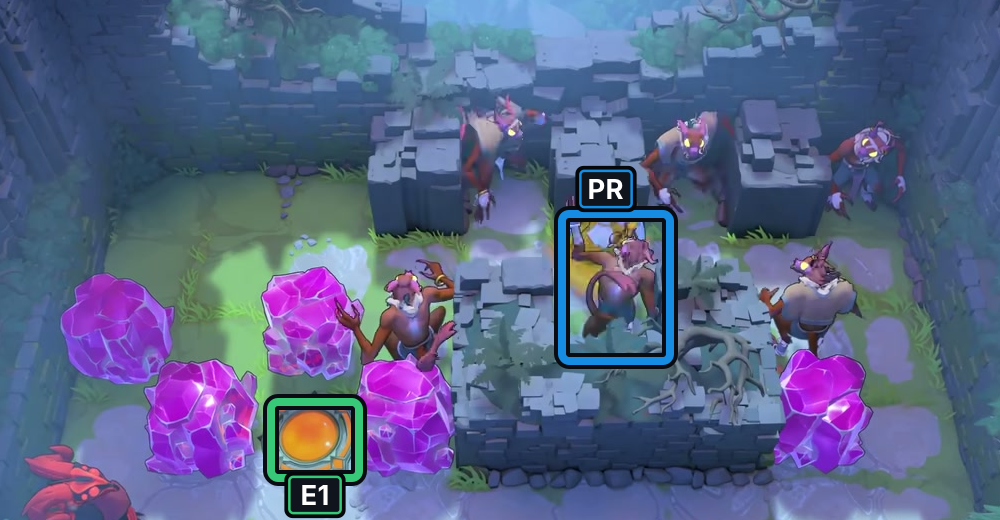
At 14:54, the Priestess remains upright beside the Goblin group.
Check: The selected footage does not show her reaching the exit. Use the separate bounded route below for a complete model route.
Open full-size image in a new tabThe P3 frames show selected encounters but not the exit; the arrows above remain a separate bounded helper route.
Full direction sequence
- PR Priestess
→ → → → → → → ↓ ↓ ↓ ← ← ← ← ← ← ↑
 Wizard and Priestess: swap across the corridor
Section titled “Wizard and Priestess: swap across the corridor”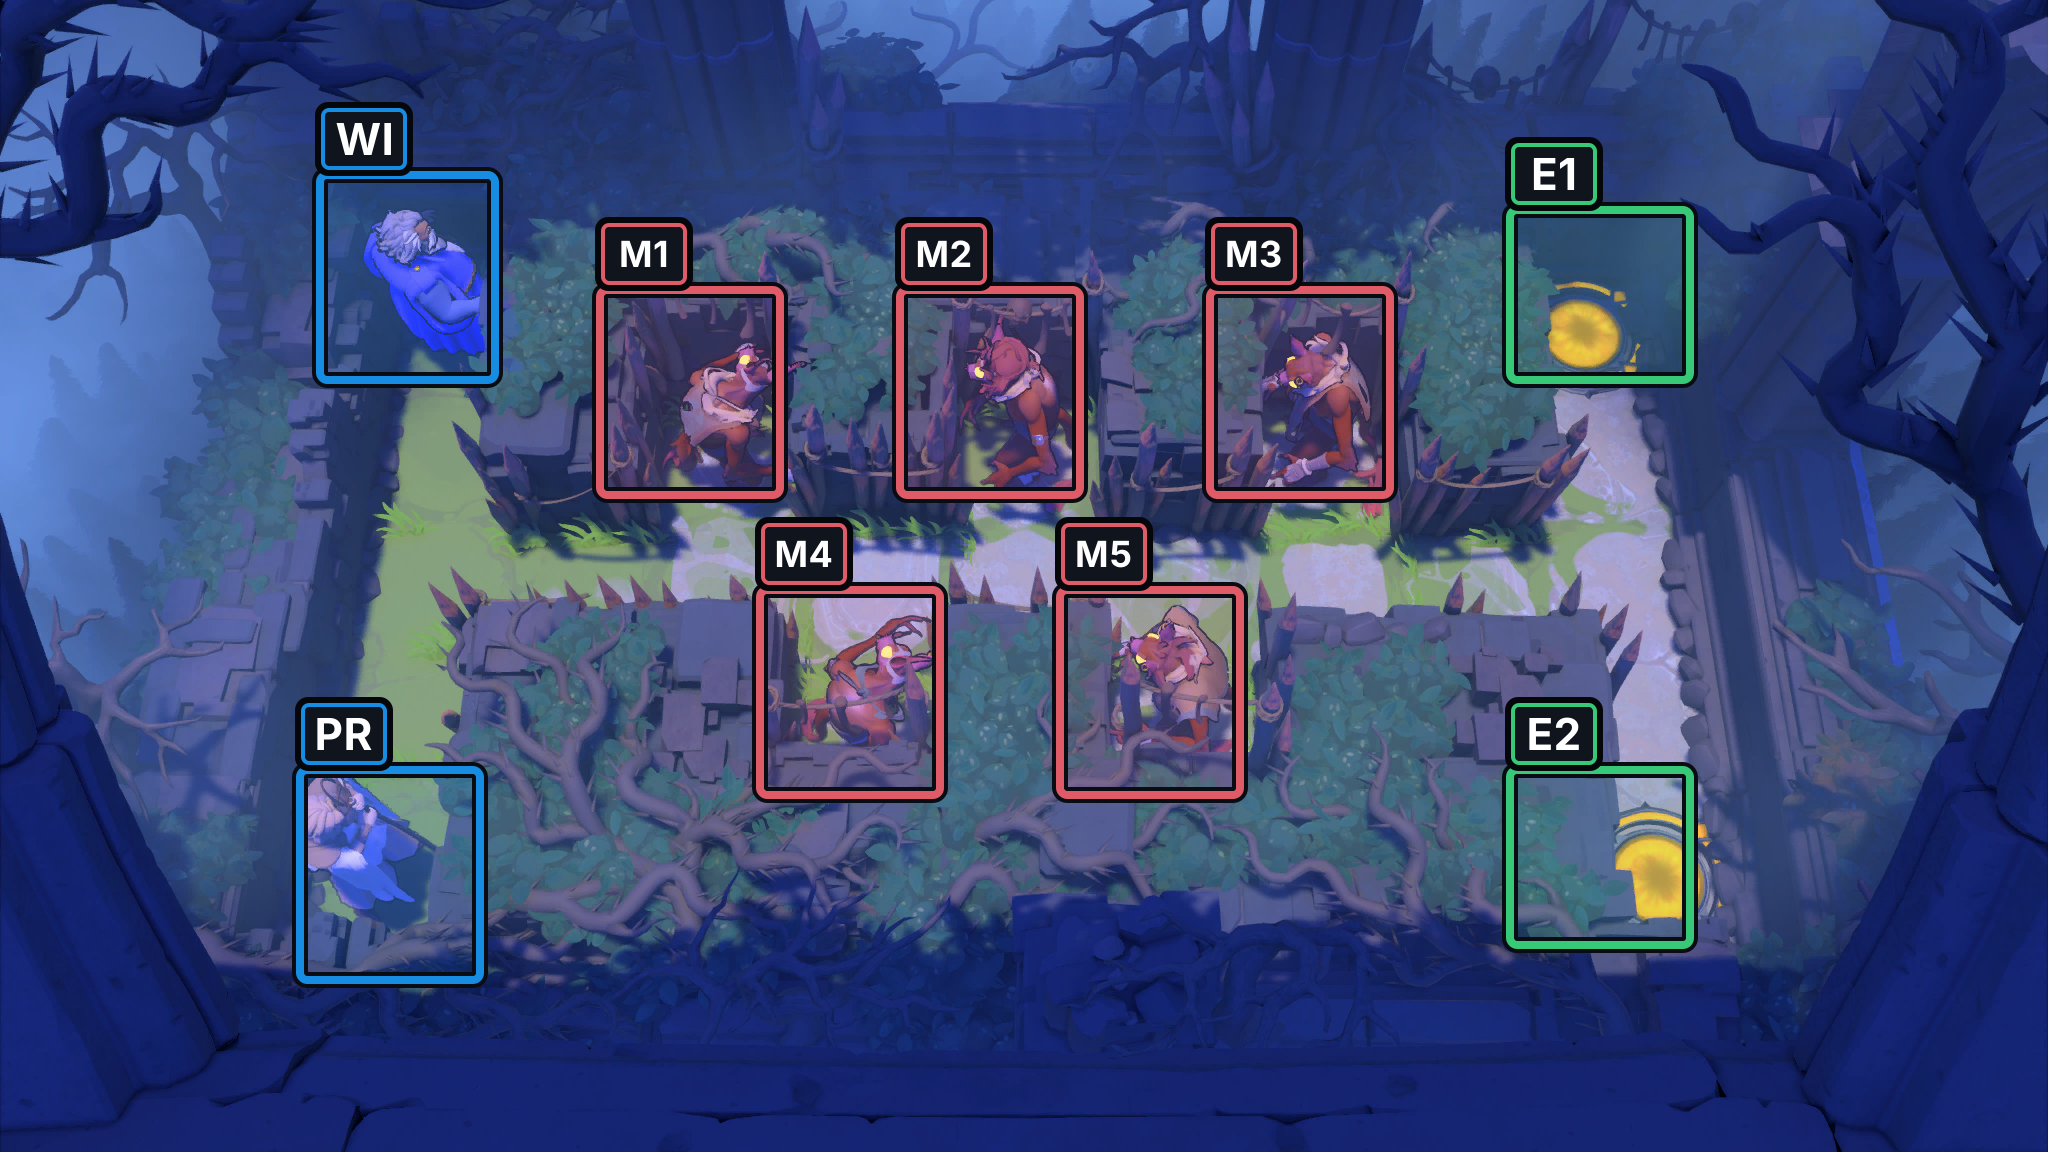
- Exits E1–E2
- WI Wizard
- PR Priestess
- Goblins M1–M5
Hint
Send the Priestess up and right to the far end of her lane while the Wizard takes the lower approach. Their rightward swap changes which hero is on each side; finish with Wizard at the upper exit and Priestess at the lower exit.
Solution
- Priestess goes
↑ ↑ →; Wizard takes↓ ↓while she continues right six tiles. - Wizard moves
→to swap with the Priestess, then→again to continue one tile farther. From there,↑ ↑takes him to the upper exit, E1. - Priestess goes
→eight tiles, then↓ ↓to the lower exit, E2. The 25-step route leaves all five Goblins in their starting positions.
If the swap happens before the Priestess reaches the far end, Undo and let her finish the rightward stretch first.
Images show selected video checkpoints; the first frame is the starting position.
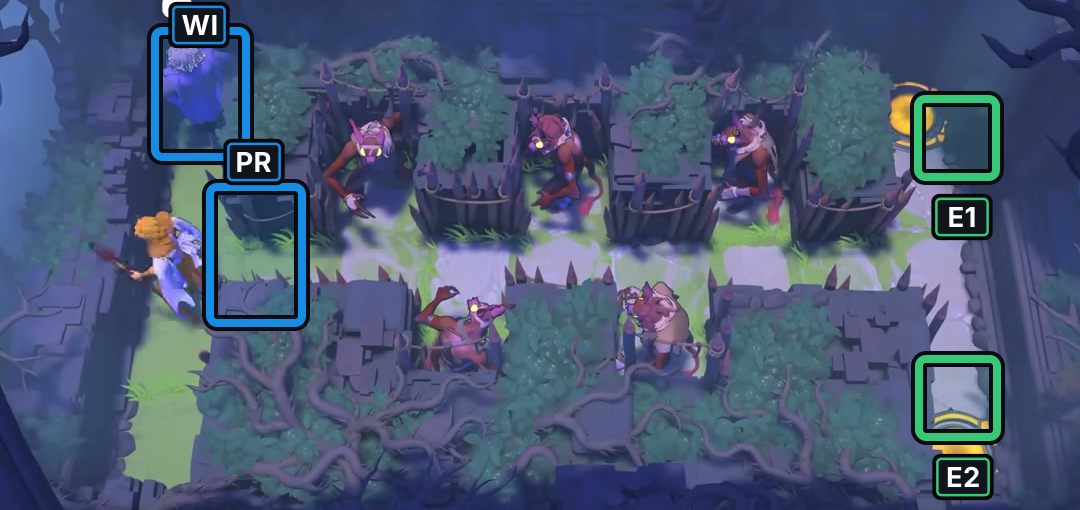
At 15:04, the Wizard and Priestess begin at the left side.
Check: Five Goblins separate them from the two right-side exits.
Open full-size image in a new tab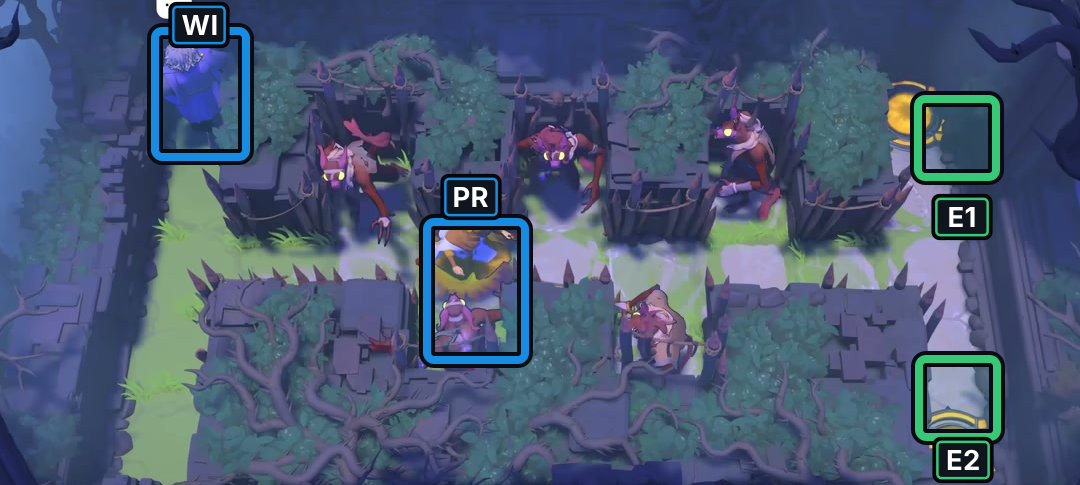
At 15:10, the Priestess has moved across the lower approach.
Check: The Wizard remains on the upper-left side in this selected frame.
Open full-size image in a new tab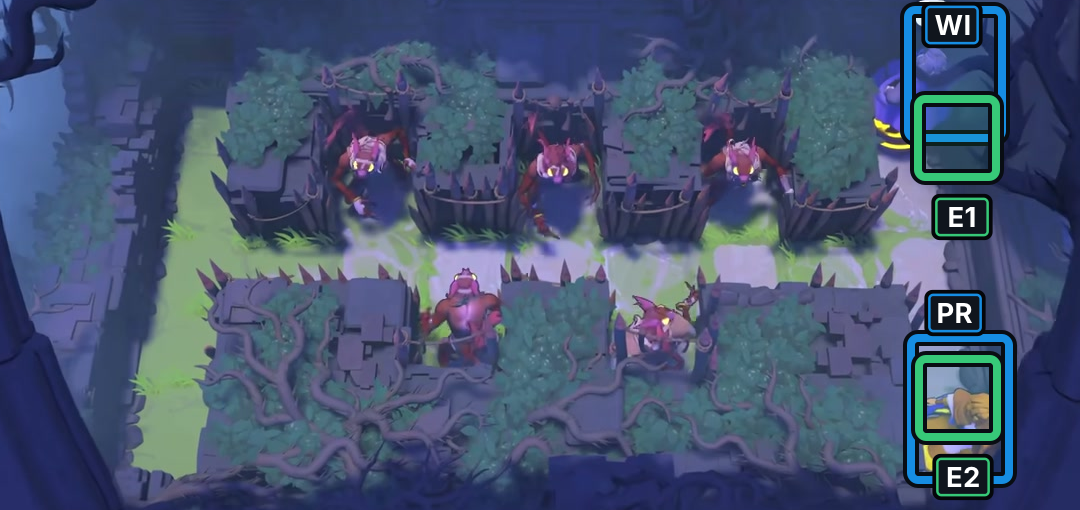
At 15:18, both heroes are on separate right-side exits.
Check: This is the clearest exit state in the selected P3 segment; the exact button sequence is not shown.
Open full-size image in a new tabFull direction sequence
- PR Priestess
↑ ↑ → - WI Wizard
↓ ↓ - PR Priestess
→ → → → → → - WI Wizard
→ → ↑ ↑ - PR Priestess
→ → → → → → → → ↓ ↓
 Warrior and Priestess: cross Goblin lanes together
Section titled “Warrior and Priestess: cross Goblin lanes together”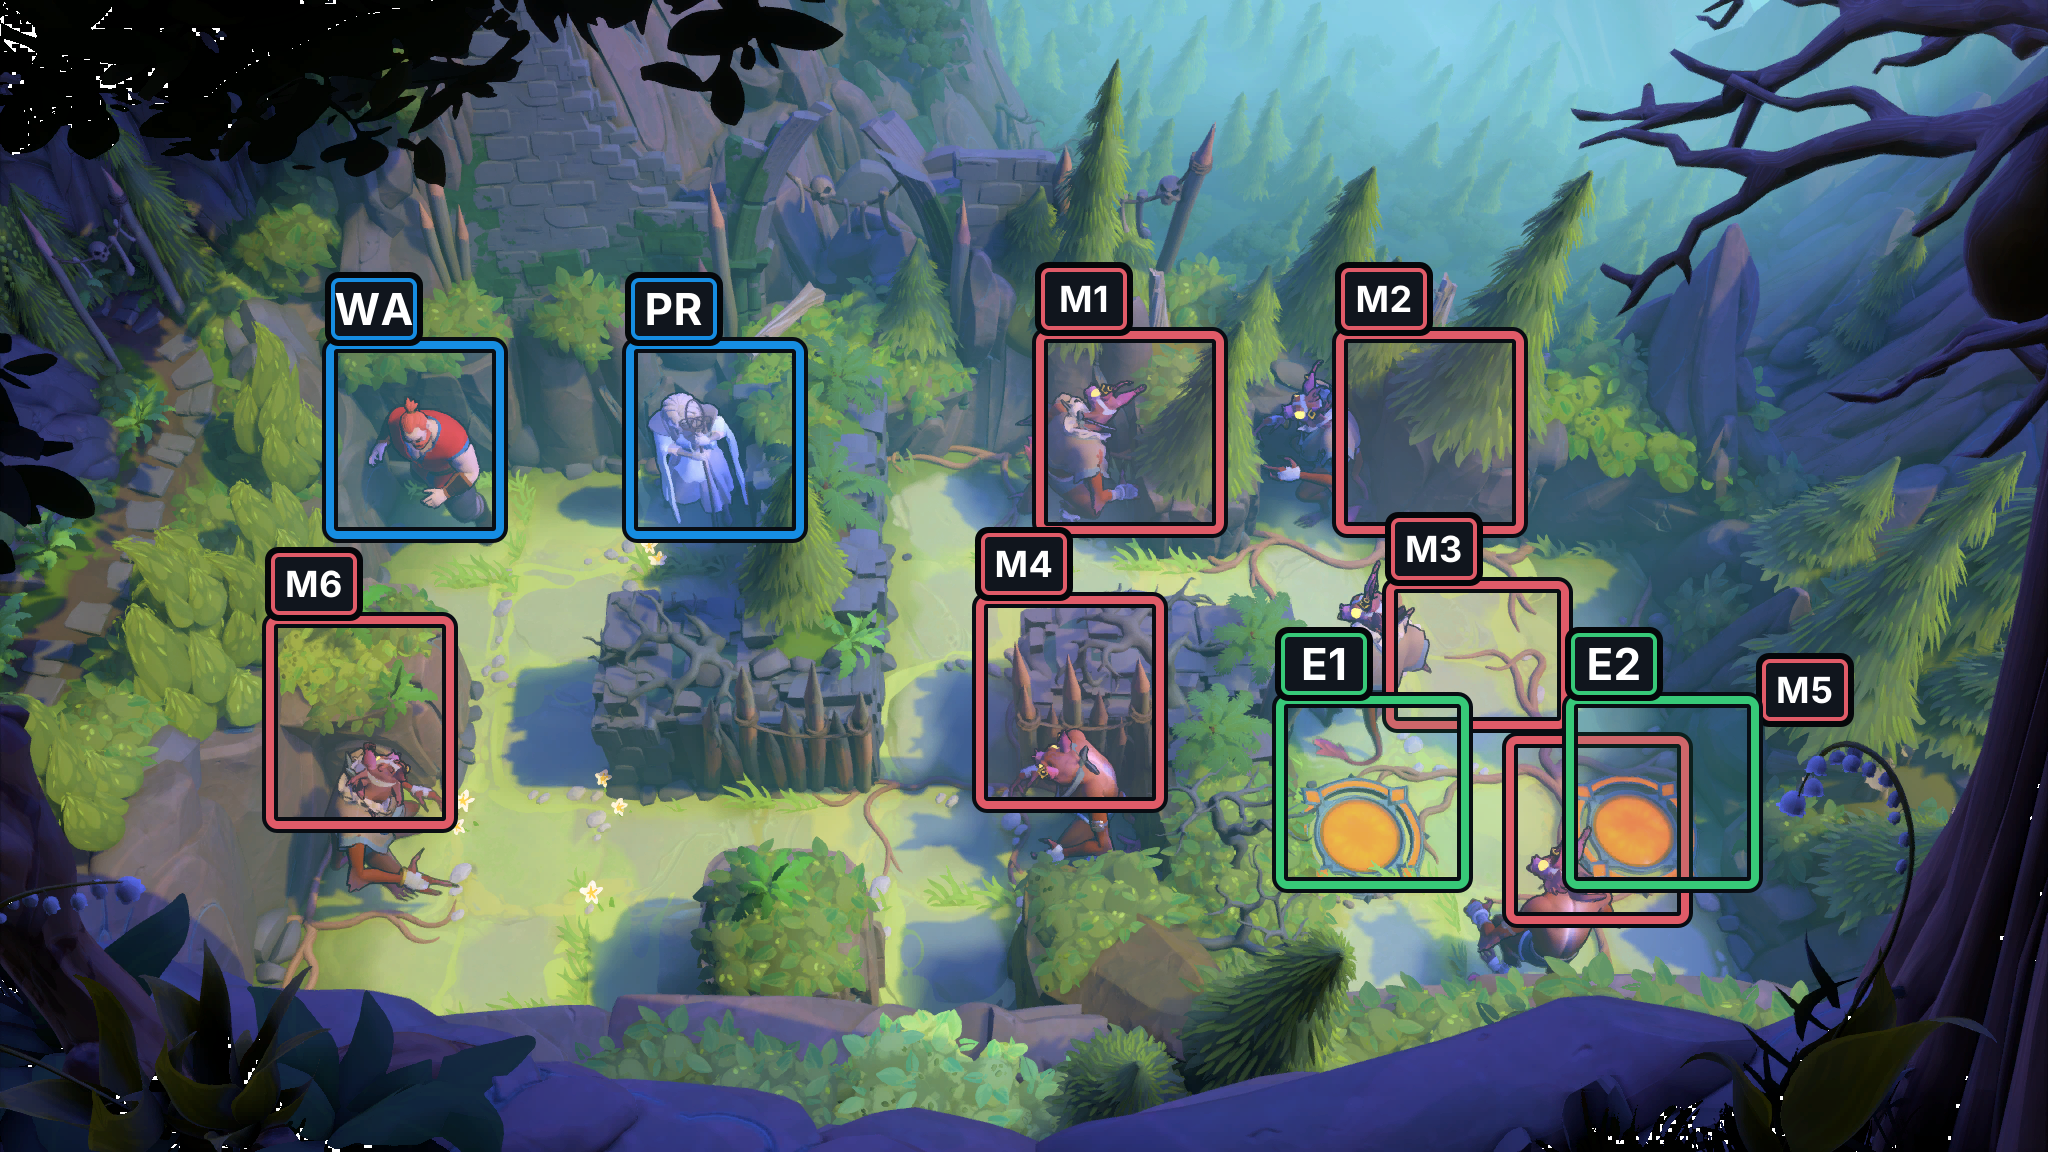
- Exits E1–E2
- WA Warrior
- PR Priestess
- Goblins M1–M6
Hint
Keep the Priestess directly above, below, left or right of the Warrior through the crowded crossing. Her protection covers her and a neighboring ally, not a hero separated diagonally or by a tile. The route reaches the east corridor before splitting toward the exits.
Solution
- Warrior takes
→; Priestess goes↓ ←; Warrior then goes↓ ↓and Priestess→to meet in the lower-left corridor. - Move east in short alternating turns. At step 14, the Warrior crosses the first Goblin lane with the Priestess orthogonally adjacent. By step 18, both are in the east corridor; all six Goblins remain in place.
- Follow the separate exit paths: Priestess to E1, Warrior to E2. Both exits are occupied at step 24.
If the heroes become diagonal or more than one tile apart before a Goblin crossing, Undo and bring the Priestess alongside the Warrior first.
Images show selected video checkpoints; the first frame is the starting position.
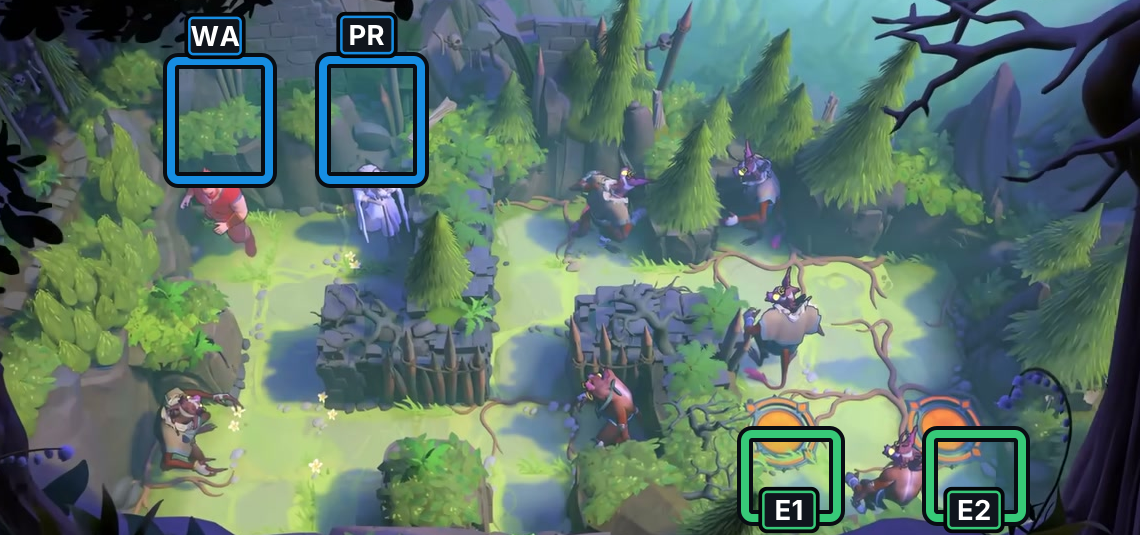
At 15:22, the Warrior and Priestess start together on the left.
Check: Six Goblins occupy the lanes between them and the two exits.
Open full-size image in a new tab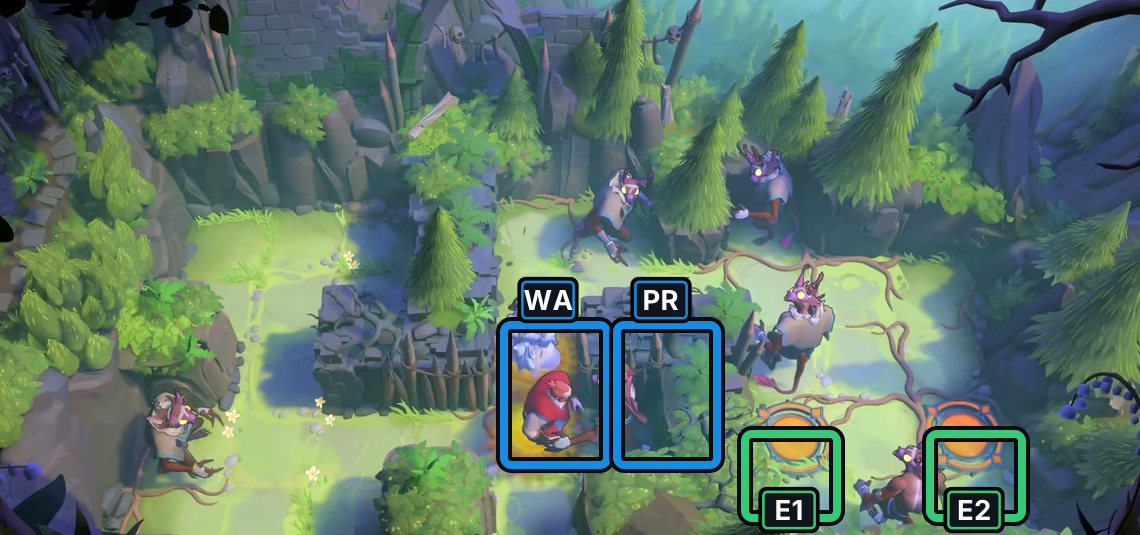
At 15:50, both heroes are close while crossing the Goblin lanes.
Check: The selected scene shows the crossing; it does not recover every movement.
Open full-size image in a new tab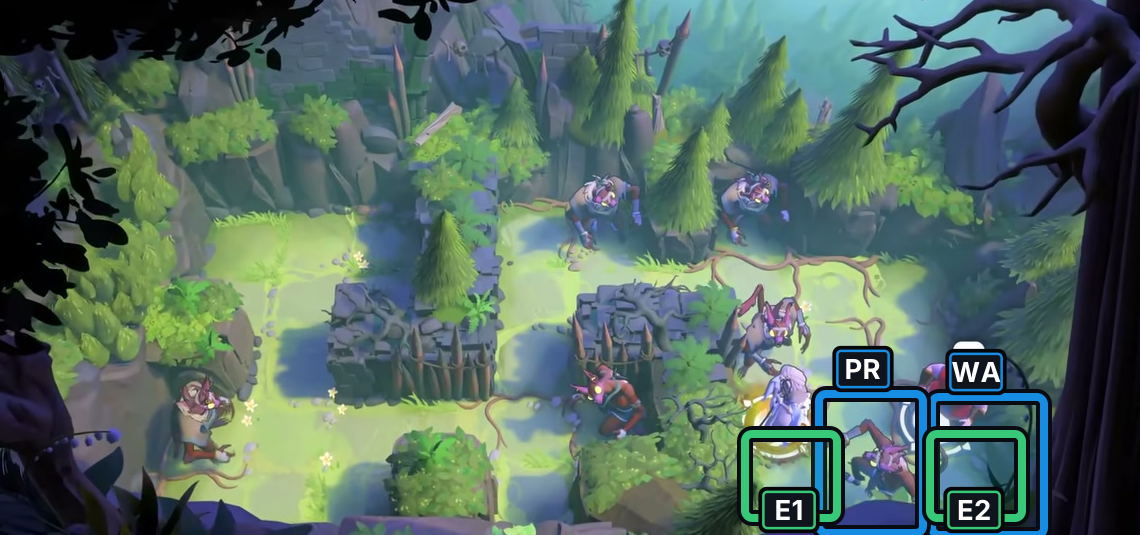
At 16:02, the two heroes reach separate exits.
Check: The video shows both exit locations occupied.
Open full-size image in a new tabFull direction sequence
- WA Warrior
→ - PR Priestess
↓ ← - WA Warrior
↓ ↓ - PR Priestess
→ - WA Warrior
↓ → → - PR Priestess
↑ - WA Warrior
→ ↑ - PR Priestess
→ - WA Warrior
↑ → → → → - PR Priestess
↓ - WA Warrior
→ ↓ - PR Priestess
← - WA Warrior
↓ - PR Priestess
←
Warrior and Priestess: finish the three-pad gate
Section titled “Warrior and Priestess: finish the three-pad gate”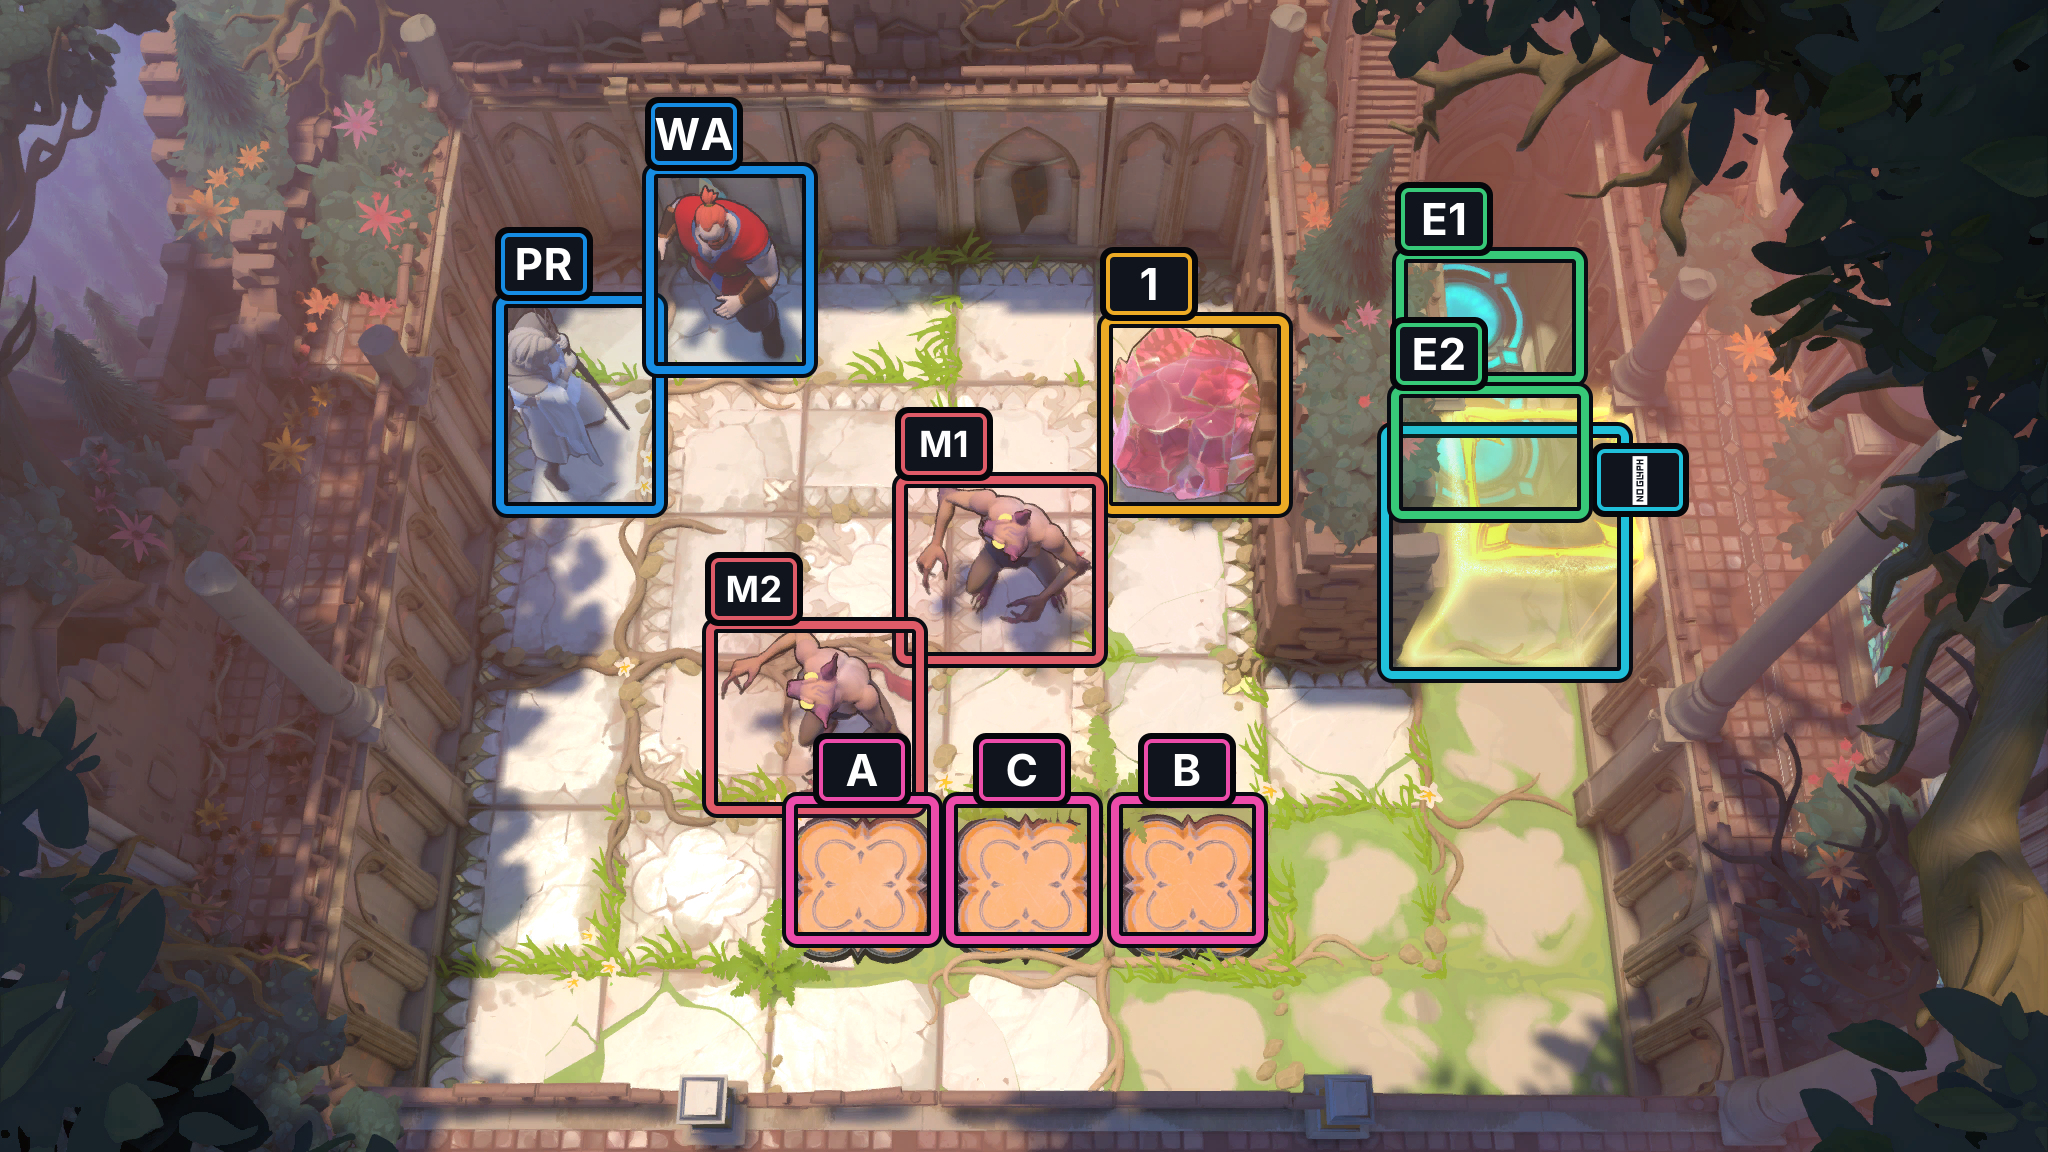
- Crystal 1
- Switches A–C
- Gate
- Exits E1–E2
- PR Priestess
- WA Warrior
- Goblins M1–M2
Hint
The two Goblins can hold the left and right pads while Crystal 1 moves toward the middle pad. Keep each holder in place until the gate opens, then guide both heroes to their separate exits without disturbing the pad arrangement.
Solution
- Priestess starts
→; Warrior goes↓, then Priestess→. Warrior follows↓ → ↑ → ↑ → ↓ ↓ ← ↑ ← ↓through step 15. By then, two outer pads are occupied and C1 has moved into the lower middle lane. - Priestess goes
←; Warrior takes← ↓ ↓ ← ↓ → → → → →. Priestess then goes↑ ←, Warrior↑ → ↑ ←, Priestess↑, and Warrior← ↑ ← ↓. C1 reaches the middle pad and the gate opens at step 37, with the other two pads still weighted. - Priestess goes
↓ ↓; Warrior pushes→ →; Priestess goes↑; Warrior finishes→ ↑ ↑. The Warrior’s pushes carry both heroes through the gate to their separate exits, occupied at step 45.
If a Goblin leaves a pad or Crystal 1 misses the middle pad, Undo to the last handoff and restore the three occupied pads before going through the gate.
Images show selected video checkpoints; the first frame is the starting position.
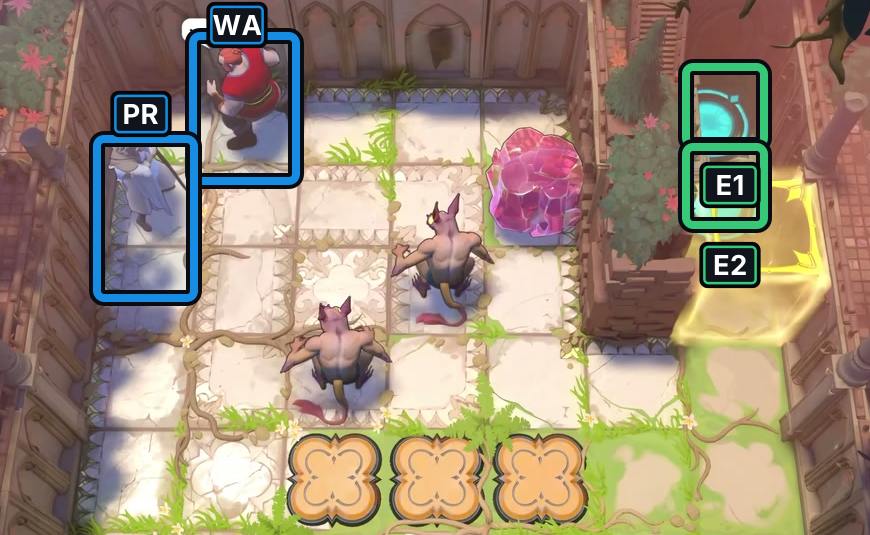
At 16:10, the Warrior and Priestess begin on the left side.
Check: Crystal 1, two Goblins, three pads, the gate and both exits are visible.
Open full-size image in a new tab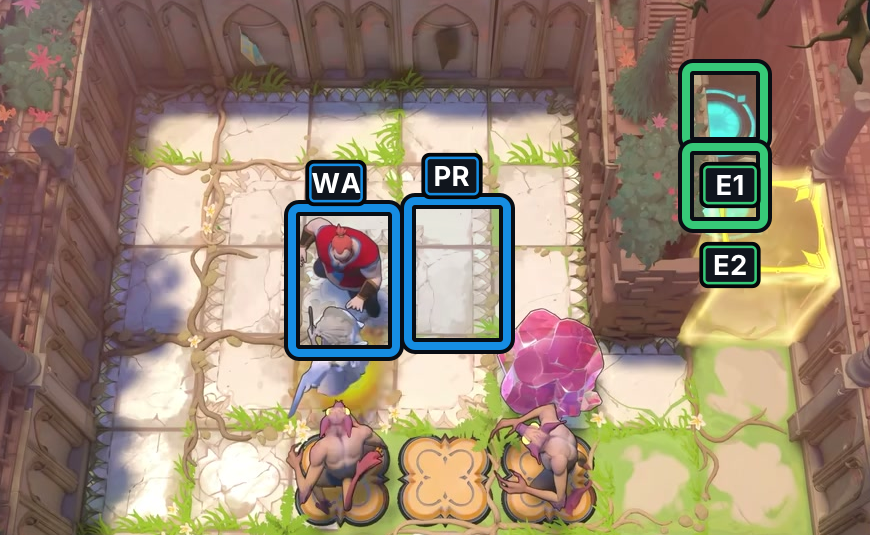
At 16:35, the heroes are working around the crystal and pad row.
Check: Goblins remain visible beside the three pads in this selected frame.
Open full-size image in a new tab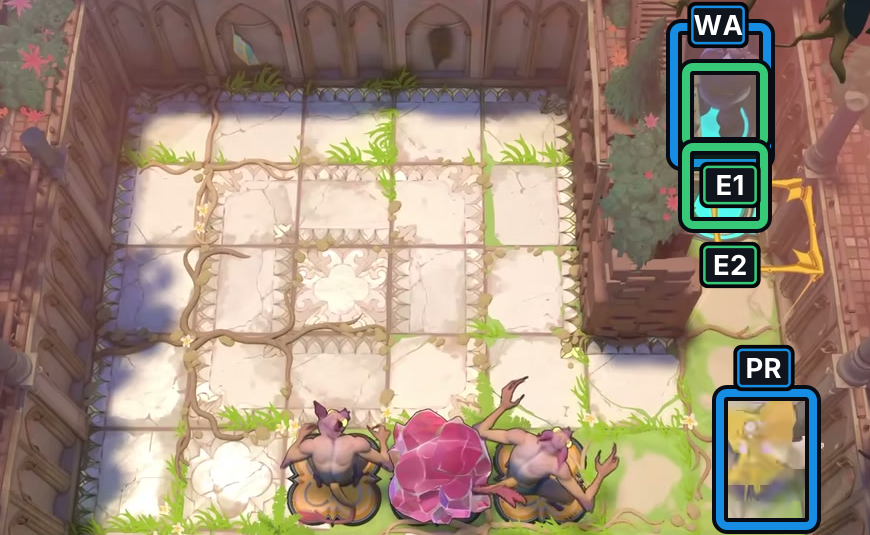
At 16:58, the heroes approach the right-side exit area.
Check: The footage shows progress toward the exits, but not a clear simultaneous finish.
Open full-size image in a new tab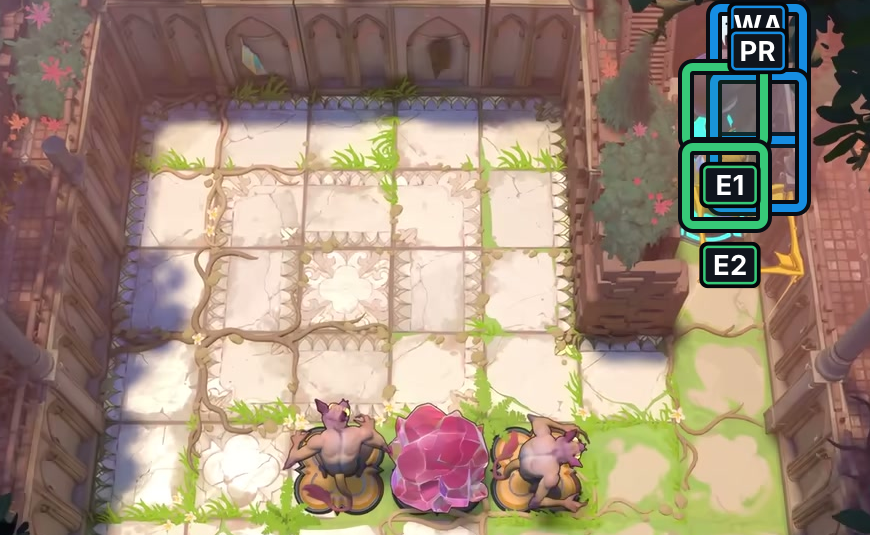
At 17:00, both heroes are still near the right-side exits.
Check: The selected frame does not establish exact exit occupancy or gate timing.
Open full-size image in a new tabThe selected P3 frames show the start and movement toward the exits, but not a clear simultaneous finish. The route above remains the separate bounded helper replay.
Full direction sequence
- PR Priestess
→ - WA Warrior
↓ - PR Priestess
→ - WA Warrior
↓ → ↑ → ↑ → ↓ ↓ ← ↑ ← ↓ - PR Priestess
← - WA Warrior
← ↓ ↓ ← ↓ → → → → → - PR Priestess
↑ ← - WA Warrior
↑ → ↑ ← - PR Priestess
↑ - WA Warrior
← ↑ ← ↓ - PR Priestess
↓ ↓ - WA Warrior
→ → - PR Priestess
↑ - WA Warrior
→ ↑ ↑
 Thief and Priestess: weigh two switches
Section titled “Thief and Priestess: weigh two switches”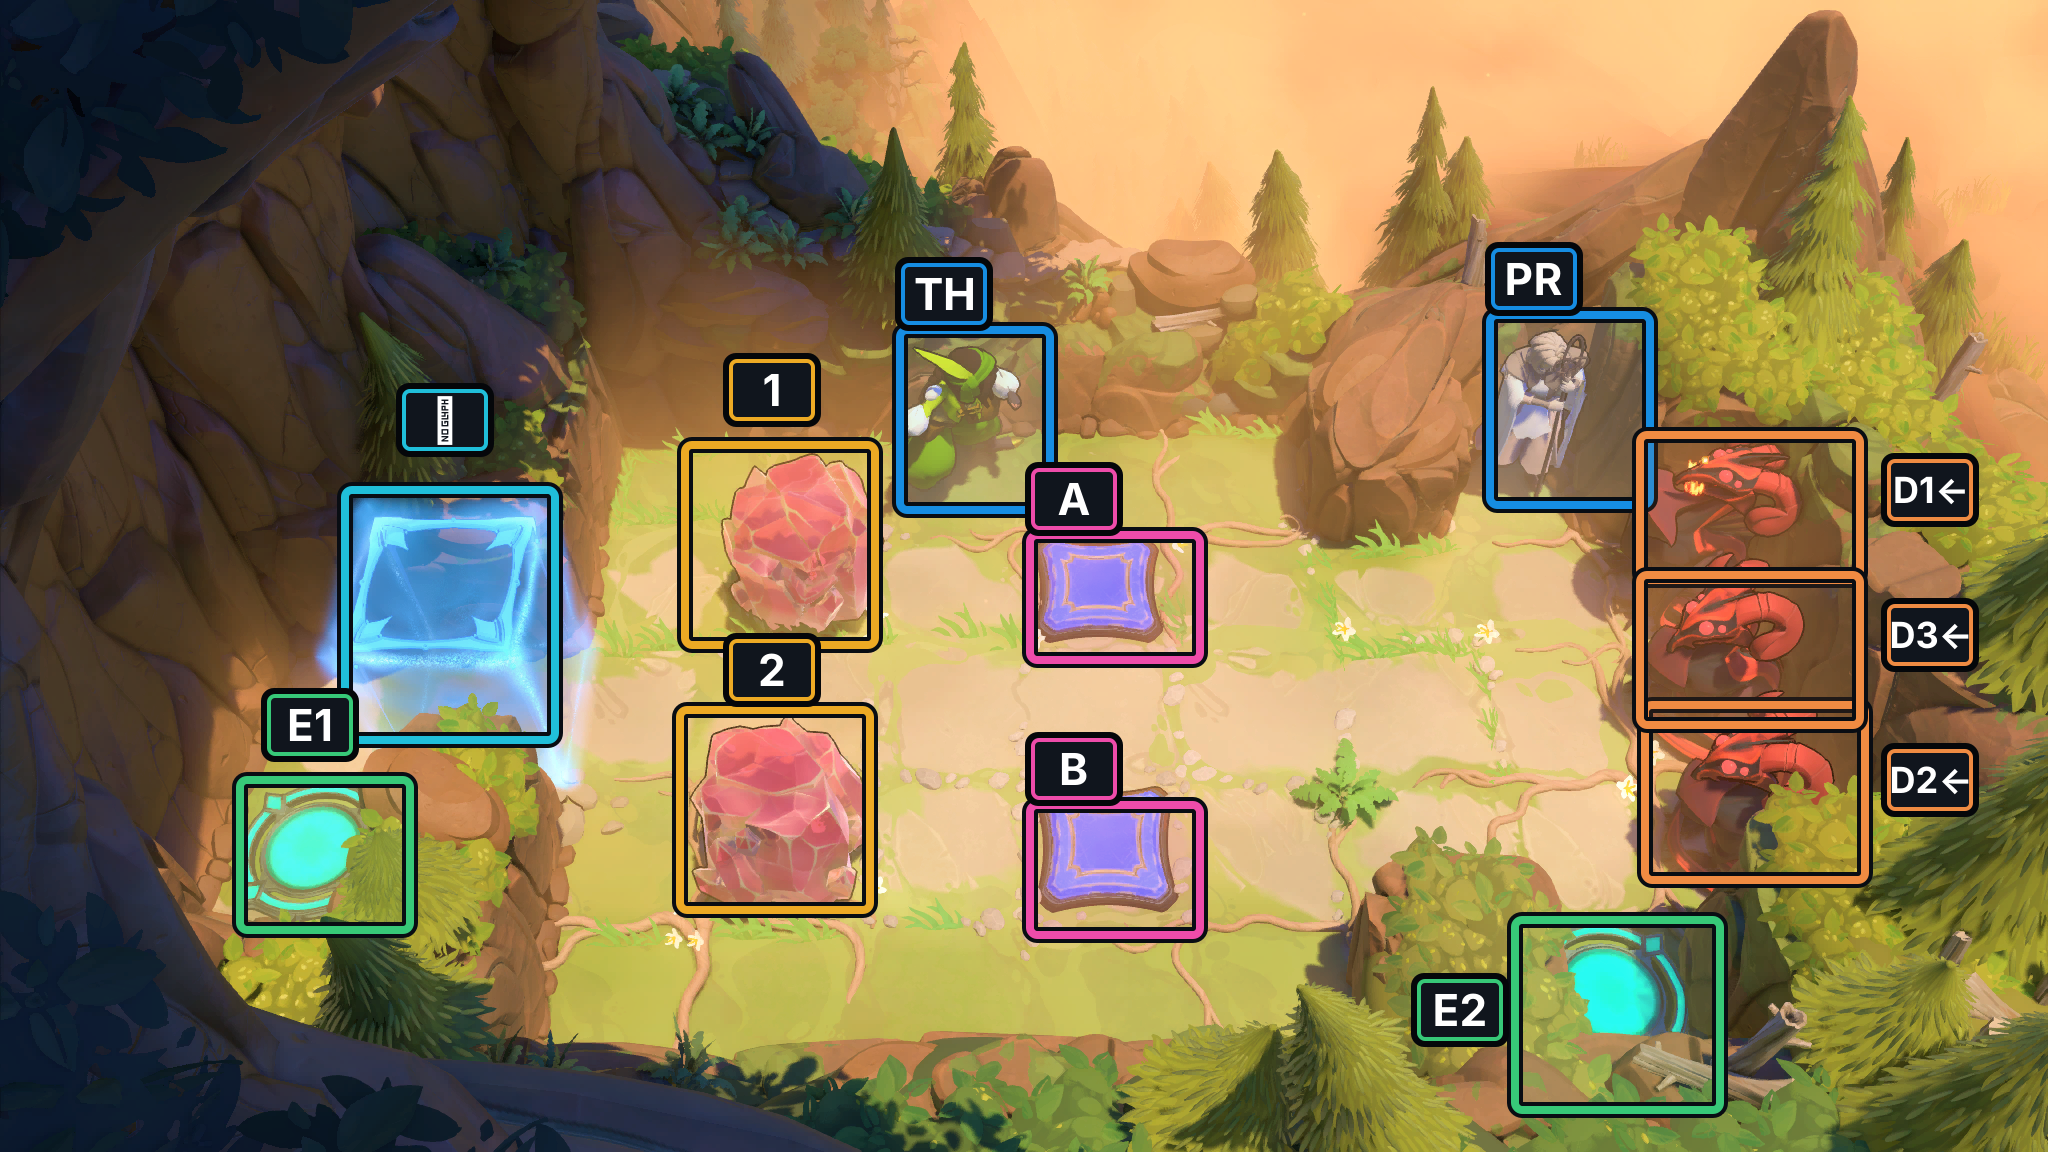
- Crystals 1–2
- Switches A–B
- Gate
- Exits E1–E2
- TH Thief
- PR Priestess
- Dragons D1–D3; arrows show initial fire direction
Hint
The Thief steps onto switch A before the next rightward pull places C1 there. Later he reaches B, opening the gate while C2 is still beside it; the following pull puts C2 on B so it stays weighted as he leaves. The Priestess takes the other route to her exit.
Solution
- Priestess starts
↓; Thief goes↓ → →. At step 3, the Thief himself stands on A while C1 is still one tile to its left; the next rightward pull at step 4 places C1 on A. - The Thief follows the middle route to B. At step 19 he stands on B while C2 remains one tile to its left, opening the gate; the rightward pull at step 20 moves C2 onto B to keep it weighted after he leaves. The Dragons stay in their starting cells, and their left-facing fire repeatedly reaches the Priestess.
- Leave C1 and C2 on A and B as the Thief takes the left exit and the Priestess the right exit. Her protection matters throughout the route because the Dragon fire reaches her repeatedly.
If C1 or C2 fails to land on its switch on the following pull, Undo to that pull before leaving the tile and place the crystal on the pad first.
Images show selected video checkpoints; the first frame is the starting position.
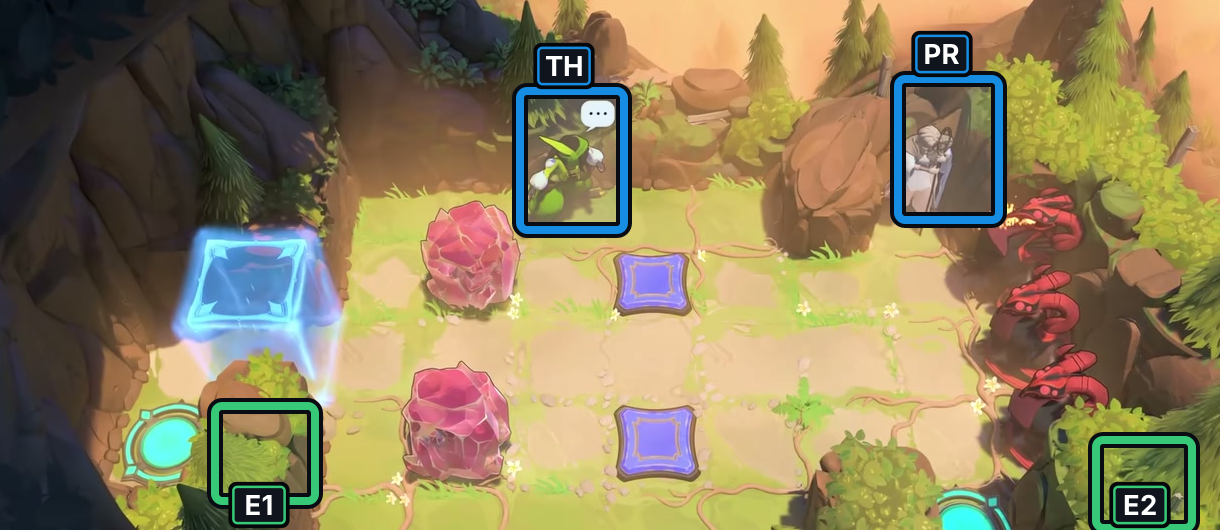
At 17:05, the Thief and Priestess begin with three Dragons across the right lane.
Check: Two Crystals, two switches and both exits are visible.
Open full-size image in a new tab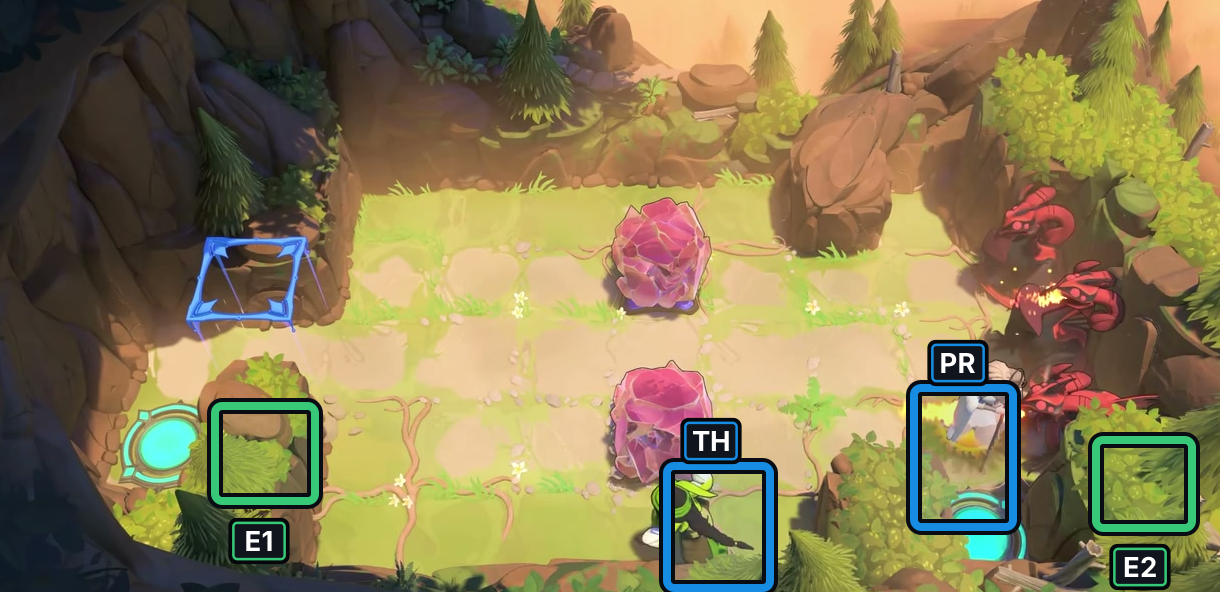
At 17:20, Dragon fire crosses the Priestess’s lane while the Thief is lower in the room.
Check: Three Dragons remain visible; this is a selected combat state, not a finish.
Open full-size image in a new tabThe selected P3 states show the start and later Dragon-fire lane, but not a clear simultaneous exit finish. The route above remains the separate bounded helper replay.
Full direction sequence
- PR Priestess
↓ - TH Thief
↓ → → ↑ ← ← ↓ - PR Priestess
↓ - TH Thief
↓ ← ← ↓ ↓ → → - PR Priestess
↓ - TH Thief
↑ → → ↓ ← ← ↑ - PR Priestess
↑ - TH Thief
↑ ← ← ← ← ↓ - PR Priestess
↓ ↓
Thief and Priestess: stay together through ten Goblins
Section titled “Thief and Priestess: stay together through ten Goblins”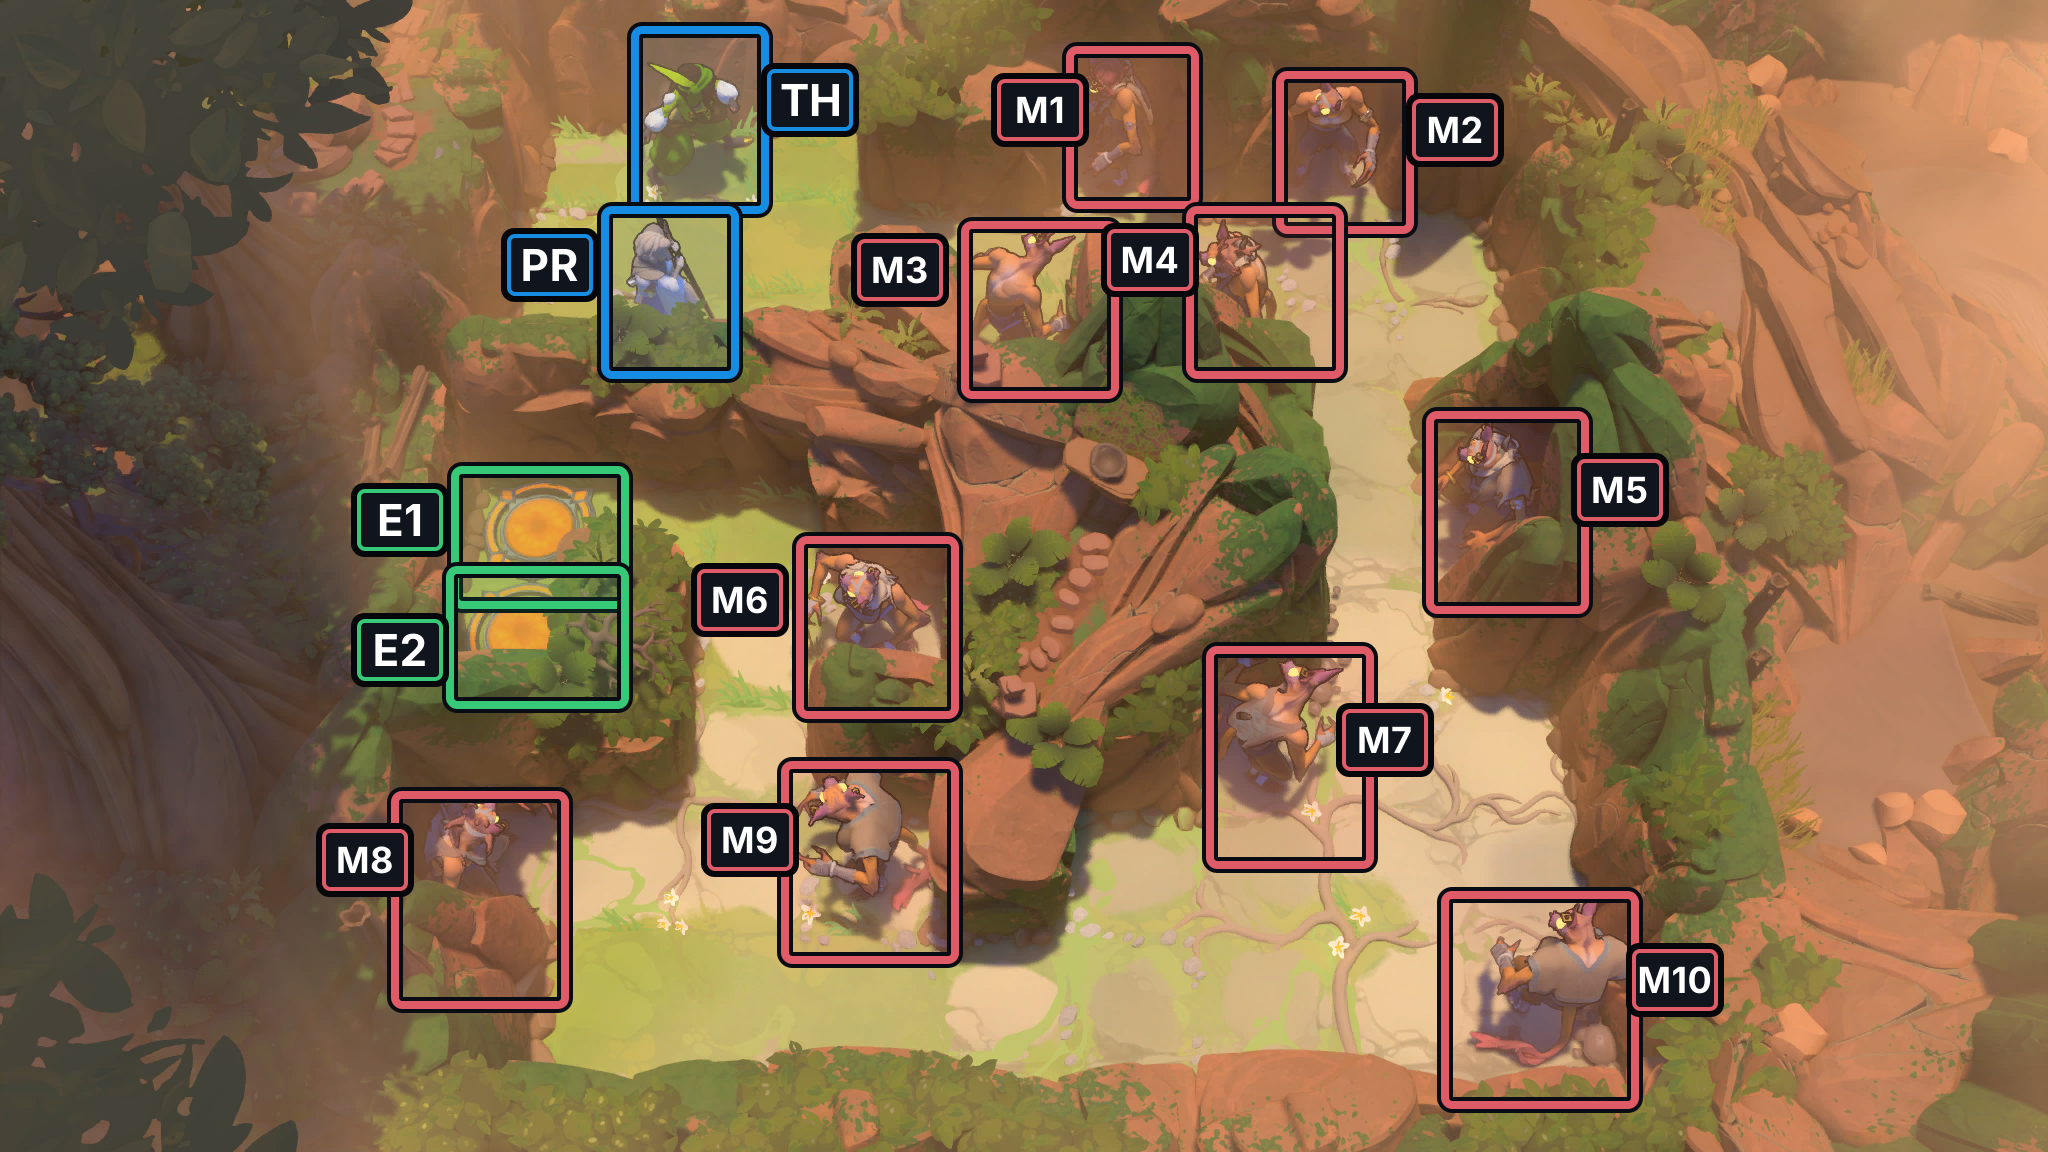
- Exits E1–E2
- TH Thief
- PR Priestess
- Goblins M1–M10
Hint
Keep the Priestess directly above, below, left or right of the Thief as you weave between Goblin groups. Her protection covers her and a neighboring ally, not the Goblins; use the role handoffs to keep the protected hero in the narrow crossing.
Solution
- Thief goes
↓ →; Priestess goes↑; Thief crosses the upper passage with→ → → → → →, then takes↓ ← ↓ ↓ ↓ ↓ ↓around the right-hand bend. At step 16, he reaches the lower end of that lane while the Priestess follows behind. - Priestess goes
→ ↓; Thief goes← ← ↓; Priestess goes↓; Thief takes← ← ← ←to the lower-left branch by step 26. Keep the Priestess alongside him through the Goblin crossings. - Priestess goes
↑, Thief→, Priestess←, Thief↑ ↑, Priestess→, then Thief↑ ↑ ←. Priestess goes↑; Thief finishes← ↓, and Priestess←enters the adjacent exit. At step 39 both exits are occupied; all ten Goblins remain alive in their starting cells.
If the heroes separate diagonally near a Goblin, Undo to the last handoff and restore orthogonal adjacency before moving through that lane.
Images show selected video checkpoints; the first frame is the starting position.
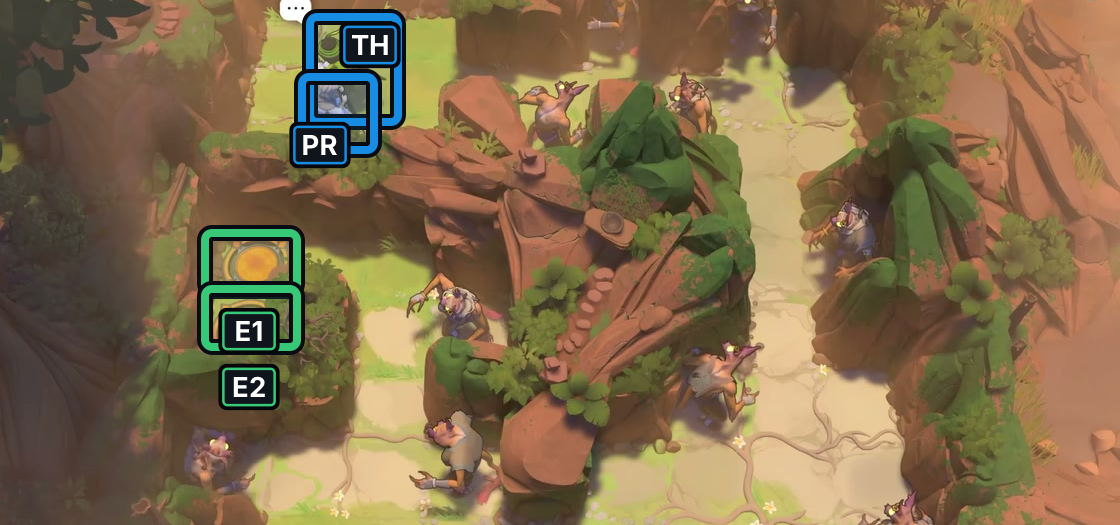
At 17:40, the Thief and Priestess enter the Goblin-filled room.
Check: Ten Goblins and two left-side exits are visible.
Open full-size image in a new tab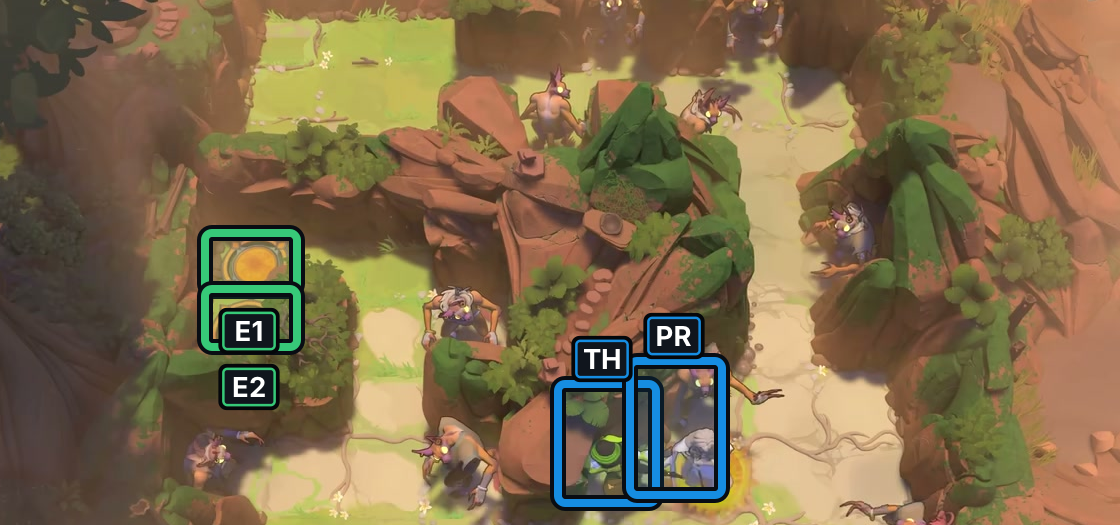
At 18:00, the heroes are together on the lower-right route.
Check: Goblins remain around the lanes; inputs and protection timing are not visible.
Open full-size image in a new tab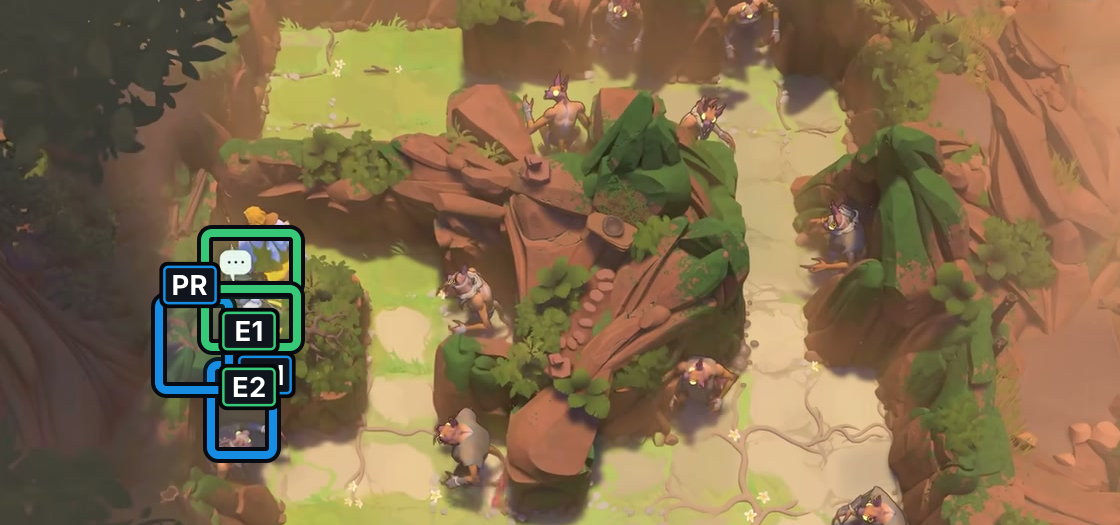
At 18:14, both heroes are in the left-side exit area.
Check: The next frames transition away; this selected frame does not prove exact tile occupancy.
Open full-size image in a new tabThe P3 sequence returns to the Overworld after the selected lower-right state; it does not establish both characters occupying the exits together. The route above remains the separate bounded helper route.
Full direction sequence
- TH Thief
↓ → - PR Priestess
↑ - TH Thief
→ → → → → → ↓ ← ↓ ↓ ↓ ↓ ↓ - PR Priestess
→ ↓ - TH Thief
← ← ↓ - PR Priestess
↓ - TH Thief
← ← ← ← - PR Priestess
↑ - TH Thief
→ - PR Priestess
← - TH Thief
↑ ↑ - PR Priestess
→ - TH Thief
↑ ↑ ← - PR Priestess
↑ - TH Thief
← ↓ - PR Priestess
←
Sources and credits
Selected room layouts and entity names: PC r67121 game files. Priestess protection: official PlayStation hands-on notes. Movement and monster-interaction context: the community PuzzleScript port. Creator video: 塞德莎, Heroes 2: Monsters, part 3. Board artwork: Thekla, Inc.
- Full puzzle candidate inventory (PC r67121) — Extracted data
- Selected Heroes 2 monster-room layouts and player-action traces (PC r67121) — Extracted data
- Joric's PuzzleScript movement-rule port — Documentation · commit-4e6e0784727d95c7337d50f6d5b3ef912aa0e8ae
- Joric's PuzzleScript Goblin interaction rules — Documentation · commit-4e6e0784727d95c7337d50f6d5b3ef912aa0e8ae
- Character portraits and selected puzzle-board images (PC r67121) — Extracted data
- [North] Hero 2: Monster [North 3] / 【北】英雄2:怪物[北3] — Observed in-game
- Priestess heroes2_13 selected P3 screenshots — Observed in-game · screenshots-reviewed-2026-10-21
- Priestess heroes2_14 selected P3 screenshots — Observed in-game · screenshots-reviewed-2026-10-21
- Priestess heroes2_15 selected P3 screenshots — Observed in-game · screenshots-reviewed-2026-10-21
- Priestess heroes2_reprise selected P3 screenshots — Observed in-game · screenshots-reviewed-2026-10-21
- Priestess heroes2_16v4 selected P3 screenshots — Observed in-game · screenshots-reviewed-2026-10-21
- Priestess heroes2_18 selected P3 screenshots — Observed in-game · screenshots-reviewed-2026-10-21
- PlayStation Blog hands-on report — Documentation · published-2026-07-21
- Installed PC gameplay keymap (r67121 local copy) — Extracted data · sha256-3f5c1ce6b96f3d30da31548f5e93c821f2ec50d668d55571316ef1aa2ab6d544
Unofficial fan wiki, not affiliated with Thekla, Inc. / Arc Games / Gamirror Games. Game content belongs to its owners.
Comments & feedback
Share a tip or suggest a correction. Comments are public. Guest names are unverified; verified accounts show their account username. All language pages share this discussion. Please keep personal information private.