
 Order of the Sinking Star
Opening Heroes puzzles

From Crossroads, head north to the board titled The Hearty Heroes of Hauling; the area reference lists it as Heroes of Hauling. After the opening cage has risen and the character can move, match the board to one of the starting pictures below. Use the crystal, switch and exit positions to identify the room, then select the matching starting layout before making moves. Restart restores the current room after you have moved its crystals; it cannot turn a different room into the pictured layout.
Each annotated map marks the start, numbered crystals, switches, gate and exit. Crystal numbers follow the map labels; use them to track a piece through the steps. Arrows below name directions, not keys; use the movement keys or stick currently bound in your controls. A normal direction moves one tile, while the  Wizard can swap with a farther visible object.
For rooms that ask you to move two characters, continue with the team walkthroughs.
 Warrior: two-block corridor
Section titled “Warrior: two-block corridor”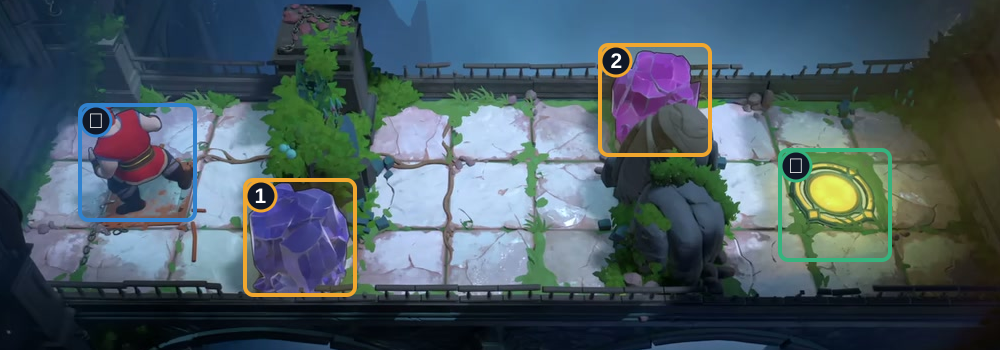
- Start
- Crystals 1–2
- Exit
Hint
The two lanes are separated by a blocked column. One push does not create the turn you need: leave room to enter the upper crossing after the lower crystal moves. If the crossing is blocked, undo until the turn is clear.
Step-by-step solution
Images show selected video checkpoints; the first frame is the starting position.
Start with the Warrior on the left.
Check: Blue Crystal 1 blocks the lower gap; purple Crystal 2 blocks the upper gap.
Open full-size image in a new tab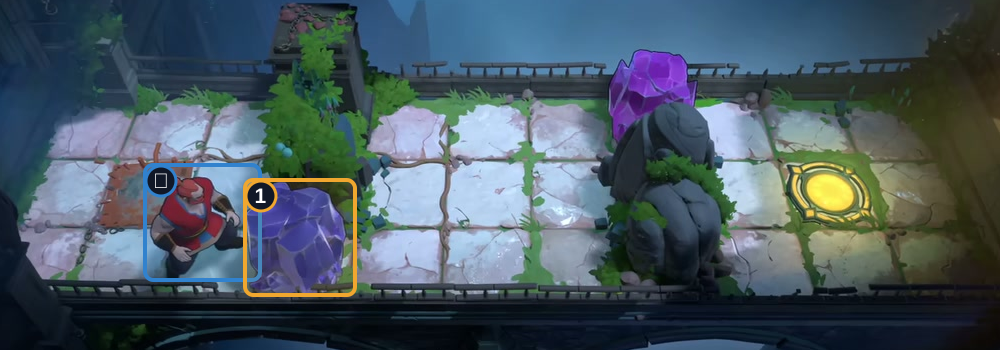
Move right, then down.
Check: Stand immediately left of blue Crystal 1.
Open full-size image in a new tab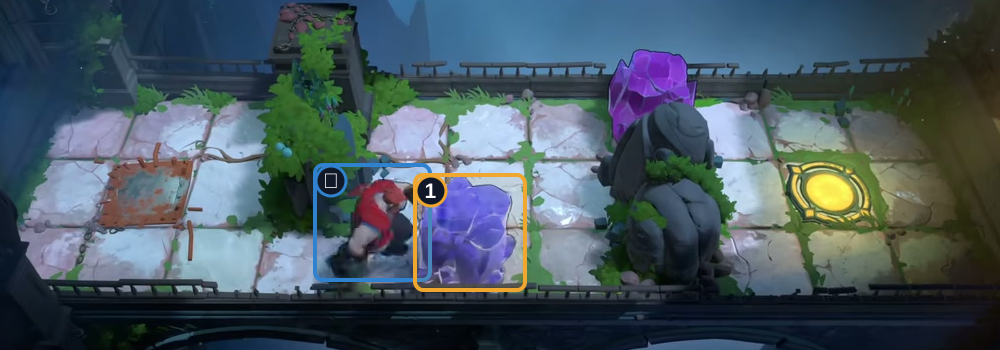
Push Crystal 1 right twice.
Check: The Warrior is past the first divider, with a clear path upward.
Open full-size image in a new tab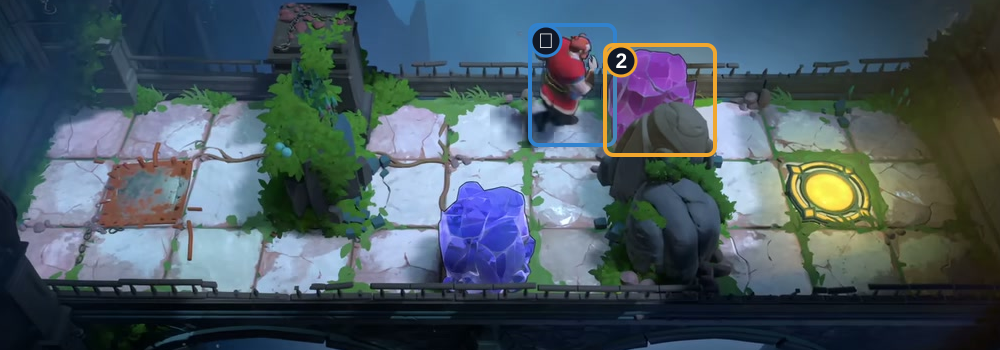
Go up twice, then right twice.
Check: Stand immediately left of purple Crystal 2.
Open full-size image in a new tab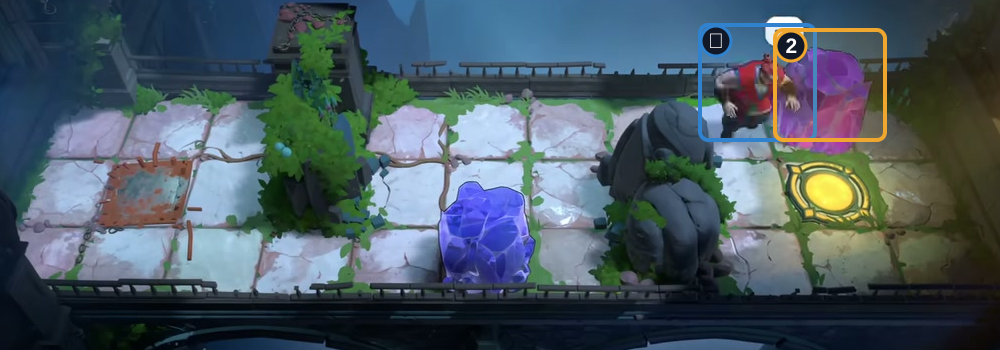
Push Crystal 2 right twice.
Check: The Warrior is past the second divider. The exit is below and to the right.
Open full-size image in a new tab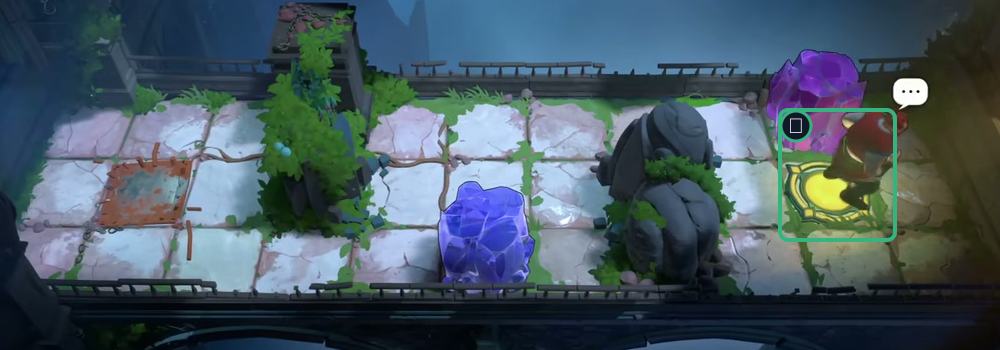
Move down, then right onto the glowing exit.
Check: The Warrior is on the exit; both crystals remain on the board.
Open full-size image in a new tabFull direction sequence
→ ↓ → → ↑ ↑ → → → → ↓ →Warrior: six chambers and crystal trains
Section titled “Warrior: six chambers and crystal trains”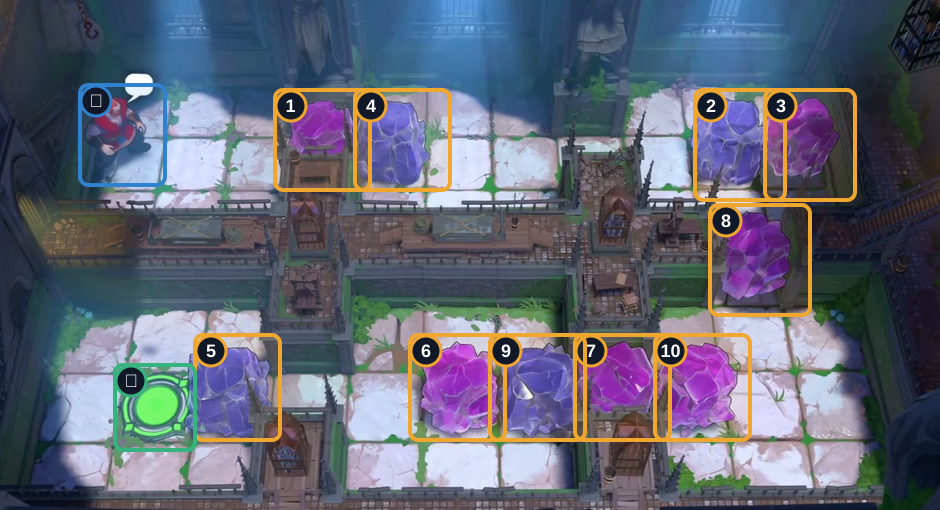
- Start
- Crystals 1–10
- Exit
Hint
Start with the two-crystal train beside the entrance. Work through the upper-right passages before bringing the long crystal row back toward the lower-left exit.
Step-by-step solution
Images show selected video checkpoints; the first frame is the starting position.
Start with the Warrior in the upper-left room.
Check: Find the green exit in the lower-left room.
Open full-size image in a new tab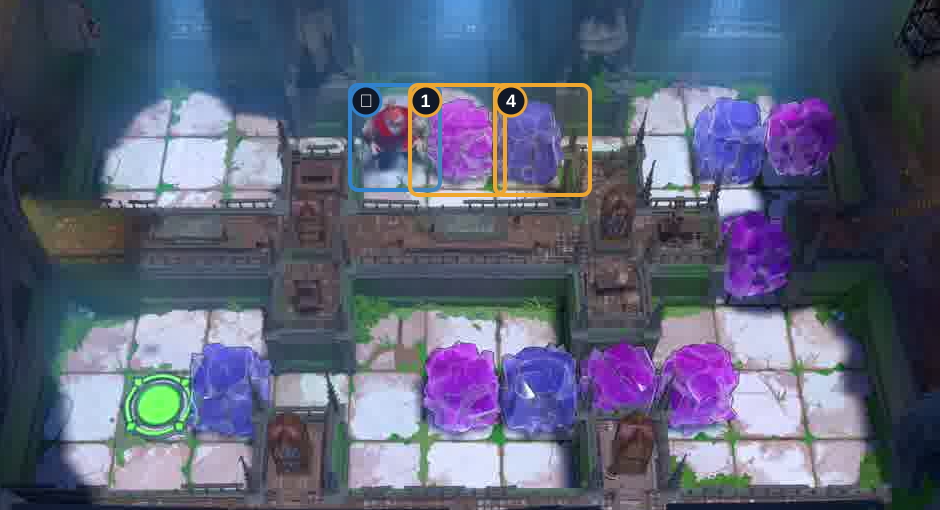
Move right twice, then push Crystals 1 and 4 right twice.
Check: Both crystals are in the upper-middle room, with the Warrior just behind Crystal 1.
Open full-size image in a new tab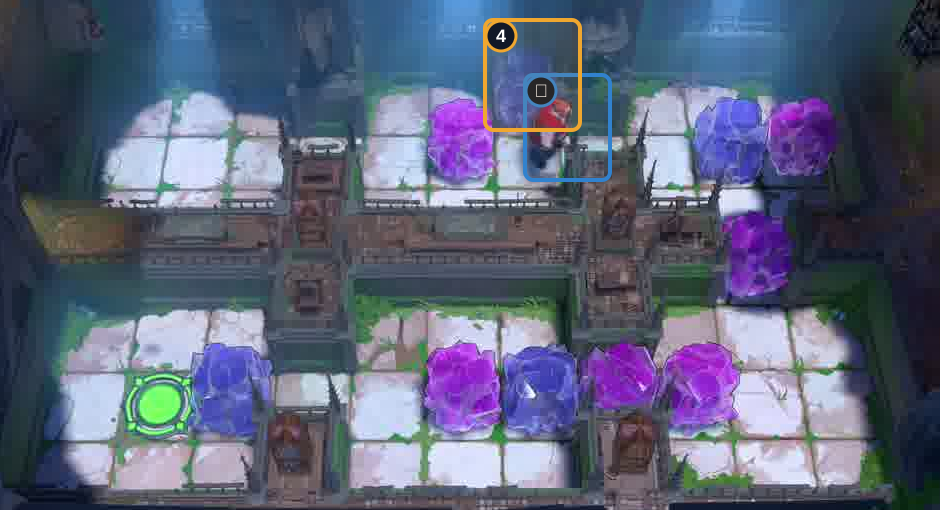
Go down once and right twice, then push Crystal 4 up once.
Check: Crystal 4 is on the top row, leaving the path to the right clear.
Open full-size image in a new tab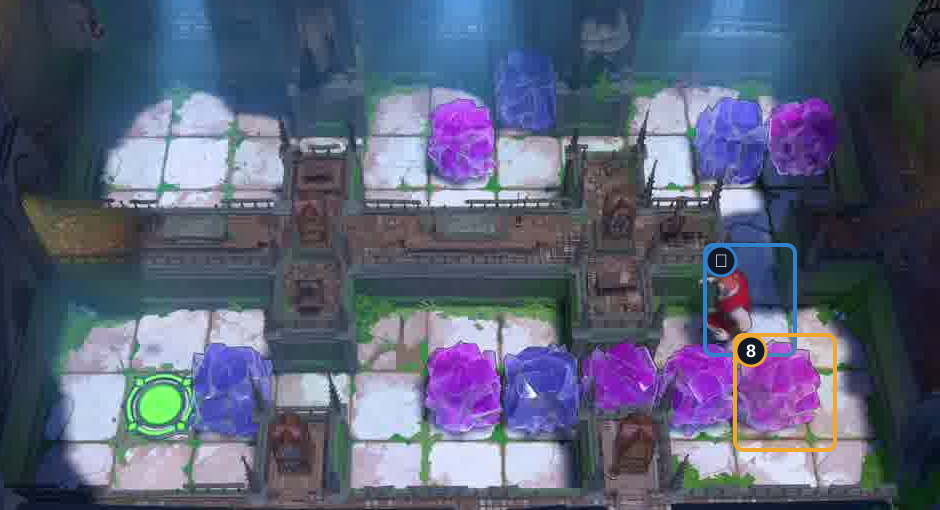
Go right twice, down once, then right once. Push Crystal 8 down twice.
Check: The Warrior stands just above Crystal 8 in the lower-right room.
Open full-size image in a new tab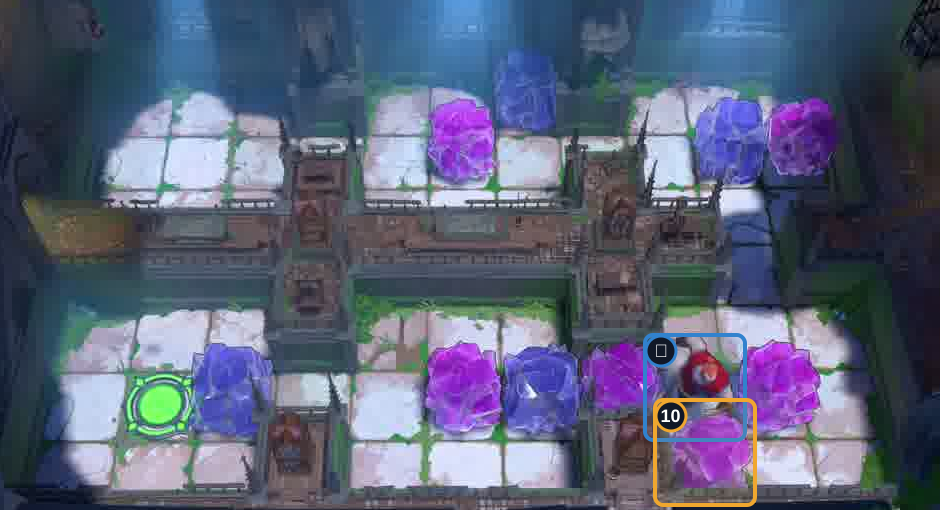
Move left once, then push Crystal 10 down once.
Check: Crystal 10 is on the lowest row. The Warrior is beside the three-crystal train.
Open full-size image in a new tab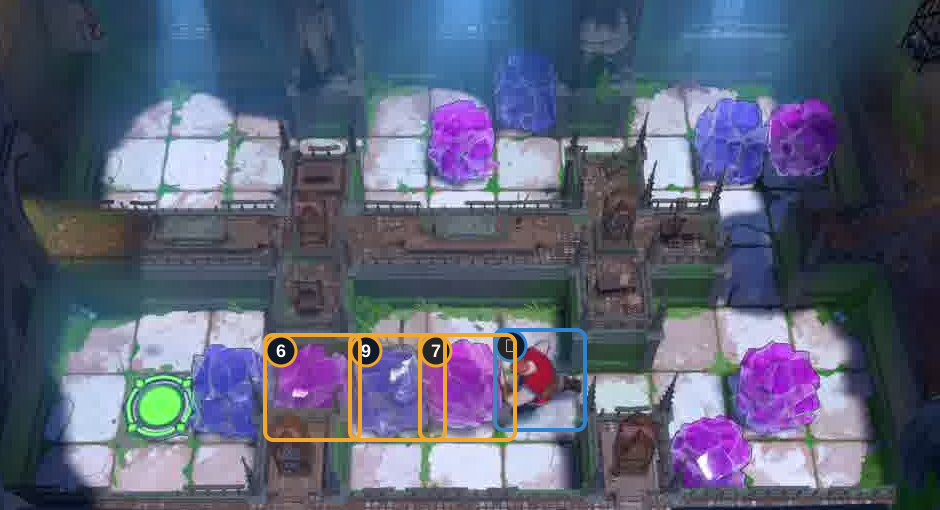
Push the highlighted row of three crystals left twice.
Check: Crystals 7, 9 and 6 have all moved two tiles left.
Open full-size image in a new tab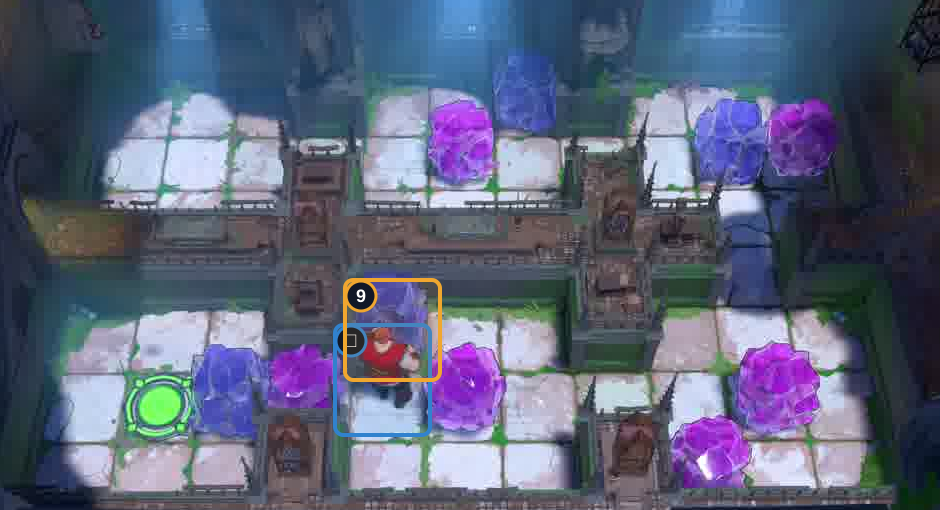
Go down once and left twice, then push Crystal 9 up once.
Check: Crystal 9 is above the row, leaving a gap between Crystals 6 and 7.
Open full-size image in a new tab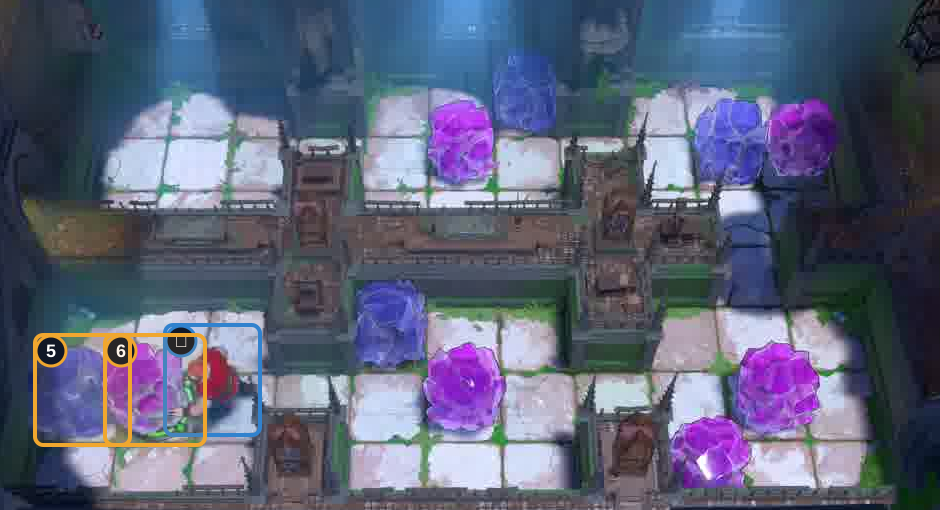
Push Crystals 6 and 5 left twice.
Check: Crystal 6 now covers the green exit; Crystal 5 is on the far-left tile.
Open full-size image in a new tab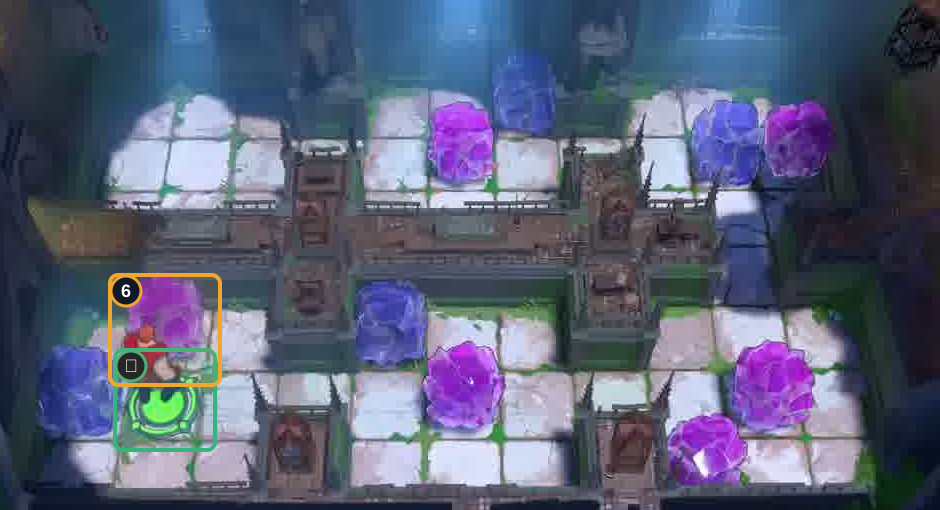
Go down once, then left once. Push Crystal 6 up once to step onto the exit.
Check: Crystal 6 is above the exit; all ten crystals remain on the board.
Open full-size image in a new tabFull direction sequence
→ → → → ↓ → → ↑ → → ↓ → ↓ ↓ ← ↓ ← ← ↓ ← ← ↑ ← ← ↓ ← ↑Warrior: one switch and one gate
Section titled “Warrior: one switch and one gate”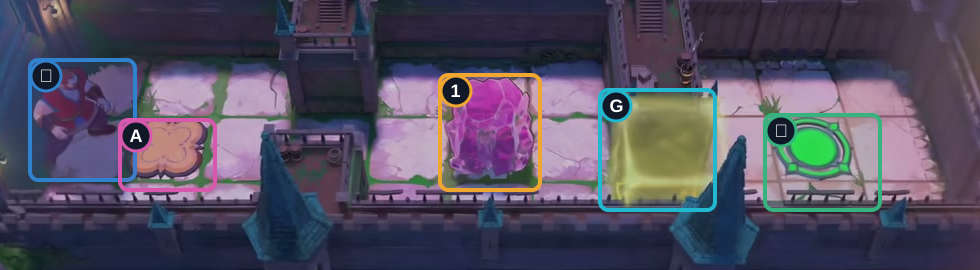
- Start
- Crystal 1
- Switch A
- Gate
- Exit
Hint
The starting switch needs a crystal to hold it. Find a route to the far side of the central crystal, then line it up with switch A.
Step-by-step solution
Images show selected video checkpoints; the first frame is the starting position.
Start at the left side of the board.
Check: Switch A is empty and the gate is closed.
Open full-size image in a new tab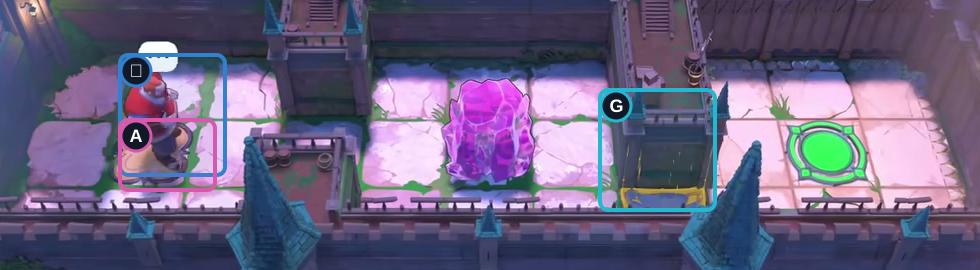
Move right once onto Switch A.
Check: The gate opens while the Warrior stands on A.
Open full-size image in a new tab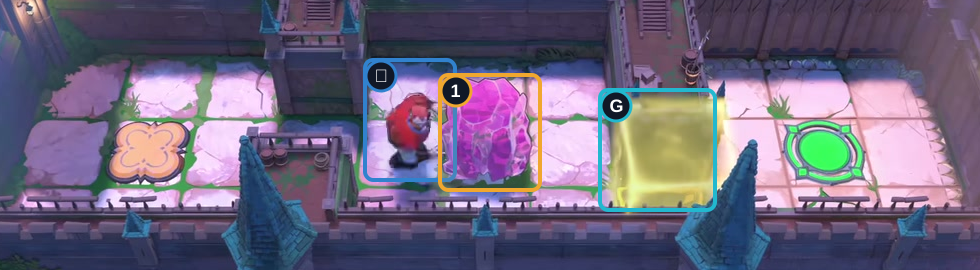
Move right three tiles, stopping just before Crystal 1.
Check: The switch is empty again, so the gate closes.
Open full-size image in a new tab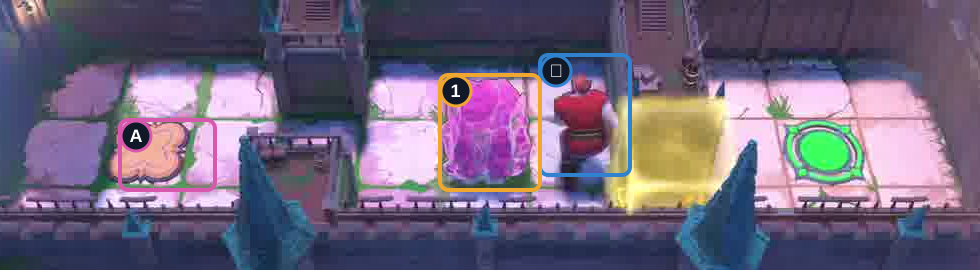
Go down once, right twice, then up once.
Check: The Warrior is immediately right of Crystal 1.
Open full-size image in a new tab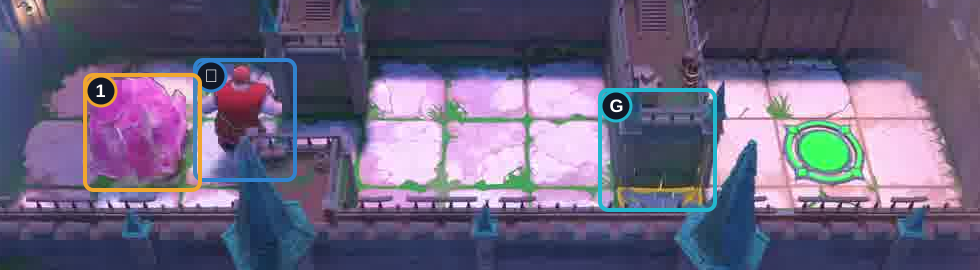
Push Crystal 1 left four times onto Switch A.
Check: Crystal 1 holds A down and the gate stays open.
Open full-size image in a new tab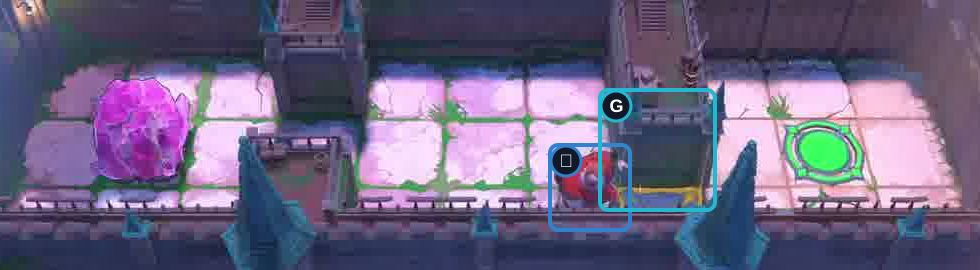
Go right twice, up once and right twice, then down twice.
Check: The Warrior is beside the open gate, ready to cross.
Open full-size image in a new tab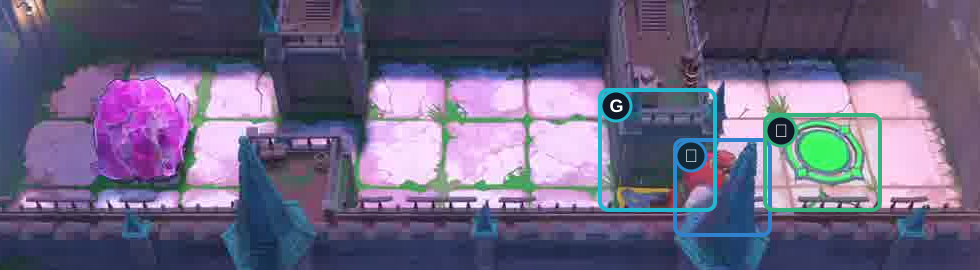
Move right twice through the gate.
Check: The Warrior is just beyond the gate, partly behind the foreground tower.
Open full-size image in a new tab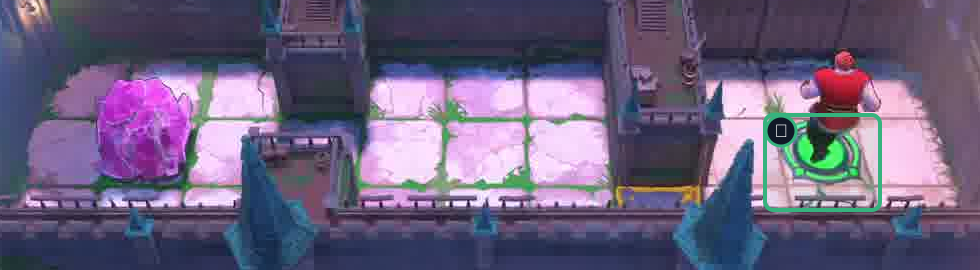
Move right twice, then up once and left onto the exit.
Check: The Warrior is on the exit; Crystal 1 remains on A.
Open full-size image in a new tabFull direction sequence
→ → → → ↓ → → ↑ ← ← ← ← → → ↑ → → ↓ ↓ → → → → ↑ ←Warrior: three switches and thorn blockers
Section titled “Warrior: three switches and thorn blockers”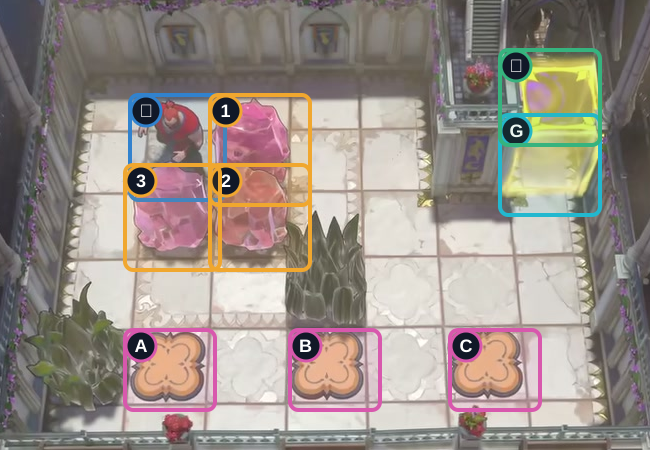
- Start
- Crystals 1–3
- Switches A–C
- Gate
- Exit
Hint
Place Crystal 1 on switch C, then move Crystal 2 onto B and Crystal 3 onto A. All three switches open the gate; keep a clear lane for the Warrior to reach the exit.
Step-by-step solution
Images show selected video checkpoints; the first frame is the starting position.
Start with the Warrior at the upper-left.
Check: Three crystals, switches A–C, the gate and exit are shown.
Open full-size image in a new tab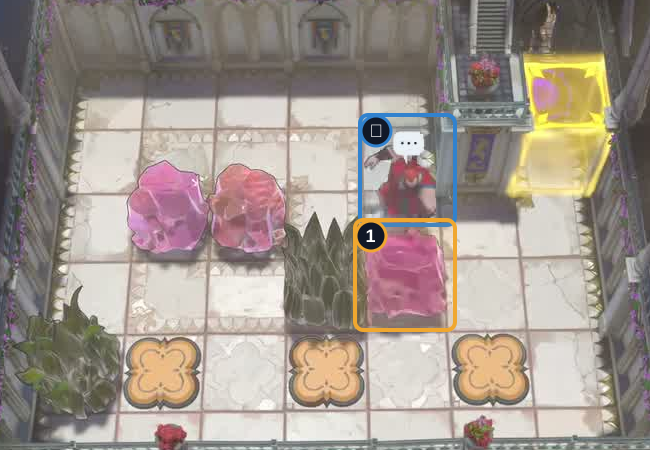
Move right twice, up once, right once, then down once.
Check: The Warrior stands above Crystal 1; the other crystals remain by the start.
Open full-size image in a new tab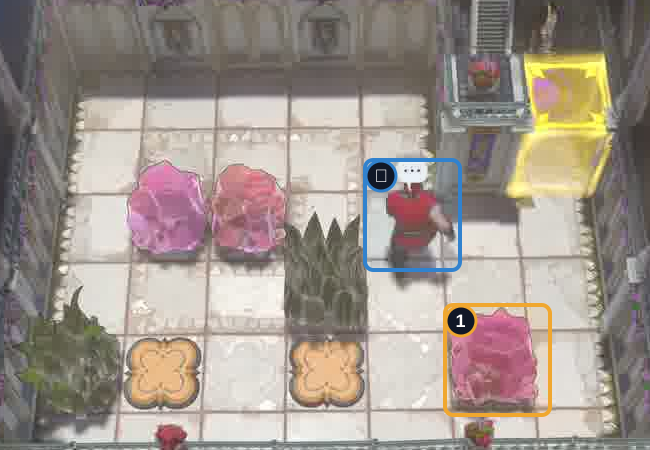
Push Crystal 1 down twice. Go right, down twice, left twice, up, then right to push it onto C. Walk up twice.
Check: Crystal 1 holds Switch C; the gate stays closed until the other switches are filled.
Open full-size image in a new tab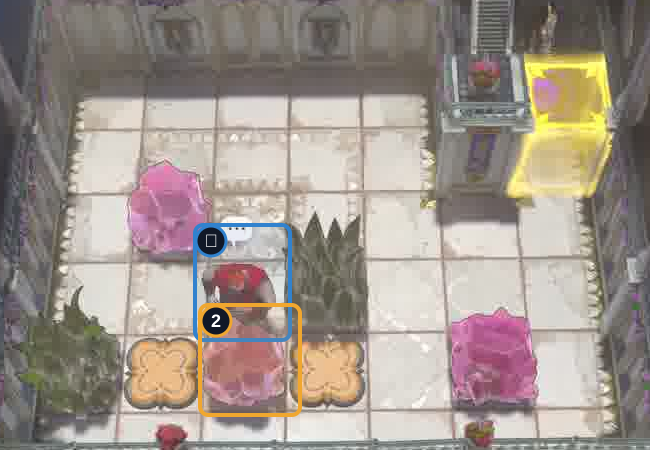
Move left, up, left, then down twice.
Check: Crystal 2 is just left of Switch B; Crystal 1 remains on C.
Open full-size image in a new tab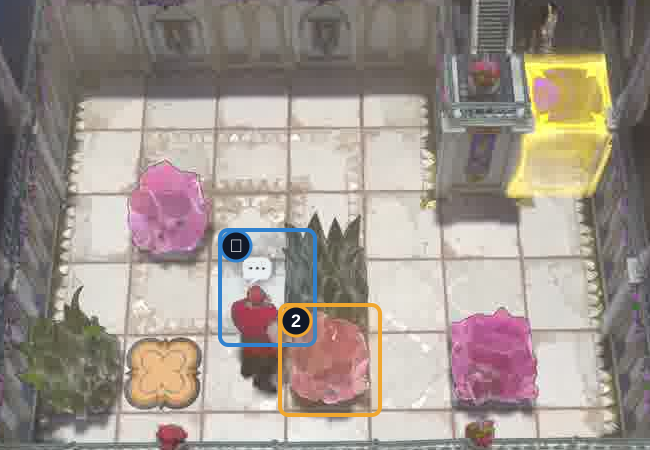
Move left, down, then right to push Crystal 2 onto Switch B.
Check: Crystal 2 holds Switch B; Crystal 1 still holds C.
Open full-size image in a new tab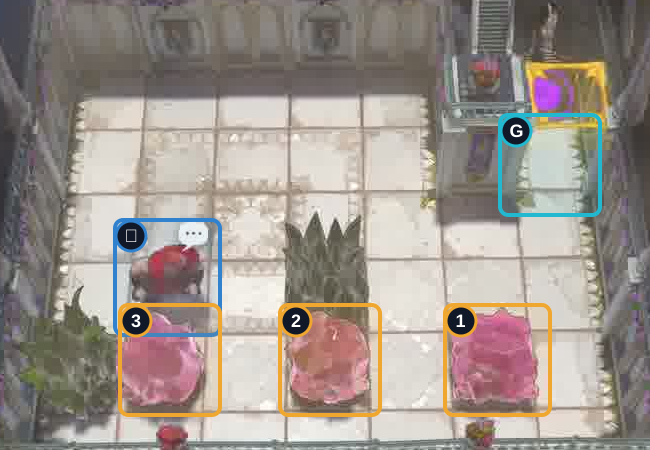
Go up three times, left once, then down twice to put Crystal 3 on Switch A.
Check: All three switches are occupied and the gate is open.
Open full-size image in a new tab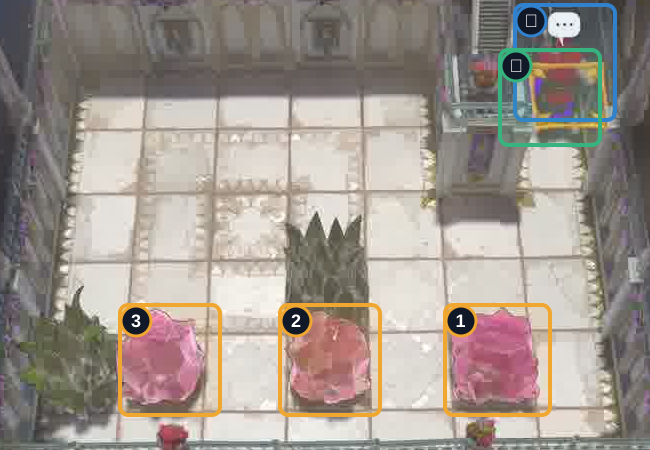
Move right, up, right four times, then up twice to reach the exit.
Check: The Warrior is on the exit; all three crystals remain on their switches.
Open full-size image in a new tabFull direction sequence
→ → ↑ → ↓ ↓ ↓ → ↓ ↓ ← ← ↑ → ↑ ↑ ← ↑ ← ↓ ↓ ← ↓ → ↑ ↑ ↑ ← ↓ ↓ → ↑ → → → → ↑ ↑ Thief: pull a crystal through the corridor
Section titled “Thief: pull a crystal through the corridor”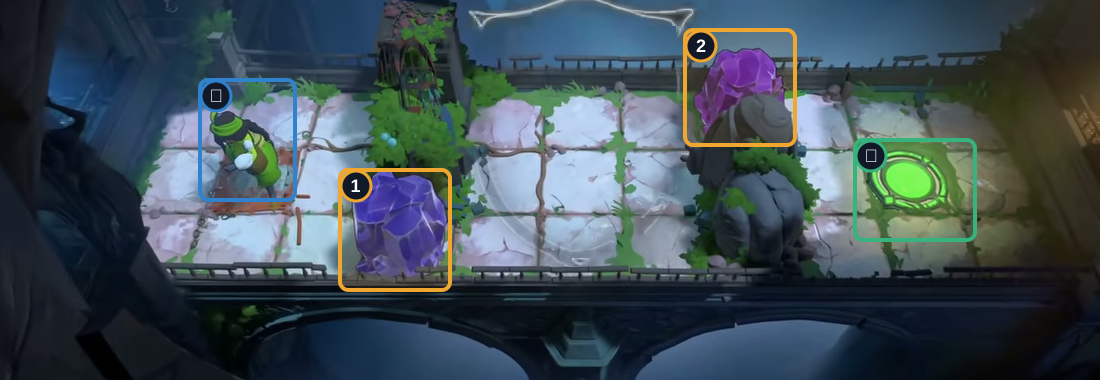
- Start
- Crystals 1–2
- Exit
Hint
When the Thief steps away from an adjacent crystal into a free tile, it follows into the tile she just left. The crystal may follow back toward its starting place when she returns.
Step-by-step solution
Images show selected video checkpoints; the first frame is the starting position.
Start with the Thief near the left edge.
Check: Crystal 1 is below the left path, Crystal 2 is upper-right, and the exit is at the far right.
Open full-size image in a new tab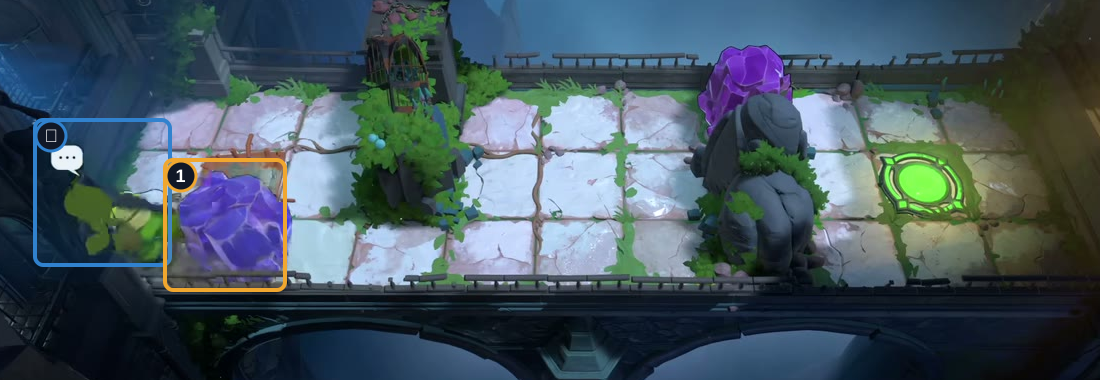
Go down, right, then left twice to pull Crystal 1 left twice.
Check: Crystal 1 is two tiles left of its starting place; the Thief stands just to its left.
Open full-size image in a new tab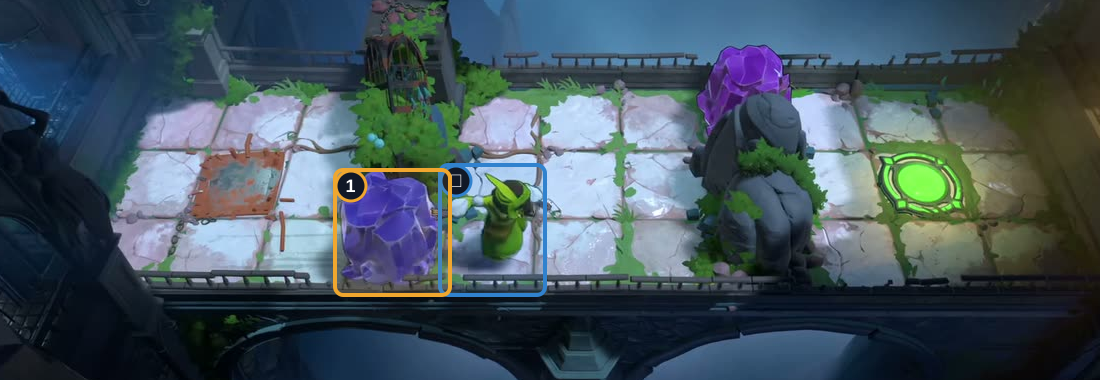
Move up, right twice, down, then right twice to return Crystal 1.
Check: Crystal 1 is back at its starting place; the Thief stands beside it.
Open full-size image in a new tab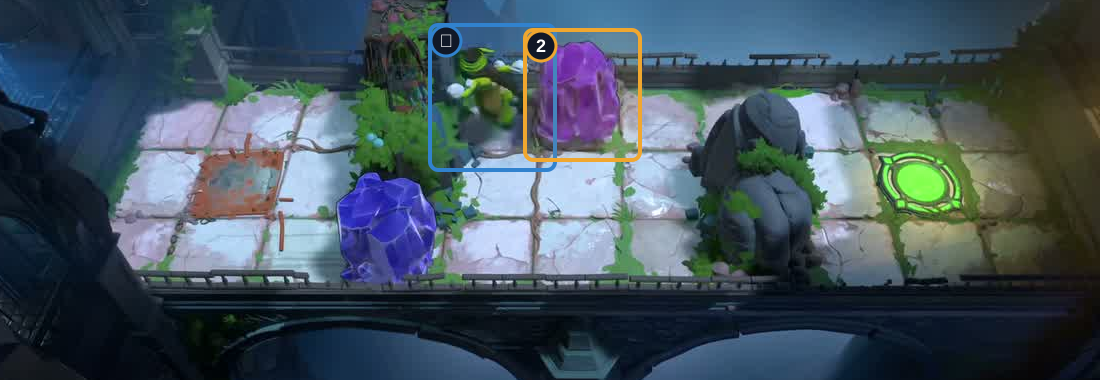
Go up twice, right twice, then left twice to pull Crystal 2 left.
Check: Crystal 2 has moved left; Crystal 1 remains at its starting place.
Open full-size image in a new tab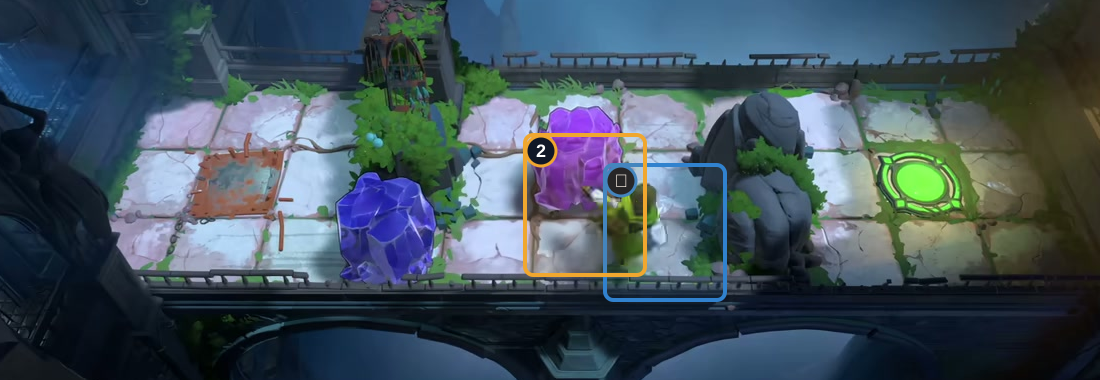
Move down, right, then down and right to pull Crystal 2 down once.
Check: Crystal 2 is in the middle lane; the Thief is heading toward the exit.
Open full-size image in a new tab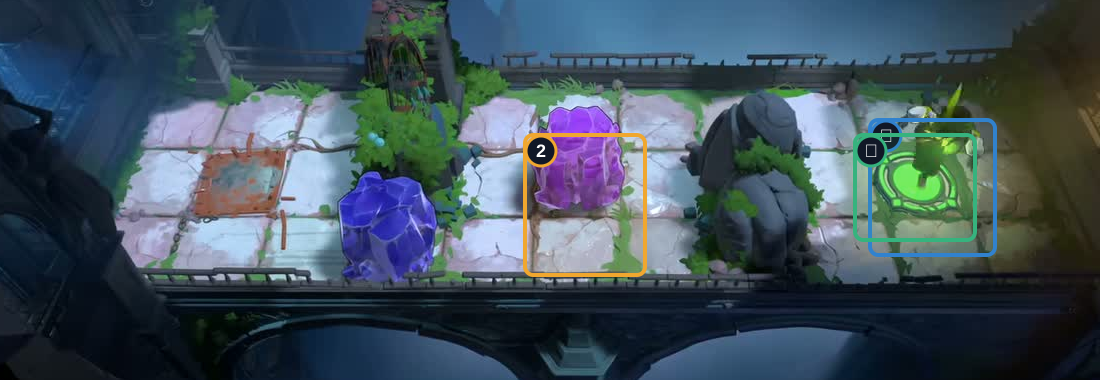
Go up twice, right twice, down, then right onto the exit.
Check: The Thief reaches the exit; Crystal 2 stays in the middle lane.
Open full-size image in a new tabFull direction sequence
↓ → ← ← ↑ → → ↓ → → ↑ ↑ → → ← ← ↓ → ↓ → ↑ ↑ → → ↓ →Thief: seven crystals and a switch
Section titled “Thief: seven crystals and a switch”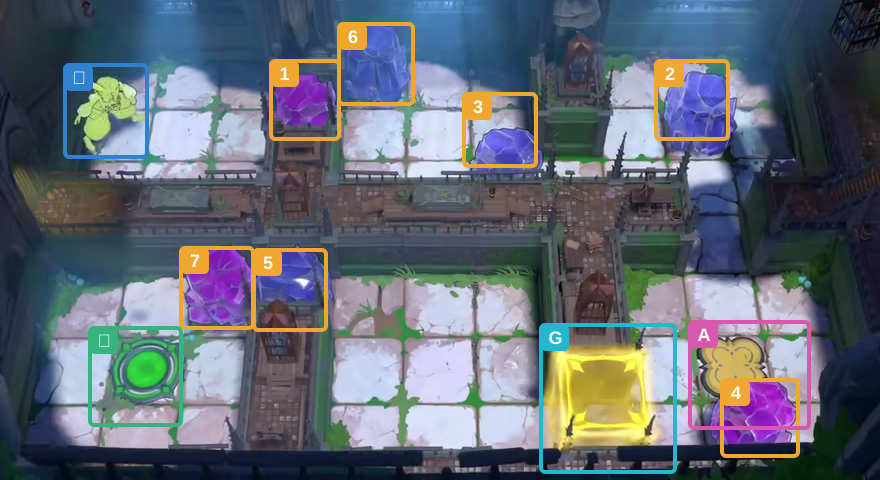
- Start
- Crystals 1–7
- Switch A
- Gate
- Exit
Hint
The opening pulls move Crystal 6 down, then right. Track its new position before entering the narrow passage. Keep Crystal 4 on switch A while crossing the gate; move other crystals aside to clear the exit route.
Step-by-step solution
Images show selected video checkpoints; the first frame is the starting position.
Start at the left end of the upper path.
Check: All seven crystals are in their starting places; Switch A is empty and the gate is closed.
Open full-size image in a new tab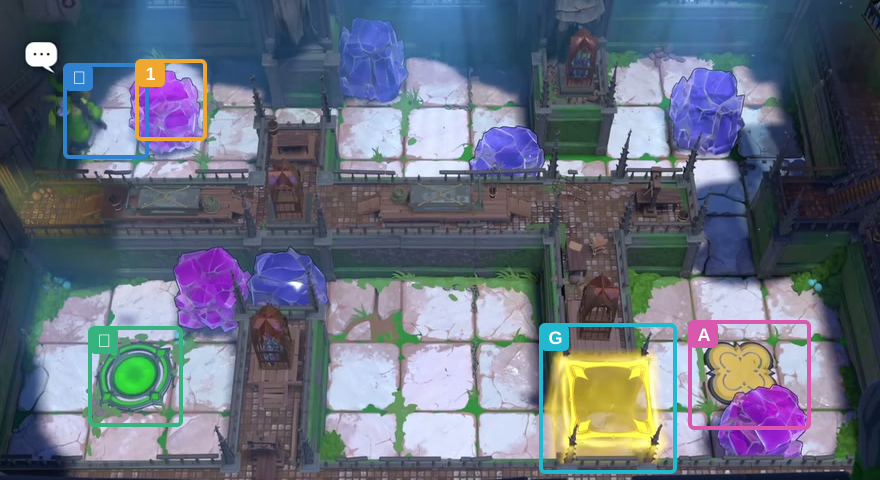
Move right twice, then pull Crystal 1 left twice.
Check: Crystal 1 is two tiles left of where it began.
Open full-size image in a new tab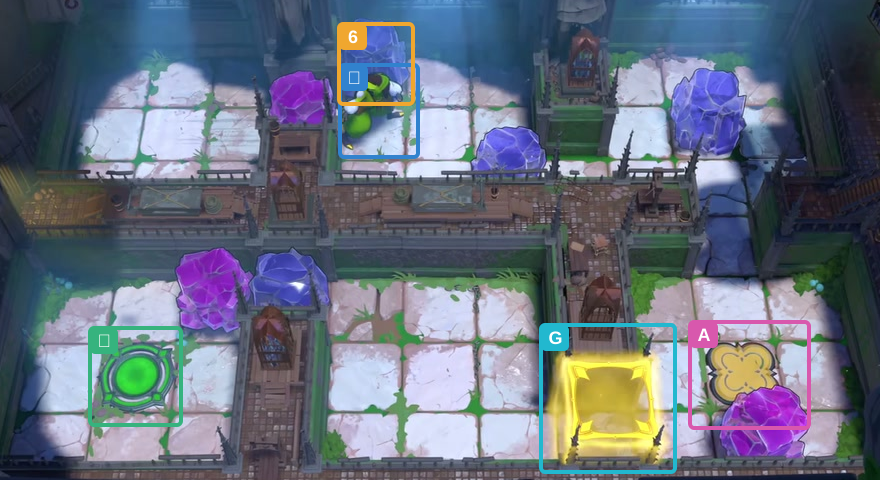
Go up once, right twice, down once, then right twice.
Check: Crystal 1 is restored; Crystal 6 is directly above the Thief.
Open full-size image in a new tab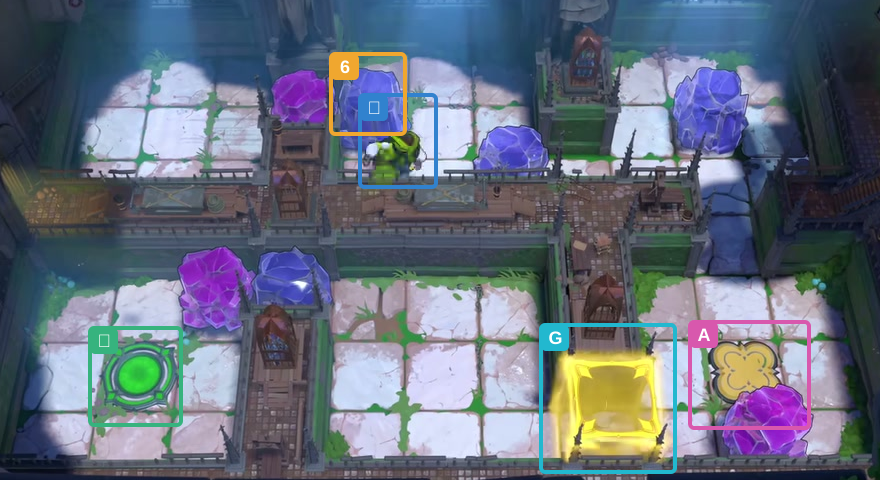
Step down to pull Crystal 6 down once.
Check: Crystal 6 moves down one space.
Open full-size image in a new tab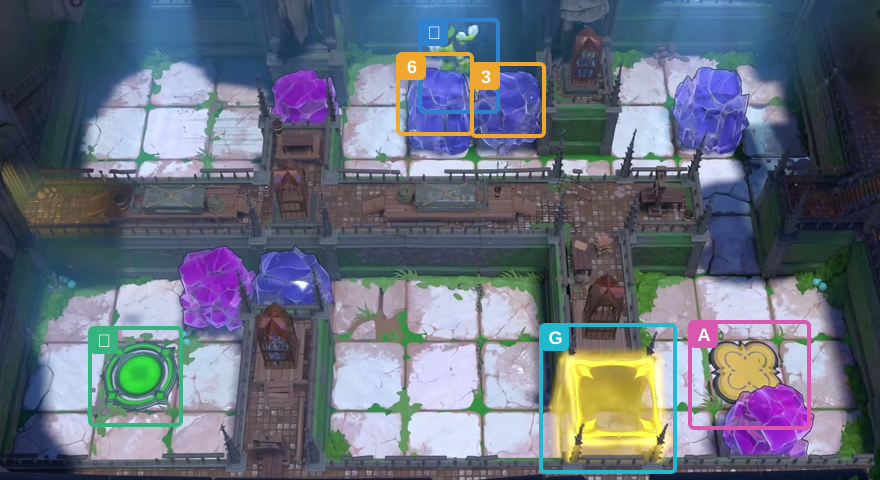
Go right once, up once, right once, then up once.
Check: Crystal 6 moves right and Crystal 3 moves up.
Open full-size image in a new tab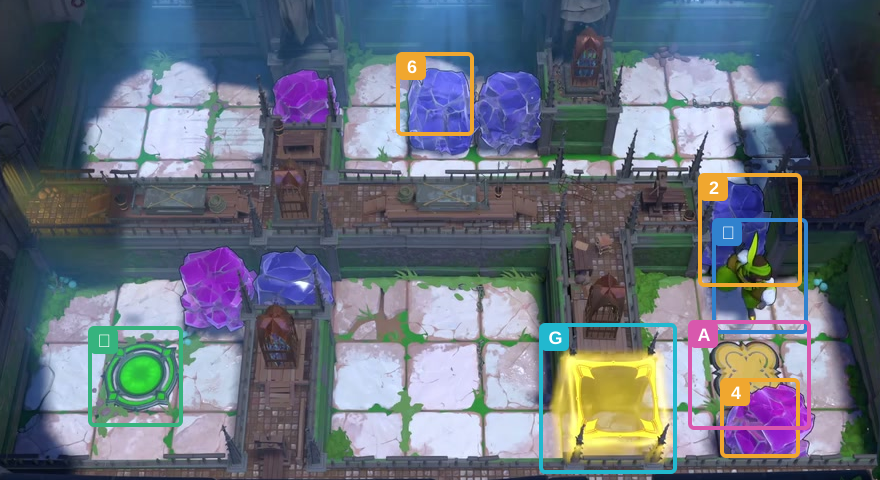
Go left twice, down twice, right five times, then down twice to pull Crystal 2.
Check: Crystal 2 is below its starting row.
Open full-size image in a new tab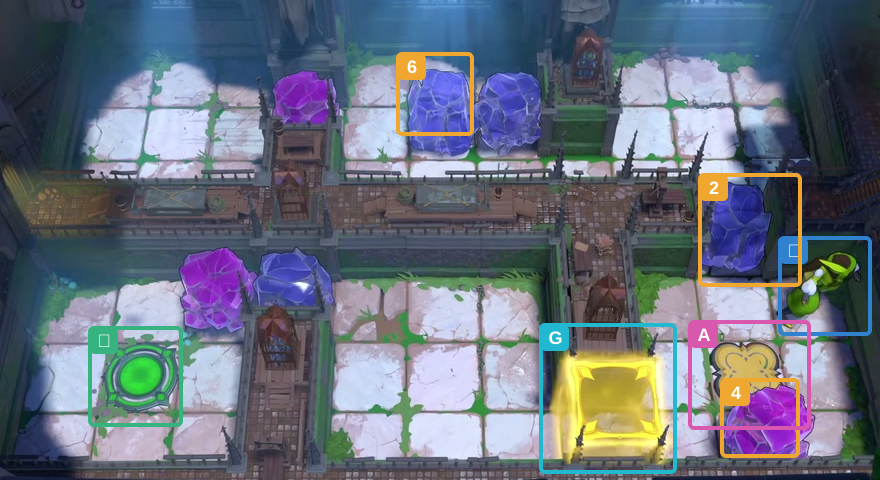
Go right once to the outer edge; keep Crystal 4 below Switch A.
Check: Crystal 4 is still below Switch A.
Open full-size image in a new tab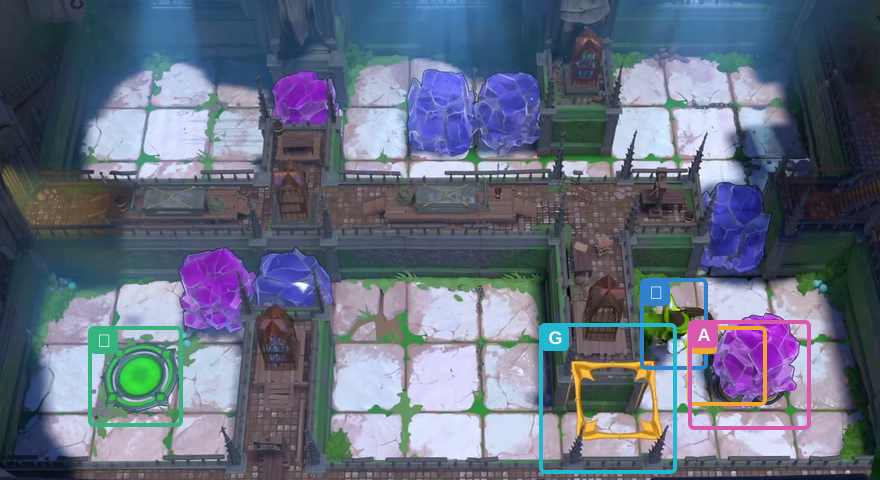
Go down, left, then up to pull Crystal 4 onto Switch A; go left and down.
Check: Switch A is occupied and the gate opens.
Open full-size image in a new tab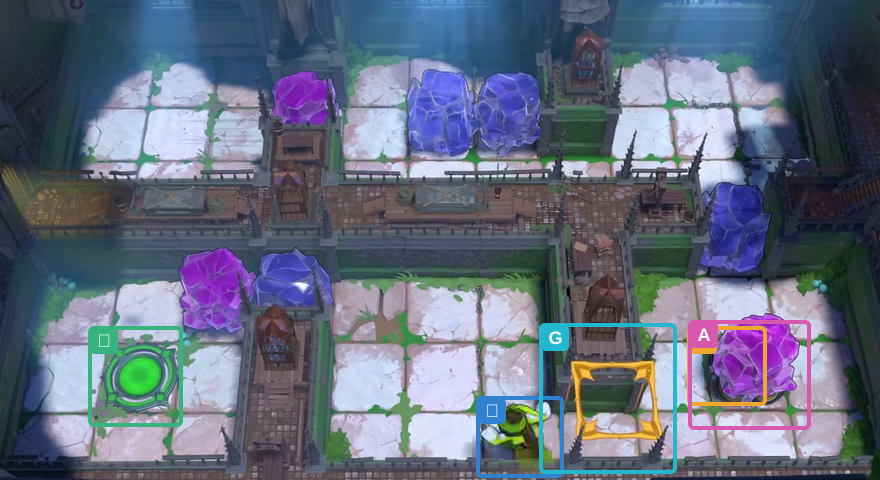
Go down, then left twice through the open gate.
Check: You are through the gate; Switch A remains occupied.
Open full-size image in a new tab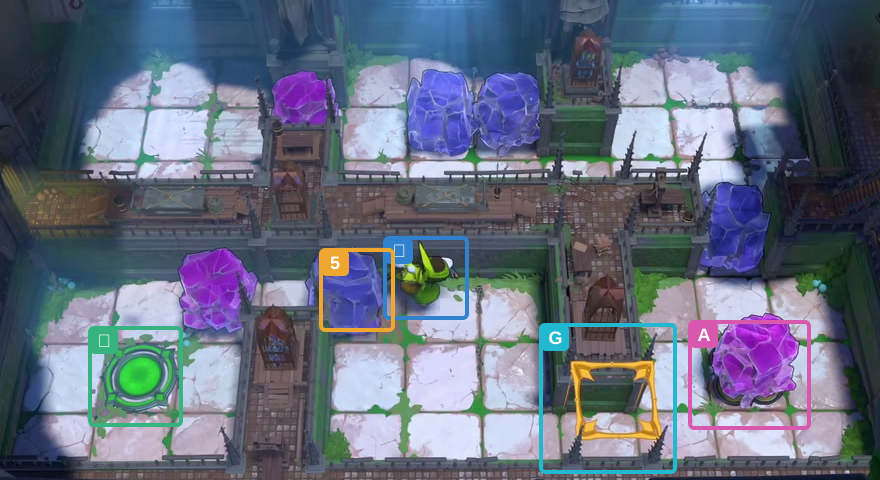
Go up twice, left twice, then right once to pull Crystal 5.
Check: Crystal 5 moves one space right.
Open full-size image in a new tab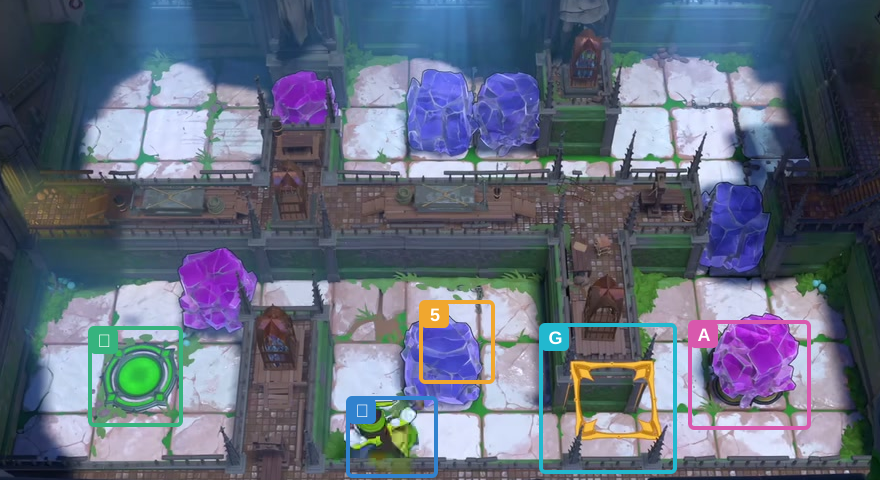
Go right, down, left, down, left, then up. Crystal 5 follows right, then down.
Check: Crystal 5 is now one row below the switch row.
Open full-size image in a new tab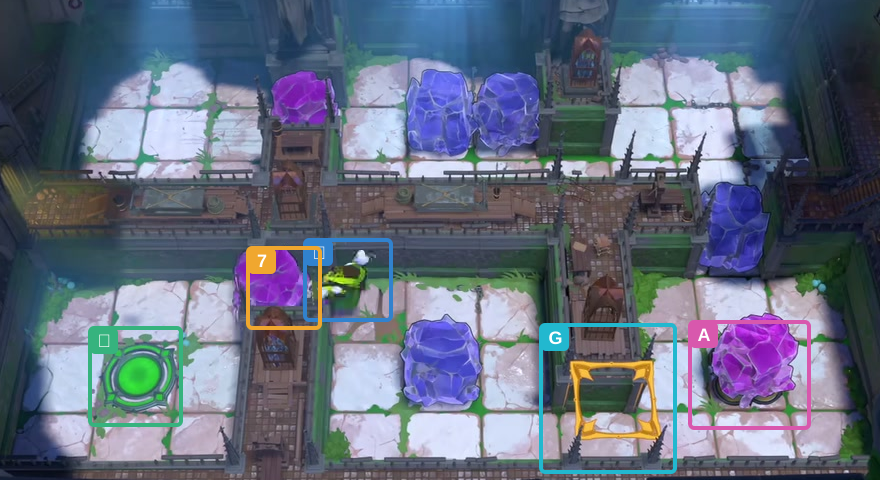
Go up once, left once, then right once to pull Crystal 7 right.
Check: Crystal 7 has moved right once.
Open full-size image in a new tab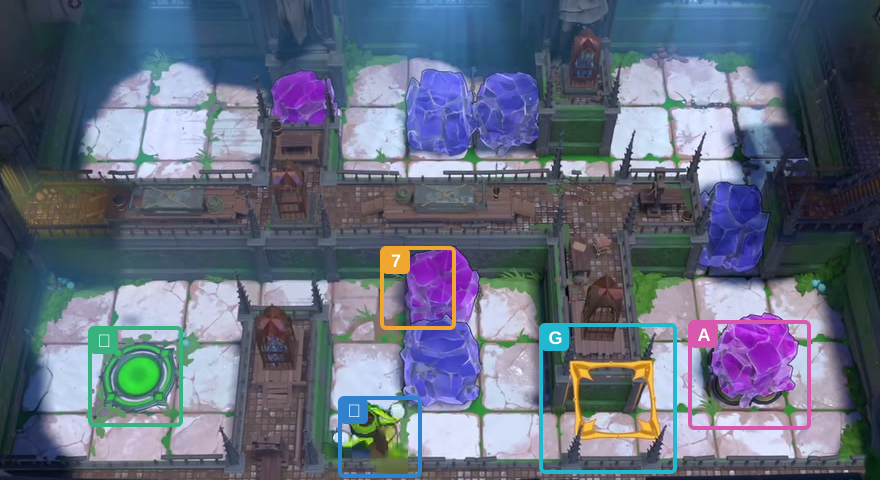
Go right twice, down twice, then left twice to pull Crystal 7 right.
Check: Crystal 7 reaches the right side of the lower path.
Open full-size image in a new tab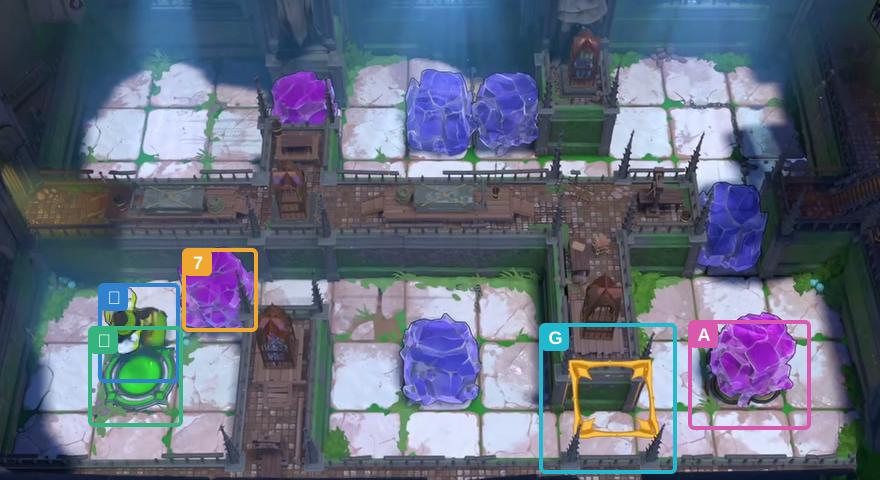
Go up twice, left twice to pull Crystal 7 left, then down once and left once to the exit.
Check: The Thief reaches the exit.
Open full-size image in a new tabFull direction sequence
→ → ← ← ↑ → → ↓ → → ↓ → ↑ → ↑ ← ← ↓ ↓ → → → → → ↓ ↓ → ↓ ← ↑ ← ↓ ↓ ← ← ↑ ↑ ← ← → → ↓ ← ↓ ← ↑ ↑ ← → → → ↓ ↓ ← ← ↑ ↑ ← ← ↓ ←Thief: a crystal around two gates
Section titled “Thief: a crystal around two gates”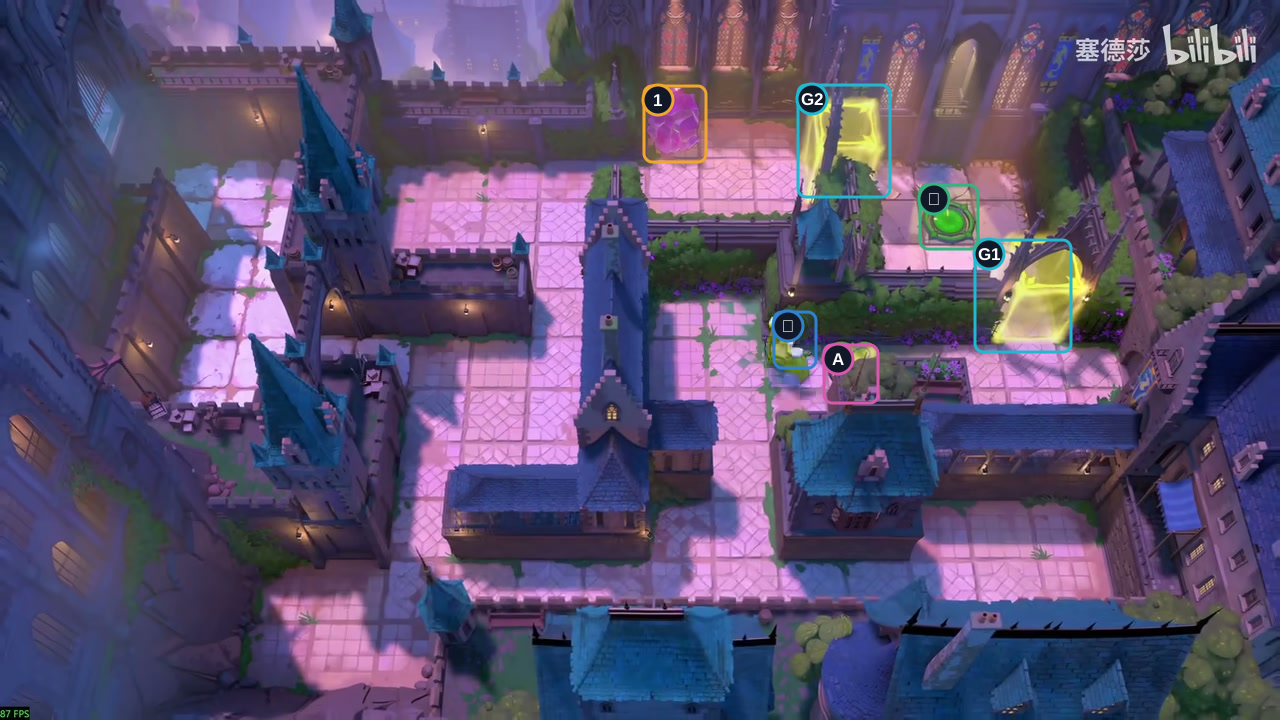
- Start
- Crystal 1
- Switch A
- Gates G1–G2
- Exit
Hint
Crystal 1 has to follow an outer loop before it can stay on A. The Thief passes A before returning, so the gates close temporarily; pulling Crystal 1 back onto A reopens them. The two gates are marked G1 and G2; use A as the route’s return point.
Step-by-step solution
Images show selected video checkpoints; the first frame is the starting position.
Start beside Switch A and take the lower path.
Check: Crystal 1 stays in its starting area; both gates are closed.
Open full-size image in a new tab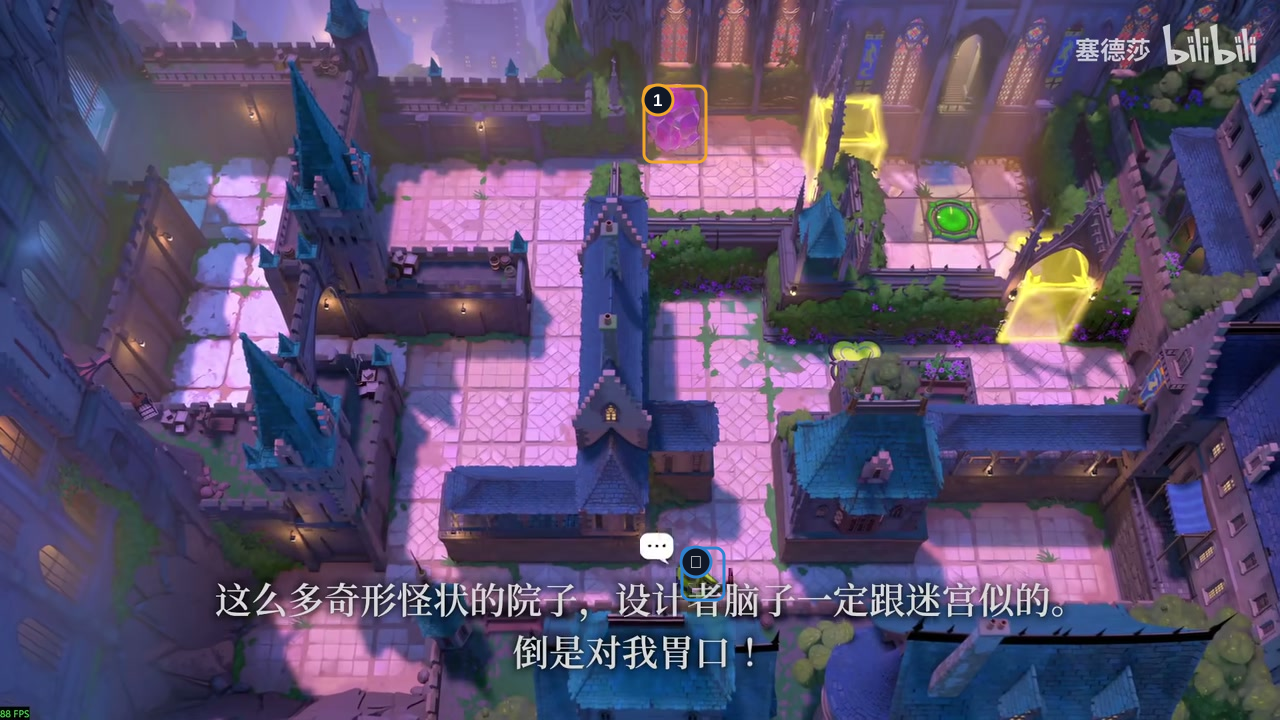
Down once, left once, down three times, then left once.
Check: The Thief reaches the lower route; Crystal 1 and both gates stay put.
Open full-size image in a new tab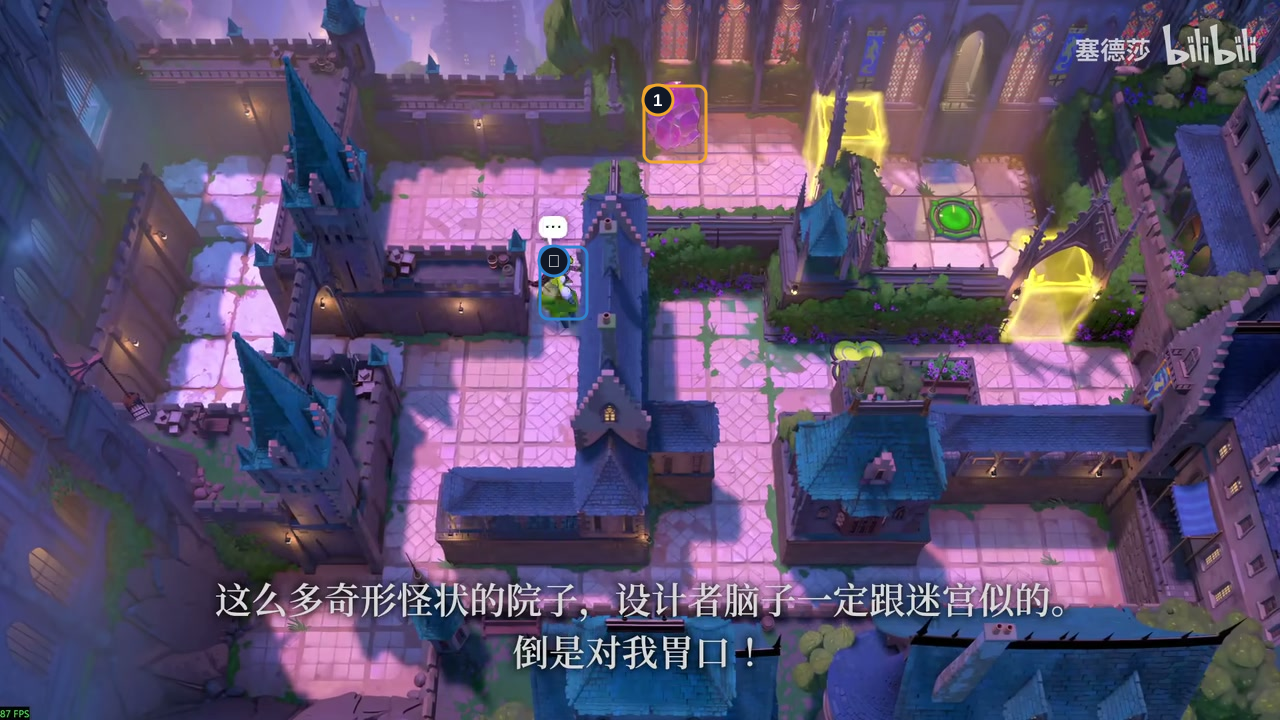
Left four, up four, right twice, then up twice.
Check: The Thief reaches the upper corridor; Crystal 1 has not moved.
Open full-size image in a new tab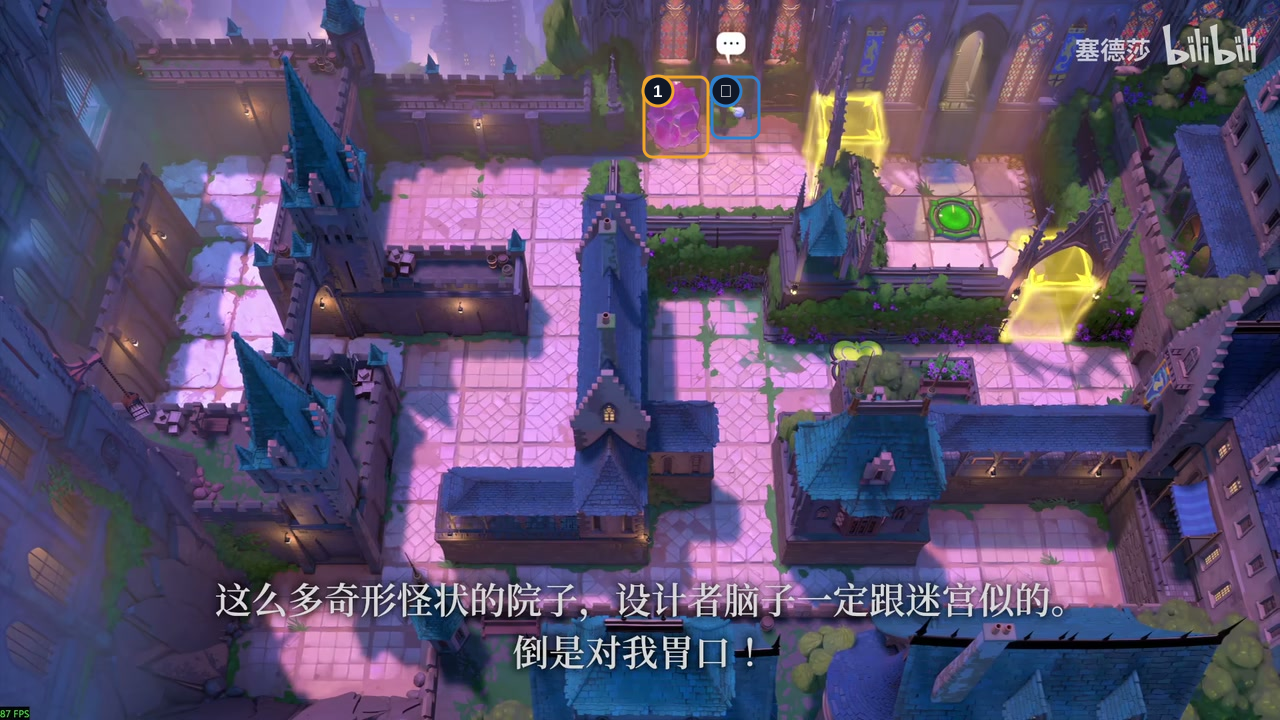
Up twice, right three times, then up once.
Check: The Thief stands to the right of Crystal 1.
Open full-size image in a new tab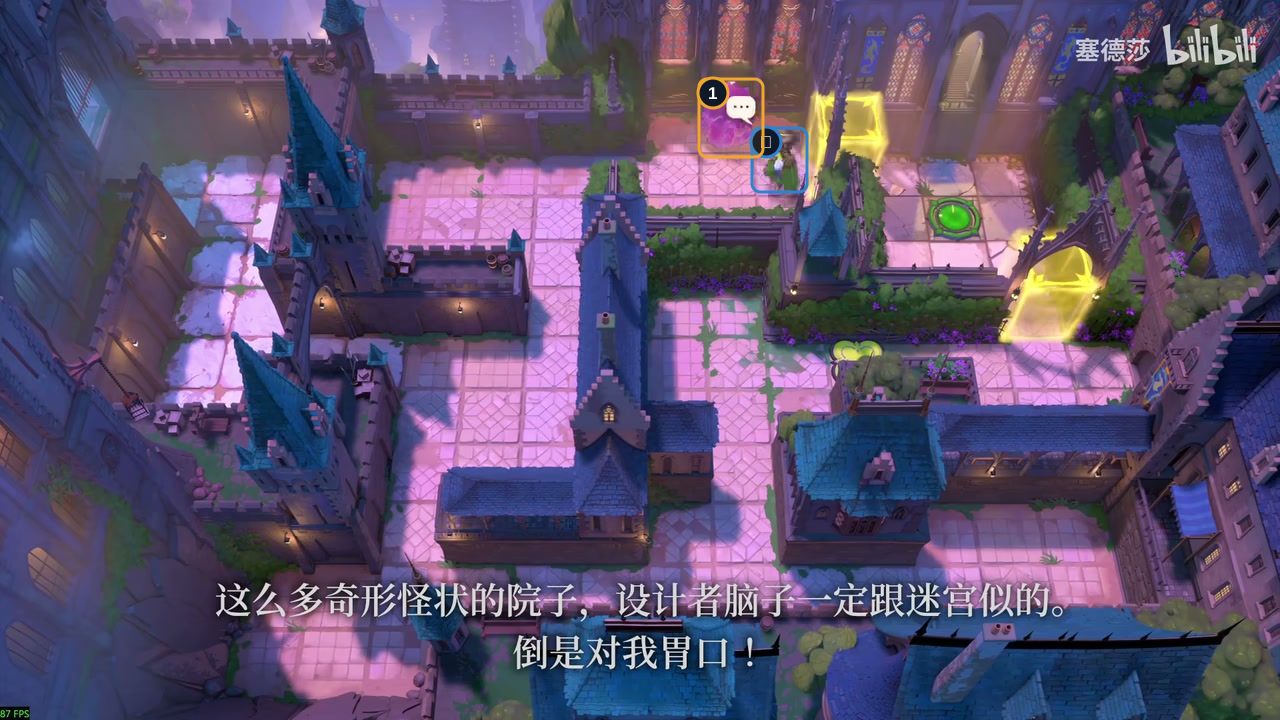
Right once to pull Crystal 1 right, then down once.
Check: Crystal 1 moves right along the upper row.
Open full-size image in a new tab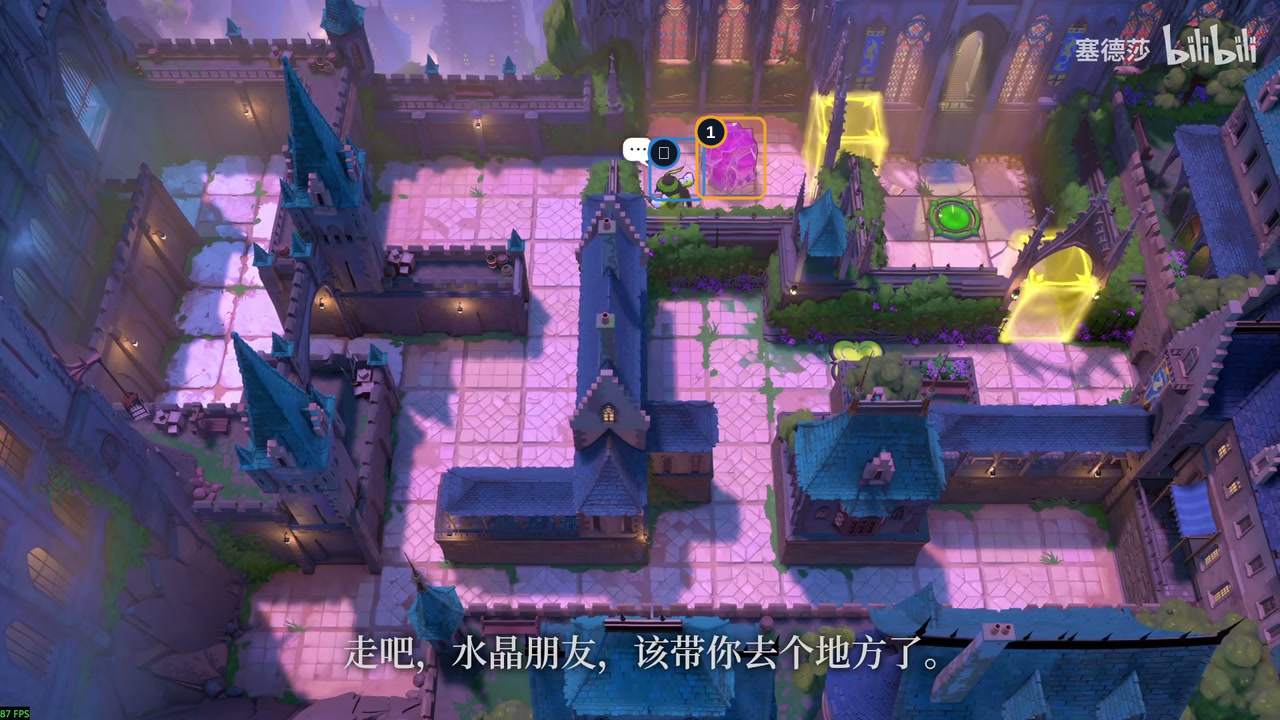
Left once, down once, left once, then up once.
Check: Crystal 1 is now one tile to the Thief’s right.
Open full-size image in a new tab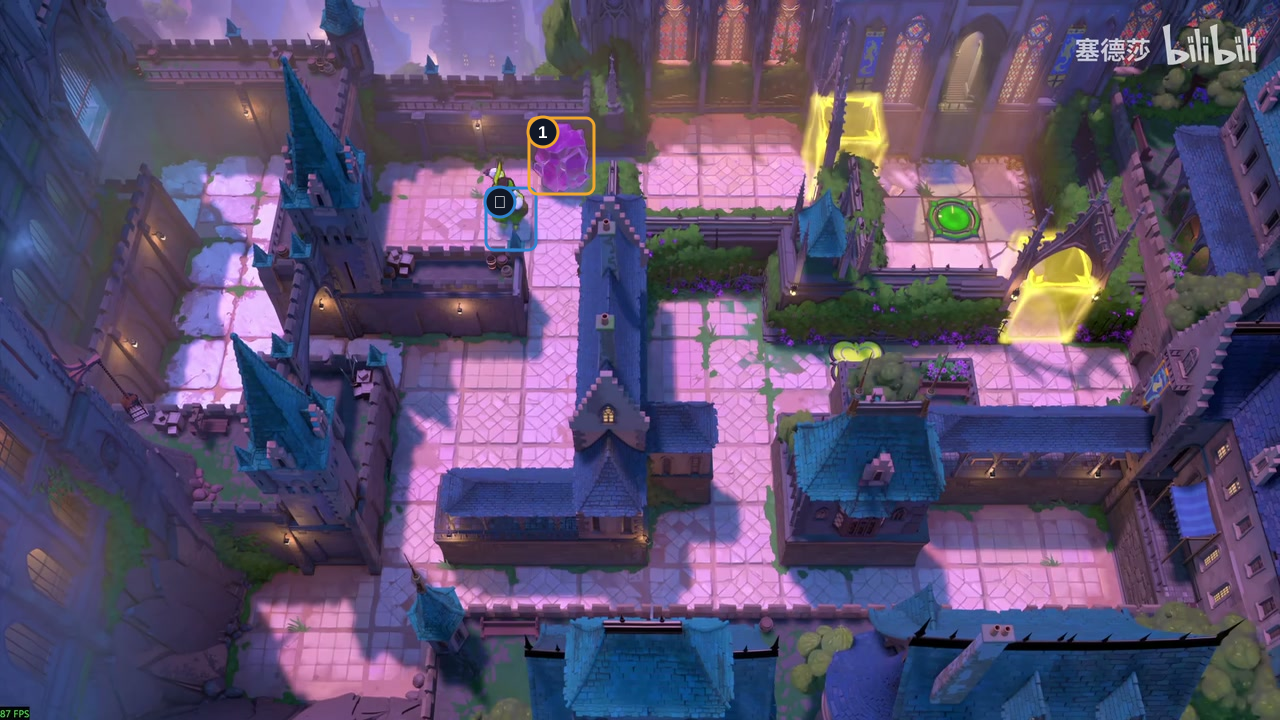
Move left three times, pulling Crystal 1 each step.
Check: Crystal 1 has moved left along the upper corridor.
Open full-size image in a new tab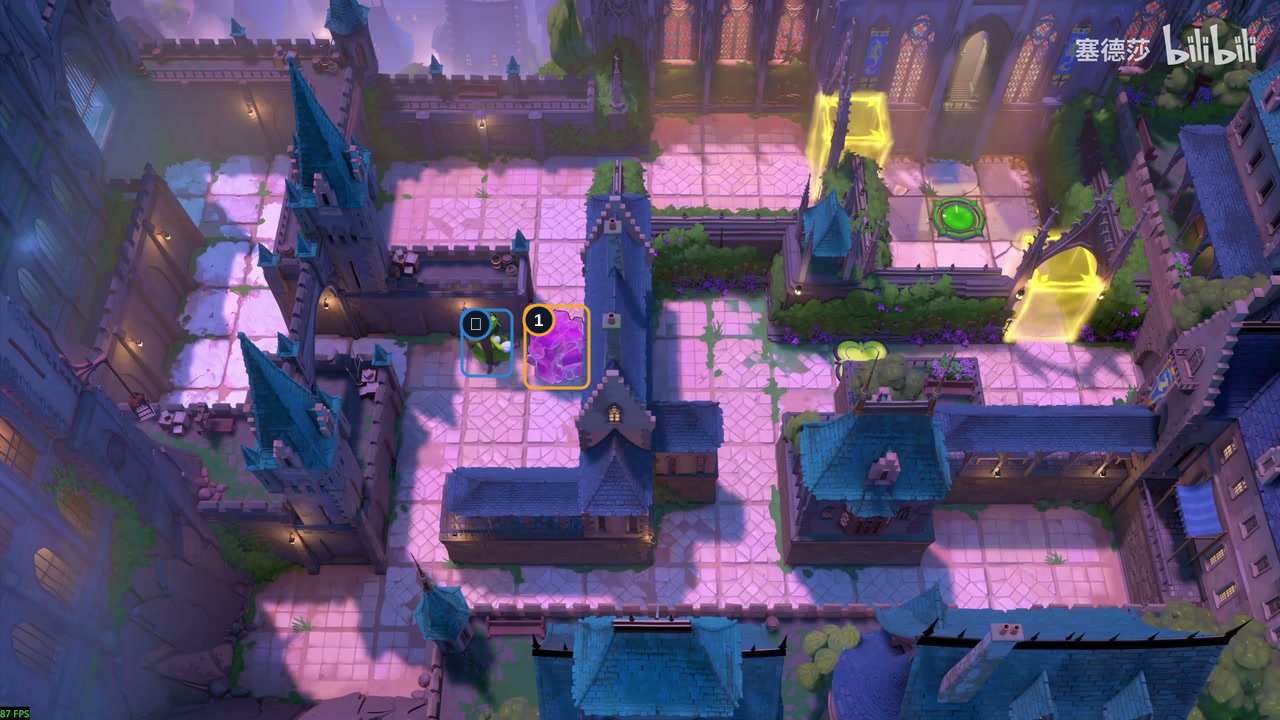
Down once, right once, down four, left once, then up once.
Check: The Thief finishes immediately left of Crystal 1.
Open full-size image in a new tab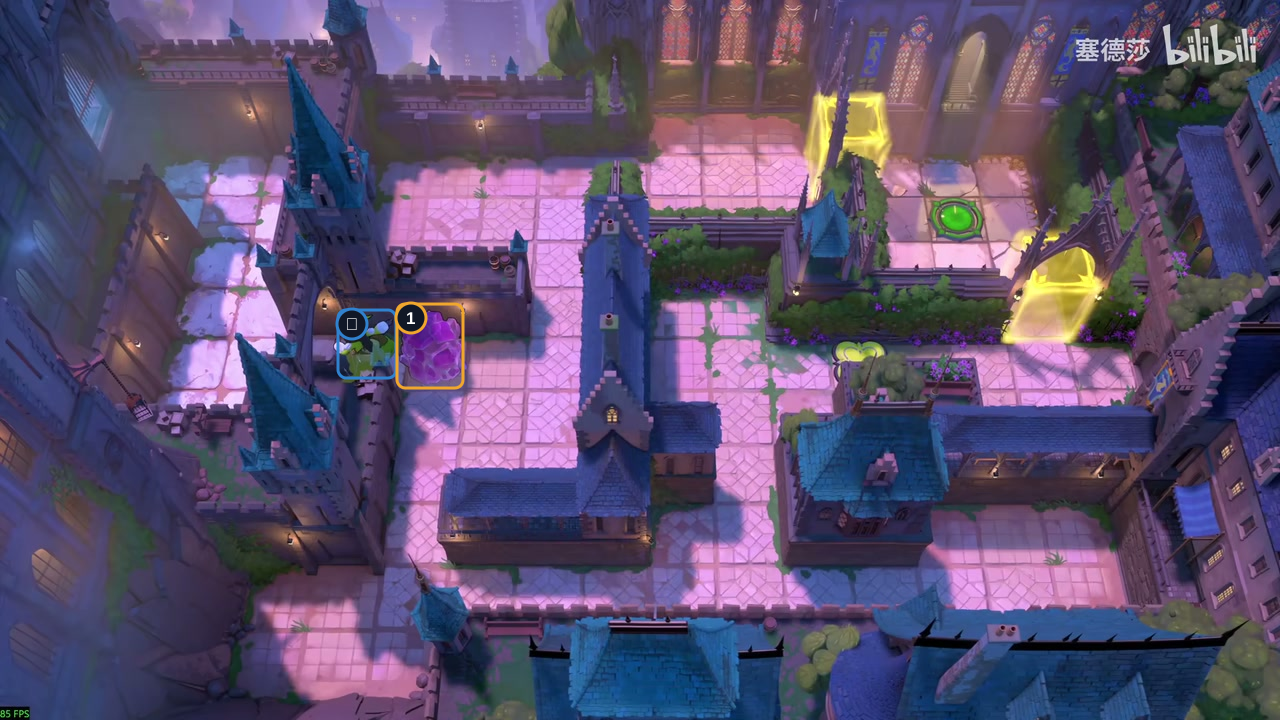
Move left twice, pulling Crystal 1 on each step.
Check: Crystal 1 moves left with the Thief.
Open full-size image in a new tab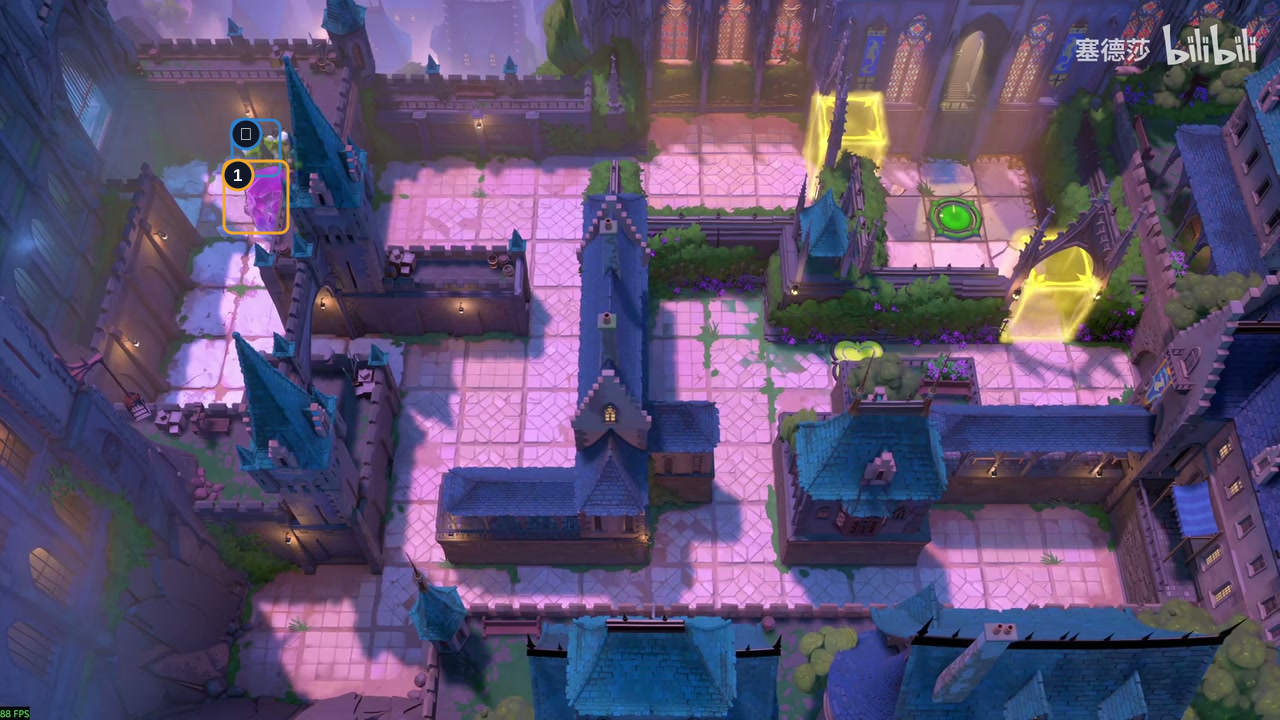
Left three, up, right, up three, left, down, left, up, then right.
Check: Crystal 1 is drawn through the upper-left loop.
Open full-size image in a new tab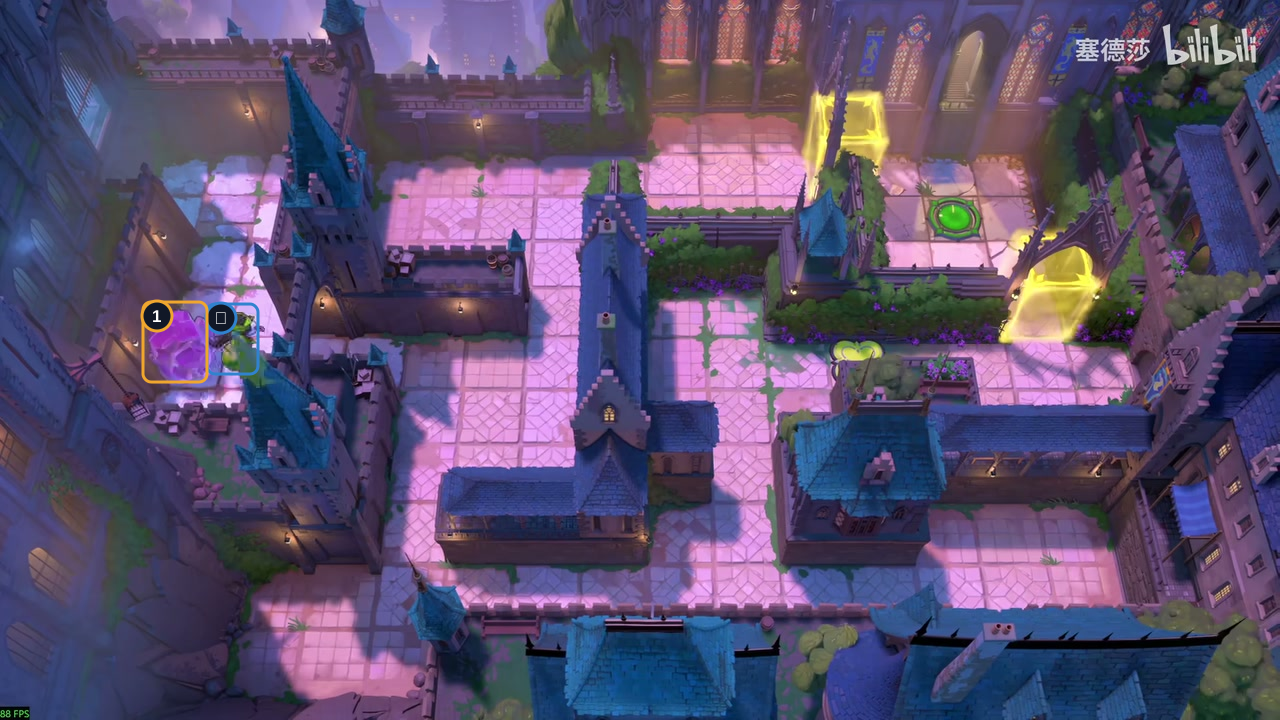
Right once, down twice, left once, down three times, right once, then up once.
Check: Crystal 1 reaches the left end of the lower lane.
Open full-size image in a new tab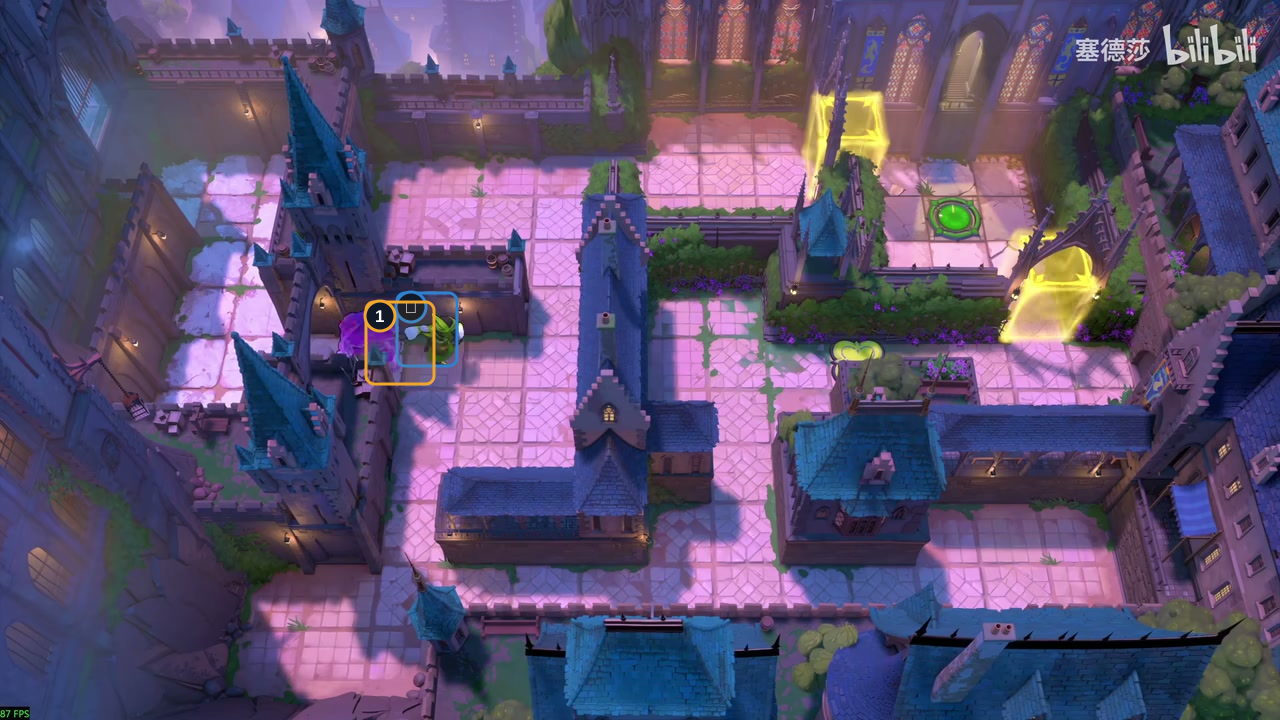
Move right four times, pulling Crystal 1 each step.
Check: Crystal 1 returns across the passage.
Open full-size image in a new tab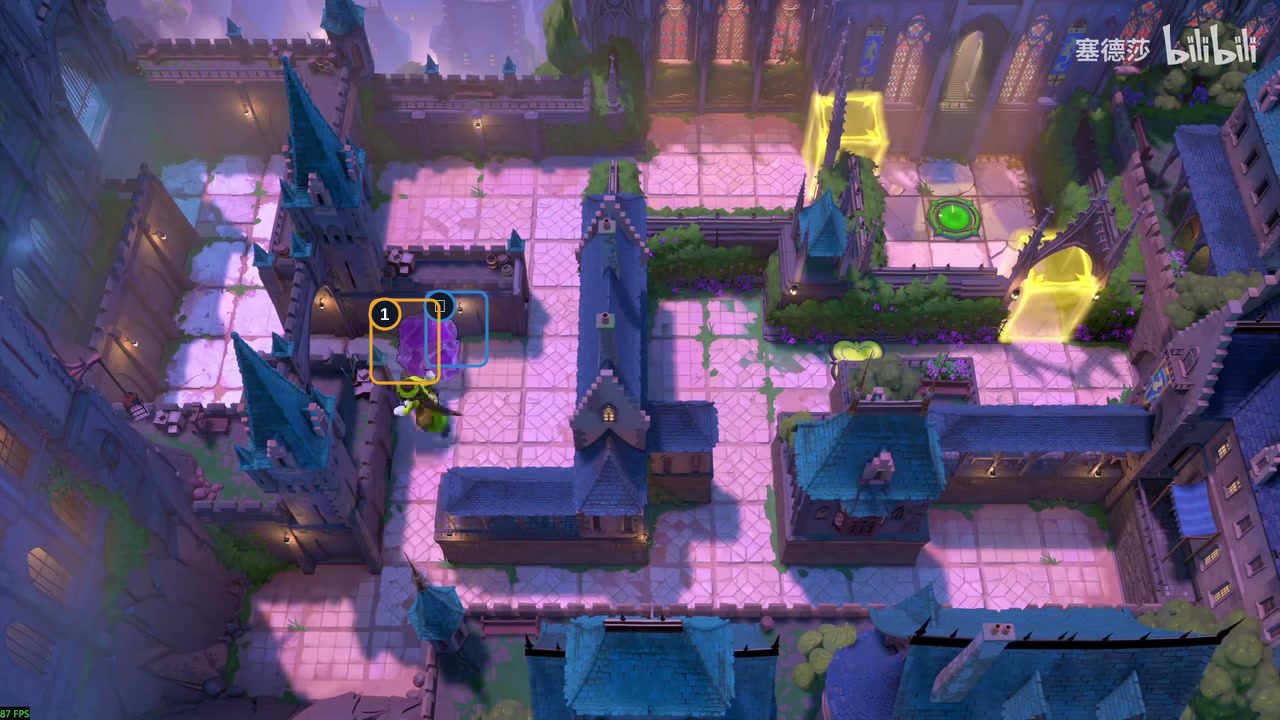
Move down once, then left once; stop below Crystal 1.
Check: Crystal 1 stays in place; the Thief ends below it.
Open full-size image in a new tab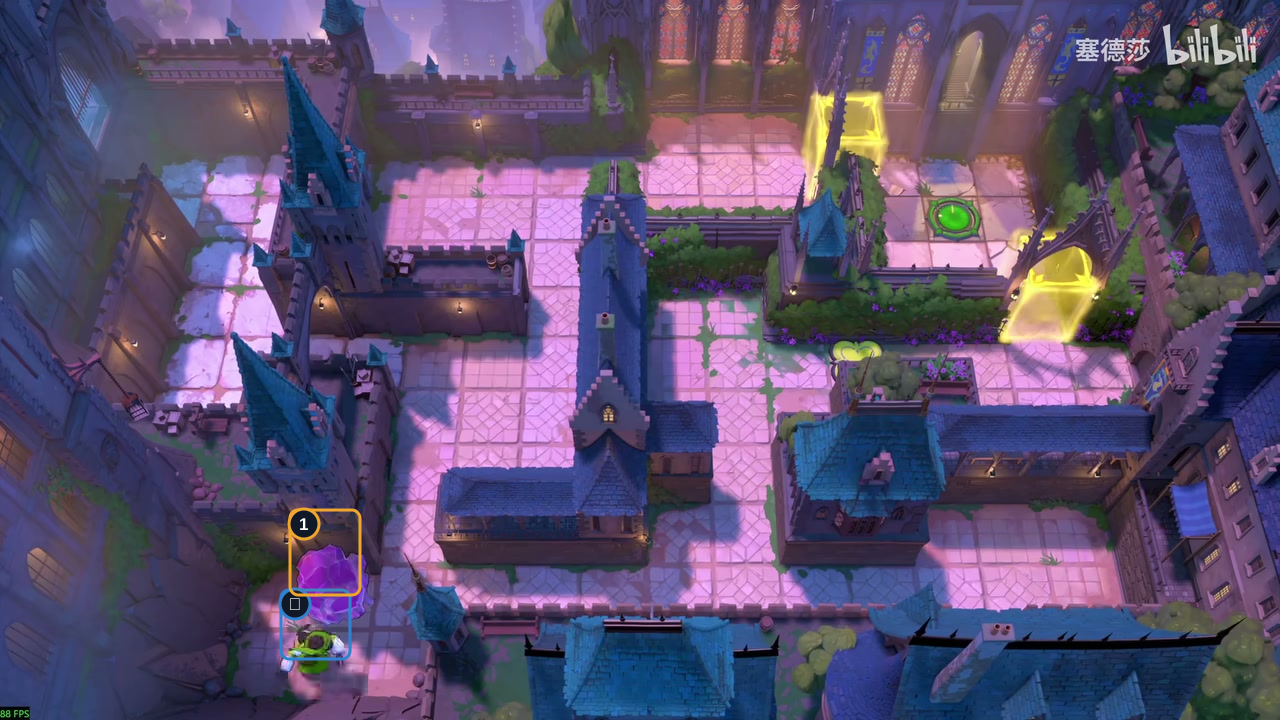
Down four, left, up, left to pull Crystal 1, then down and right.
Check: The Thief ends below Crystal 1 after pulling it one tile left.
Open full-size image in a new tab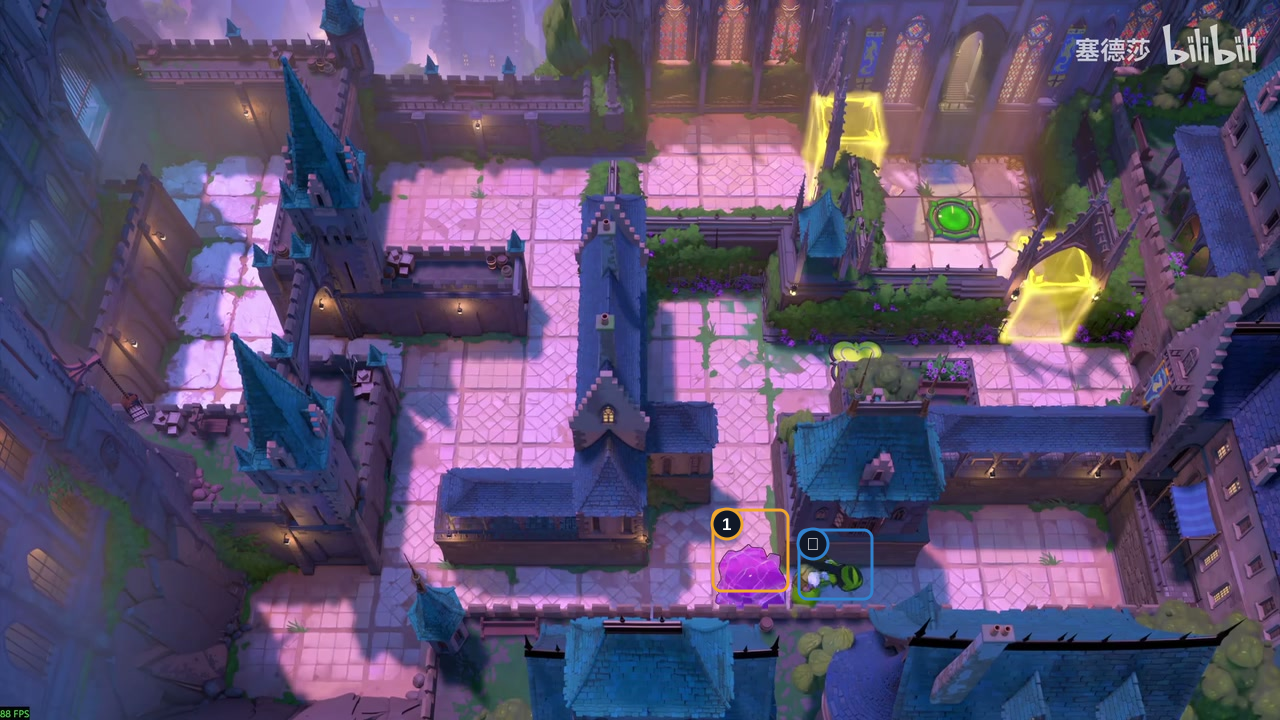
Move right once, up once, then right six times while pulling Crystal 1.
Check: Crystal 1 reaches the lower-right passage.
Open full-size image in a new tab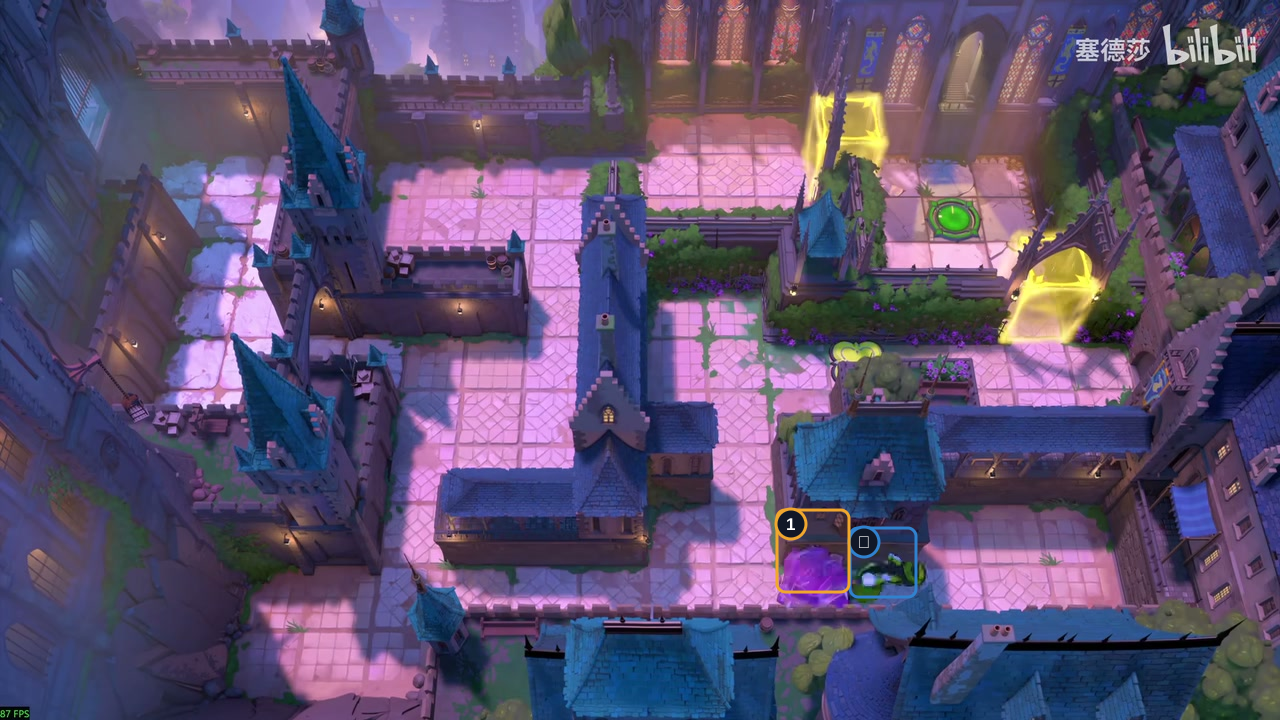
Move right once to pull Crystal 1 one tile farther.
Check: Crystal 1 advances one tile into the lower-right passage.
Open full-size image in a new tab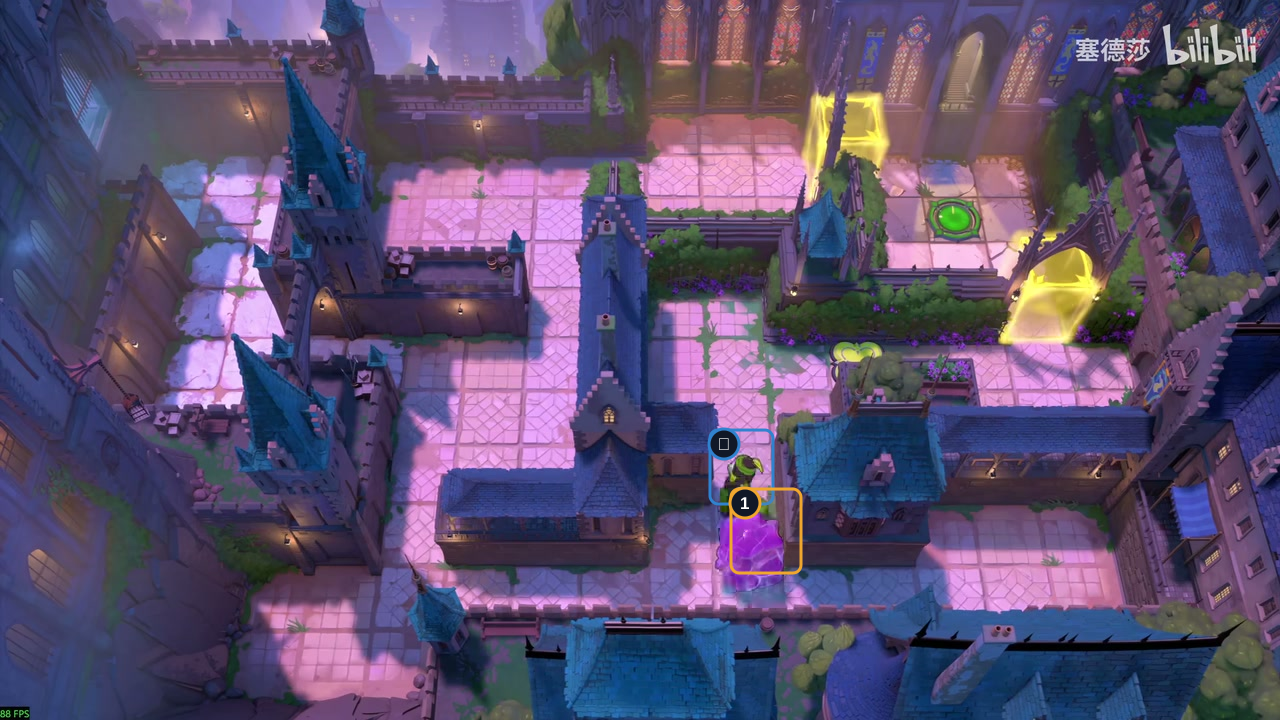
Right three, up, left twice, down, left four, up, then right.
Check: The Thief turns back above Crystal 1, ready to climb.
Open full-size image in a new tab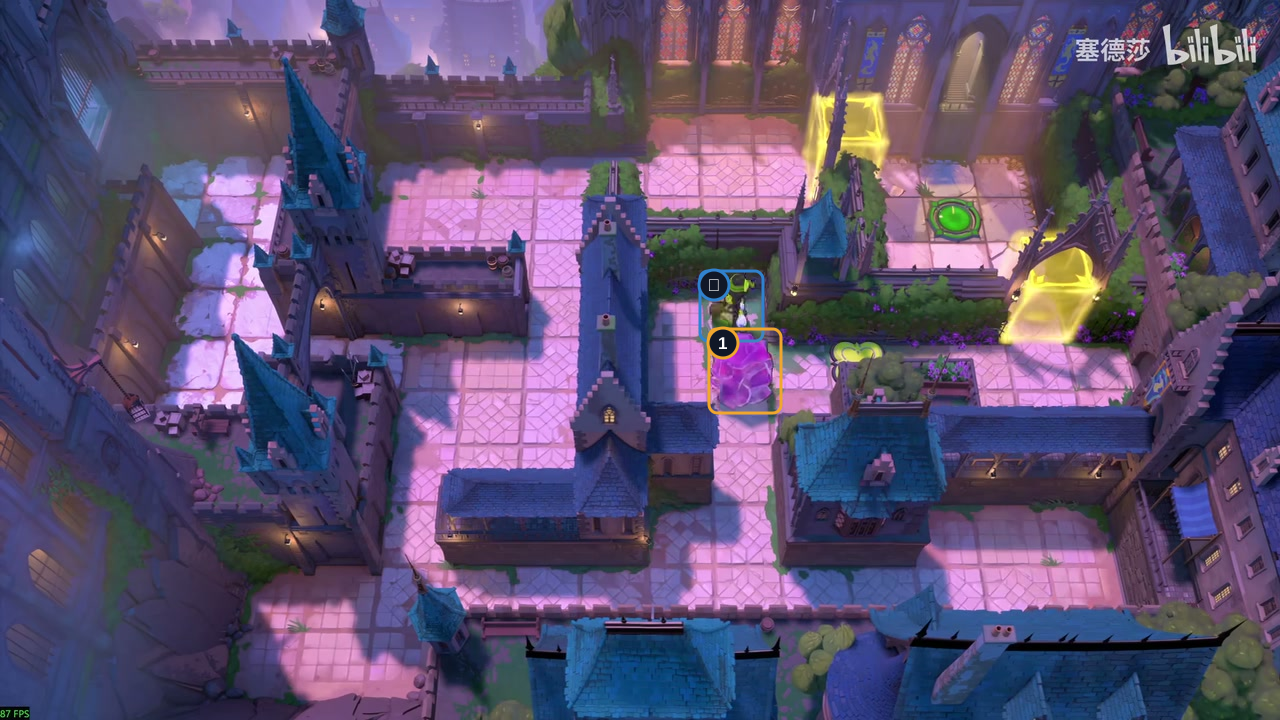
Move up four times, pulling Crystal 1 into the garden.
Check: Crystal 1 reaches the upper garden lane.
Open full-size image in a new tab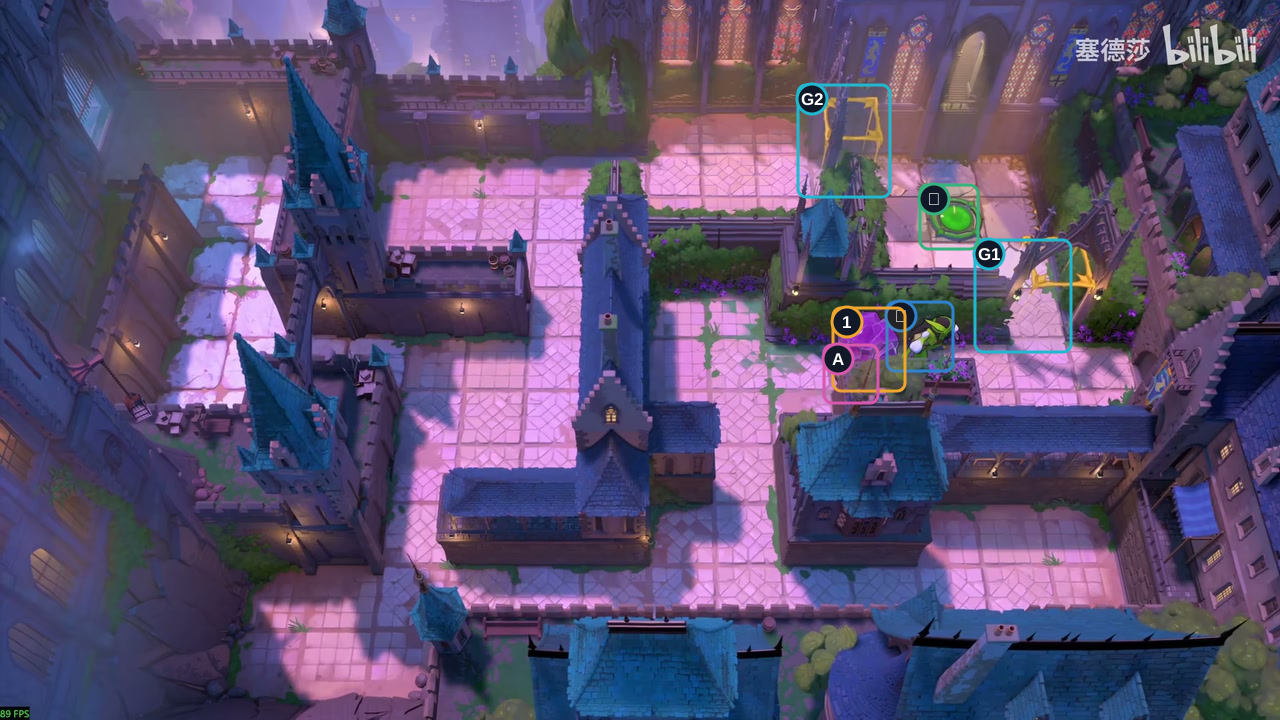
Left once, down twice, right twice, up once, then right twice to pull Crystal 1 onto A.
Check: Crystal 1 occupies A and opens both gates.
Open full-size image in a new tab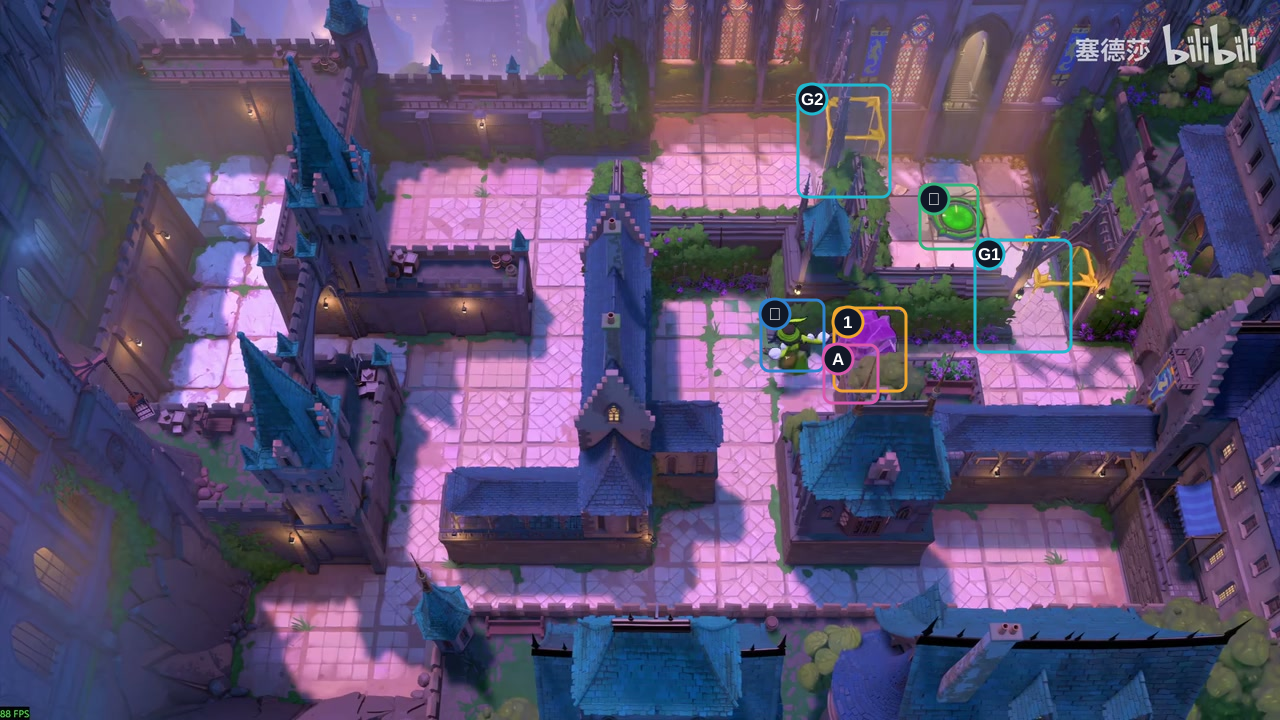
Pull Crystal 1 right three, loop below its right end, then pull left three back onto A.
Check: The gates close while Crystal 1 leaves A, then reopen when it returns.
Open full-size image in a new tab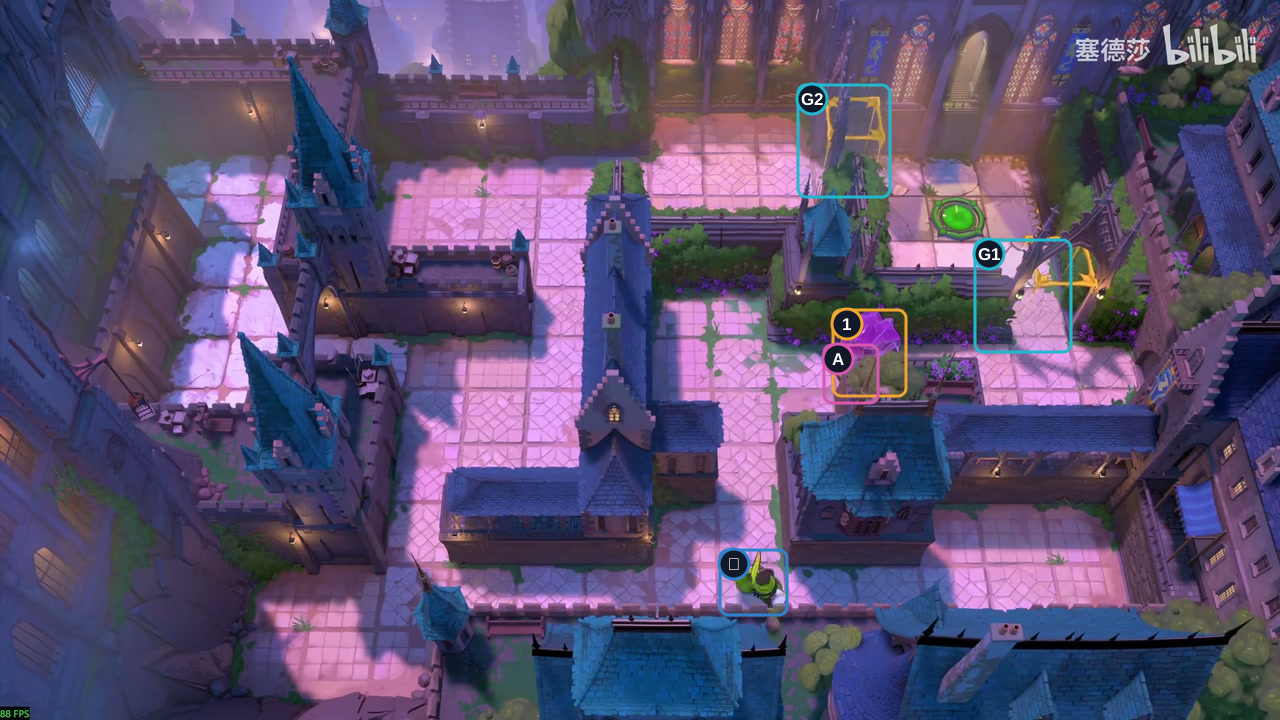
Down once, left once, then down three times.
Check: Crystal 1 stays on A; both gates remain open.
Open full-size image in a new tab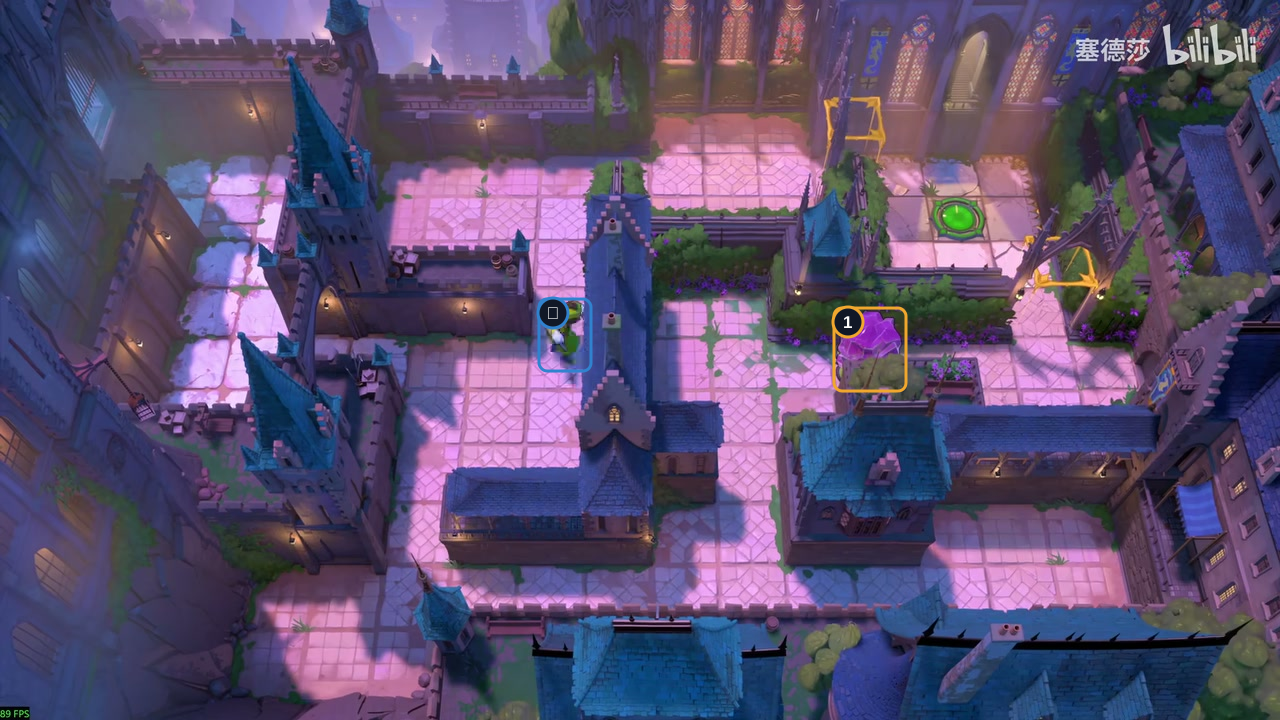
Left five, up four, right twice, then up once.
Check: Crystal 1 remains on A, keeping both gates open.
Open full-size image in a new tab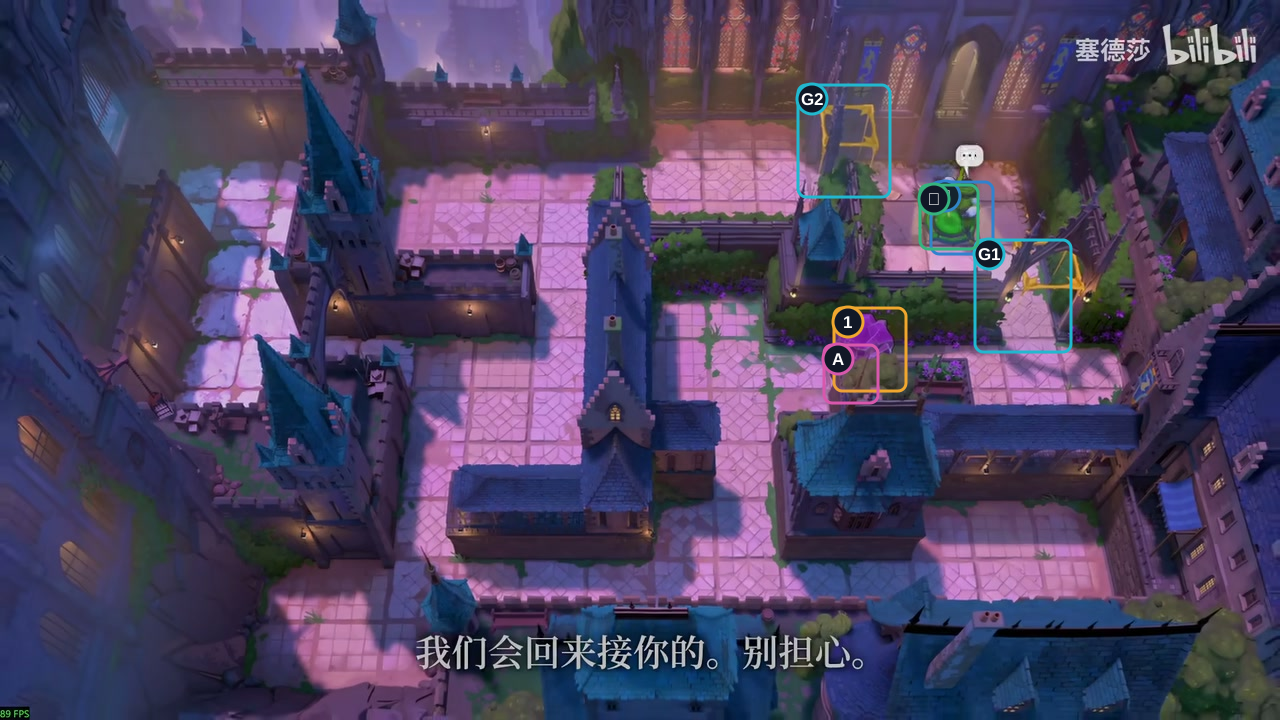
Move up three, right six, down once, then right once to the exit.
Check: The Thief reaches the green exit; Crystal 1 stays on A and both gates are open.
Open full-size image in a new tabFull direction sequence
↓ ← ↓ ↓ ↓ ← ← ← ← ← ↑ ↑ ↑ ↑ → → ↑ ↑ ↑ ↑ → → → ↑ → ↓ ← ↓ ← ↑ ← ← ← ↓ → ↓ ↓ ↓ ↓ ← ↑ ← ← ← ← ← ↑ → ↑ ↑ ↑ ← ↓ ← ↑ → → ↓ ↓ ← ↓ ↓ ↓ → ↑ → → → → ↓ ← ↓ ↓ ↓ ↓ ← ↑ ← ↓ → → ↑ → → → → → → → → → → ↑ ← ← ↓ ← ← ← ← ↑ → ↑ ↑ ↑ ↑ ← ↓ ↓ → → ↑ → → → → → ↓ ← ← ↑ ← ← ← ↓ ← ↓ ↓ ↓ ← ← ← ← ← ↑ ↑ ↑ ↑ → → ↑ ↑ ↑ ↑ → → → → → → ↓ →Thief: three switches and the long loop
Section titled “Thief: three switches and the long loop”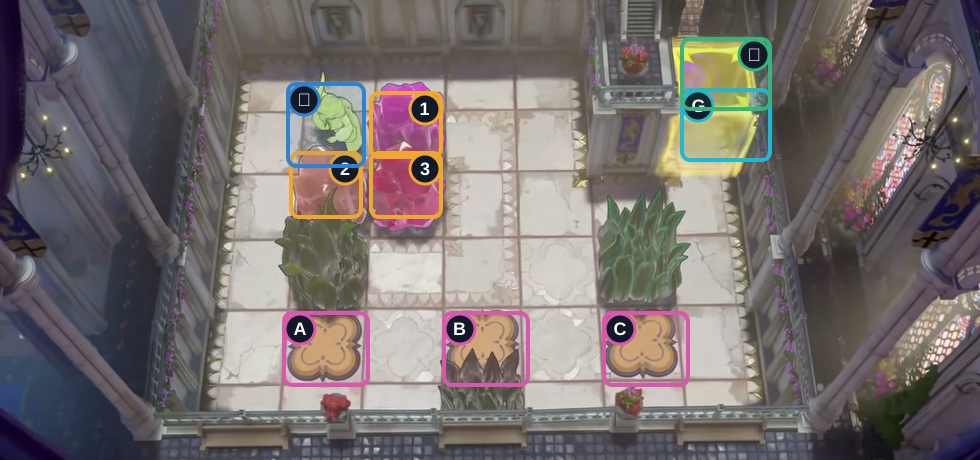
- Start
- Crystals 1–3
- Switches A–C
- Gate
- Exit
Hint
Bring Crystal 3 to switch C first, then leave Crystal 2 on A and Crystal 1 on B. The gate opens once A, B and C are occupied.
Step-by-step solution
Images show selected video checkpoints; the first frame is the starting position.
Start on the left side of the room.
Check: All three switches are empty; the gate is closed.
Open full-size image in a new tab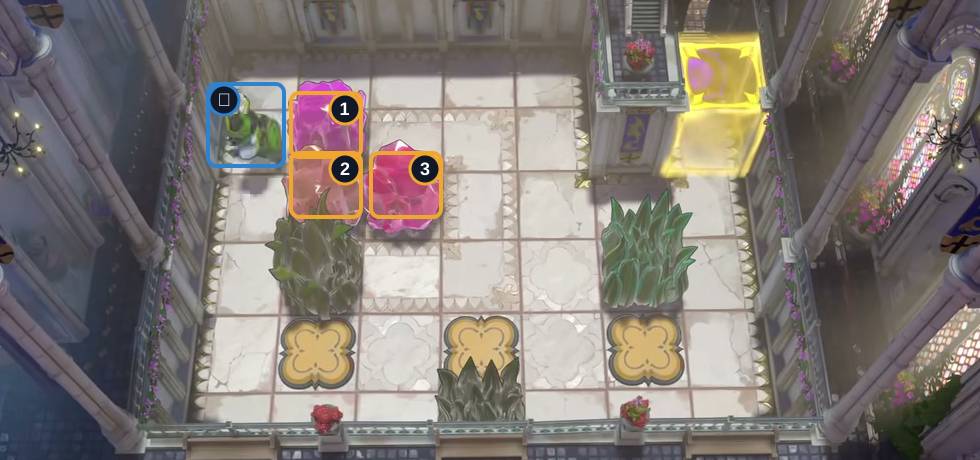
Move left once to pull Crystal 1 (purple) left.
Check: Crystal 1 has shifted left; Crystals 2 and 3 remain in place.
Open full-size image in a new tab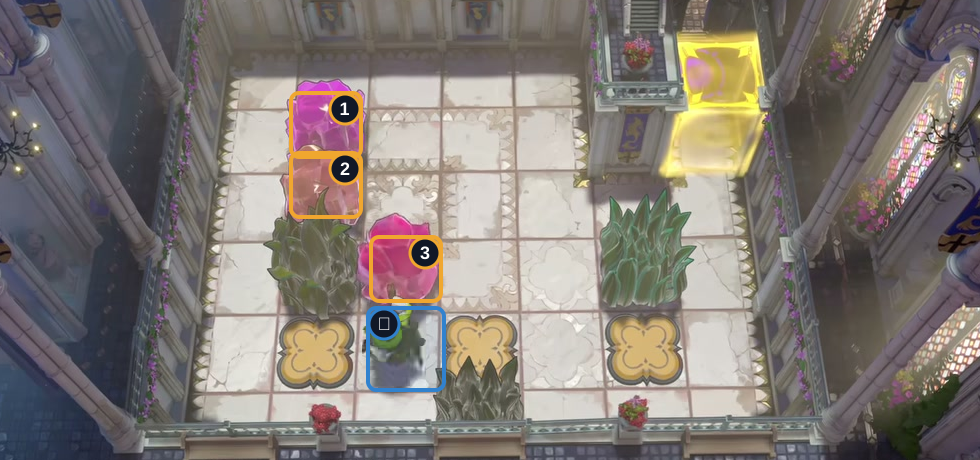
Walk down three cells, right twice, then up and down to pull Crystal 3 (pink) down one cell.
Check: Crystal 3 is one cell lower; the Thief stands below it.
Open full-size image in a new tab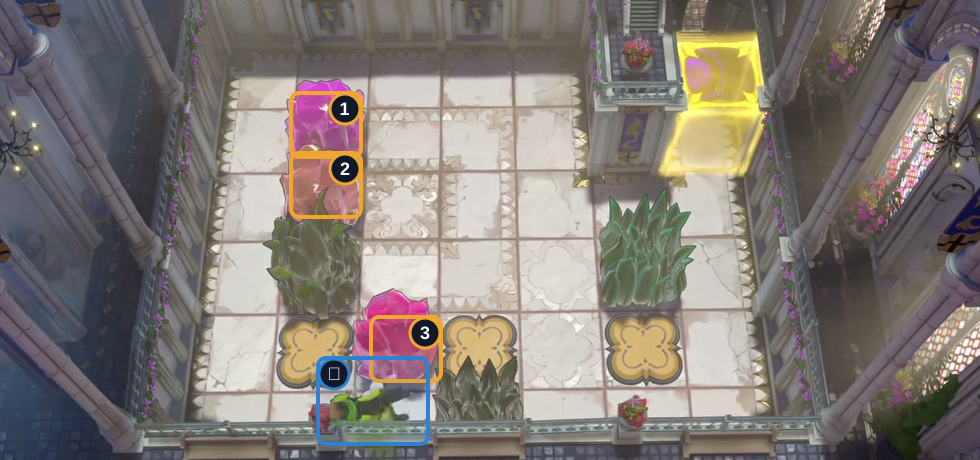
Step down once more to pull Crystal 3 down again.
Check: Crystal 3 moves one more cell down; the Thief follows below.
Open full-size image in a new tab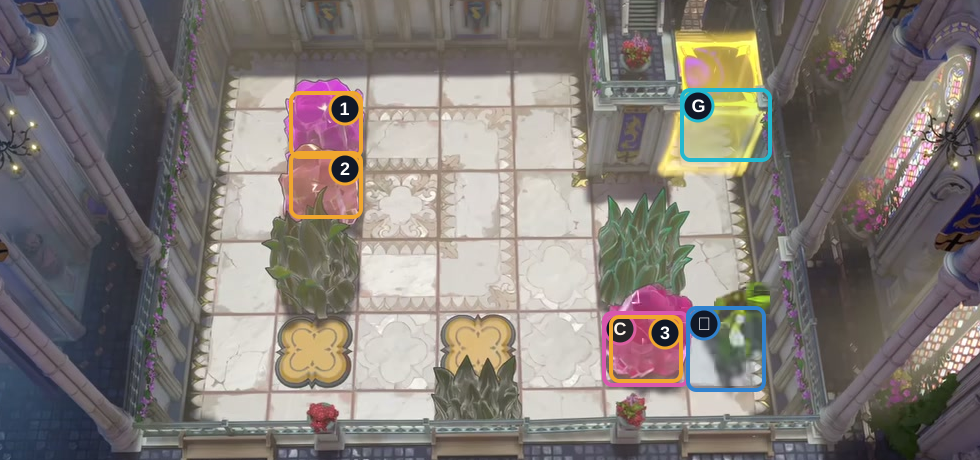
Pull Crystal 3 left once, loop below it, then pull right four times onto Switch C.
Check: Crystal 3 holds Switch C; A and B are empty, so the gate is closed.
Open full-size image in a new tab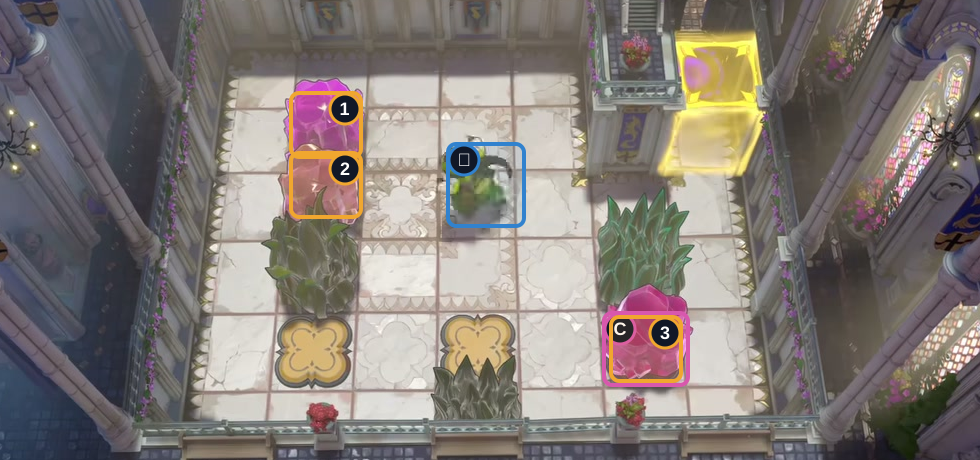
Move up twice, then left three cells.
Check: The Thief has crossed toward Crystal 2; the crystals have not moved.
Open full-size image in a new tab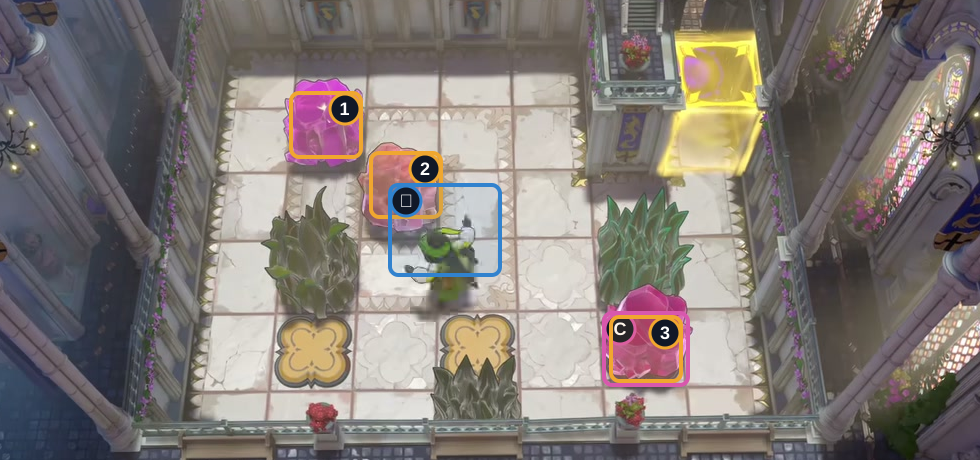
Step left and right to pull Crystal 2 one cell right, then move down once.
Check: Crystal 2 shifts right; the Thief stands below it.
Open full-size image in a new tab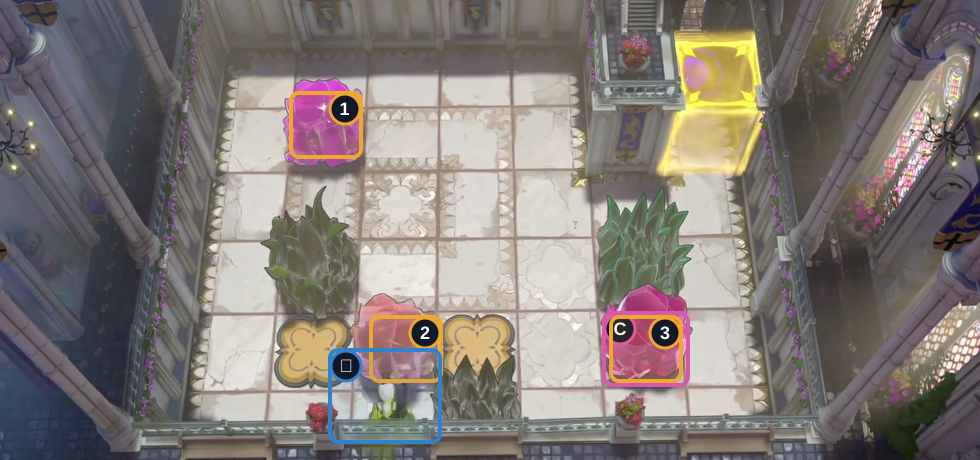
Move left once, then down twice to pull Crystal 2 two cells down.
Check: Crystal 2 reaches the middle lane; the Thief stands below it.
Open full-size image in a new tab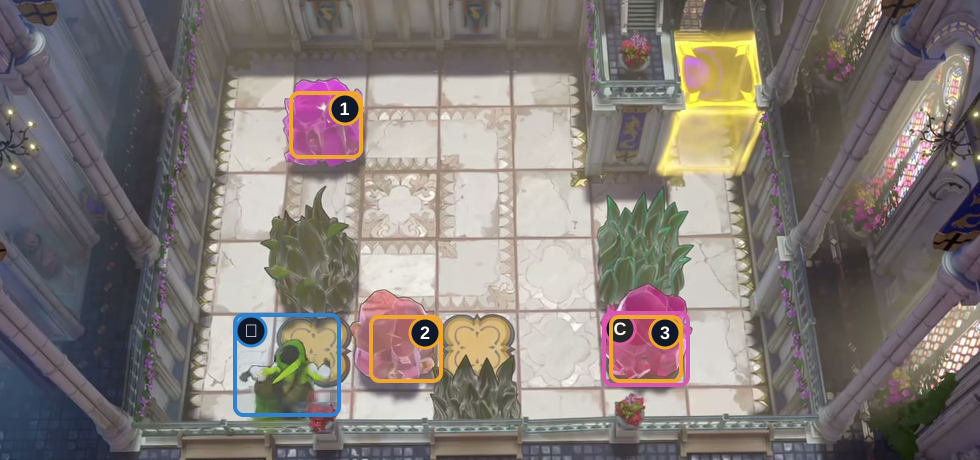
Step left once to stand below Switch A.
Check: The Thief stands below Switch A; Crystal 2 remains in the middle lane.
Open full-size image in a new tab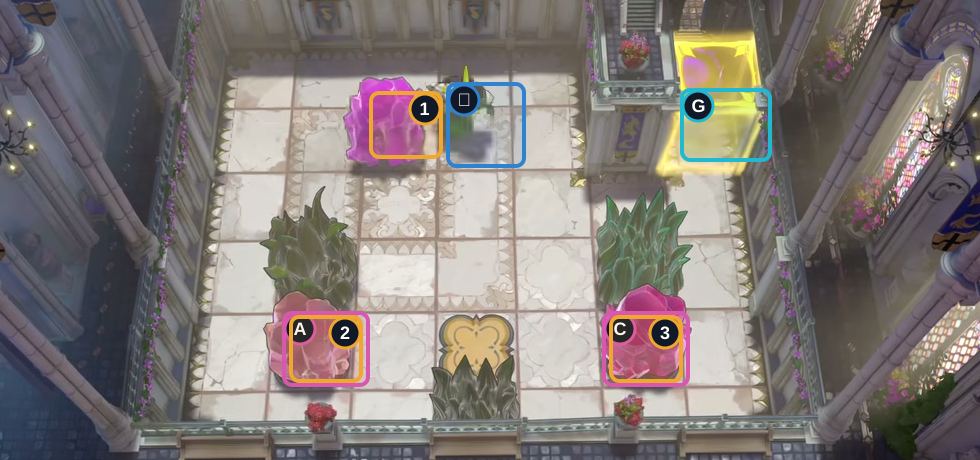
Move up and left to pull Crystal 2 onto Switch A; circle up and right to pull Crystal 1 one cell right.
Check: Crystal 2 holds A and Crystal 3 holds C; Crystal 1 remains in the upper-left lane. The gate is closed.
Open full-size image in a new tab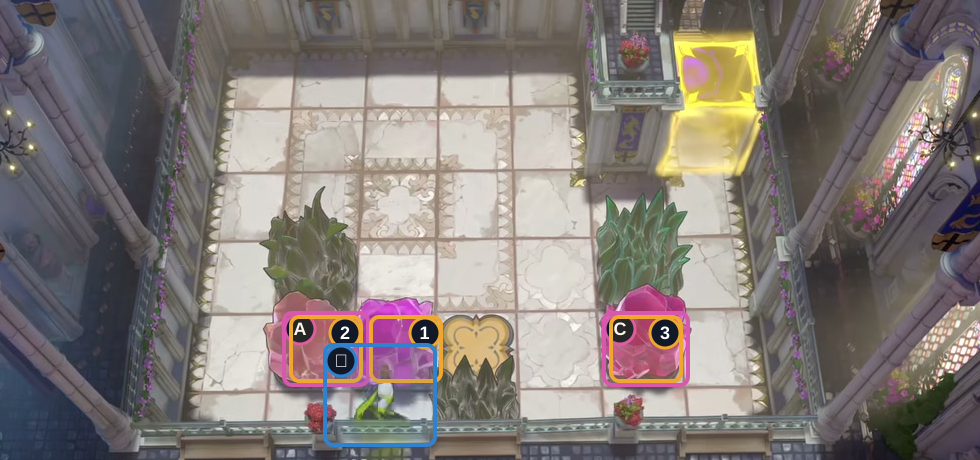
Move down, left, then down three times to pull Crystal 1 toward the middle.
Check: Crystal 1 reaches the middle lane; Crystals 2 and 3 remain on A and C.
Open full-size image in a new tab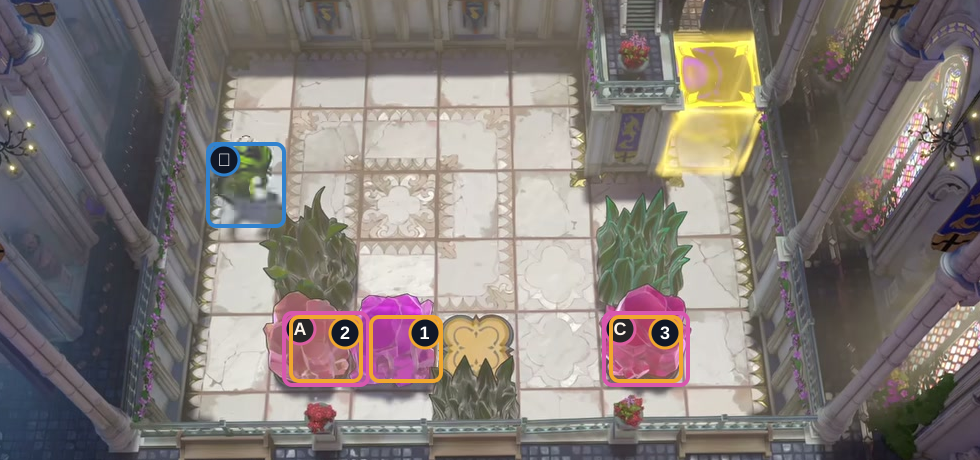
Move left twice, then up three times.
Check: Crystal 1 stays in the middle; Crystals 2 and 3 remain on A and C.
Open full-size image in a new tab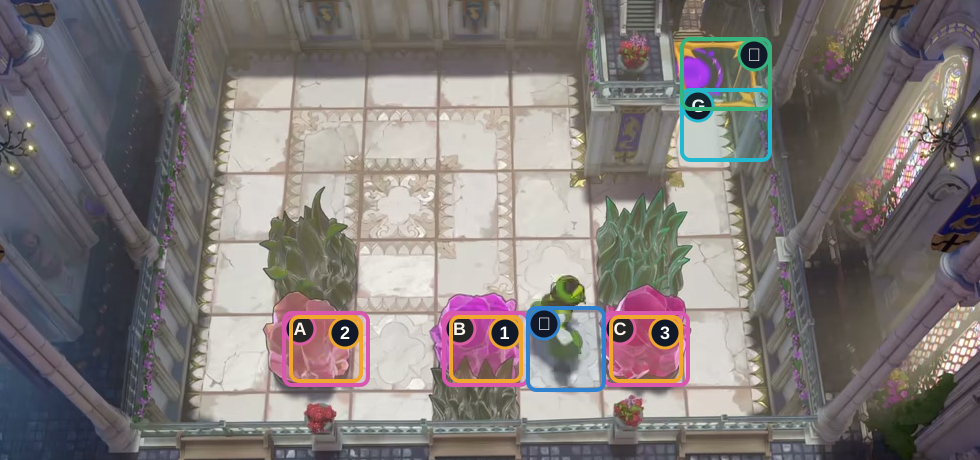
Move right twice, down, right, down, then right to pull Crystal 1 onto Switch B.
Check: Crystal 1 holds B, Crystal 2 holds A, and Crystal 3 holds C. All switches are occupied; the gate is open.
Open full-size image in a new tab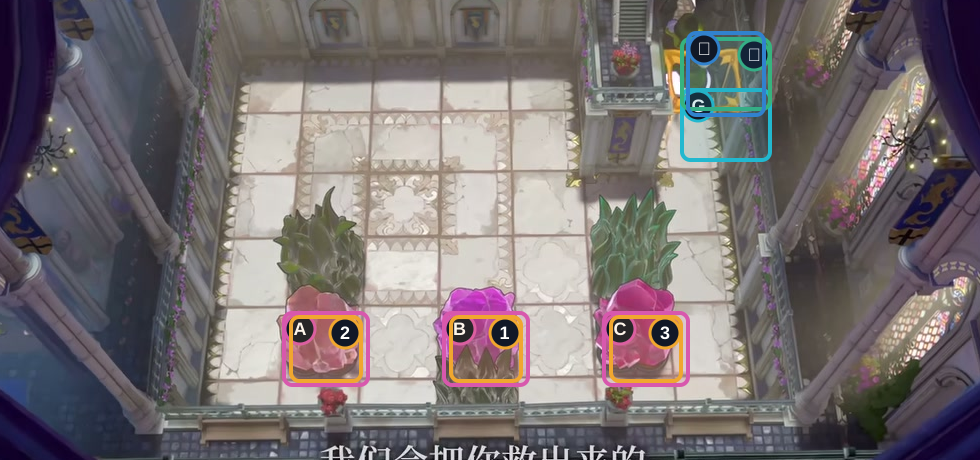
Move up twice, right twice, then up twice through the open gate to the exit.
Check: The Thief reaches the exit; all three switches remain occupied and the gate is open.
Open full-size image in a new tabFull direction sequence
← ↓ ↓ ↓ → → ↑ ↓ ↓ ← ↑ ← ↓ → → ↑ → → → → ↑ ↑ ← ← ← ← → ↓ ← ↓ ↓ ← ↑ ← ↑ ↑ → → ↑ → ↓ ← ↓ ↓ ↓ ← ← ↑ ↑ ↑ → → ↓ → ↓ → ↑ ↑ → → ↑ ↑Wizard: swap with two crystals
Section titled “Wizard: swap with two crystals”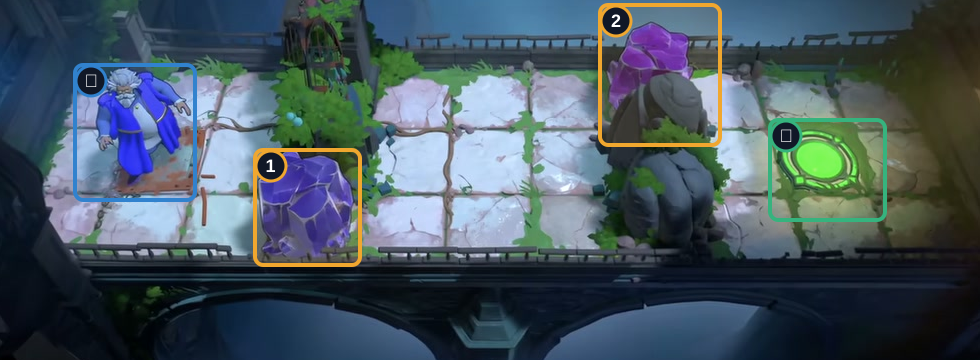
- Start
- Crystals 1–2
- Exit
Hint
A directional move swaps with the first visible crystal in its line; if no object is ahead, it is a normal step. The second swap can reach past an empty tile.
Step-by-step solution
Images show selected video checkpoints; the first frame is the starting position.
Start on the left side of the bridge.
Check: Both crystals are in their starting positions.
Open full-size image in a new tab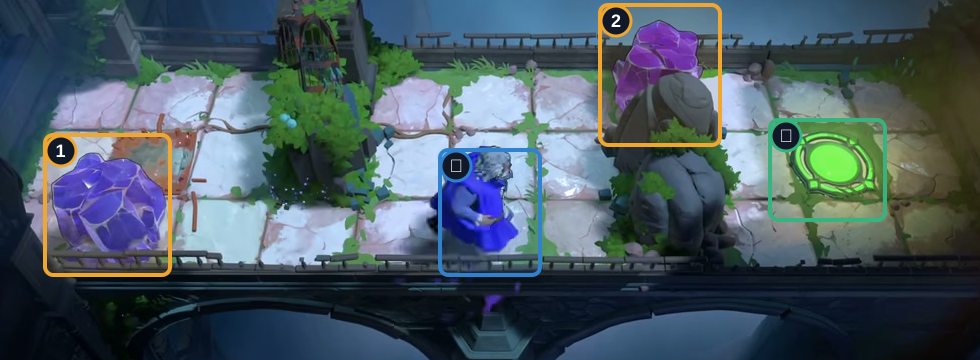
Step down, then right to swap with Crystal 1. Move right twice more.
Check: Crystal 1 is now at the left side; the Wizard has crossed to the lower middle.
Open full-size image in a new tab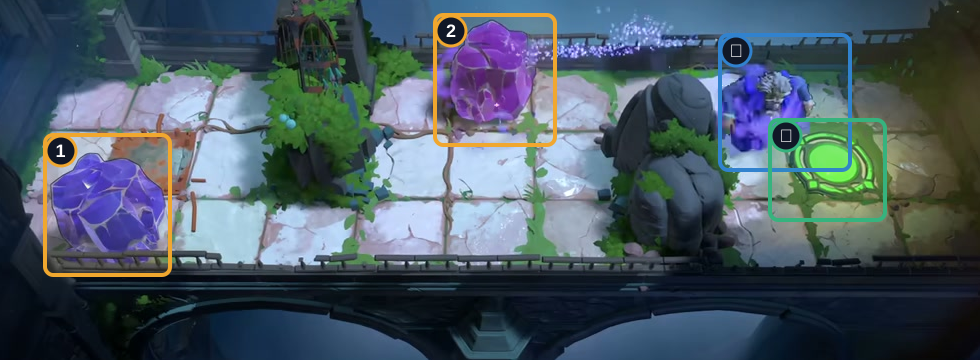
Go up twice, then right to swap with Crystal 2. Move right once more.
Check: Crystal 2 has shifted to the upper middle; Crystal 1 remains on the left.
Open full-size image in a new tab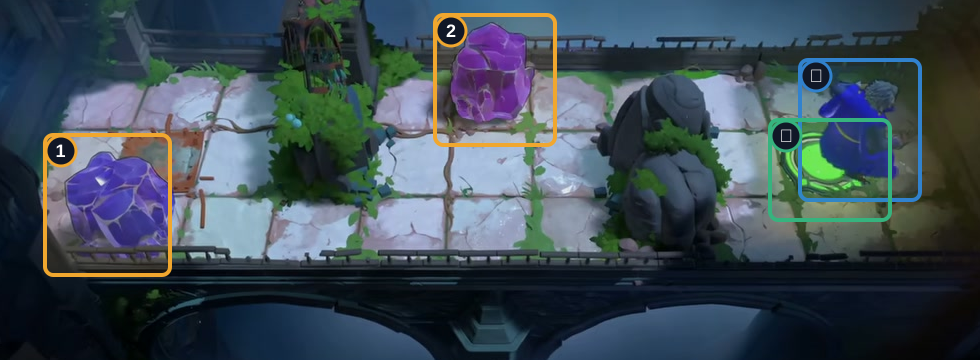
Move down once and right once to reach the exit.
Check: The Wizard reaches the green exit with both crystals in their new positions.
Open full-size image in a new tabFull direction sequence
↓ → → → ↑ ↑ → → ↓ →Wizard: one crystal and a switch
Section titled “Wizard: one crystal and a switch”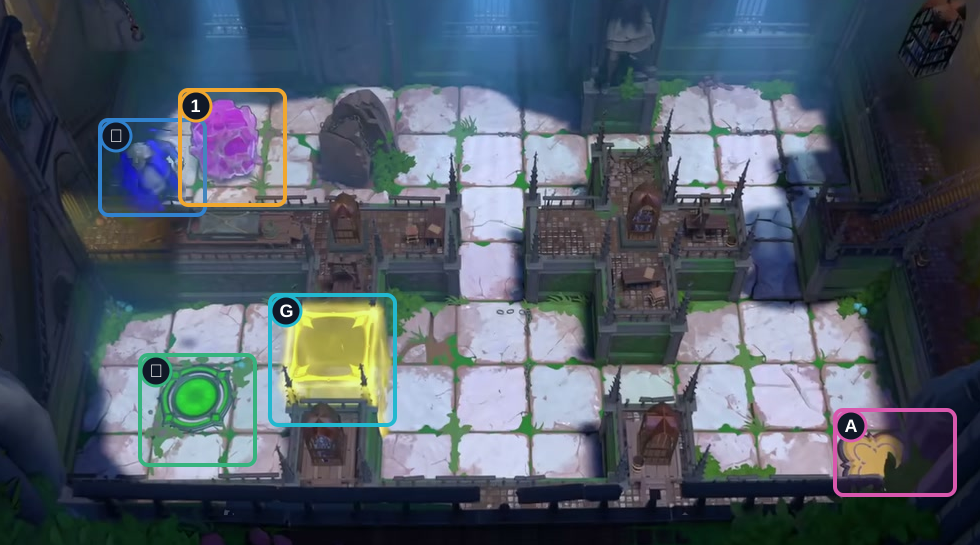
- Start
- Crystal 1
- Switch A
- Gate
- Exit
Hint
Use the single crystal as a moving marker. Each visible-line swap relocates it to the Wizard’s previous tile; the final position must be switch A.
Step-by-step solution
Images show selected video checkpoints; the first frame is the starting position.
Start on the upper-left path. Crystal 1 is one tile to the right.
Check: Switch A is clear and Gate G is closed.
Open full-size image in a new tab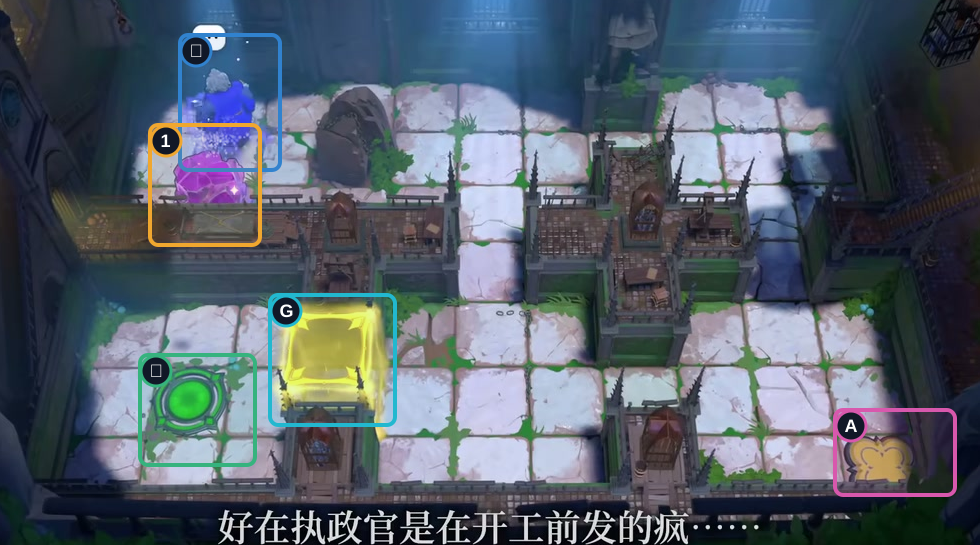
Go down, right, then up twice to move Crystal 1 down one row.
Check: Crystal 1 moved one row down; the Wizard is on the upper-left lane.
Open full-size image in a new tab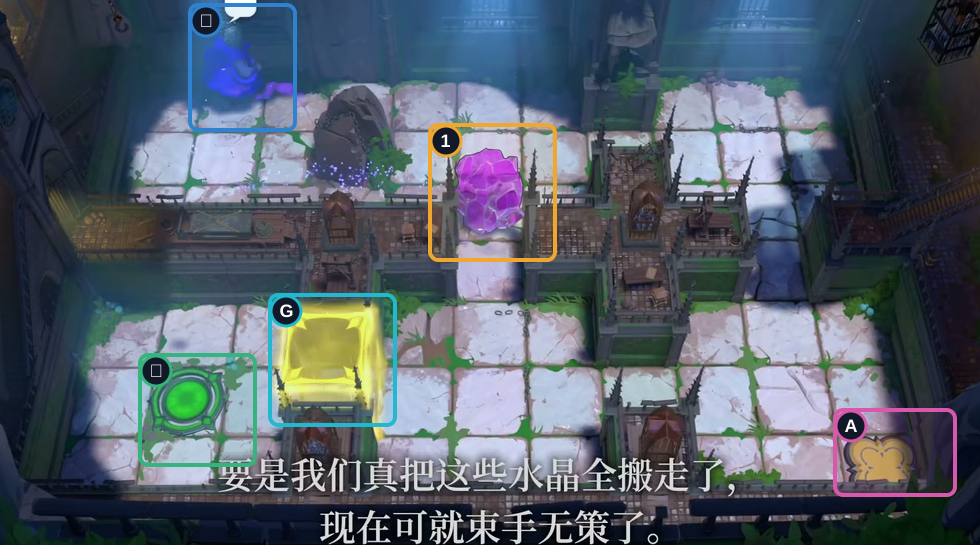
Move right, down twice, right three times, left to swap with Crystal 1, then up twice.
Check: Crystal 1 is at the middle crossing; the Wizard is back on the upper-left lane.
Open full-size image in a new tab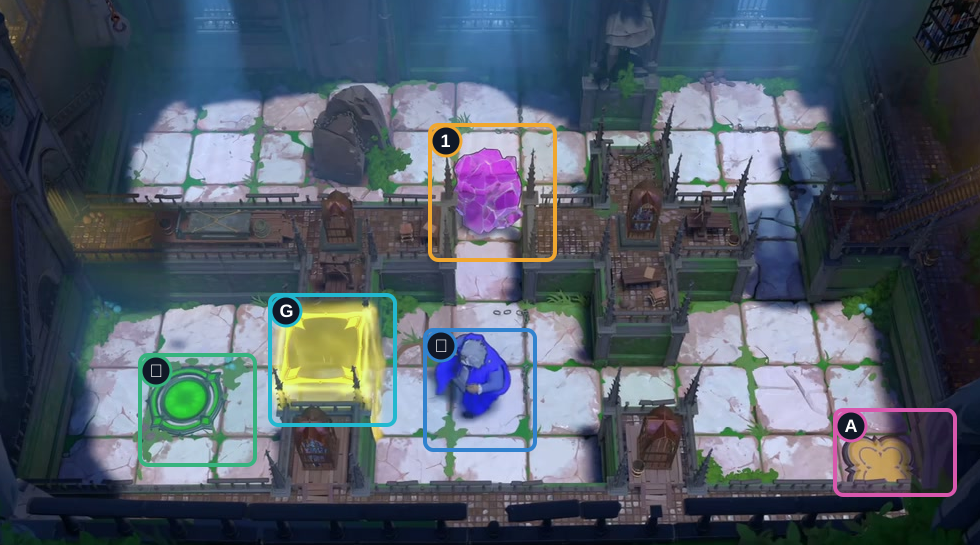
Move right three, down, right, then down to swap with Crystal 1.
Check: Crystal 1 moved to the upper middle; the Wizard stands below it.
Open full-size image in a new tab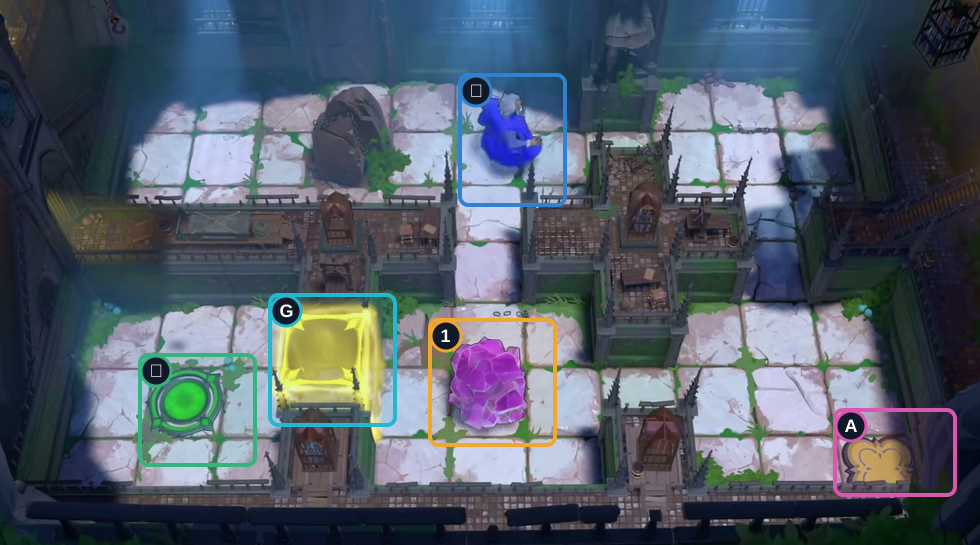
Move down three, then up to swap Crystal 1. Circle left, down, right, and up.
Check: The Wizard reaches the central crossing; Crystal 1 stays in the lower middle.
Open full-size image in a new tab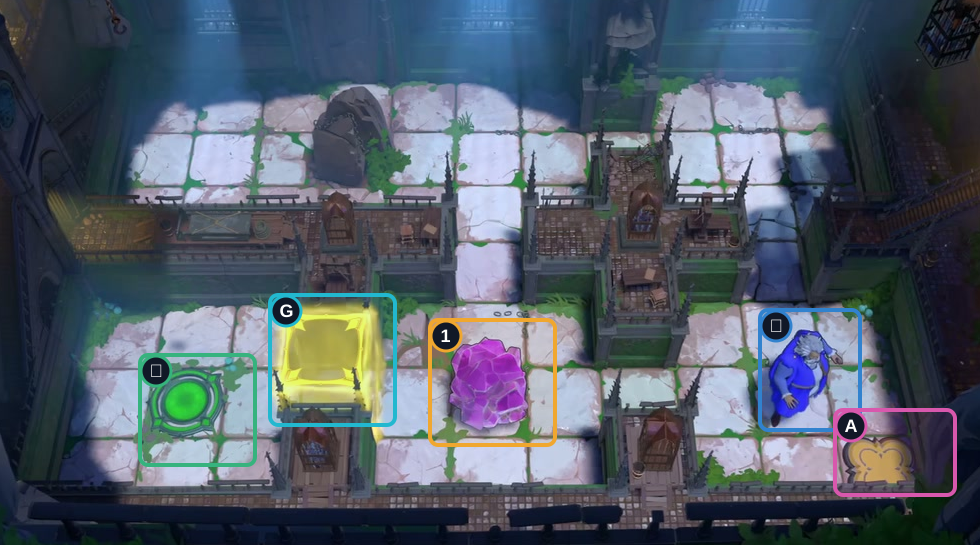
Move right three, down, right, then down three, then right.
Check: The Wizard reaches the right lane; Crystal 1 remains in the lower middle.
Open full-size image in a new tab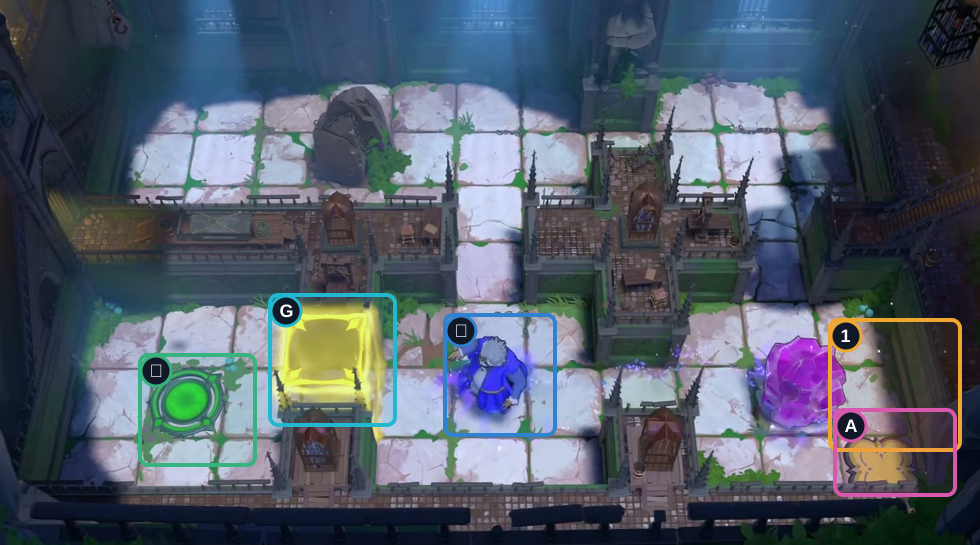
Move left to swap with Crystal 1.
Check: Crystal 1 moves to the tile above Switch A; the Wizard returns to the lower middle.
Open full-size image in a new tab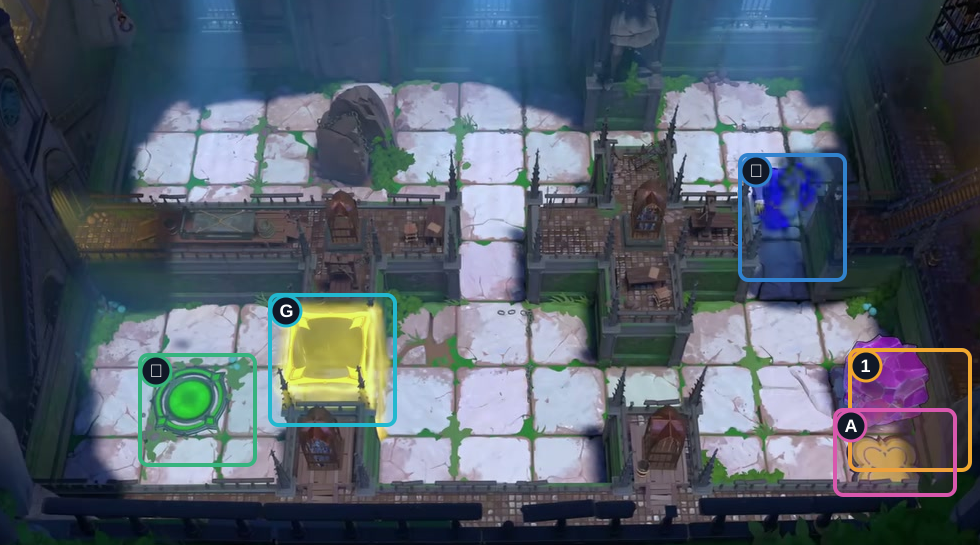
Move up four, right three, down, right, then down once toward Switch A.
Check: The Wizard is approaching Switch A; Gate G is still closed.
Open full-size image in a new tab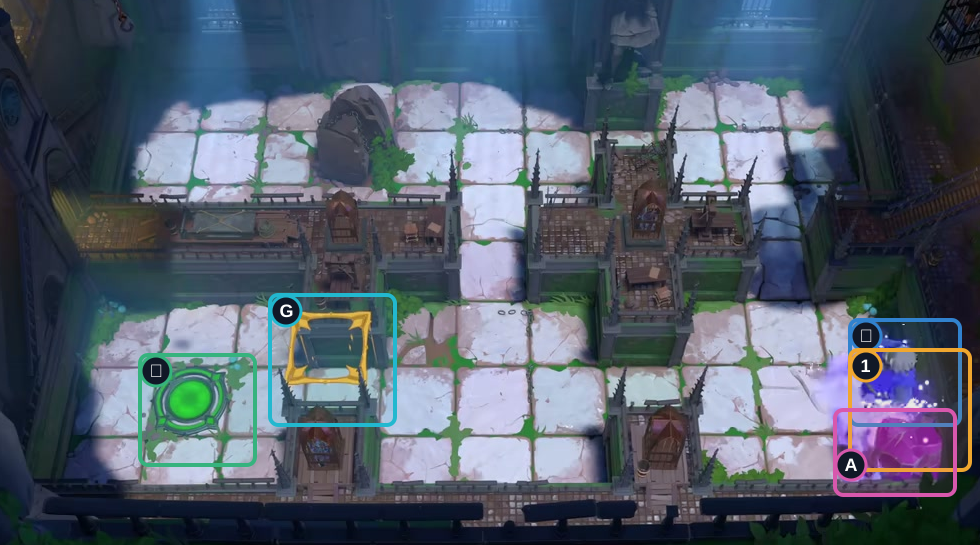
Move down three and right onto Switch A, then up to swap Crystal 1 onto it.
Check: Crystal 1 holds Switch A and Gate G opens.
Open full-size image in a new tab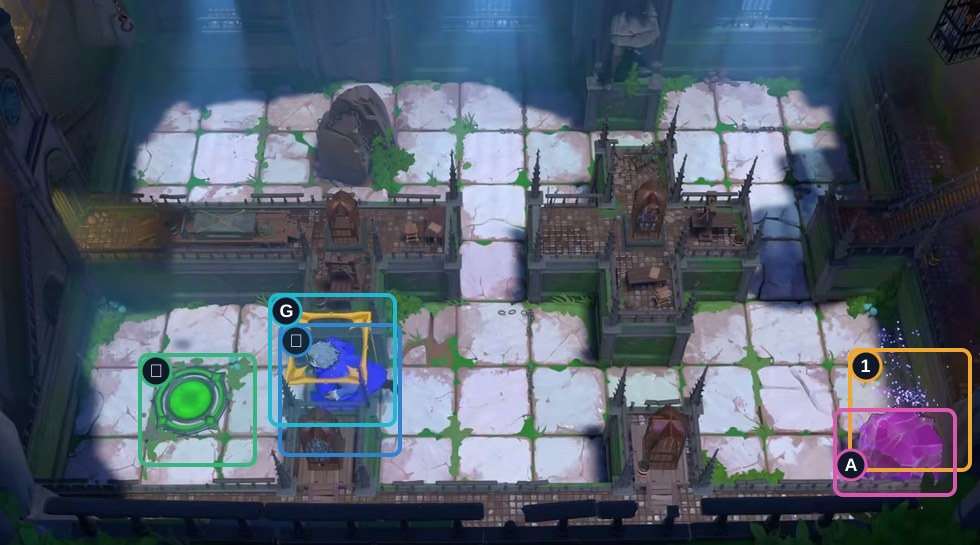
Move left seven through the open gate passage.
Check: The Wizard reaches the open gate passage; Crystal 1 keeps Switch A pressed.
Open full-size image in a new tab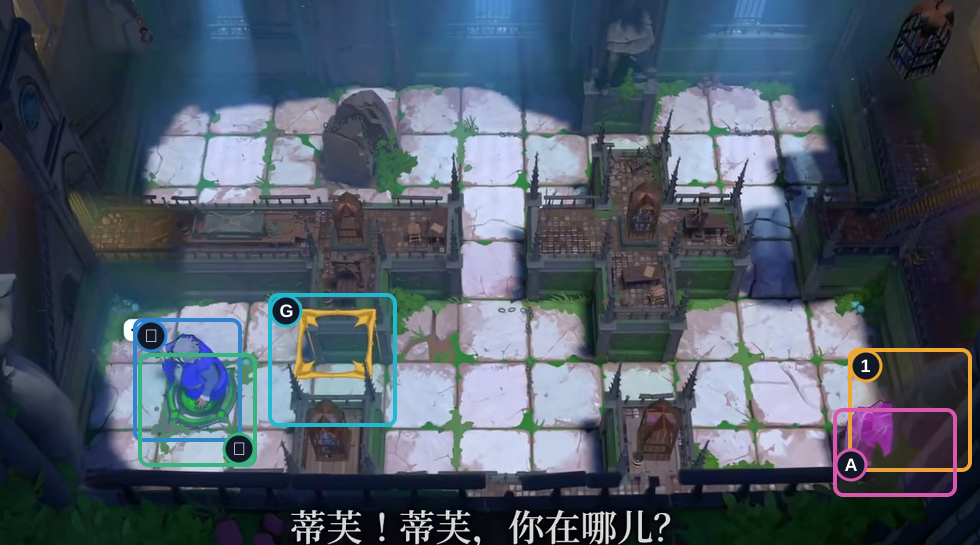
Move left twice more to reach the green exit.
Check: The Wizard reaches the exit; Crystal 1 keeps Switch A pressed.
Open full-size image in a new tabFull direction sequence
↓ → ↑ ↑ → ↓ ↓ → → → ← ↑ ↑ → → → ↓ → ↓ ↓ ↓ ↓ ↑ ← ↓ → ↑ → → → ↓ → ↓ ↓ ↓ → ← ↑ ↑ ↑ ↑ → → → ↓ → ↓ ↓ ↓ ↓ → ↑ ← ← ← ← ← ← ← ← ←Wizard: nine switches and the side gate
Section titled “Wizard: nine switches and the side gate”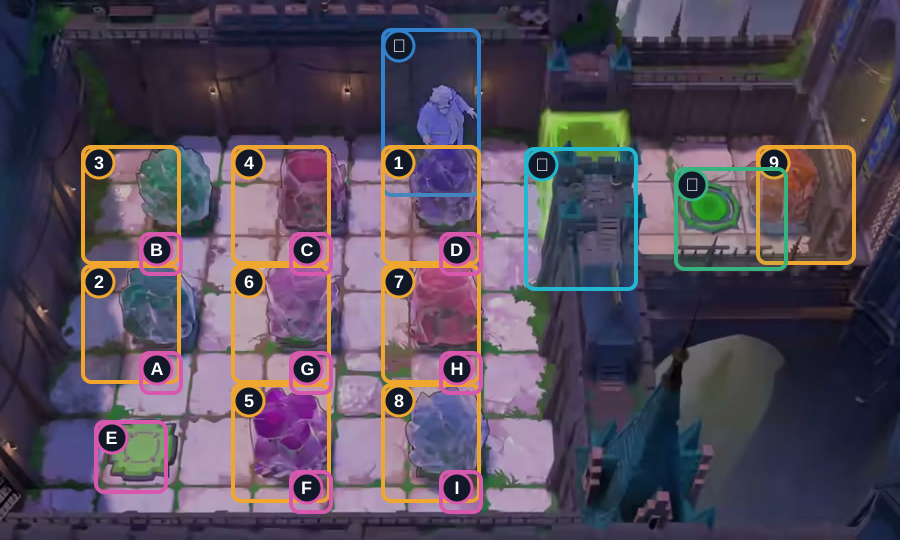
- Start
- Crystals 1–9
- Switches A–I
- Gate
- Exit
Hint
Switch labels A through I follow the map’s pink markers; some markers sit beneath crystals. E is the empty switch. Reach it, then use a chain of swaps to fill the pads left behind by each crystal.
Step-by-step solution
Images show selected video checkpoints; the first frame is the starting position.
Start on the upper side of the board.
Check: Switch E is the only uncovered switch.
Open full-size image in a new tab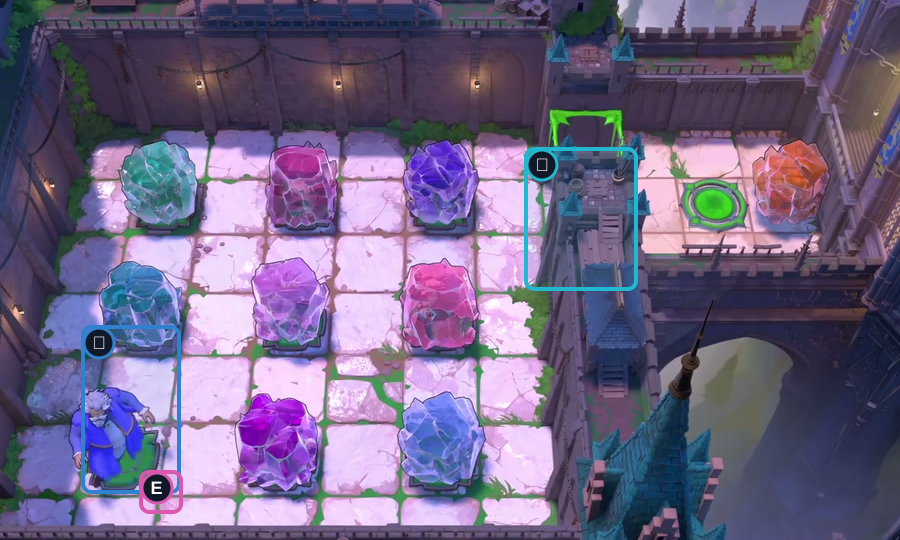
Walk left five, down four, right once, then down to empty Switch E.
Check: The Wizard stands on E; all switches are now occupied and the gate opens.
Open full-size image in a new tab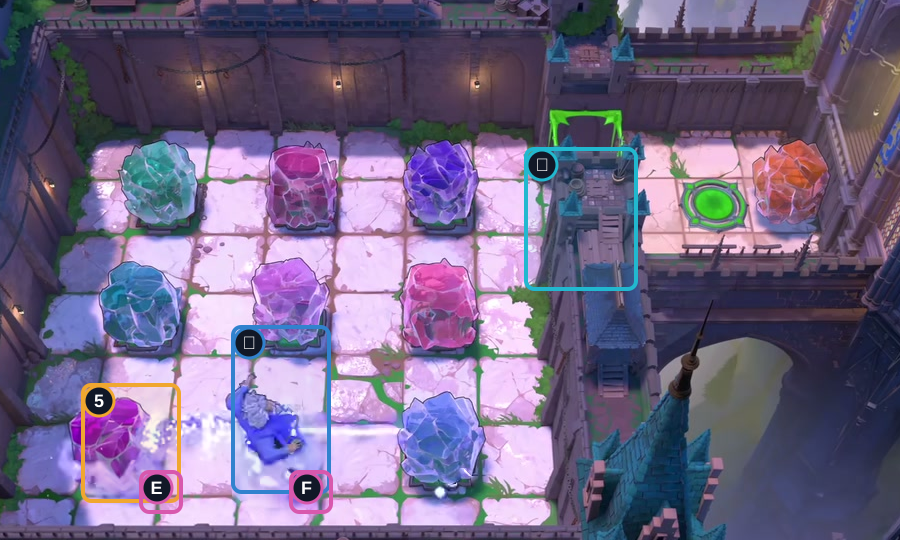
Press right to swap Crystal 5 from F onto E.
Check: Crystal 5 covers E and the Wizard stands on F.
Open full-size image in a new tab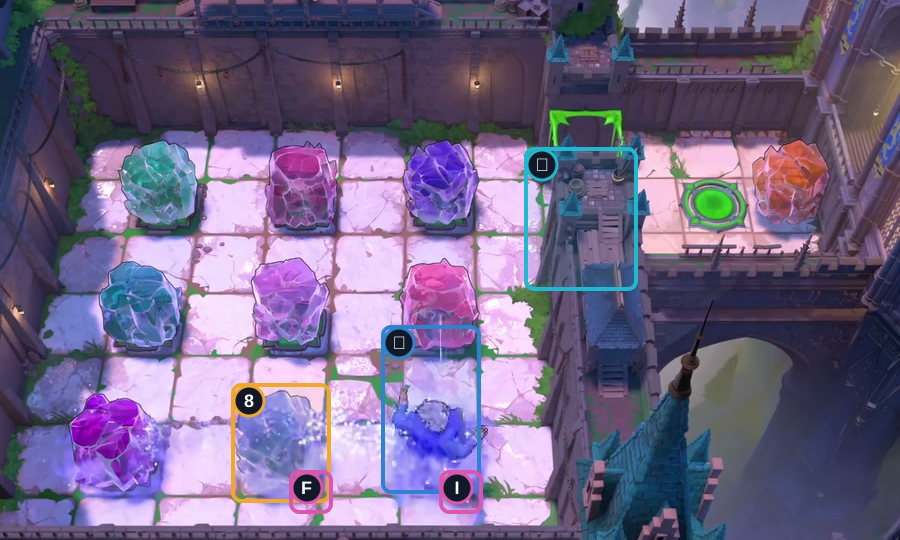
Press right again to swap Crystal 8 from I onto F.
Check: Crystal 8 covers F and the Wizard stands on I.
Open full-size image in a new tab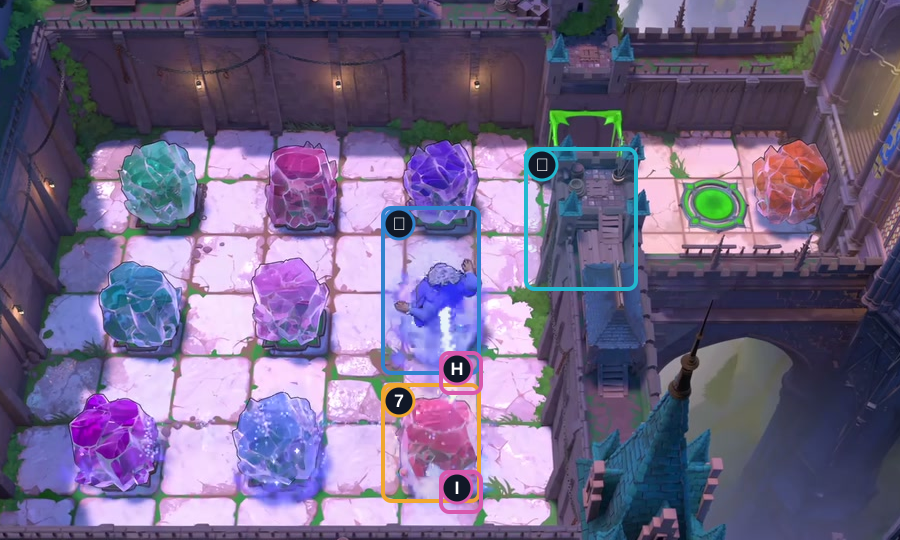
Press up to swap Crystal 7 from H onto I.
Check: Crystal 7 covers I and the Wizard stands on H.
Open full-size image in a new tab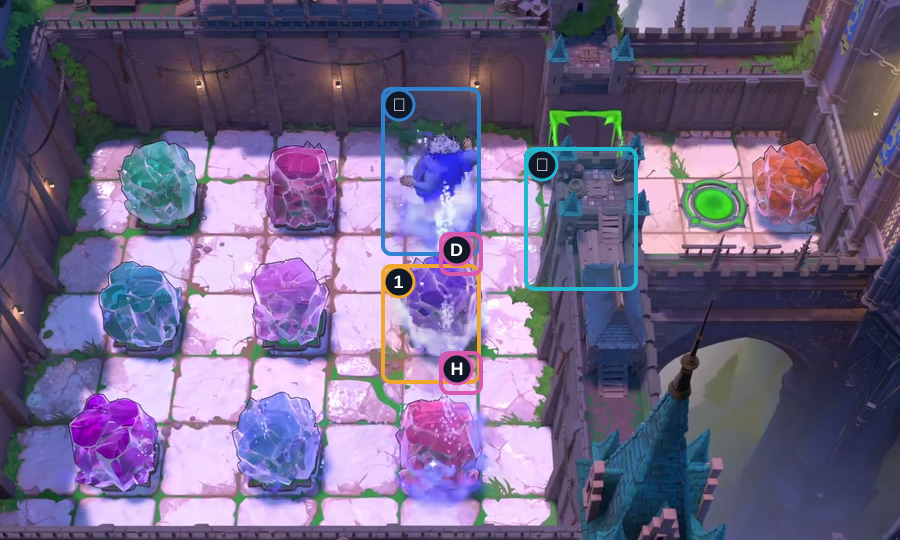
Press up to swap Crystal 1 from D onto H.
Check: The Wizard stands on D while the switches remain occupied.
Open full-size image in a new tab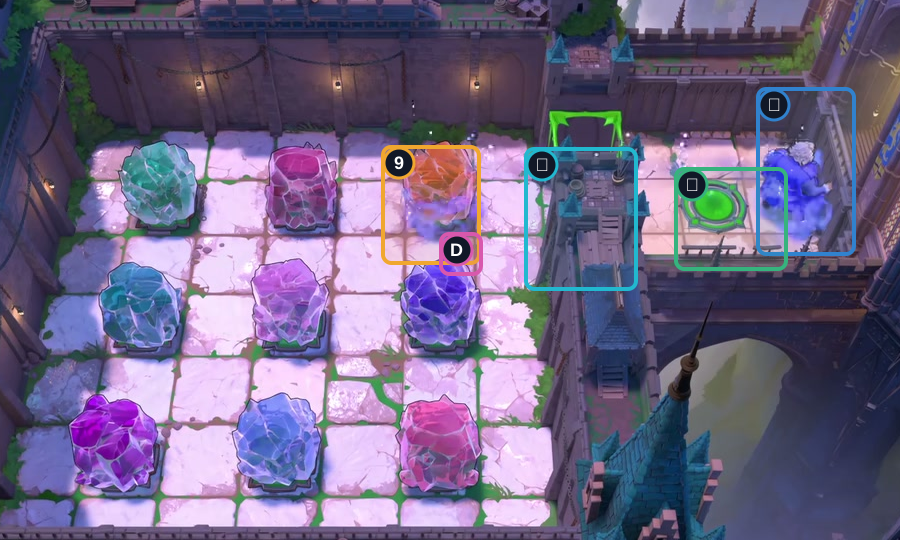
Press right to swap Crystal 9 onto D.
Check: The gate stays open while the Wizard stands outside.
Open full-size image in a new tab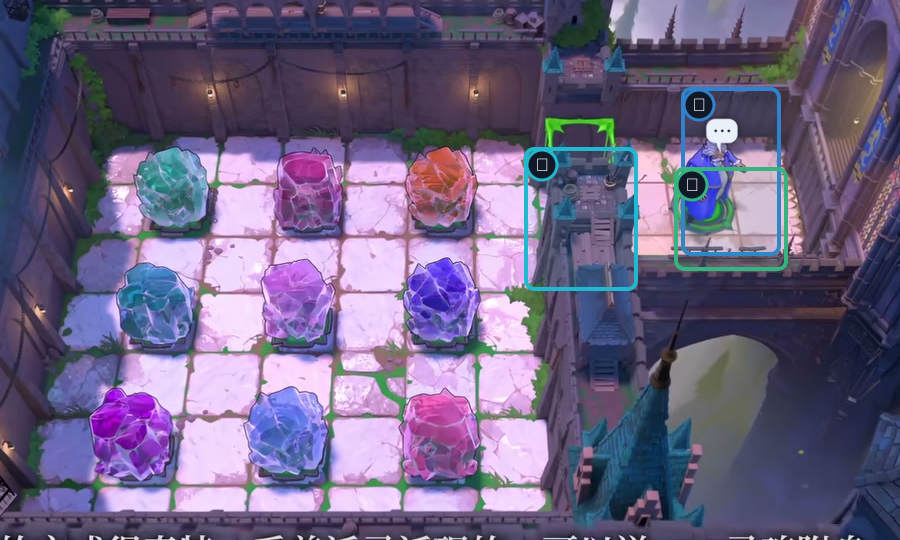
Move down, left, then up onto the exit.
Check: The Wizard reaches the green exit.
Open full-size image in a new tabFull direction sequence
← ← ← ← ← ↓ ↓ ↓ ↓ → ↓ → → ↑ ↑ → ↓ ← ↑Wizard: three switches around the thorns
Section titled “Wizard: three switches around the thorns”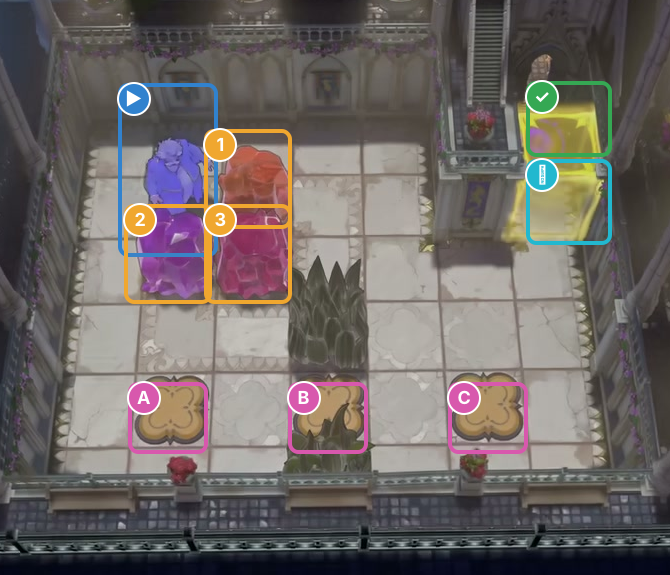
- Start
- Crystals 1–3
- Switches A–C
- Gate
- Exit
Hint
Leave Crystal 1 on switch C, Crystal 2 on B and Crystal 3 on A. The central thorns block direct crossing, so follow the clear lanes around the board.
Step-by-step solution
Images show selected video checkpoints; the first frame is the starting position.
Look over the board: the Wizard starts beside Crystals 1–3.
Check: All three switches are empty; the gate is closed.
Open full-size image in a new tab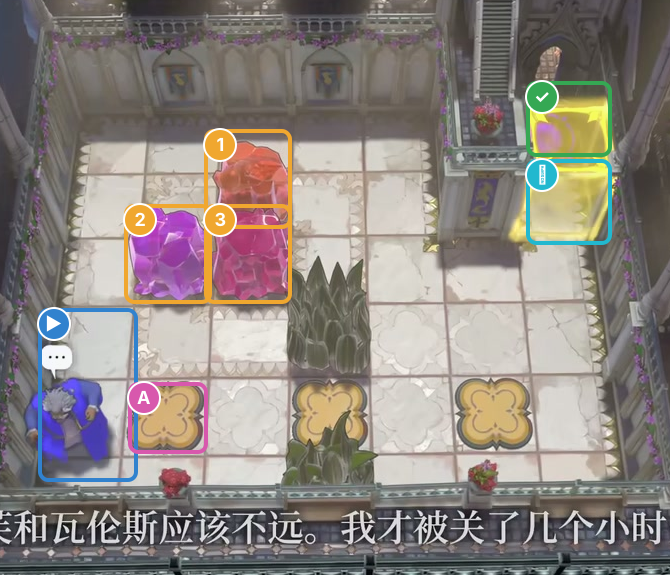
Move left, then down three spaces to stand beside Switch A.
Check: The Wizard is left of A; all three crystals remain in place.
Open full-size image in a new tab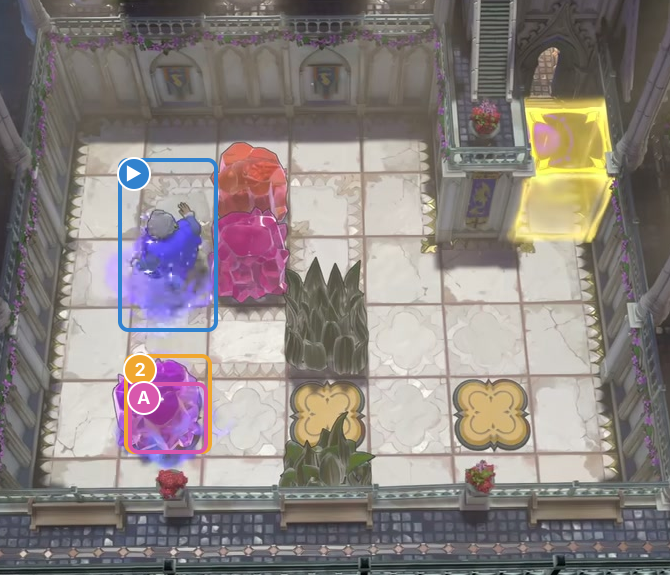
Move right onto A, then swap up with Crystal 2.
Check: Crystal 2 rests on A; the Wizard stands above it.
Open full-size image in a new tab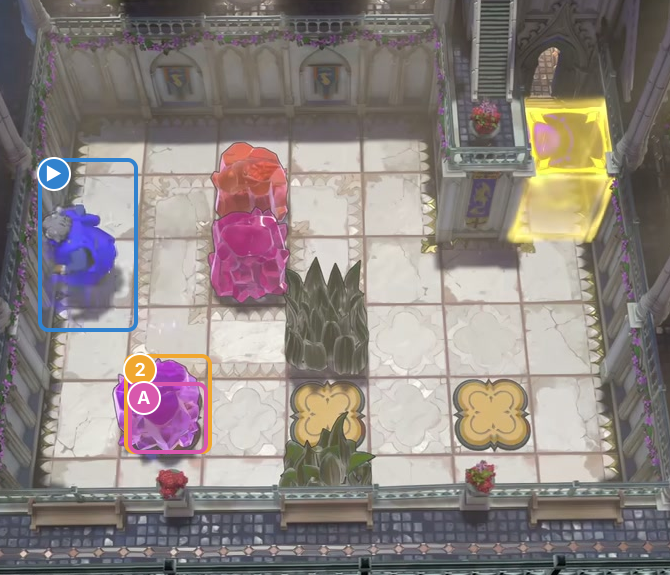
Move left one tile.
Check: Crystal 2 occupies A; the Wizard stands one tile to the left of its former square.
Open full-size image in a new tab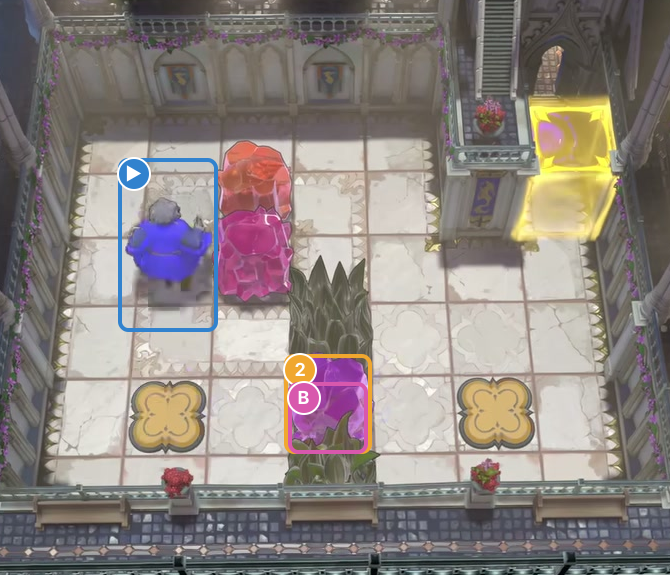
Move down, right twice, down, right onto B, left to swap Crystal 2 onto B, then up twice.
Check: Crystal 2 is on B; Crystals 1 and 3 remain in their starting squares.
Open full-size image in a new tab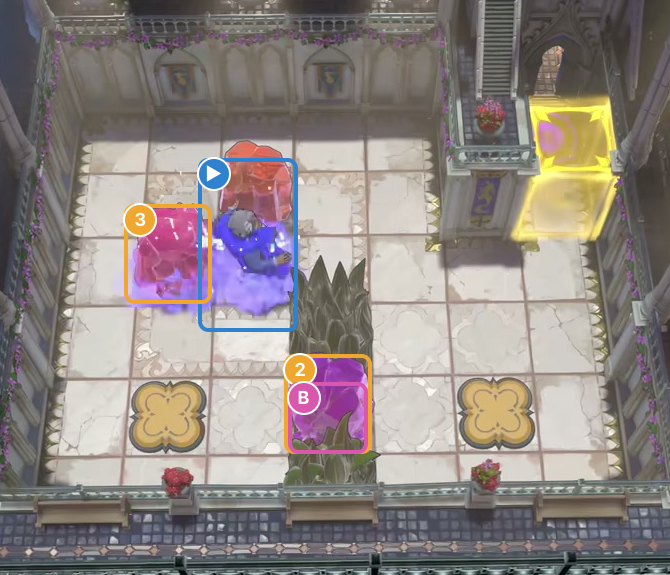
Swap right with Crystal 3, moving it to the left side of the thorns.
Check: Crystal 3 is now at the left of the thorns; Crystal 2 stays on B.
Open full-size image in a new tab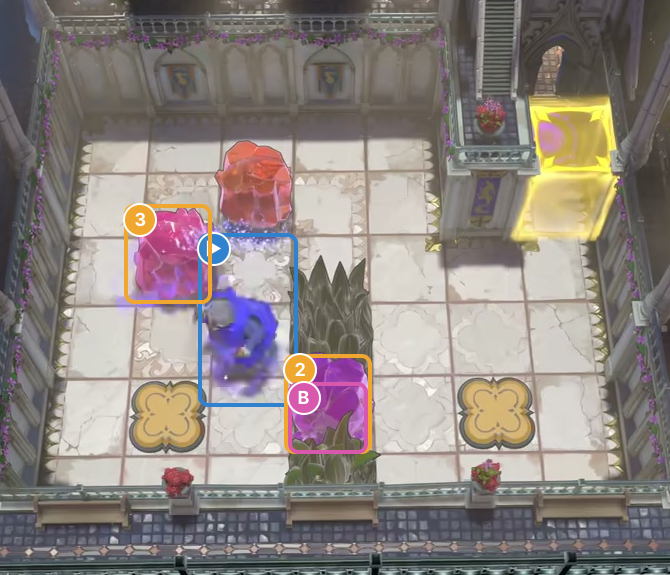
Step down beside the thorns to continue the route.
Check: The crystal positions stay fixed: Crystal 2 on B and Crystal 3 left of the thorns.
Open full-size image in a new tab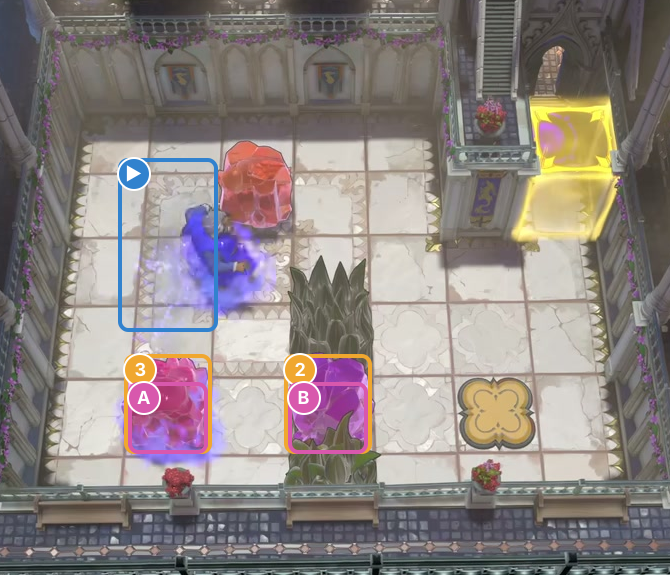
Move down, left, then swap up to place Crystal 3 on A.
Check: Crystal 3 is on A; Crystal 2 stays on B.
Open full-size image in a new tab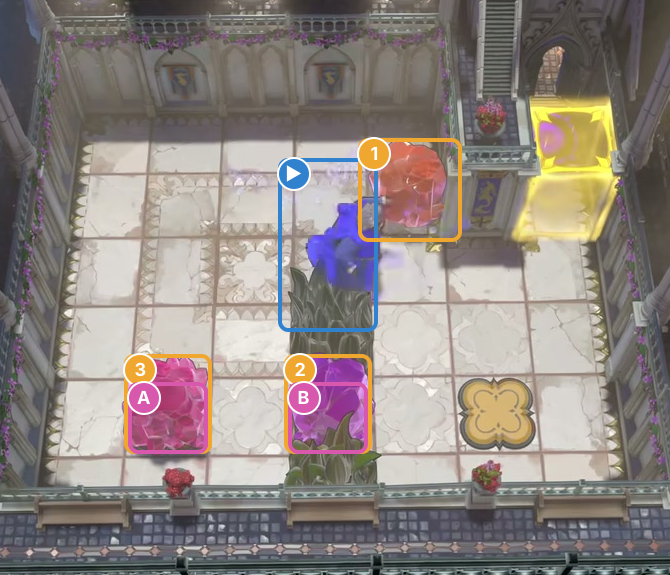
Right twice, up, right, left to swap with Crystal 1, down, then right.
Check: Crystal 1 has moved right along the upper path; Crystals 2 and 3 stay on B and A.
Open full-size image in a new tab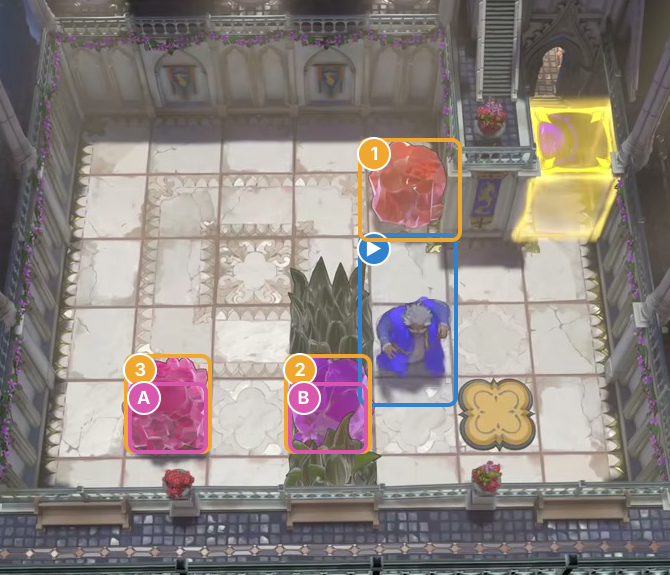
Move right, then down.
Check: Crystal 1 stays to the right of the thorns; Crystals 2 and 3 stay on B and A.
Open full-size image in a new tab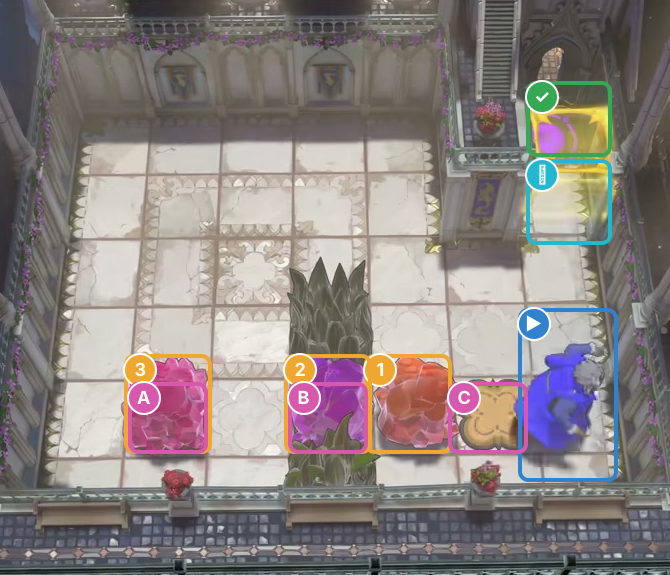
Down, up to swap with Crystal 1, left, down, right twice, down twice, then right.
Check: Crystal 1 is beside C, but C is empty and the gate is closed.
Open full-size image in a new tab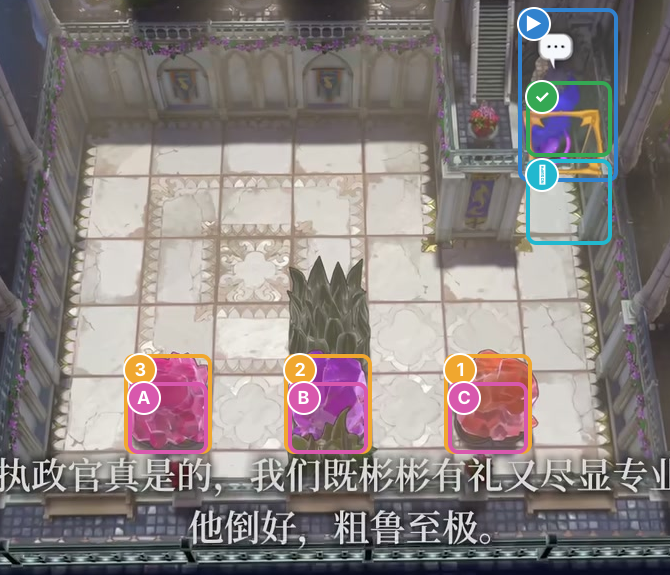
Swap left with Crystal 1, then up, right, down, right, and up four to the exit.
Check: Crystals 1–3 occupy C, B, and A; the gate is open and the Wizard reaches the exit.
Open full-size image in a new tabFull direction sequence
← ↓ ↓ ↓ → ↑ ← ↓ → → ↓ → ← ↑ ↑ → ↓ ↓ ← ↑ → → ↑ → ← ↓ → → ↓ ↓ ↑ ← ↓ → → ↓ ↓ → ← ↑ → ↓ → ↑ ↑ ↑ ↑Sources and credits
Starting layouts and route notation: PC r67121 opening boards. Board images: Thekla, Inc. Creator footage: 塞德莎, Heroes of Hauling part 2.
- Opening hero puzzle boards and ability flags (PC r67121) — Extracted data
- Joric's PuzzleScript movement-rule port — Documentation · commit-4e6e0784727d95c7337d50f6d5b3ef912aa0e8ae
- [North] Hero Transporter [North 1 missing 1 / North 2] / 【北】搬运英雄[北1缺1题/北2] — Observed in-game
- Warrior corridor step-by-step screenshots — Observed in-game · screenshots-reviewed-2026-10-18
- Warrior six-chamber step-by-step screenshots — Observed in-game · screenshots-reviewed-2026-10-18
- Warrior one-switch step-by-step screenshots — Observed in-game · screenshots-reviewed-2026-10-18
- Wizard two-crystal corridor step-by-step screenshots — Observed in-game · screenshots-reviewed-2026-10-18
- Warrior three-switch step-by-step screenshots — Observed in-game · screenshots-reviewed-2026-10-18
- Thief two-crystal corridor step-by-step screenshots — Observed in-game · screenshots-reviewed-2026-10-18
- Wizard nine-switch side-gate step-by-step screenshots — Observed in-game · screenshots-reviewed-2026-10-18
- Thief three-crystal step-by-step screenshots — Observed in-game · screenshots-reviewed-2026-10-18
- Wizard one-crystal switch step-by-step screenshots — Observed in-game · screenshots-reviewed-2026-10-18
- Thief seven-crystal switch step-by-step screenshots — Observed in-game · screenshots-reviewed-2026-10-18
- Thief two-gate outer-loop step-by-step screenshots — Observed in-game · screenshots-reviewed-2026-10-18
- Wizard three-switch thorn-room step-by-step screenshots — Observed in-game · screenshots-reviewed-2026-10-18
- Character portraits and selected puzzle-board images (PC r67121) — Extracted data
Unofficial fan wiki, not affiliated with Thekla, Inc. / Arc Games / Gamirror Games. Game content belongs to its owners.
Comments & feedback
Share a tip or suggest a correction. Comments are public. Guest names are unverified; verified accounts show their account username. All language pages share this discussion. Please keep personal information private.