
 Order of the Sinking Star
First Goblin puzzles

These four rooms place Goblins along narrow routes. A Goblin can kill a hero on an adjacent square, so check each landing tile. Controllable screenshots begin with the starting board and show each result. Blue WA, TH and WI markers identify heroes; crystals are numbered, switches are pink A, gates cyan G and exits green E. Arrows show screen directions, not literal keys. The 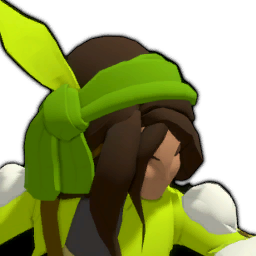 Thief board is rotated; follow its displayed orientation.
 Warrior: a safe path past three Goblins
Section titled “Warrior: a safe path past three Goblins”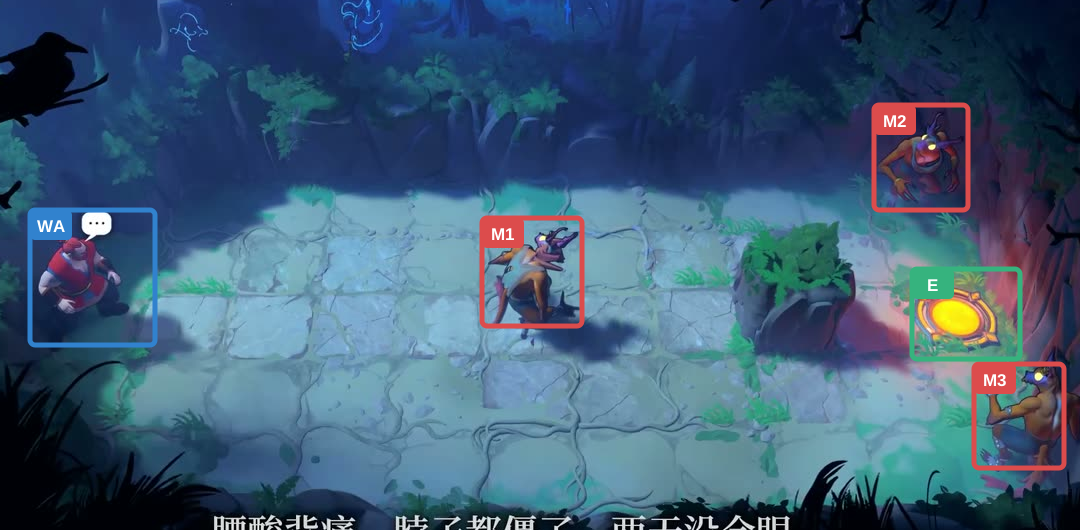
- Exit
- WA Warrior
- Goblins M1–M3
Hint
Pass below M1, climb back above the obstacle, then enter the exit between the right-side Goblins. The screenshots show one route; check each landing tile as you go.
Step-by-step solution
Images show selected video checkpoints; the first frame is the starting position.
Start with the Warrior at the left edge.
Check: The Warrior starts at the left edge; the three Goblins and exit stay fixed.
Open full-size image in a new tab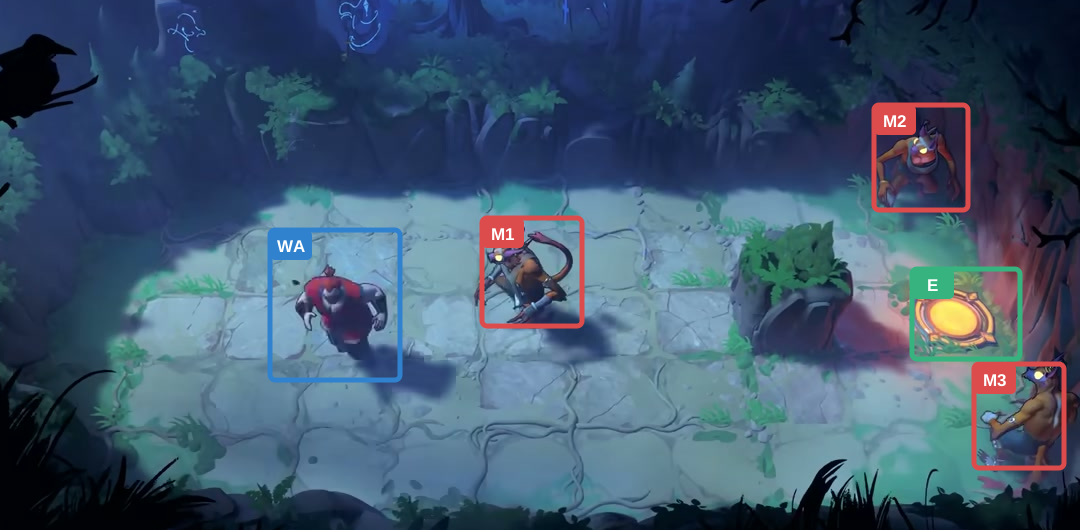
Warrior: right three tiles.
Check: The Warrior reaches the lower-lane turn, two tiles left of the central Goblin.
Open full-size image in a new tab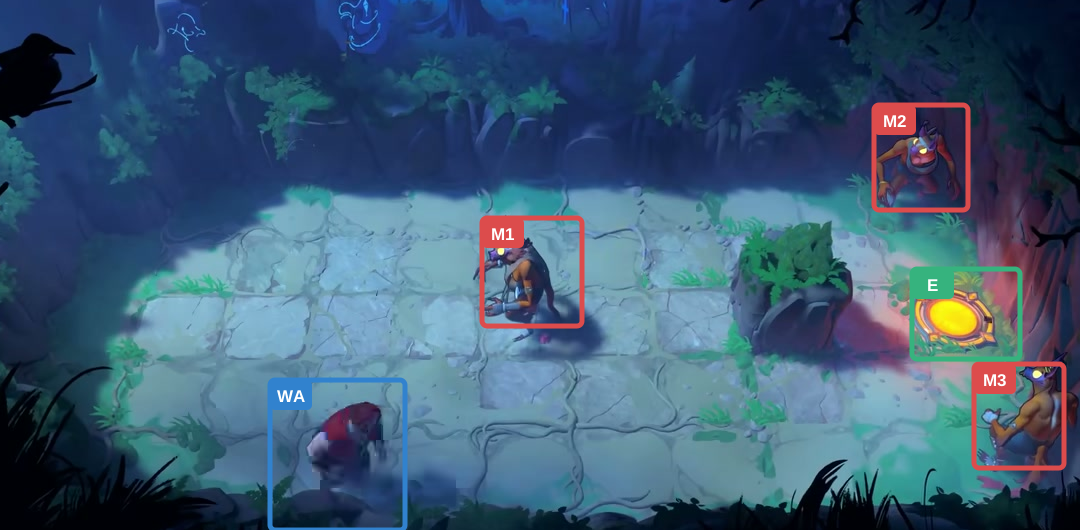
Warrior: down two tiles.
Check: The Warrior enters the lower lane.
Open full-size image in a new tab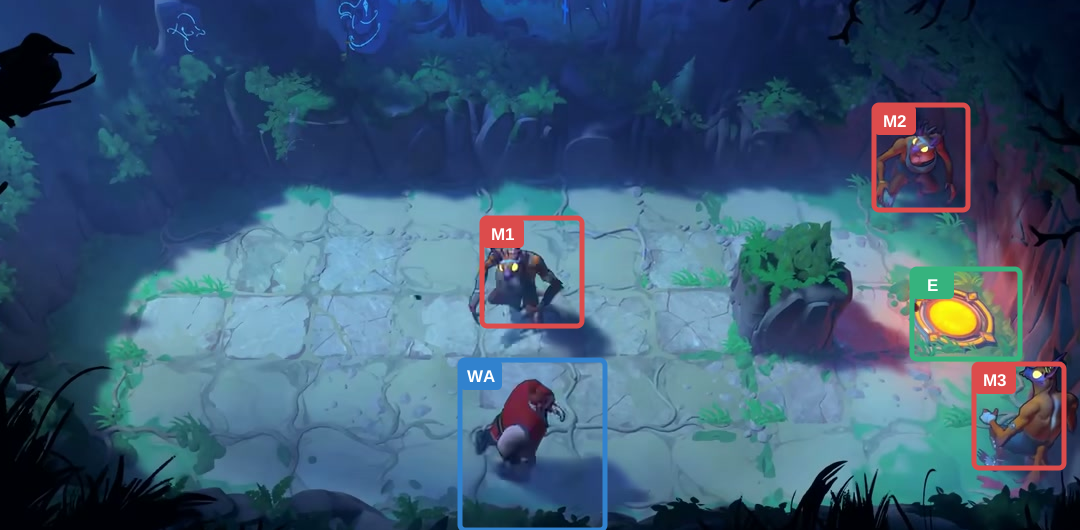
Warrior: right two tiles.
Check: The Warrior advances along the lower lane; all Goblins stay in place.
Open full-size image in a new tab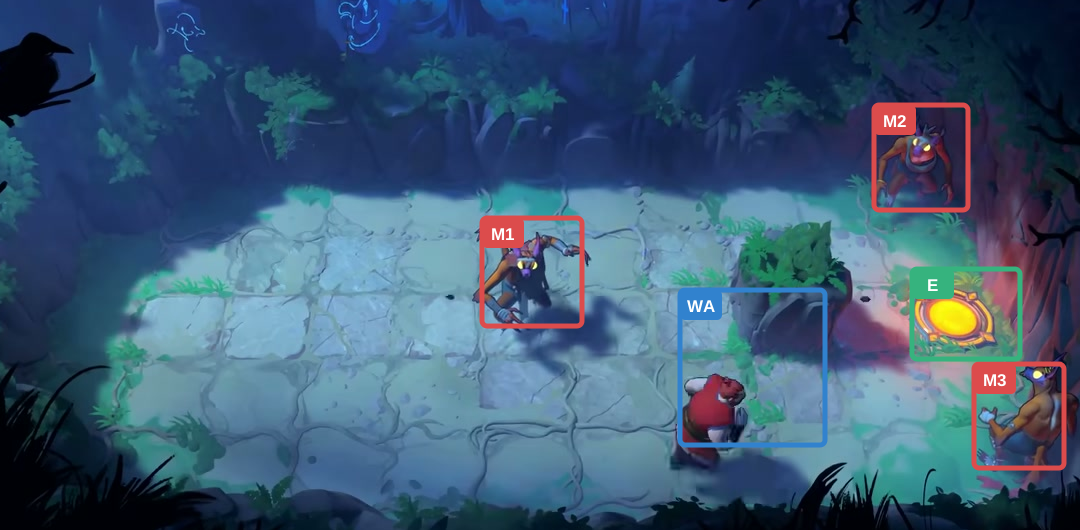
Warrior: right twice, then up once.
Check: The Warrior turns upward from the lower lane.
Open full-size image in a new tab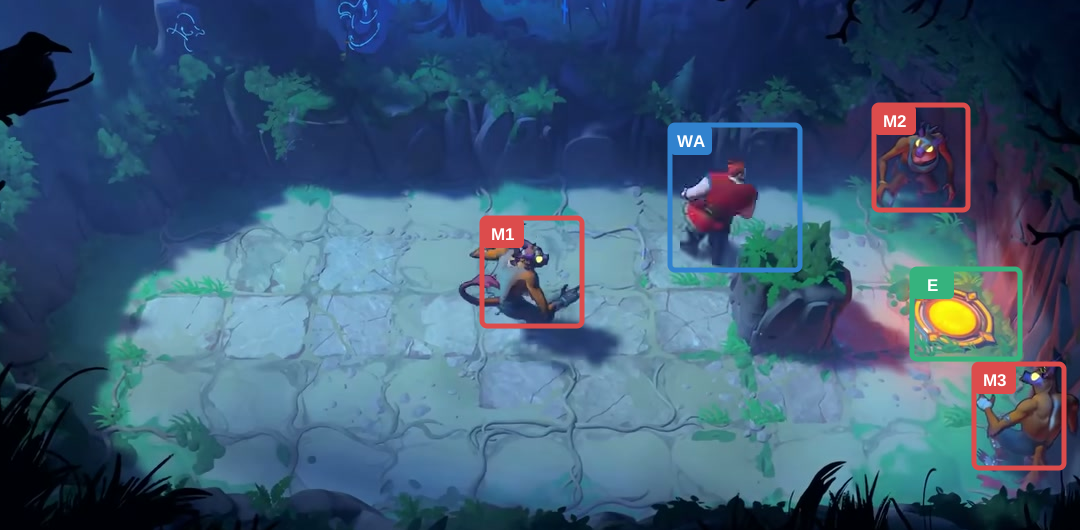
Warrior: up three tiles.
Check: The Warrior reaches the upper path above the central Goblin.
Open full-size image in a new tab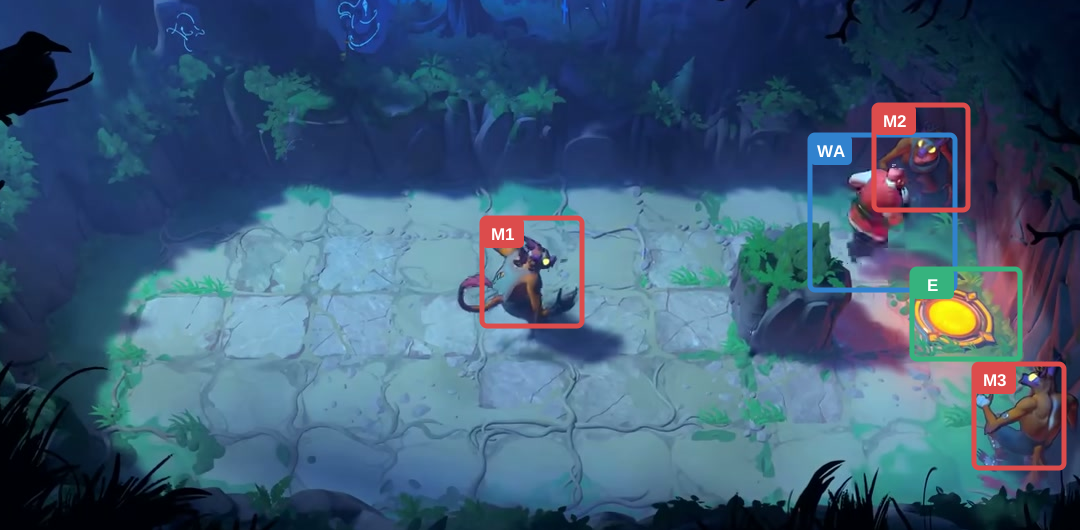
Warrior: right, down, right.
Check: The Warrior makes the final right-down-right bend toward the exit.
Open full-size image in a new tab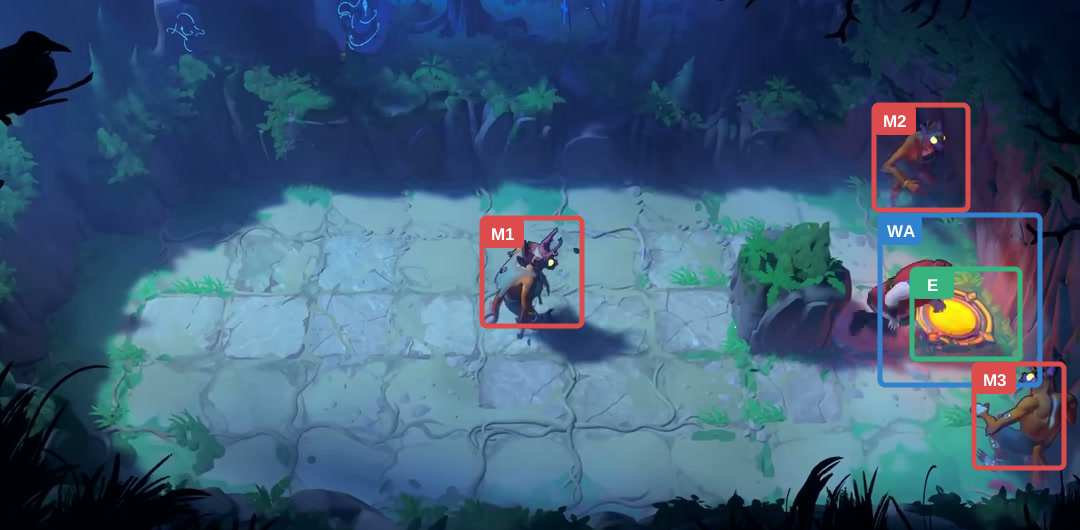
Warrior: down, right.
Check: The Warrior reaches the exit; no Goblins moved or died.
Open full-size image in a new tabActor-by-actor direction route
Full direction sequence
- WA Warrior
→ → → ↓ ↓ → → → → ↑ ↑ ↑ ↑ → ↓ → ↓ →
Warrior: ten Goblins around the exit path
Section titled “Warrior: ten Goblins around the exit path”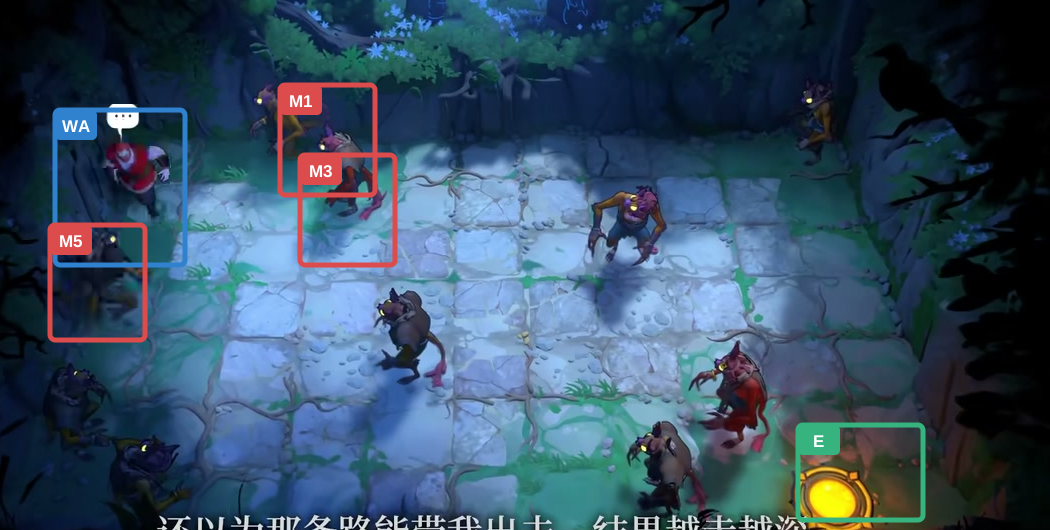
- Exit
- WA Warrior
- Goblins M1–M10
Hint
The Goblins form boundaries around several passages. Follow the open lanes toward the exit and check each landing tile before moving.
Step-by-step solution
Images show selected video checkpoints; the first frame is the starting position.
Start with the Warrior in the upper-left corner.
Check: The Warrior and all ten Goblins are in their starting places.
Open full-size image in a new tab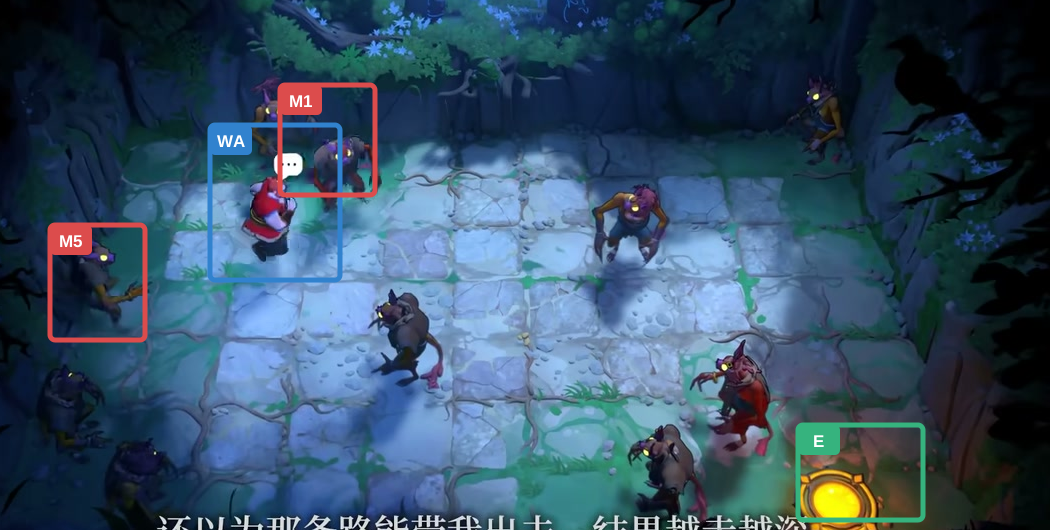
Warrior: down, right, down.
Check: Warrior reaches (2,5); all Goblins remain in place.
Open full-size image in a new tab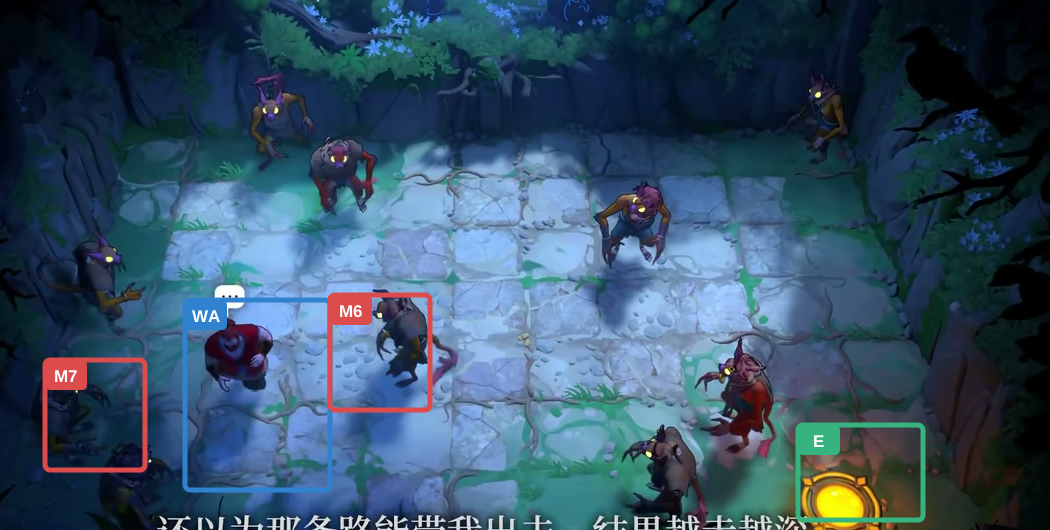
Warrior: right once, then down three.
Check: Warrior reaches (3,2); all Goblins remain in place.
Open full-size image in a new tab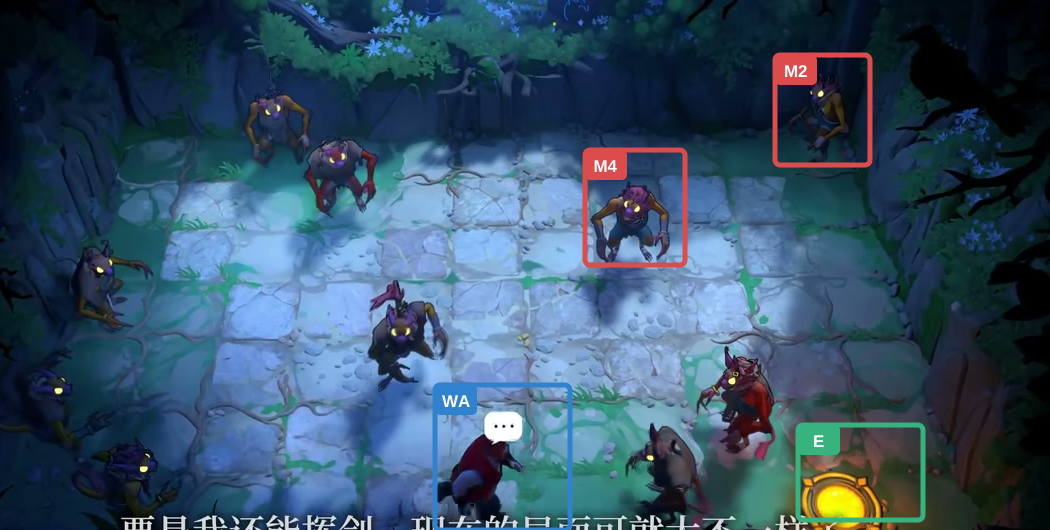
Warrior: right once, down once, then right twice.
Check: Warrior reaches (6,1); all Goblins remain in place.
Open full-size image in a new tab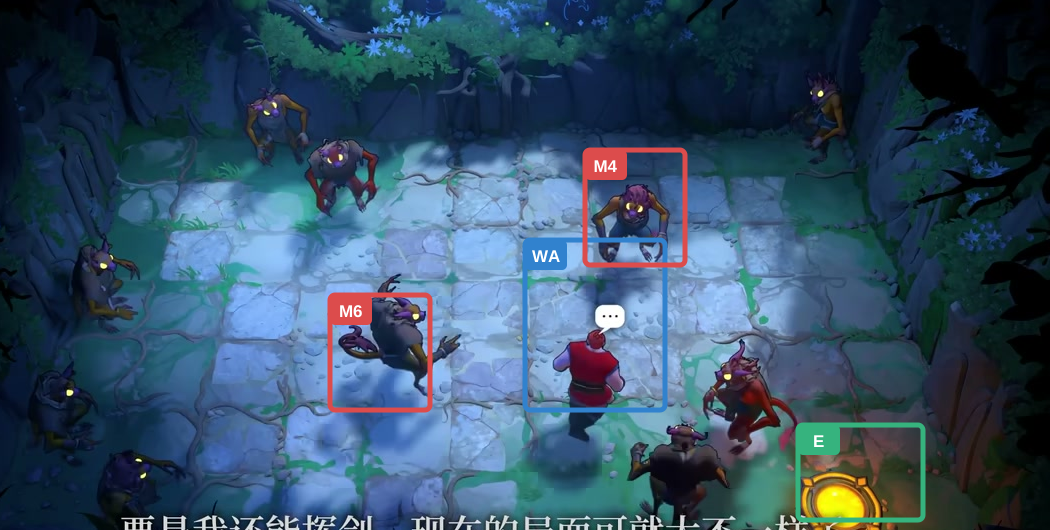
Warrior: up, right, up.
Check: Warrior reaches (7,3) and turns toward the upper route.
Open full-size image in a new tab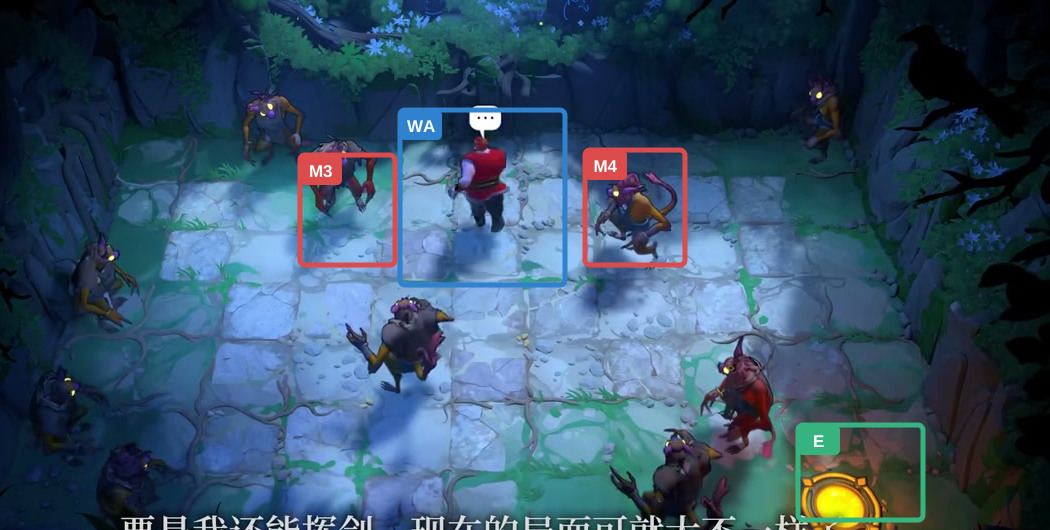
Warrior: up once, left once, then up twice.
Check: Warrior reaches (6,6); all Goblins remain in place.
Open full-size image in a new tab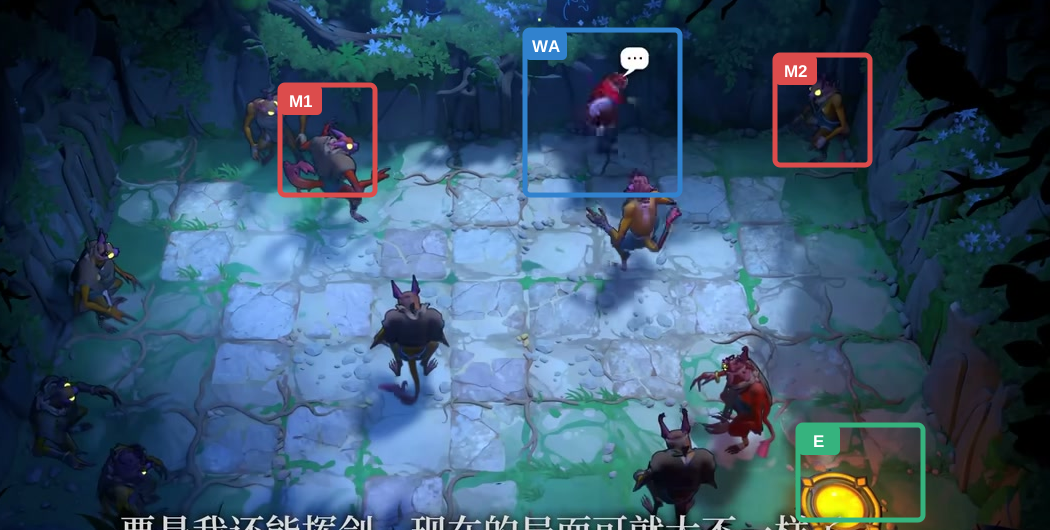
Warrior: up once, then right twice.
Check: Warrior reaches (8,7) along the top row.
Open full-size image in a new tab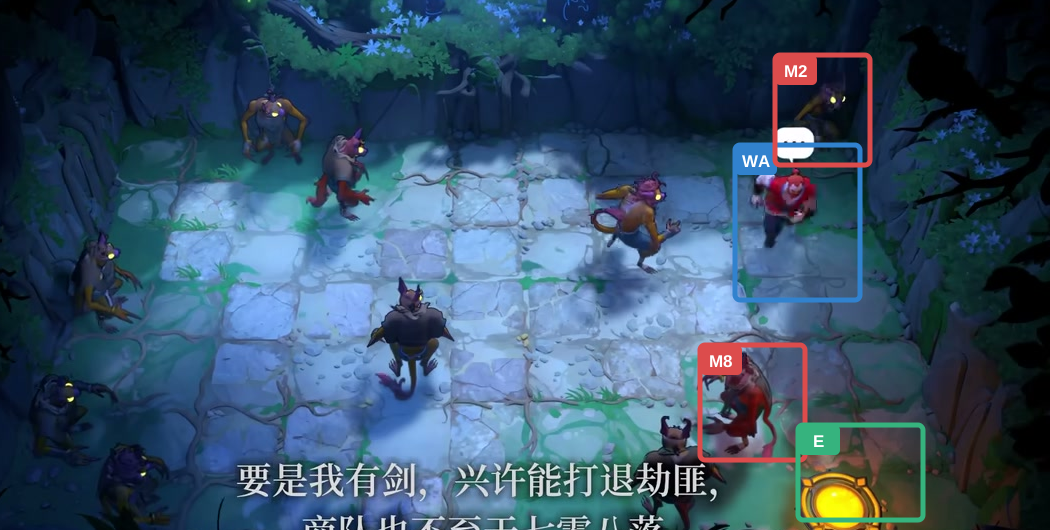
Warrior: right, down, right.
Check: Warrior reaches (10,6) on the right side.
Open full-size image in a new tab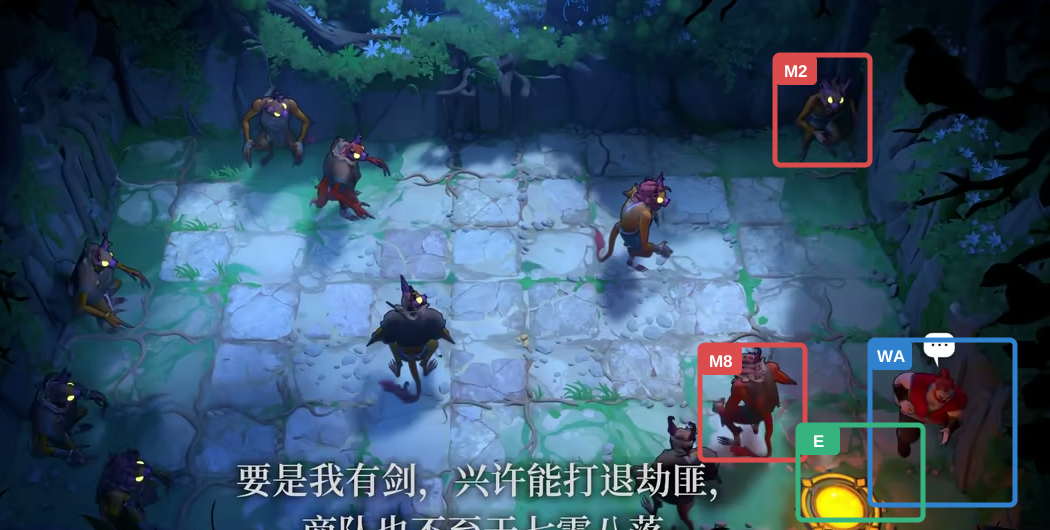
Warrior: down three, then right once.
Check: Warrior reaches (11,3), above the exit.
Open full-size image in a new tab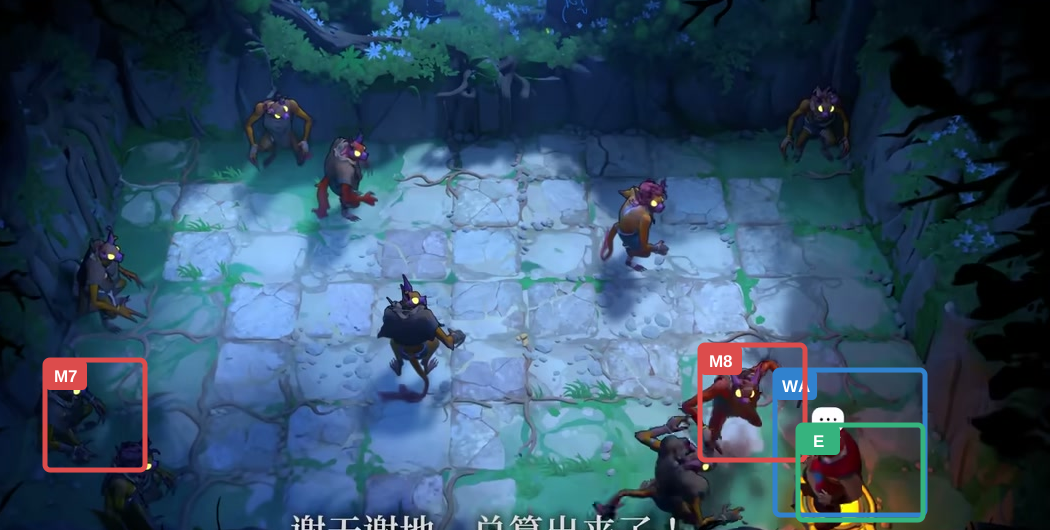
Warrior: down twice, then left once.
Check: Warrior reaches the exit at (10,1); all Goblins remain in place.
Open full-size image in a new tabActor-by-actor direction route
Full direction sequence
- WA Warrior
↓ → ↓ → ↓ ↓ ↓ → ↓ → → ↑ → ↑ ↑ ← ↑ ↑ ↑ → → → ↓ → ↓ ↓ ↓ → ↓ ↓ ←
Thief: draw a crystal to switch A
Section titled “Thief: draw a crystal to switch A”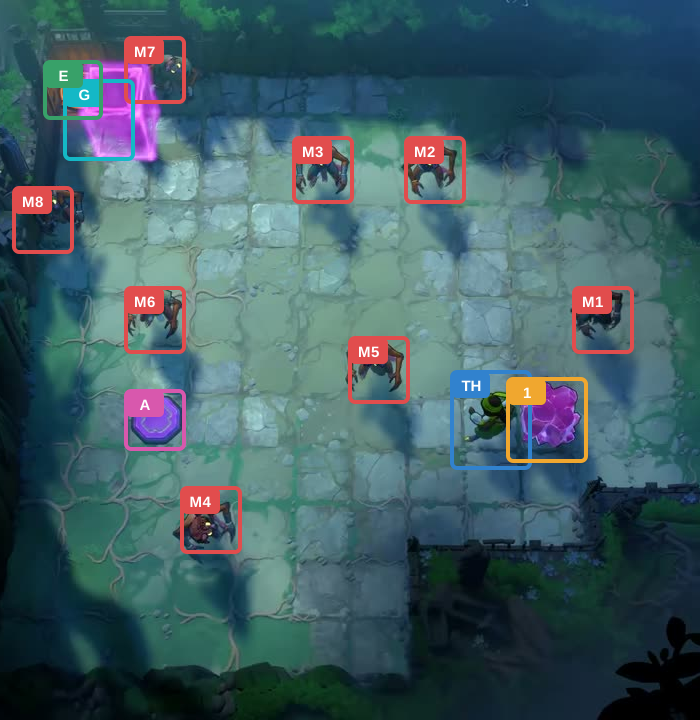
- Crystal 1
- Switch A
- Gate
- Exit
- TH Thief
- Goblins M1–M8
Hint
Use the Thief’s pull to guide Crystal 1 onto A, then leave the crystal there to hold the gate while you reach the exit.
Step-by-step solution
Images show selected video checkpoints; the first frame is the starting position.
Thief starts here beside Crystal 1.
Check: Thief starts beside Crystal 1; all eight Goblins are alive.
Open full-size image in a new tab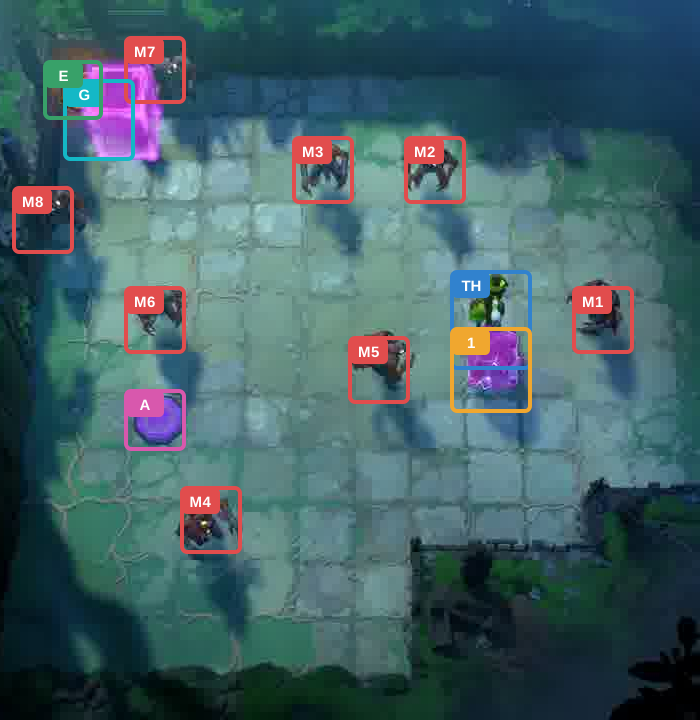
Move Thief: left 1, down 1, right 2, up 2, left 1, up 1.
Check: Thief circles the upper-left lane with Crystal 1; all eight Goblins remain alive.
Open full-size image in a new tab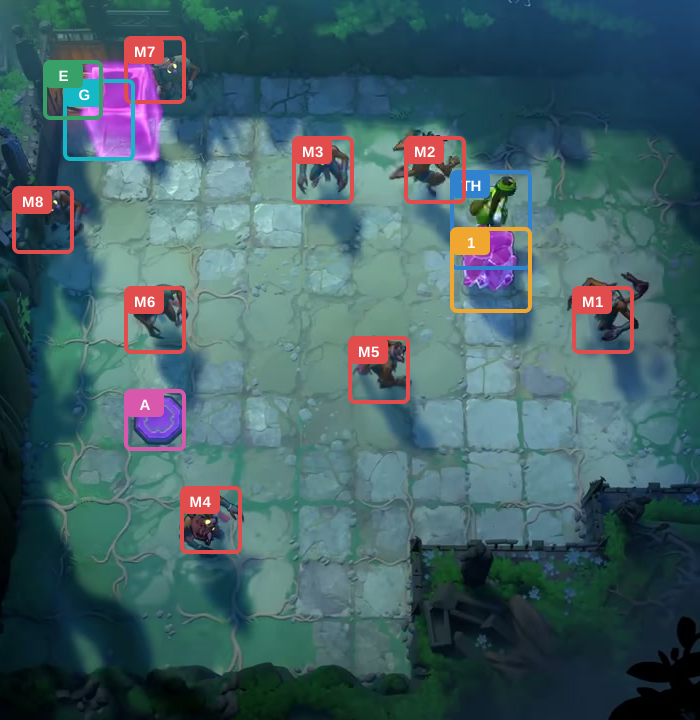
Move Thief: up 2.
Check: Thief circles the upper-left lane with Crystal 1; all eight Goblins remain alive.
Open full-size image in a new tab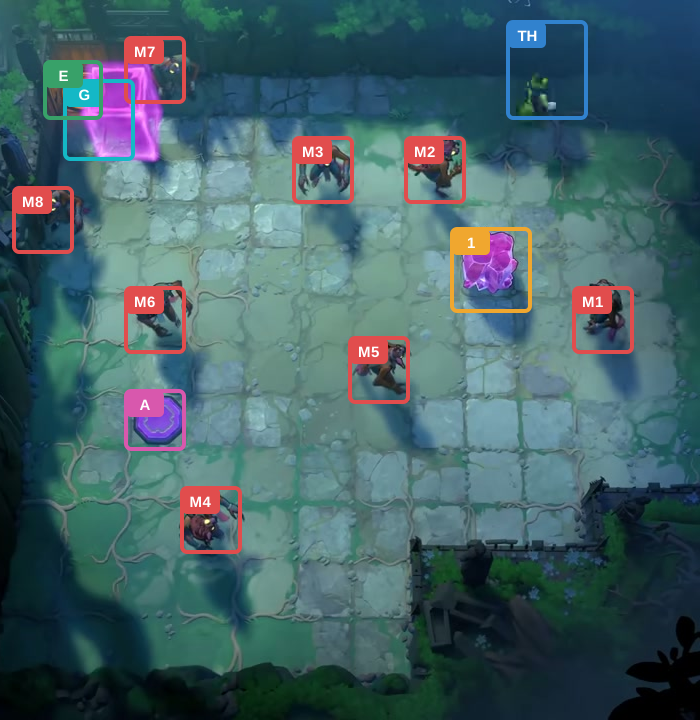
Move Thief: right 1, up 3.
Check: Thief circles the upper-left lane with Crystal 1; all eight Goblins remain alive.
Open full-size image in a new tab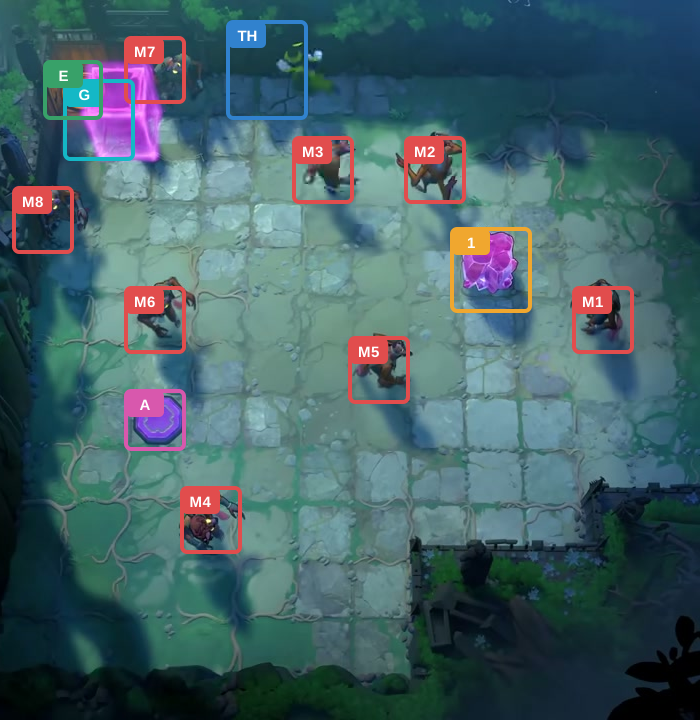
Move Thief: left 5.
Check: Thief circles the upper-left lane with Crystal 1; all eight Goblins remain alive.
Open full-size image in a new tab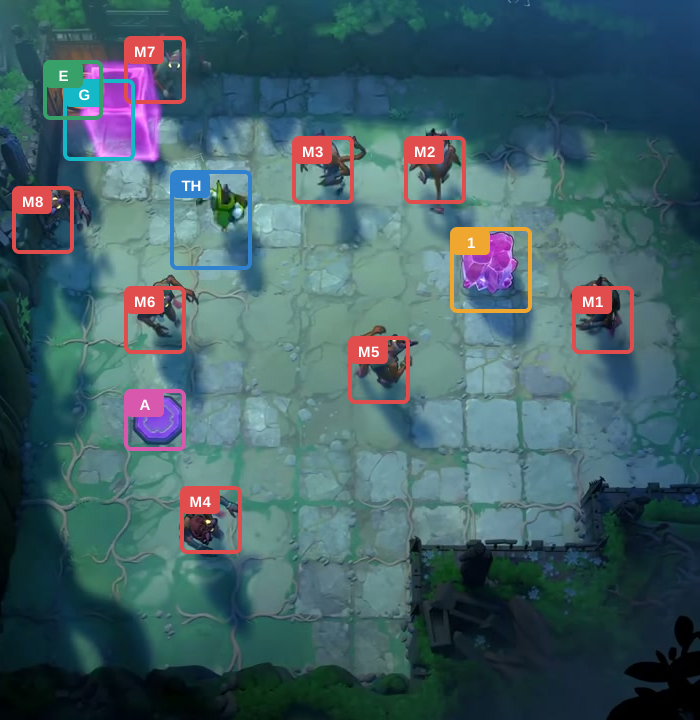
Move Thief: down 1, left 1, down 2.
Check: Thief circles the upper-left lane with Crystal 1; all eight Goblins remain alive.
Open full-size image in a new tab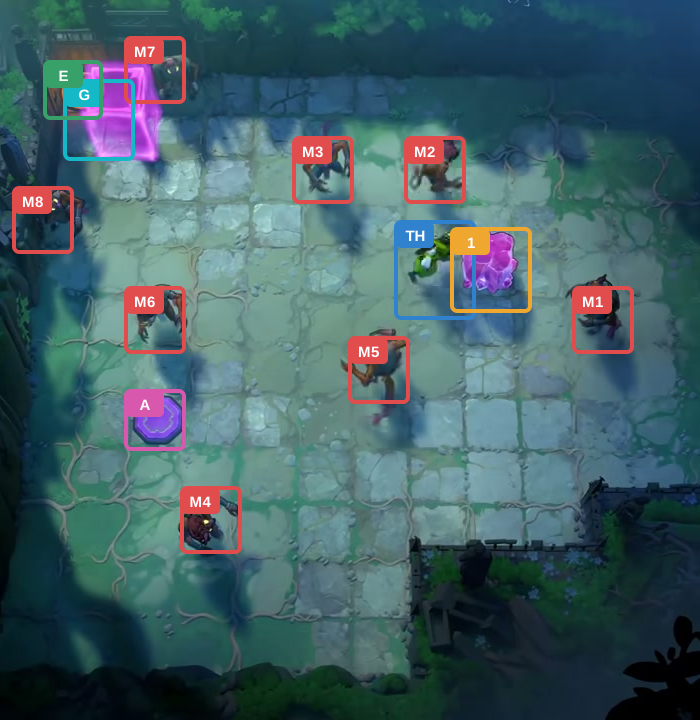
Move Thief: right 1, down 1, right 3.
Check: Thief circles the upper-left lane with Crystal 1; all eight Goblins remain alive.
Open full-size image in a new tab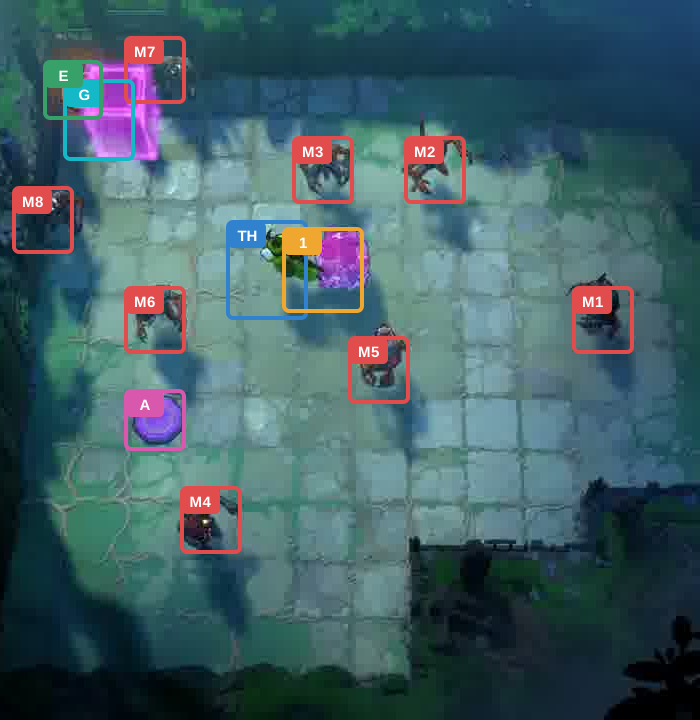
Move Thief: left 3.
Check: Thief circles the upper-left lane with Crystal 1; all eight Goblins remain alive.
Open full-size image in a new tab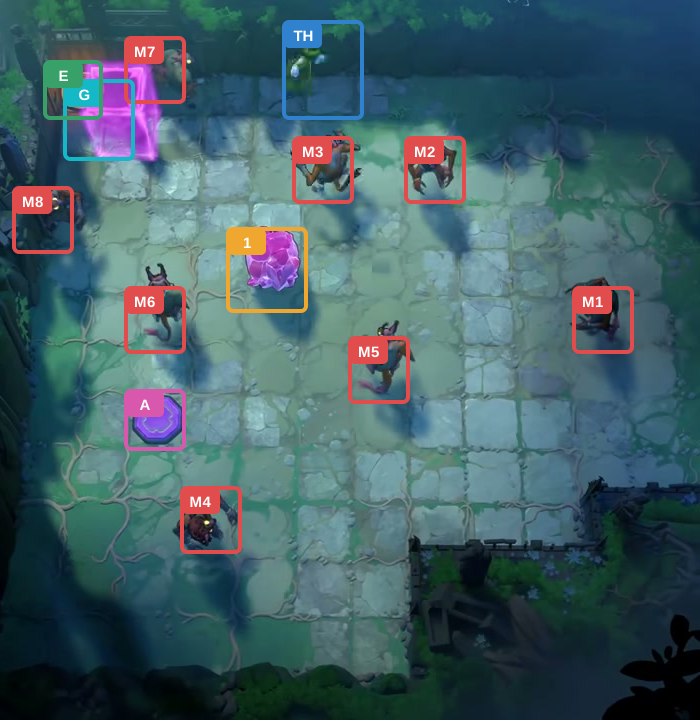
Move Thief: left 1, up 3, right 1, up 1, right 1.
Check: Thief and Crystal 1 cross the central lane; all eight Goblins remain alive.
Open full-size image in a new tab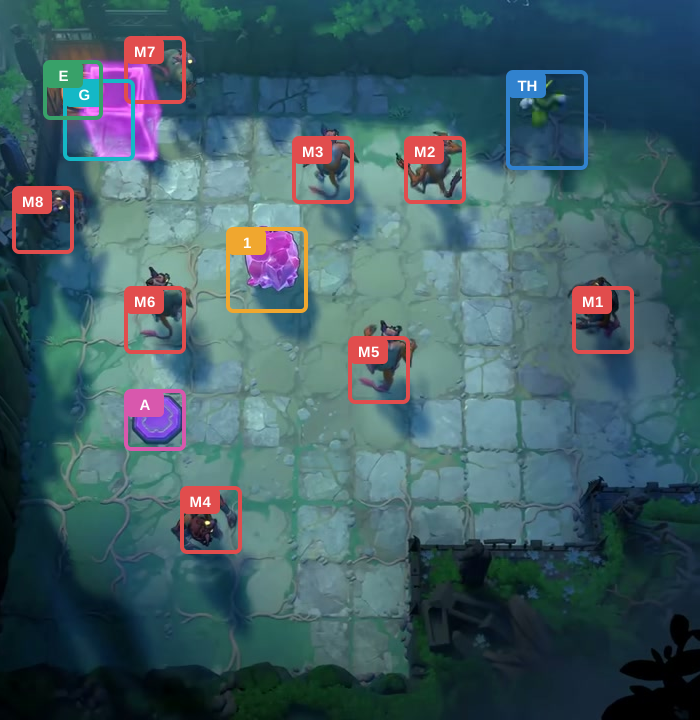
Move Thief: right 4, down 1.
Check: Thief and Crystal 1 cross the central lane; all eight Goblins remain alive.
Open full-size image in a new tab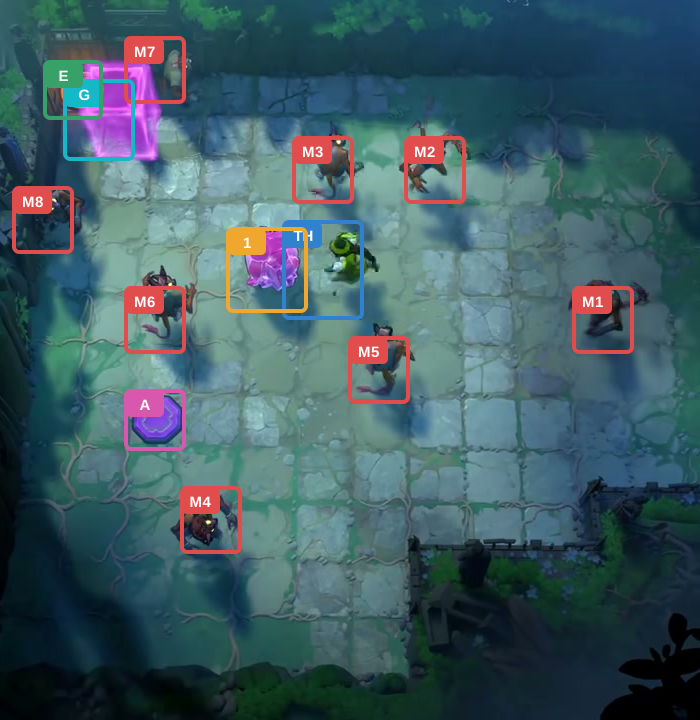
Move Thief: down 2, left 1, down 1, left 3.
Check: Thief and Crystal 1 cross the central lane; all eight Goblins remain alive.
Open full-size image in a new tab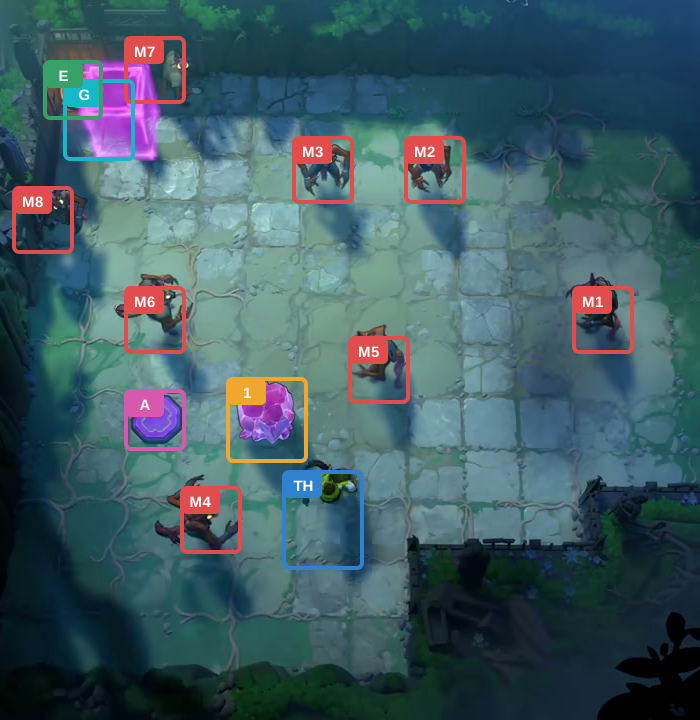
Move Thief: down 1, left 1, down 3, right 1, down 1.
Check: Thief and Crystal 1 cross the central lane; all eight Goblins remain alive.
Open full-size image in a new tab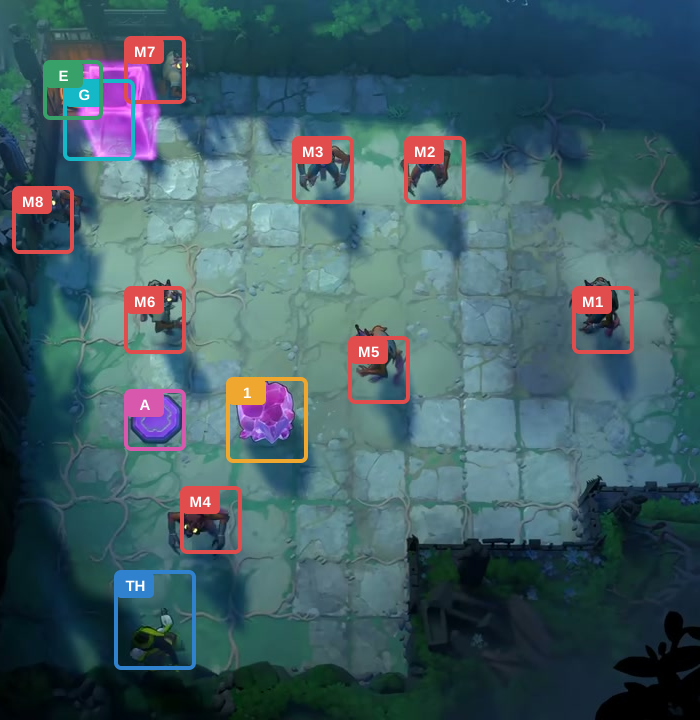
Move Thief: down 1, left 1, down 1, left 2.
Check: Crystal 1 waits two tiles to the right of A while Thief loops around.
Open full-size image in a new tab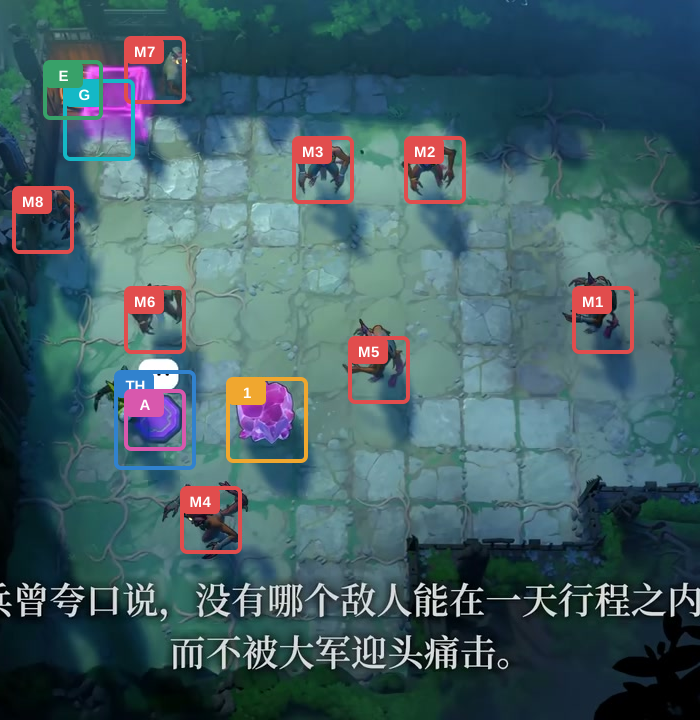
Move Thief: left 1, up 3, right 1, up 1.
Check: Thief steps on A and opens gate G; Crystal 1 is still to the right of A.
Open full-size image in a new tab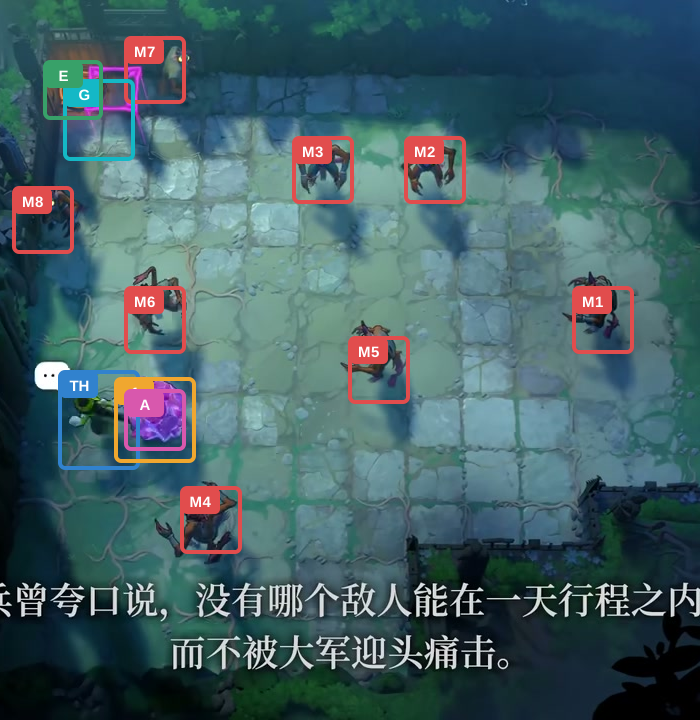
Move Thief: right 1, left 2.
Check: Crystal 1 now rests on A and keeps gate G open; all eight Goblins remain alive.
Open full-size image in a new tab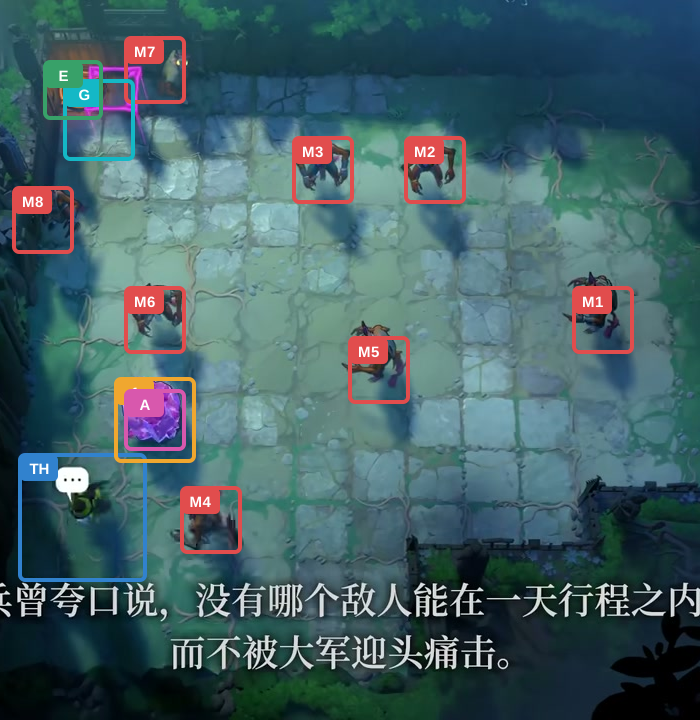
Move Thief: down 1, left 1, down 1.
Check: Thief crosses the lower lane; Crystal 1 remains on A and gate G stays open.
Open full-size image in a new tab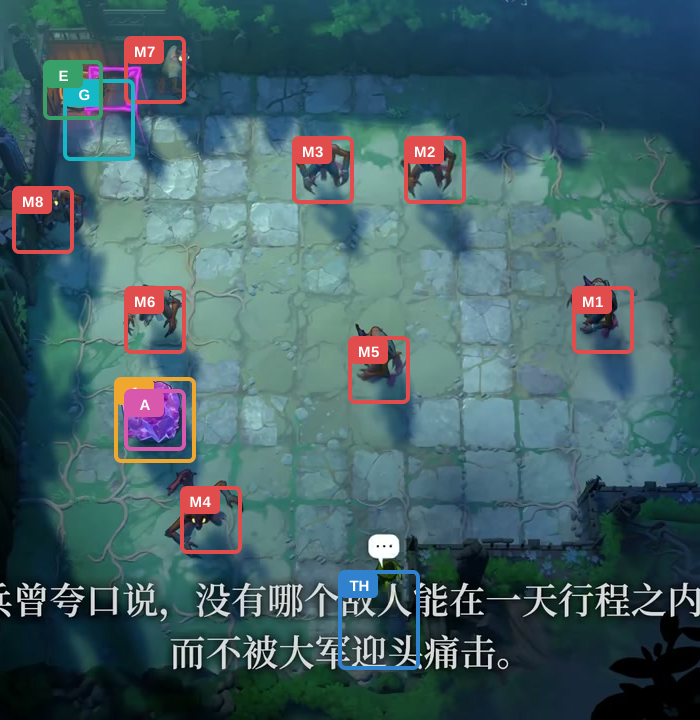
Move Thief: down 2, right 6.
Check: Thief follows the lower loop toward the exit; Crystal 1 holds A and gate G stays open.
Open full-size image in a new tab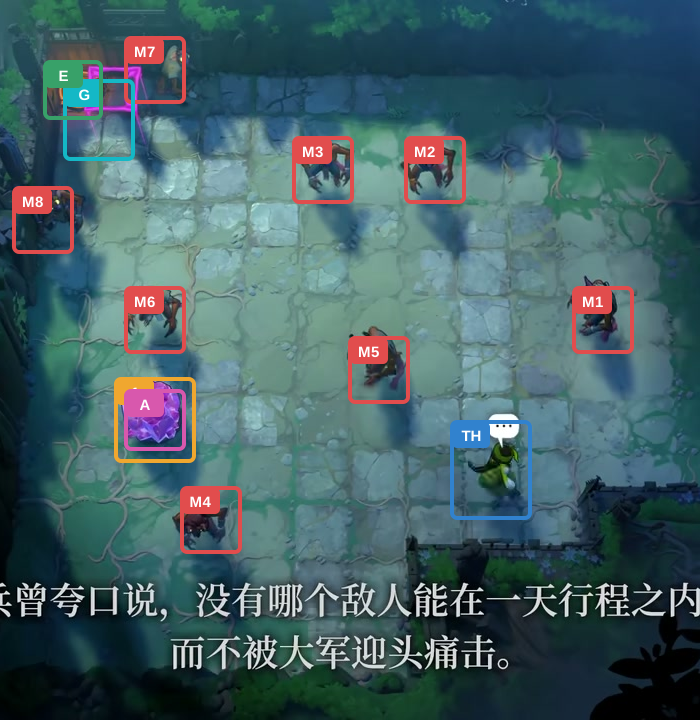
Move Thief: up 3, right 2.
Check: Thief follows the lower loop toward the exit; Crystal 1 holds A and gate G stays open.
Open full-size image in a new tab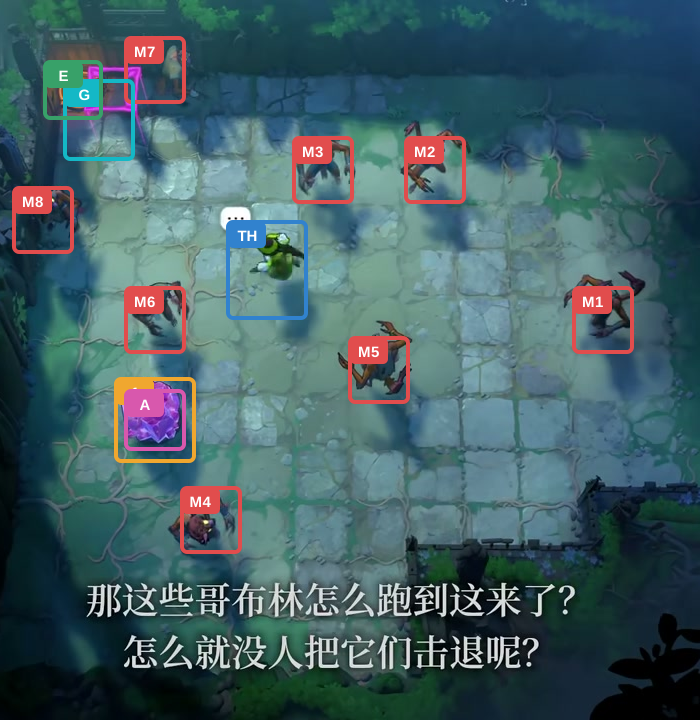
Move Thief: up 3, left 1, up 1, left 3.
Check: Thief follows the lower loop toward the exit; Crystal 1 holds A and gate G stays open.
Open full-size image in a new tab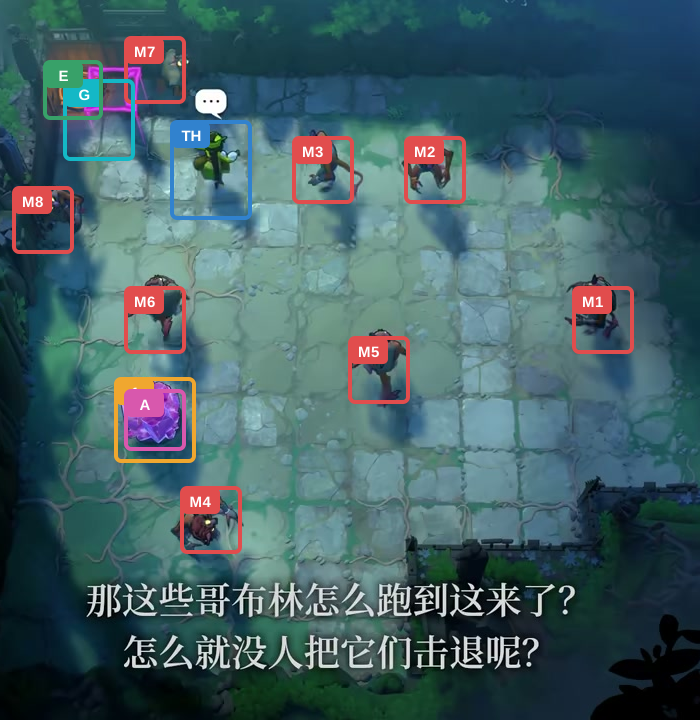
Move Thief: left 1, up 2.
Check: Thief follows the lower loop toward the exit; Crystal 1 holds A and gate G stays open.
Open full-size image in a new tab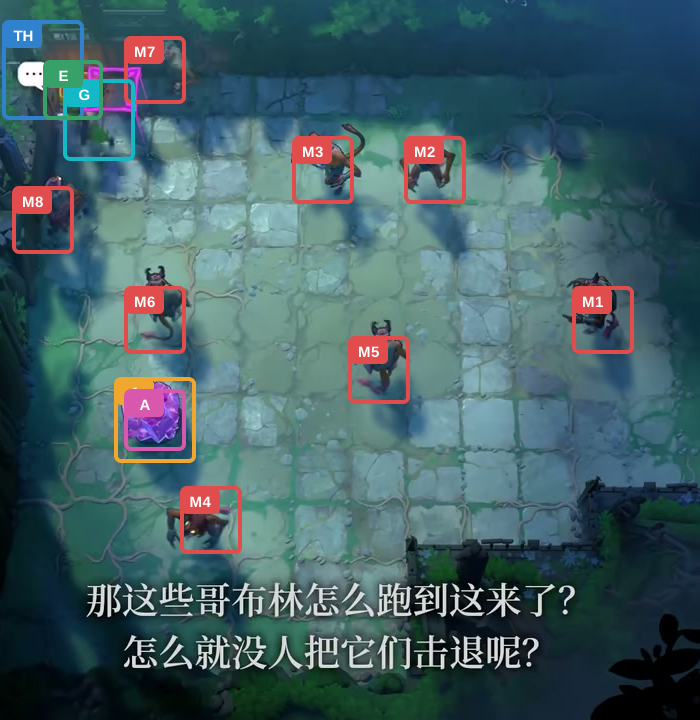
Move Thief: left 2, up 1, left 1, up 1.
Check: Thief reaches exit E; Crystal 1 holds A and gate G remains open.
Open full-size image in a new tabActor-by-actor direction route
Full direction sequence
- TH Thief
← ↓ → → ↑ ↑ ← ↑ ↑ ↑ → ↑ ↑ ↑ ← ← ← ← ← ↓ ← ↓ ↓ → ↓ → → → ← ← ← ← ↑ ↑ ↑ → ↑ → → → → → ↓ ↓ ↓ ← ↓ ← ← ← ↓ ← ↓ ↓ ↓ → ↓ ↓ ← ↓ ← ← ← ↑ ↑ ↑ → ↑ → ← ← ↓ ← ↓ ↓ ↓ → → → → → → ↑ ↑ ↑ → → ↑ ↑ ↑ ← ↑ ← ← ← ← ↑ ↑ ← ← ↑ ← ↑
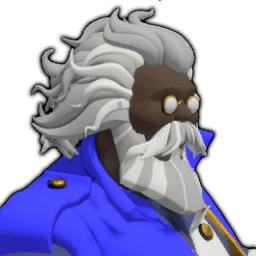 Wizard: rearrange the crystal corridor
Section titled “Wizard: rearrange the crystal corridor”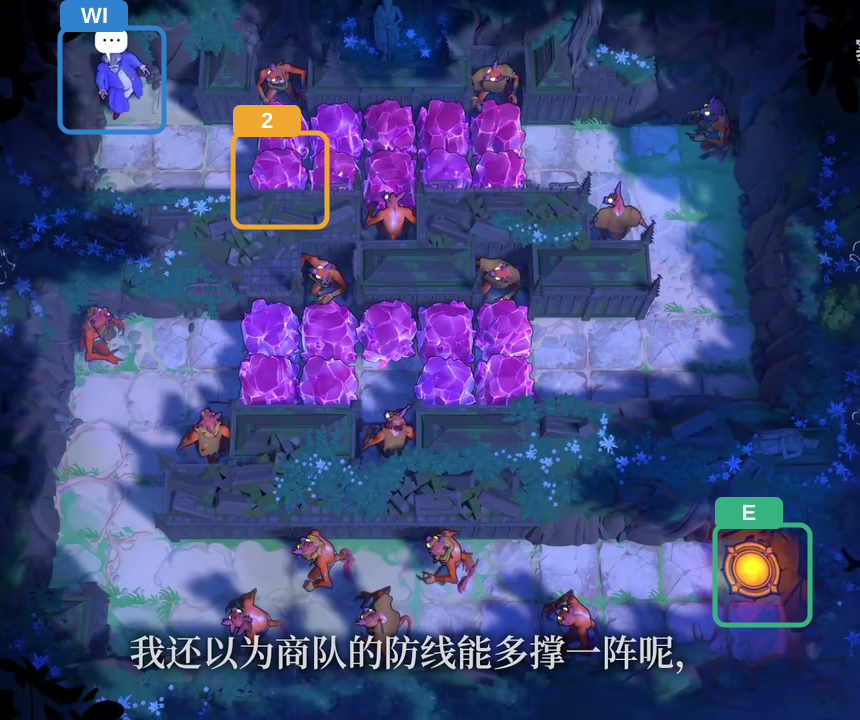
- Crystals 1–19
- Exit
- WI Wizard
- Goblins M1–M15
Hint
Use Wizard swaps to open a path through the numbered crystals. Goblins can move when a swap reaches them; check each landing tile.
Step-by-step solution
Images show selected video checkpoints; the first frame is the starting position.
Wizard starts at the upper-left edge of the room.
Check: The Wizard, all 15 Goblins and all 19 crystals are in their starting positions.
Open full-size image in a new tab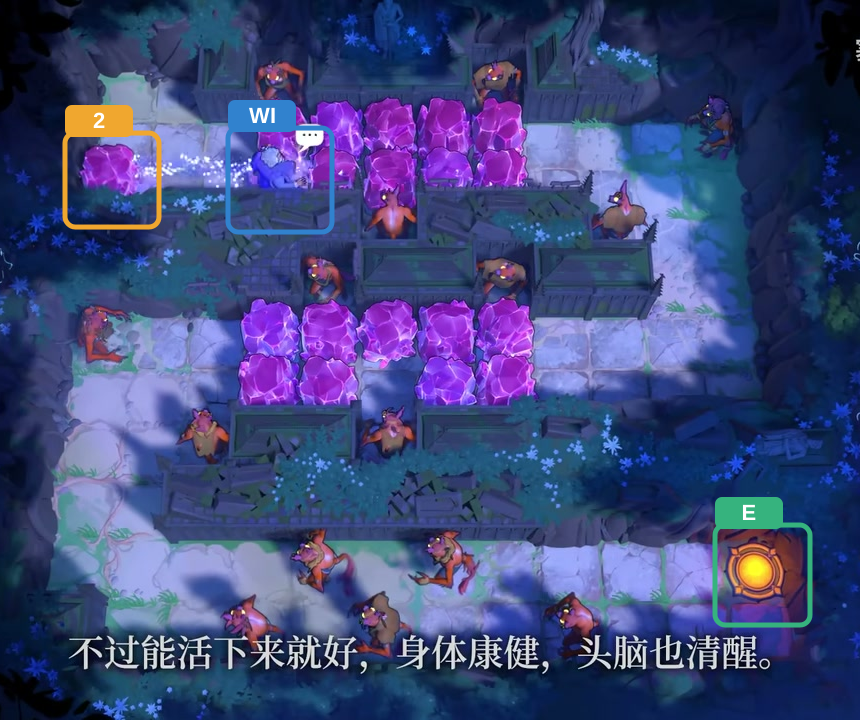
Wizard: down 2, right 1 (3 moves); swap with Crystal 2.
Check: The highlighted crystal swap is complete; the Wizard and all Goblins remain safe.
Open full-size image in a new tab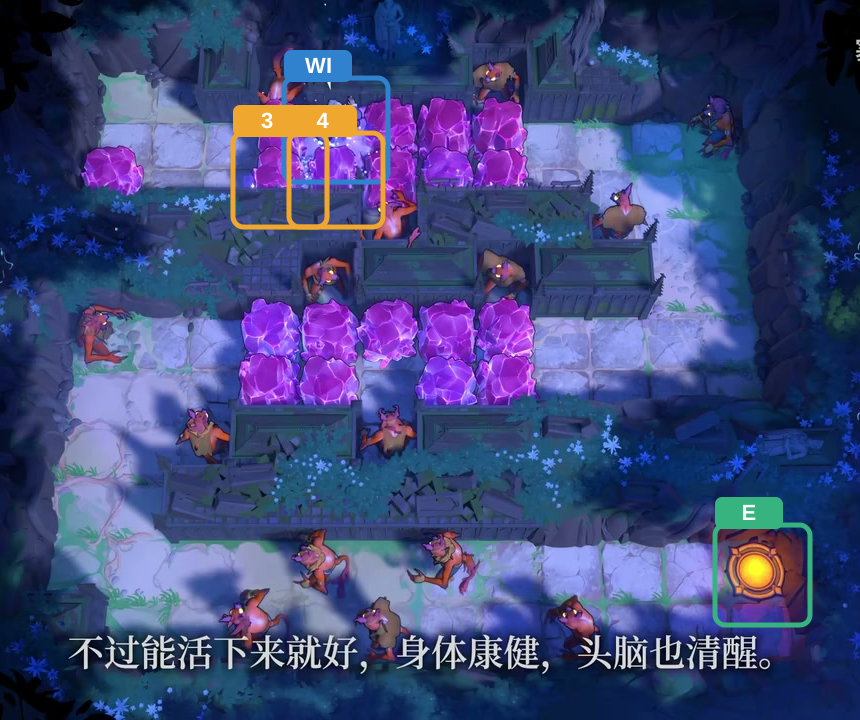
Wizard: right 1, up 1 (2 moves); swap with Crystal 3, Crystal 4.
Check: The highlighted crystal swap is complete; the Wizard and all Goblins remain safe.
Open full-size image in a new tab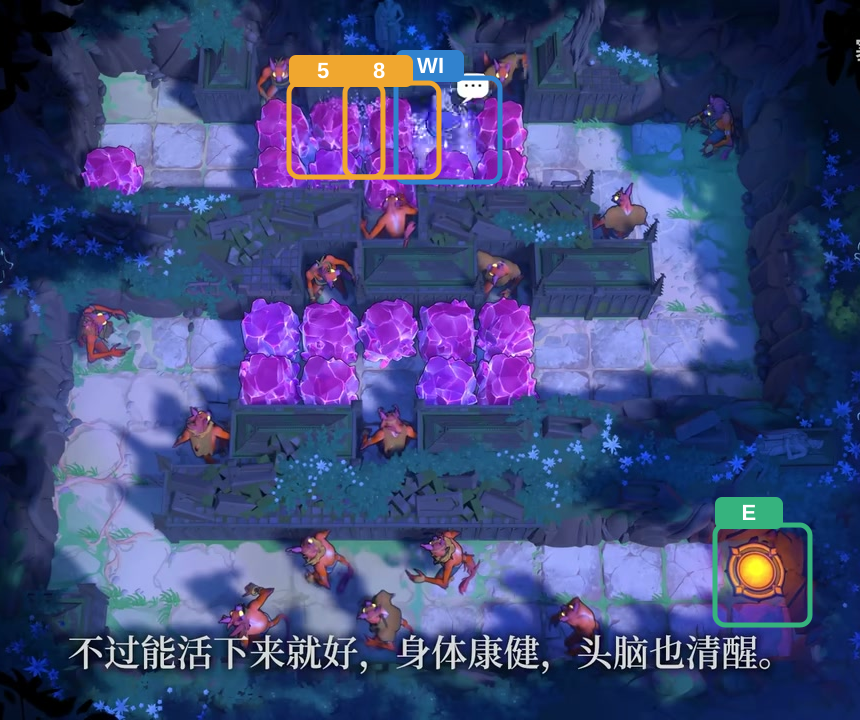
Wizard: right 2 (2 moves); swap with Crystal 5, Crystal 8.
Check: The highlighted crystal swap is complete; the Wizard and all Goblins remain safe.
Open full-size image in a new tab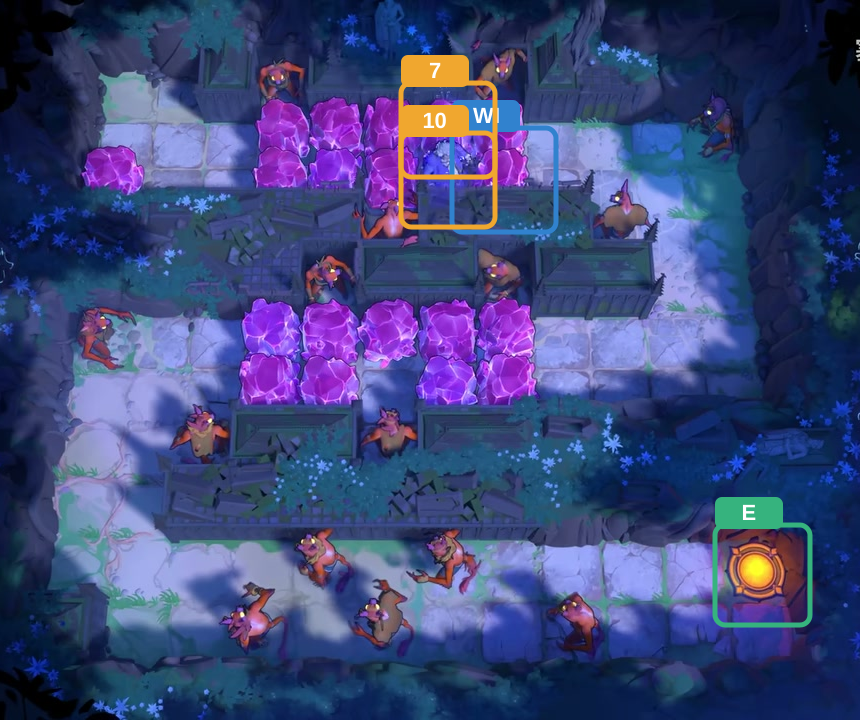
Wizard: down 1, right 1 (2 moves); swap with Crystal 7, Crystal 10.
Check: The highlighted crystal swap is complete; the Wizard and all Goblins remain safe.
Open full-size image in a new tab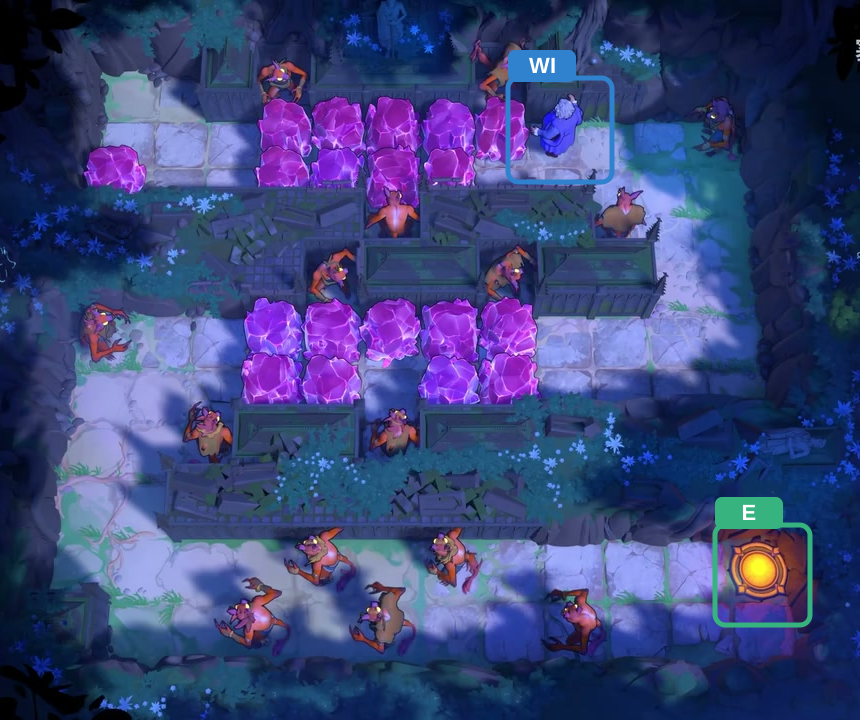
Wizard: right 1, up 1 (2 moves).
Check: The Wizard reaches the upper-right lane; M13 is next.
Open full-size image in a new tab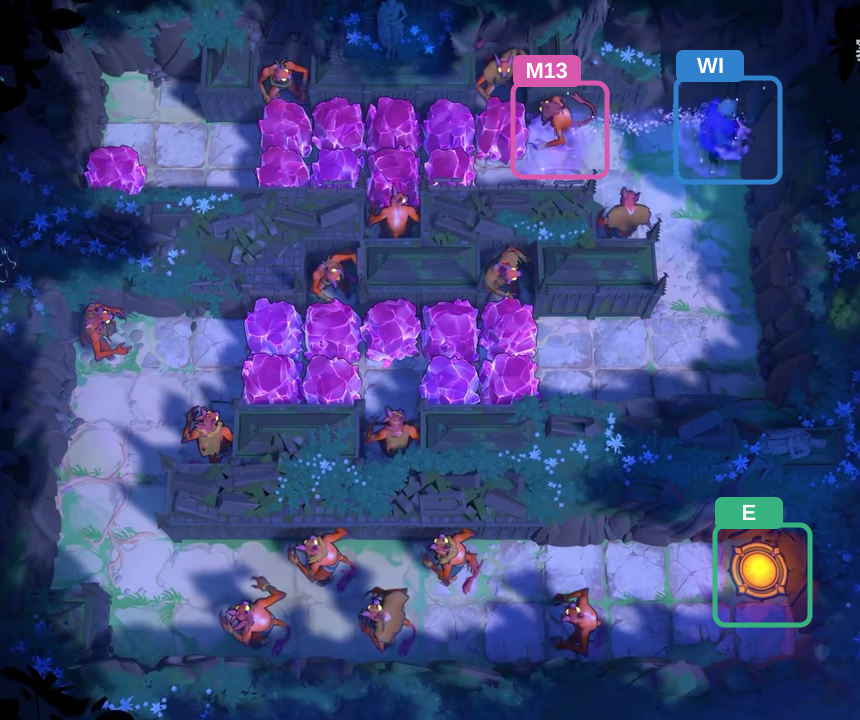
Wizard: right 1 (1 move); swap with M13.
Check: The Wizard swaps with M13; M13 remains alive at the Wizard’s previous tile.
Open full-size image in a new tab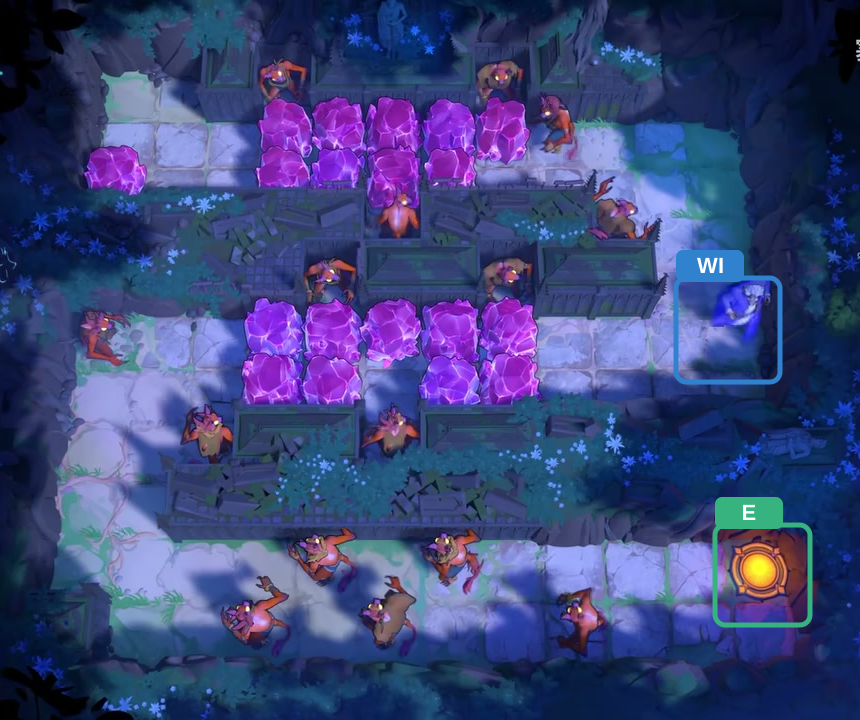
Wizard: down 4 (4 moves).
Check: The Wizard reaches the lower-right end of the lane before turning left.
Open full-size image in a new tab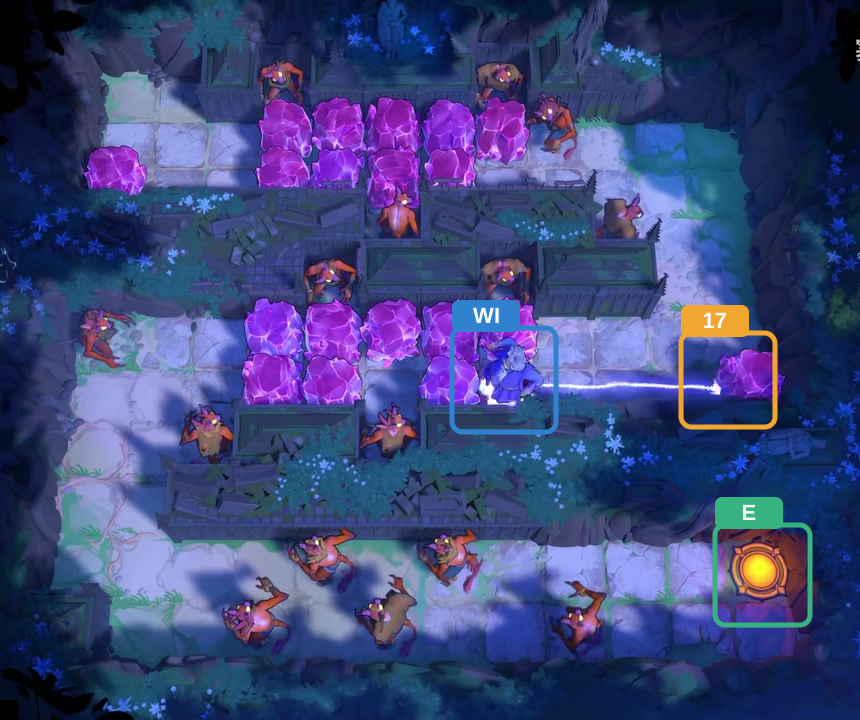
Wizard: down 1, left 1 (2 moves); swap with Crystal 17.
Check: The highlighted crystal swap is complete; the Wizard and all Goblins remain safe.
Open full-size image in a new tab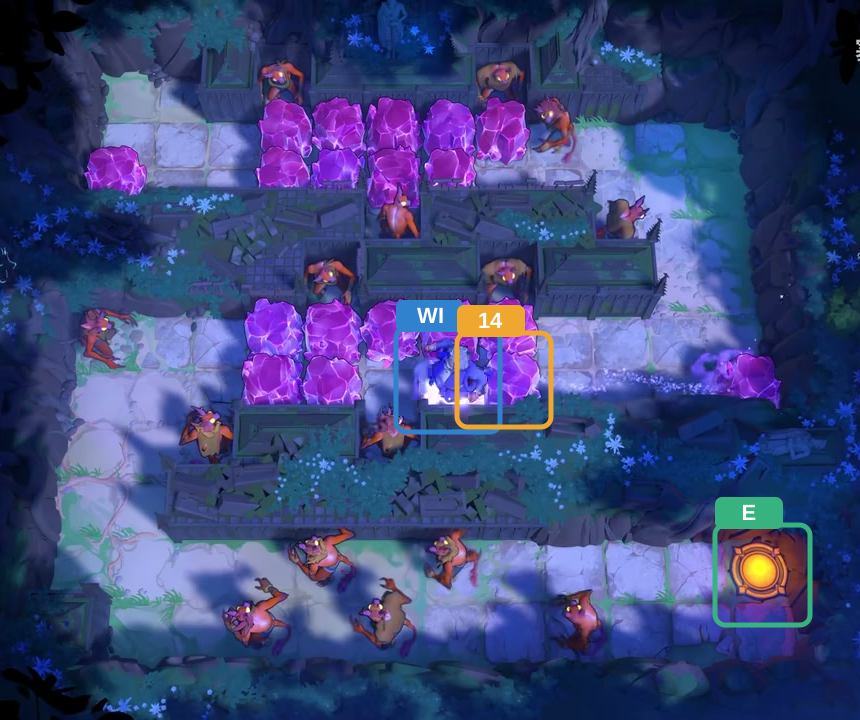
Wizard: left 1 (1 move); swap with Crystal 14.
Check: The highlighted crystal swap is complete; the Wizard and all Goblins remain safe.
Open full-size image in a new tab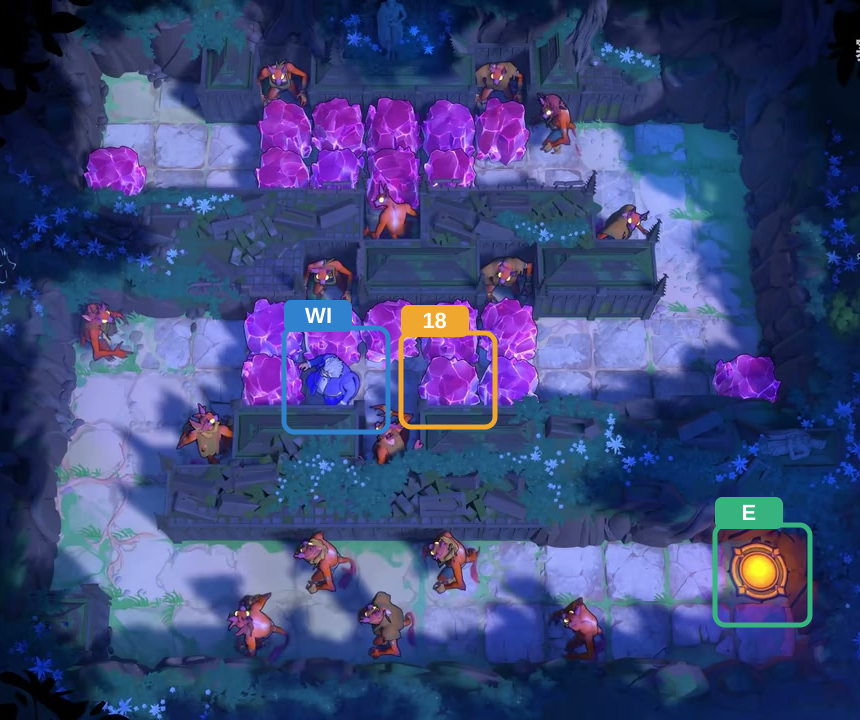
Wizard: left 1 (1 move); swap with Crystal 18.
Check: The highlighted crystal swap is complete; the Wizard and all Goblins remain safe.
Open full-size image in a new tab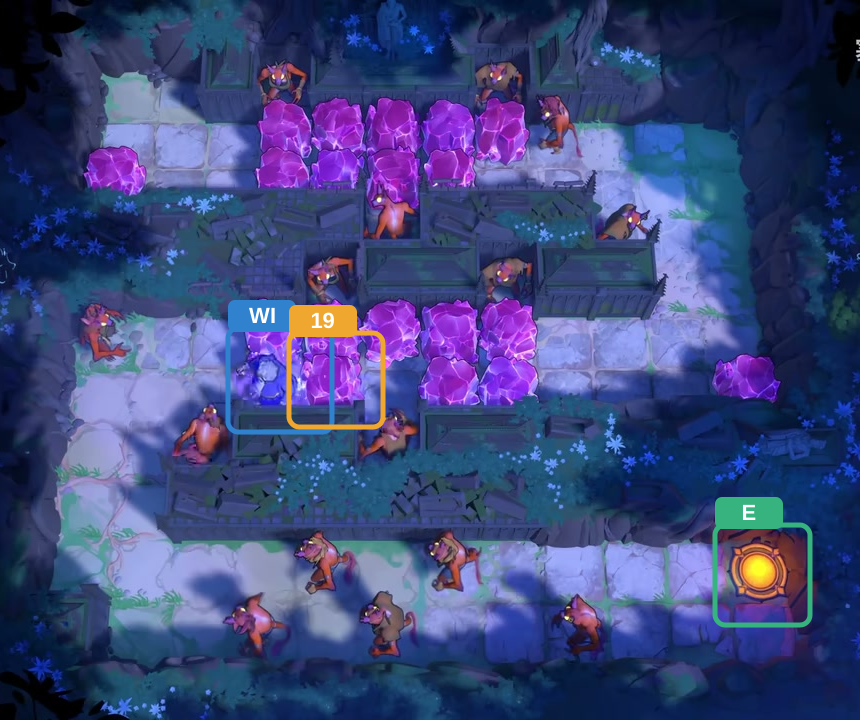
Wizard: left 1 (1 move); swap with Crystal 19.
Check: The highlighted crystal swap is complete; the Wizard and all Goblins remain safe.
Open full-size image in a new tab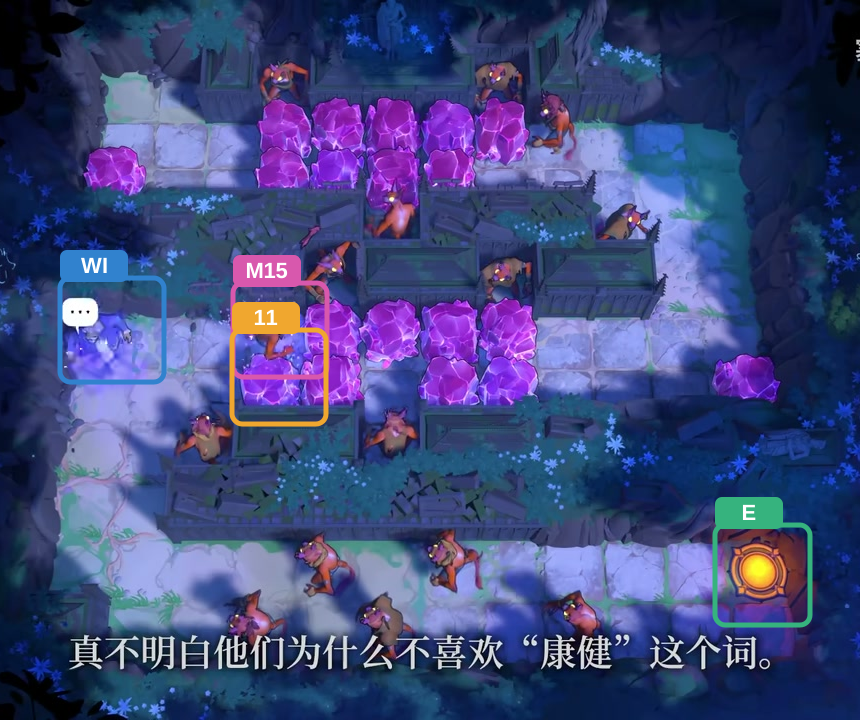
Wizard: up 1, left 1 (2 moves); swap with Crystal 11, M15.
Check: The Wizard swaps with M15; M15 survives, and Crystal 11 shifts into the lower lane.
Open full-size image in a new tab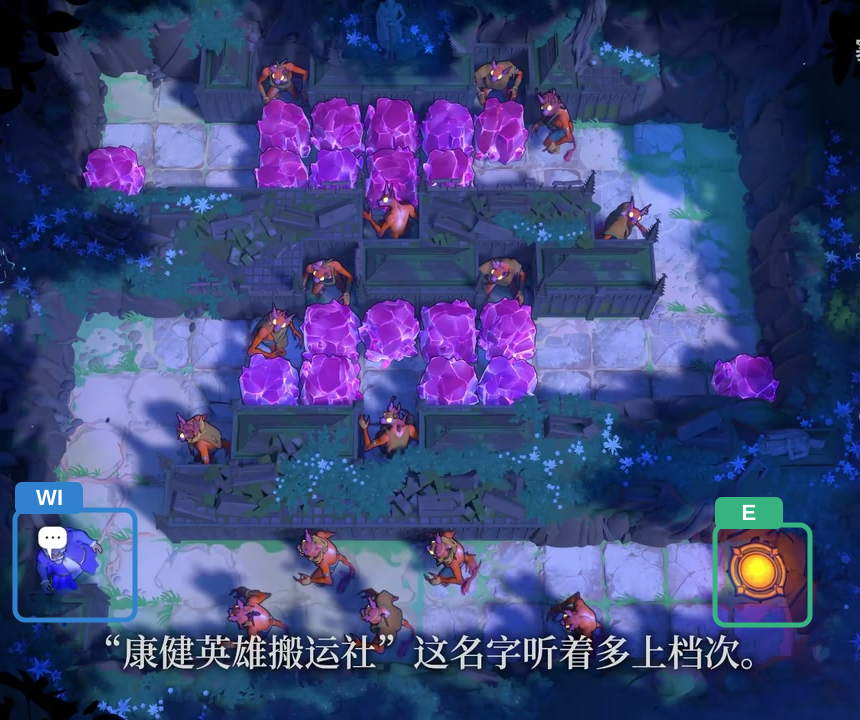
Wizard: down 3 (3 moves).
Check: The Wizard descends along the left edge toward the lower Goblins.
Open full-size image in a new tab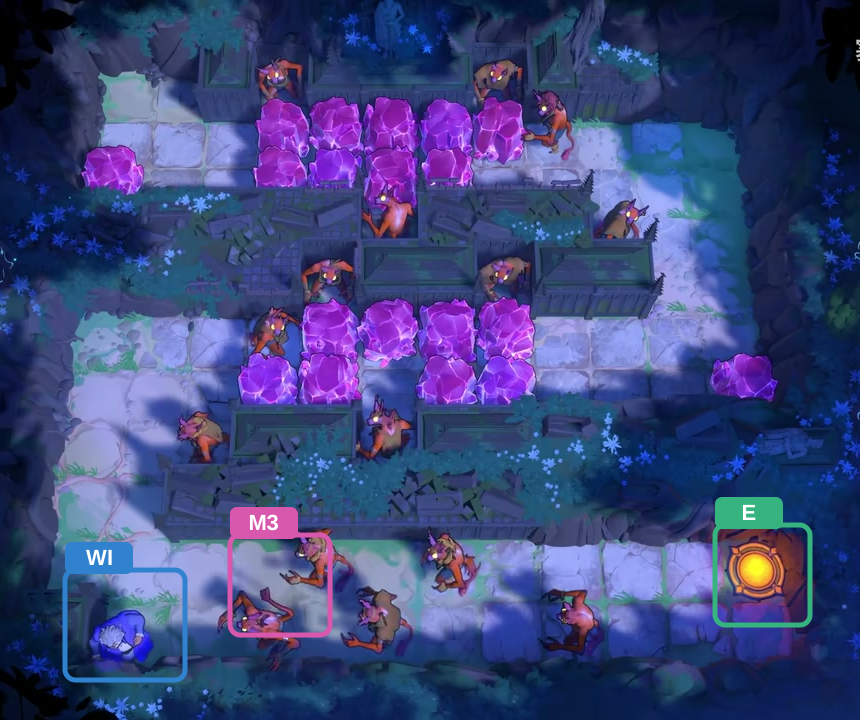
Wizard: right 1, down 2 (3 moves); M3 is the next swap.
Check: The Wizard reaches the lower Goblin row; M3 is still at its starting tile.
Open full-size image in a new tab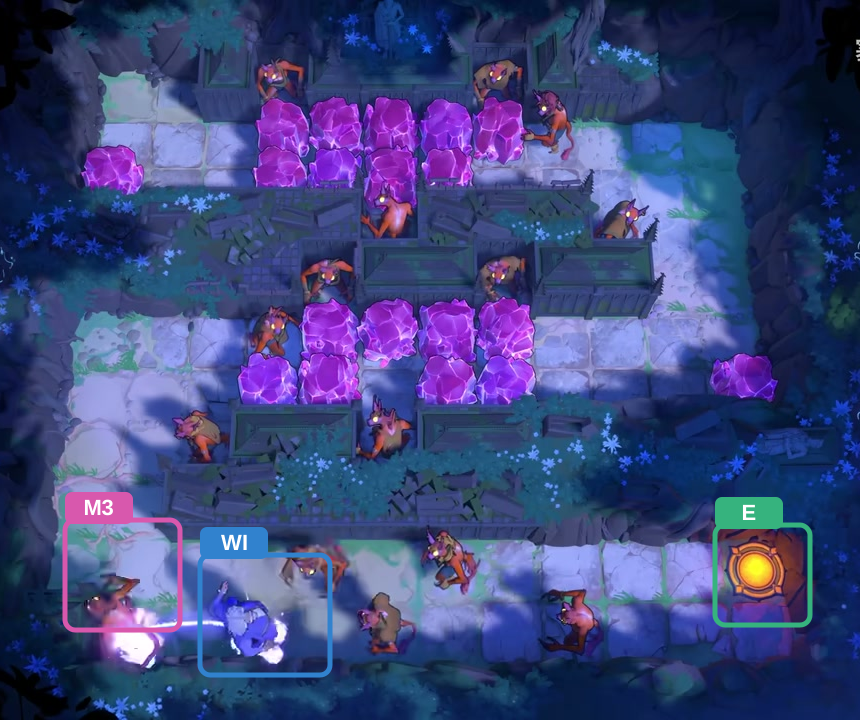
Wizard: right 1 (1 move); swap with M3.
Check: The Wizard swaps with M3; the Goblin survives at the Wizard’s previous tile.
Open full-size image in a new tab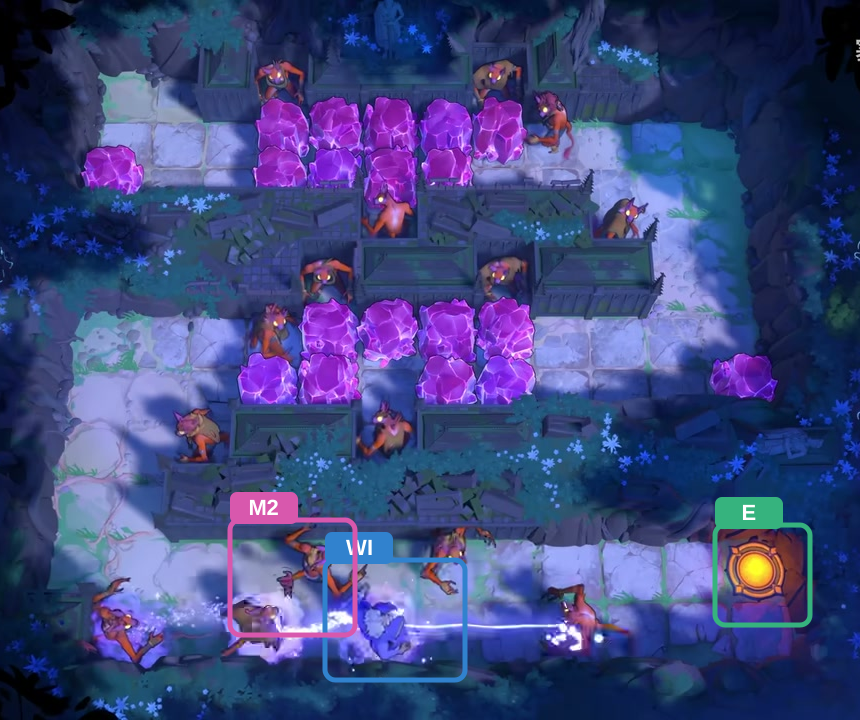
Wizard: right 1 (1 move); swap with M2.
Check: The Wizard swaps with M2; the Goblin survives at the Wizard’s previous tile.
Open full-size image in a new tab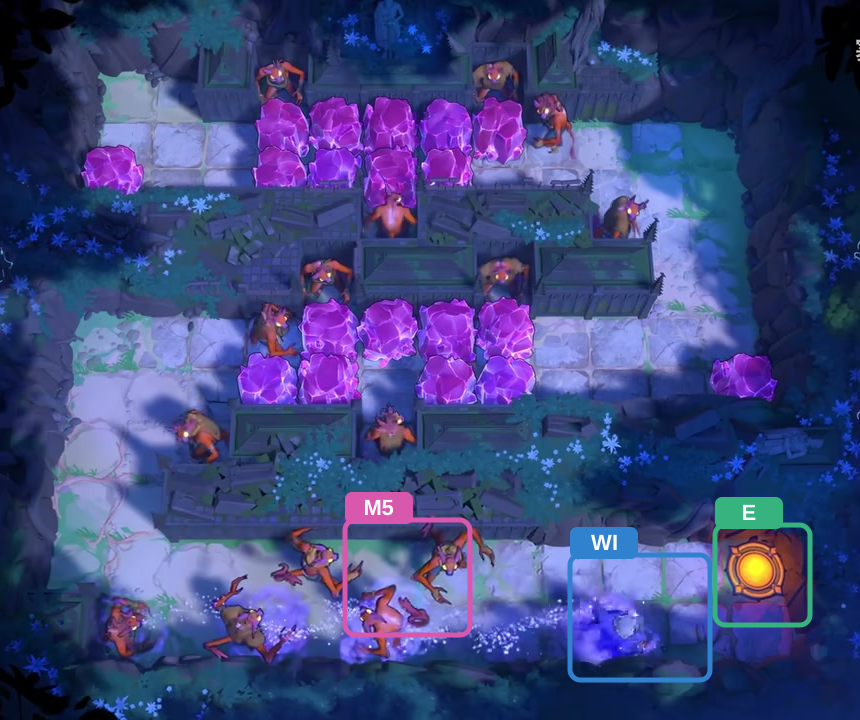
Wizard: right 1 (1 move); swap with M5.
Check: The Wizard swaps with M5; the Goblin survives at the Wizard’s previous tile.
Open full-size image in a new tab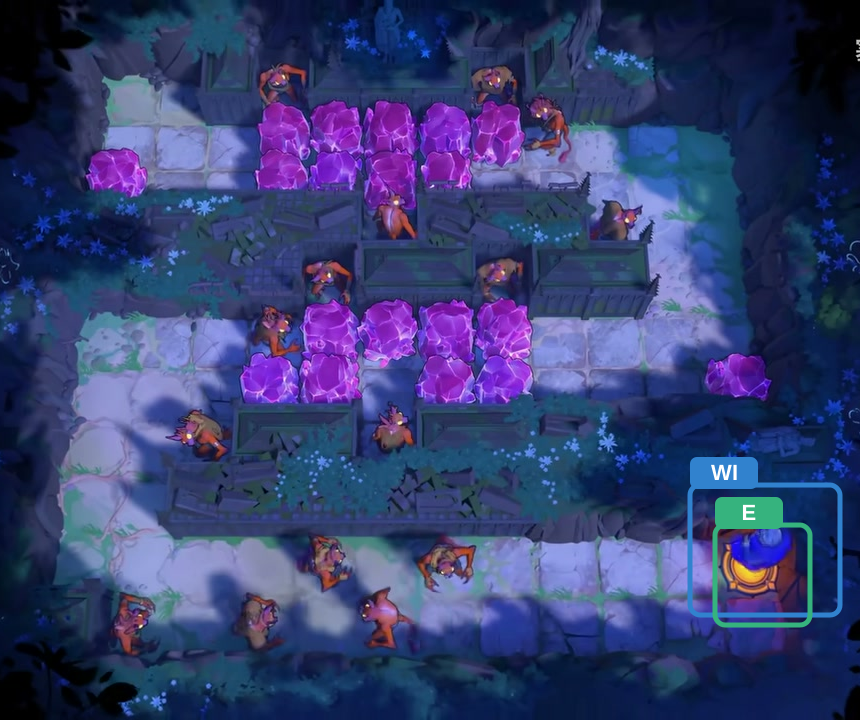
Wizard: up 1, right 3 (4 moves).
Check: The Wizard reaches the lower-right exit; all 15 Goblins remain alive.
Open full-size image in a new tabActor-by-actor direction route
Full direction sequence
- WI Wizard
↓ ↓ → → ↑ → → ↓ → → ↑ → ↓ ↓ ↓ ↓ ↓ ← ← ← ← ↑ ← ↓ ↓ ↓ → ↓ ↓ → → → ↑ → → →
Sources and credits
Room layouts: PC r67121 game files. The adjacent-Goblin hazard is described in the PlayStation Blog hands-on report. Creator video: 塞德莎, Heroes 2: Monsters, part 3. Board artwork: Thekla, Inc.
- Selected Heroes 2 monster-room layouts and player-action traces (PC r67121) — Extracted data
- [North] Hero 2: Monster [North 3] / 【北】英雄2:怪物[北3] — Observed in-game
- Character portraits and selected puzzle-board images (PC r67121) — Extracted data
- PlayStation Blog hands-on report — Documentation · published-2026-07-21
- Warrior three-Goblin screenshot walkthrough — Observed in-game · screenshots-reviewed-2026-10-20
- Warrior ten-Goblin screenshot walkthrough — Observed in-game · screenshots-reviewed-2026-10-20
- Thief Goblin switch screenshot walkthrough — Observed in-game · screenshots-reviewed-2026-10-20
- Wizard Goblin crystal screenshot walkthrough — Observed in-game · screenshots-reviewed-2026-10-20
Unofficial fan wiki, not affiliated with Thekla, Inc. / Arc Games / Gamirror Games. Game content belongs to its owners.
Comments & feedback
Share a tip or suggest a correction. Comments are public. Guest names are unverified; verified accounts show their account username. All language pages share this discussion. Please keep personal information private.