
 Order of the Sinking Star
Sailor: six island crossings

Prepare each Crystal and Stone before sending it into the water. A Crystal that settles becomes a fixed foothold. A moving Stone can skip across water. Some launches end at a named target; those steps tell you when to wait for the Stone to settle. When a launch moves a Lily, follow the position cues and move toward the boarding stance right away. Hold Ctrl during those moving stretches to run while slowing the world; Shift runs without slowing time. Use Undo before a mistimed launch or Lily loading, then retry from the last clear checkpoint instead of waiting a guessed number of seconds.
Blue SA marks the Sailor; gold numbers mark Crystals C1–C6; teal S marks Stones S1–S5; green L marks Lilies L1–L5; violet T marks approximate source-derived recipe locations. These six P20 images are selected states, not a continuous route; T targets do not establish settled video positions. The route instructions below remain separate model/source-based guidance.
Images show selected video checkpoints; the first frame is the starting position.
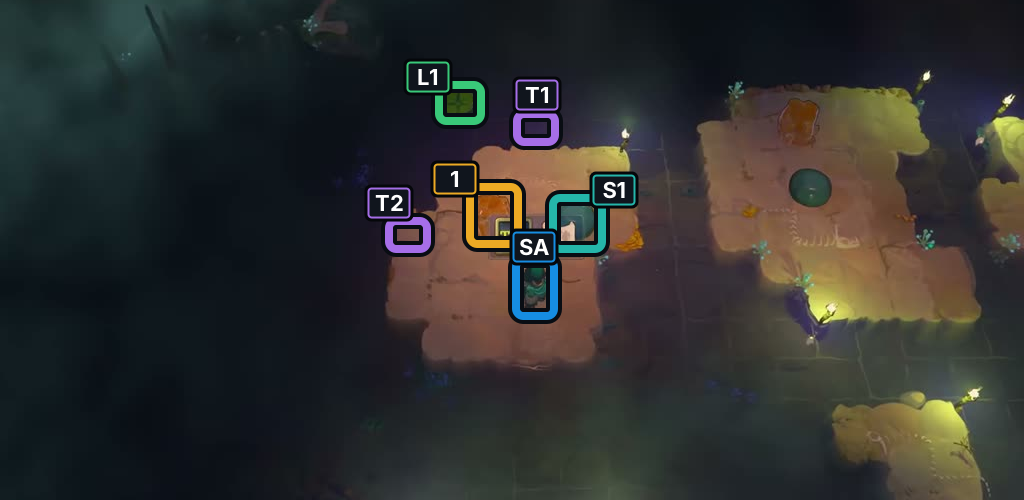
15:40.5 · Initial island A view.
Check: The Sailor, C1, S1 and L1 match this selected layout; T1–T2 are approximate recipe targets.
Open full-size image in a new tab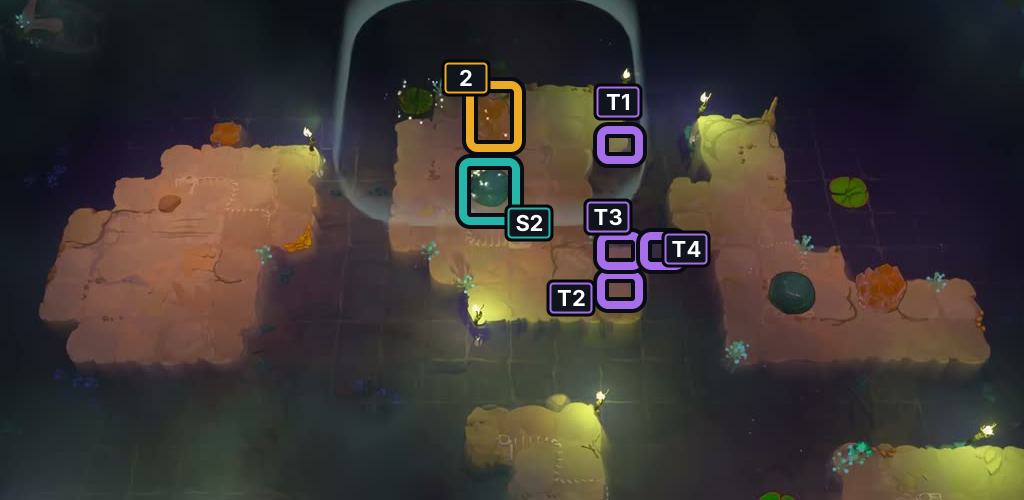
16:03 · Selected island B view.
Check: C2 and S2 appear before the later move; T1–T4 are recipe hypotheses, not confirmed landings.
Open full-size image in a new tab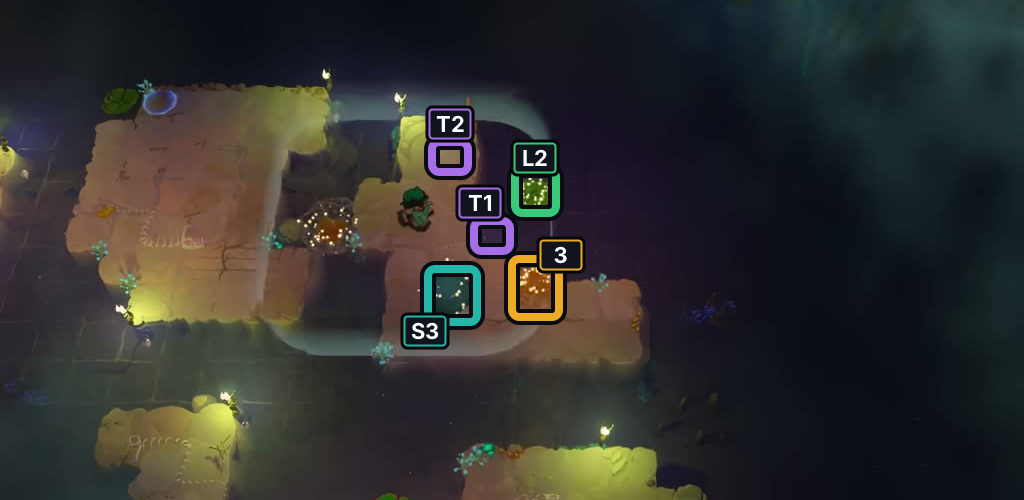
16:35.5 · Selected island C view.
Check: S3, C3 and L2 are visible; T1–T2 mark approximate local recipe positions.
Open full-size image in a new tab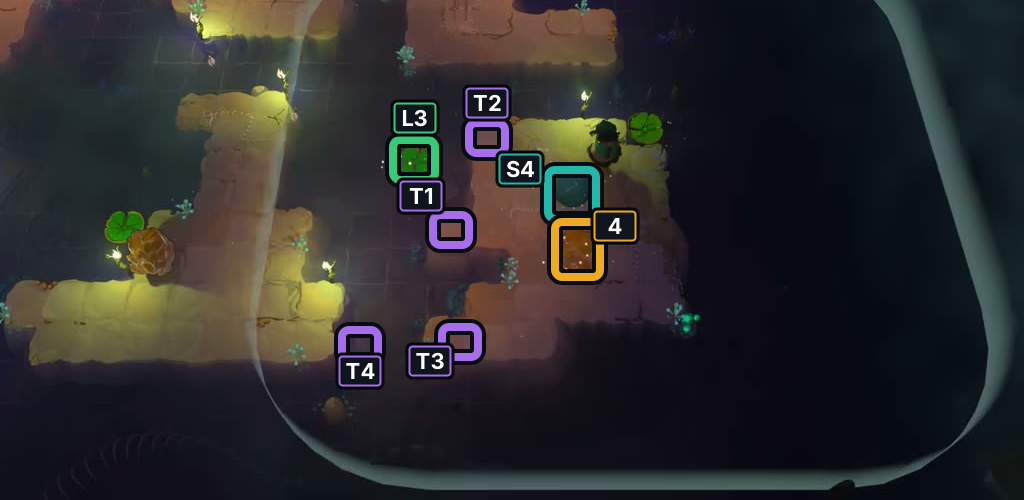
17:35 · Selected island D view.
Check: C4, S4 and L3 are shown before the transfer; T1–T4 are approximate recipe marks.
Open full-size image in a new tab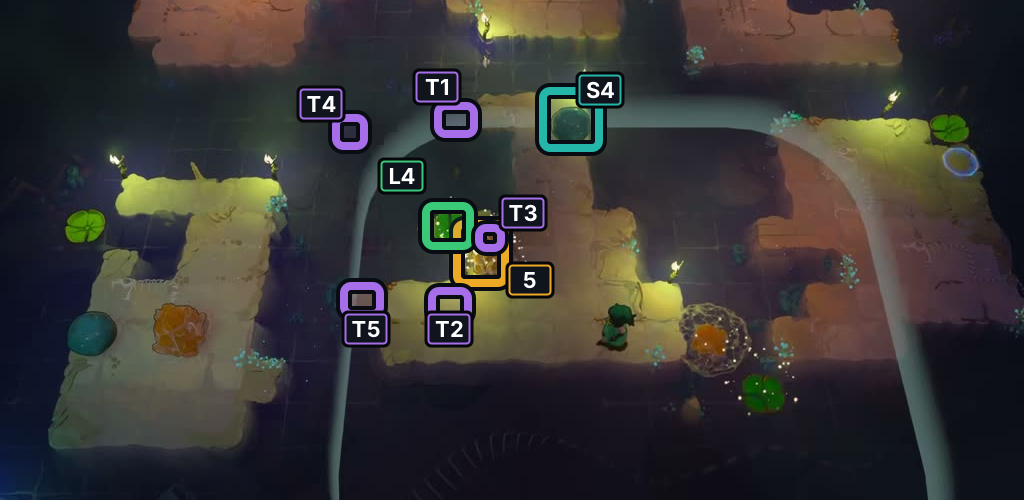
18:20 · Selected central-island view.
Check: C5 and L4 are visible; S4 and T1–T5 include source-derived recipe hypotheses, not video-proven settled cells.
Open full-size image in a new tab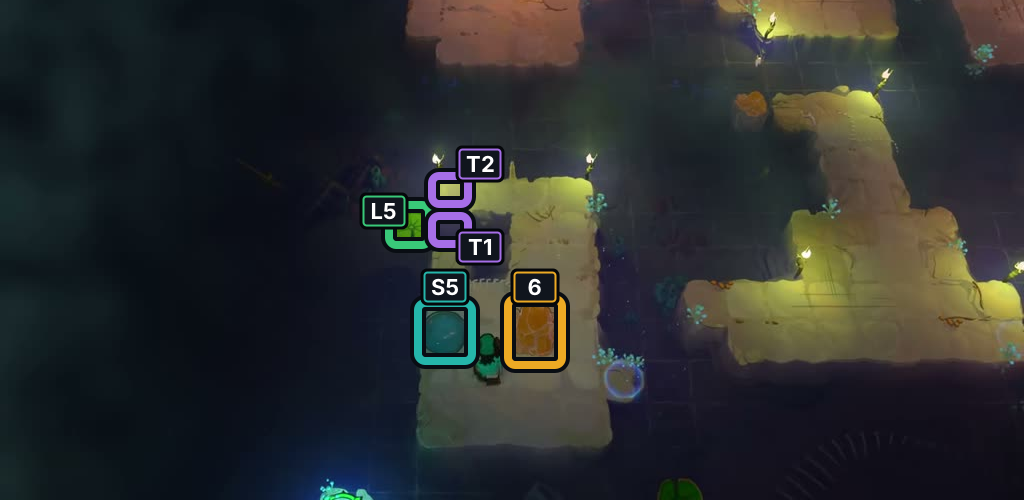
20:58 · Selected final-island view.
Check: S5, C6 and L5 are visible; this frame precedes the separate exit-contact window.
Open full-size image in a new tabA: cross the first gap
Section titled “A: cross the first gap”Hint
Set the Crystal foothold first. Then stage S1 on T2 and use the lane beside L1. Board only after the Lily comes alongside the foothold.
Solution
Push Crystal 1 right once, then north three times onto T1. It settles as a foothold. Move around S1 and push it left four times to T2. Stand below the Stone and launch it north along the lane beside L1. As L1 aligns on the right, step up from the Crystal 1 foothold onto the Lily. Ride it to island B.
If Crystal 1 does not settle on T1, Undo before launching Stone 1. If L1 passes before you reach the foothold, Undo to before the launch or loading push and realign the pieces.
B: build the paired footholds
Section titled “B: build the paired footholds”Hint
S2 needs a landing on T1 and a stopper below it. Crystal 2 supplies the stopper, then becomes the second foothold. Check each landing before crossing.
Solution
- Move S2 down twice and right three times to the lower shaft entrance. Launch it north to T1 and wait until it settles.
- Move Crystal 2 right twice, down four times and right once to T2 as a stopper.
- Reach the upper pushing tile and send S2 south into Crystal 2. S2 sinks at T3.
- Push Crystal 2 north onto the S2 foothold, then right to T4. Once it settles, cross both footholds to island C.
If S2 does not settle on T1, Undo before arranging the stopper. If it misses T3 or Crystal 2 does not settle at T4, Undo to before that launch or push and reset the pieces.
C: ride Lily L2 south
Section titled “C: ride Lily L2 south”Hint
Build Crystal 3’s foothold first, then stage S3 above L2. The Stone’s launch should pass beside the Lily so it moves toward the next island.
Solution
Push Crystal 3 left once and north twice onto T1. Move to S3 and push it north four times to T2. Launch S3 east above L2. As L2 aligns, step right from the Crystal 3 foothold onto the Lily, then ride south to island D.
If the Stone stops short of T2 or L2 passes before you reach the foothold, Undo before launching. Reposition S3 or Crystal 3 and wait for the Lily to come alongside again.
D: carry Crystal 4 across the inner passage
Section titled “D: carry Crystal 4 across the inner passage”Hint
Set Crystal 4 and S4 first. Launch S4 west onto central island E and leave it there for the next phase. When L3 moves south, load Crystal 4 onto it; take the dry inner passage to meet the Lily near T3.
Solution
- Push Crystal 4 north once, then left three times to T1. Push S4 north twice and left twice to T2.
- Launch S4 west onto central island E. Leave it there for the next crossing.
- As L3 moves south, push Crystal 4 left onto it. While it carries the Crystal, take the dry detour right twice, down three times, then left twice to T3.
- When L3 brings the Crystal beside you, push it left onto T4 while boarding. Cross the settled Crystal foothold, then continue left onto E.
If L3 passes the boarding stance at T3 before bringing Crystal 4 alongside, Undo to before the loading push and wait for a safe alignment.
E: turn L4 west, then south
Section titled “E: turn L4 west, then south”Hint
The first northward launch carries S4 on L4 until it stops below Crystal 5; then push the Stone down off the Lily to return it to the lower slab. A second launch sends S4 across the gap and turns L4 west. Put S4 on Crystal 5, then wait until L4 reaches T4 before the final launch. Board from T5 at the lower-left; Crystal 5 is not the boarding point.
Solution
- Move S4 down four times along the upper stem to clear it. Push Crystal 5 down once, right once, north six times and left twice onto T1.
- Push S4 down once and left three times to T2 on the bottom slab, then launch it north into L4. Let the Lily carry S4 north until it stops just below Crystal 5.
- Run up the dry inner stem onto Crystal 5 and push S4 down off the Lily, returning it to the lower slab. L4 stays below the Crystal.
- Move S4 right once and north twice to T3, then launch it north. It crosses the water to the right of L4, turns the Lily west and lands on the upper stem.
- Run up and push S4 left once onto Crystal 5. Wait on the dry tile immediately to the Stone’s right while L4 travels west toward T4.
- When the Lily reaches T4 above the final island, push S4 left off Crystal 5. Its westward flight above L4 turns the Lily south. Hold Ctrl during the moving stretches to run while slowing the world.
- As soon as L4 turns south, go right twice back to the dry stem. Run down the stem and left along the bottom slab to T5. Step left onto L4 as it passes, then ride down until beside the small protruding tile on the final island’s lower-right edge; step left onto it.
If L4 turns too early and returns beside E, Undo to before the final westward launch and wait until it reaches T4. If it passes the boarding point, Undo that launch and run to T5 sooner. Use the Lily’s position as the cue; do not time the wait by seconds.
F: ride L5 to the exit
Section titled “F: ride L5 to the exit”Hint
Push S5 down once first. Then settle Crystal 6 on T1; placing the Crystal before moving S5 north keeps L5 in place during setup. Push S5 north across the Crystal foothold to T2 and wait until it settles. Walk around the notch to S5’s right, then make the west launch. Run toward the Crystal foothold and L5 while the Stone moves.
Solution
- Push S5 down once.
- Push Crystal 6 north once, left twice and north twice onto T1. Wait for it to settle as a foothold.
- Walk below S5 and push it north five times across the Crystal foothold to T2. Wait until it settles, then walk around the notch to S5’s right.
- Launch S5 west above L5. Move immediately toward Crystal 6 and L5; do not wait at the launch point for the Stone to stop. When L5 comes alongside, step left from Crystal 6 onto the Lily, ride south, then step left directly from the Lily onto the green exit.
If Crystal 6 does not settle on T1, Undo before pushing S5 north. If S5 misses T2, Undo and reset the setup before the west launch. If L5 passes before you reach the boarding point, Undo the final launch and run to the Crystal foothold sooner. Follow the Lily’s position rather than counting seconds.
Sources and credits
Puzzle layout and piece positions: PC r67121 game files. Controls: the installed PC keymap. Video reference: 塞德莎, part 20. Cover and board artwork: Thekla, Inc.
- Heroes and Stones Lily-course source records (PC r67121) — Extracted data
- Installed PC gameplay keymap (r67121 local copy) — Extracted data · sha256-3f5c1ce6b96f3d30da31548f5e93c821f2ec50d668d55571316ef1aa2ab6d544
- 【南北】黄金谜题+英雄与水:北部+英雄与飞石:西部[北6+北5东1/北4东1补1题+北6西1/南5西1/南5左半/北6西2/北6西3] — 塞德莎 — Observed in-game
- Heroes and Stones P3 one_of_each selected-state screenshots — Observed in-game · screenshots-reviewed-2026-10-21
Unofficial fan wiki, not affiliated with Thekla, Inc. / Arc Games / Gamirror Games. Game content belongs to its owners.
Comments & feedback
Share a tip or suggest a correction. Comments are public. Guest names are unverified; verified accounts show their account username. All language pages share this discussion. Please keep personal information private.