
 Order of the Sinking Star
Sideways gate puzzles

The Dragon room pairs  Priestess and
 Thief to shift a Dragon through G1; the crystal room uses a blue gate to move six crystals in a line; the relay room uses five switch pads and gate rows to move C1–C4 and place M2 at the portal; a
 Warrior route shifts three Dragons through four gates. Follow each map’s crystal, switch, gate and exit labels.
Dragon on the Wall
Section titled “Dragon on the Wall”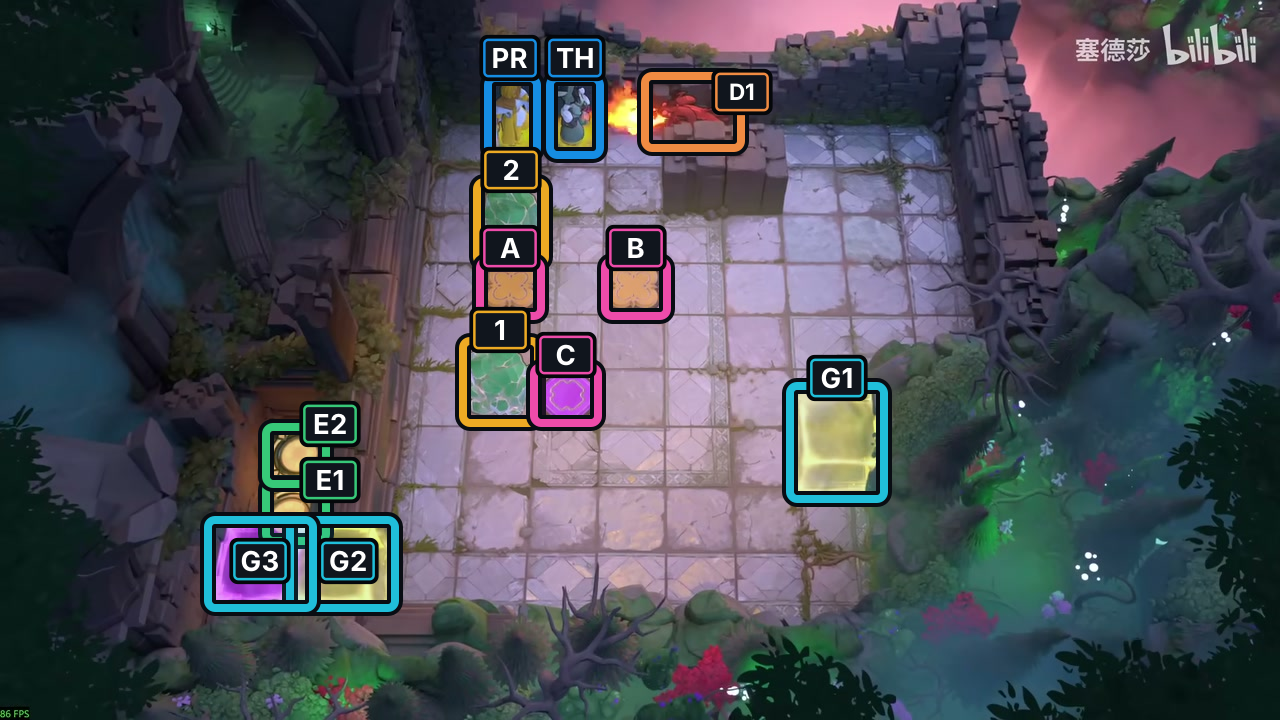
- Crystals 1–2
- Switches A–C
- Gates G1–G3
- Exits E1–E2
- TH Thief
- PR Priestess
- Dragon D1
Images show selected video checkpoints; the first frame is the starting position.
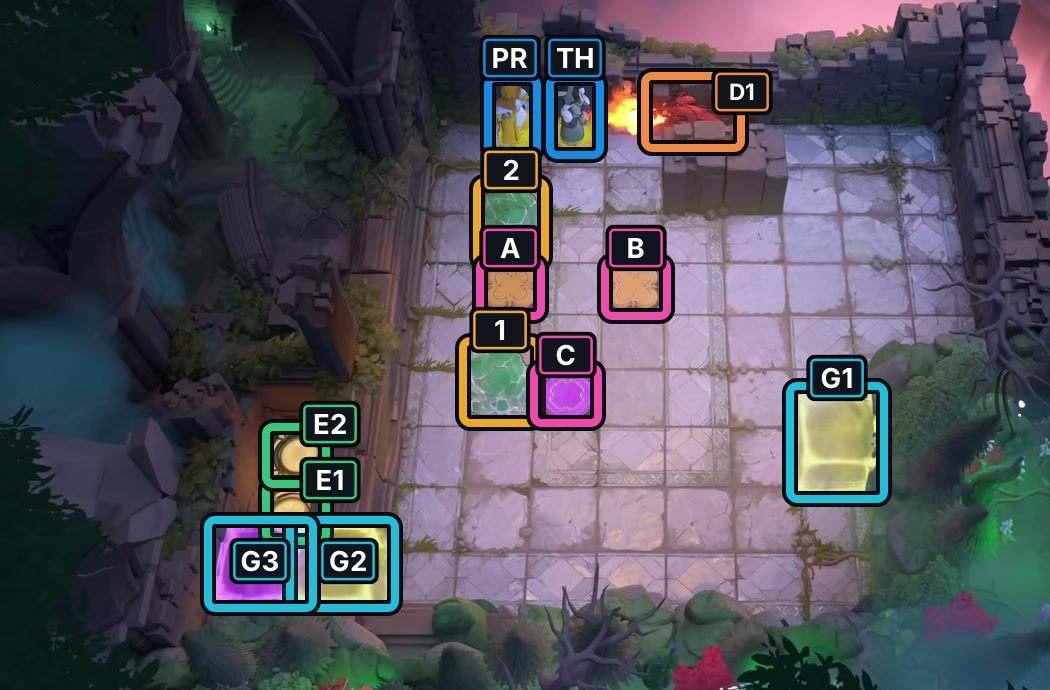
At 45:08, the Thief, Priestess and Dragon appear in the starting layout.
Check: This frame does not establish D1's facing, inputs or route finish.
Open full-size image in a new tabHint
Pull C2 down onto A and put the Priestess on B. C2 screens the fire lane. The Priestess toggles B so G1 shoves the Thief-and-Dragon row left. Bring C1 between the Thief and Dragon for the last push; then use C to hold C1 and B to hold the Dragon. After the Dragon reaches B, move the Priestess down at step 65 before the Thief heads left for the exits.
Solution
- Set the first two weights. The Thief pulls C2 down onto A by step 5. The Priestess reaches B by step 10. C2 now screens the fire lane.
- Bring the Dragon to G1. Thief circles around the right and upper lanes, pulling the Dragon along the top and down the right column. By step 30, the Dragon is lined up with G1.
- Use B to shift the row. Priestess first steps up off B and down back onto it, nudging the Dragon left. Once B is weighted and G1 is open again, the Thief steps up into G1. Priestess repeats the up-and-back toggle; the second push shifts the Dragon left by step 35.
- Add C1 as a spacer. Thief pulls C1 right across the row and down between the Thief and Dragon, then returns to G1. Priestess steps up off B, then right; the third G1 push at step 49 shifts the Thief, C1 and Dragon left together.
- Set C and B. Thief pulls C1 up and left onto purple C by step 57. The Thief lines up below the Dragon and pulls it onto B by step 64. C1 stays on C and the Dragon stays on B.
- Clear the exits. Priestess moves down out of the Thief’s path at step 65. Thief reaches upper exit E2 by step 78; Priestess takes lower exit E1 at step 90. All three gates are open, with the Dragon still alive.
If C2 slips off A or the Priestess leaves B before the Dragon reaches G1, undo and restore those two weights before trying the row shift again. After the Dragon reaches B, move the Priestess down at step 65 before the Thief heads left for the exits, so the automatic pull does not drag her along.
Full direction sequence
- TH Thief
↓ ↓ ↓ ← ↓ - PR Priestess
↓ → → ↓ ↓ - TH Thief
→ → → → → ↑ ↑ ↑ ↑ ← → → ↓ ← ↓ ↓ ↓ ↓ ↓ ↓ - PR Priestess
↑ ↓ - TH Thief
↑ - PR Priestess
↑ ↓ - TH Thief
↑ ← ← ← → → → → ↓ ← ↓ → ↑ - PR Priestess
↑ → - TH Thief
↑ ← ↑ ← ↓ ← ← ↑ → → ↓ ↑ ↑ ↑ - PR Priestess
↓ - TH Thief
← ← ← ↓ ↓ ↓ ↓ ↓ ↓ ← ← ↑ ↑ - PR Priestess
↓ ↓ ↓ ← ← ← ← ↓ ↓ ← ← ↑
Six-crystal train
Section titled “Six-crystal train”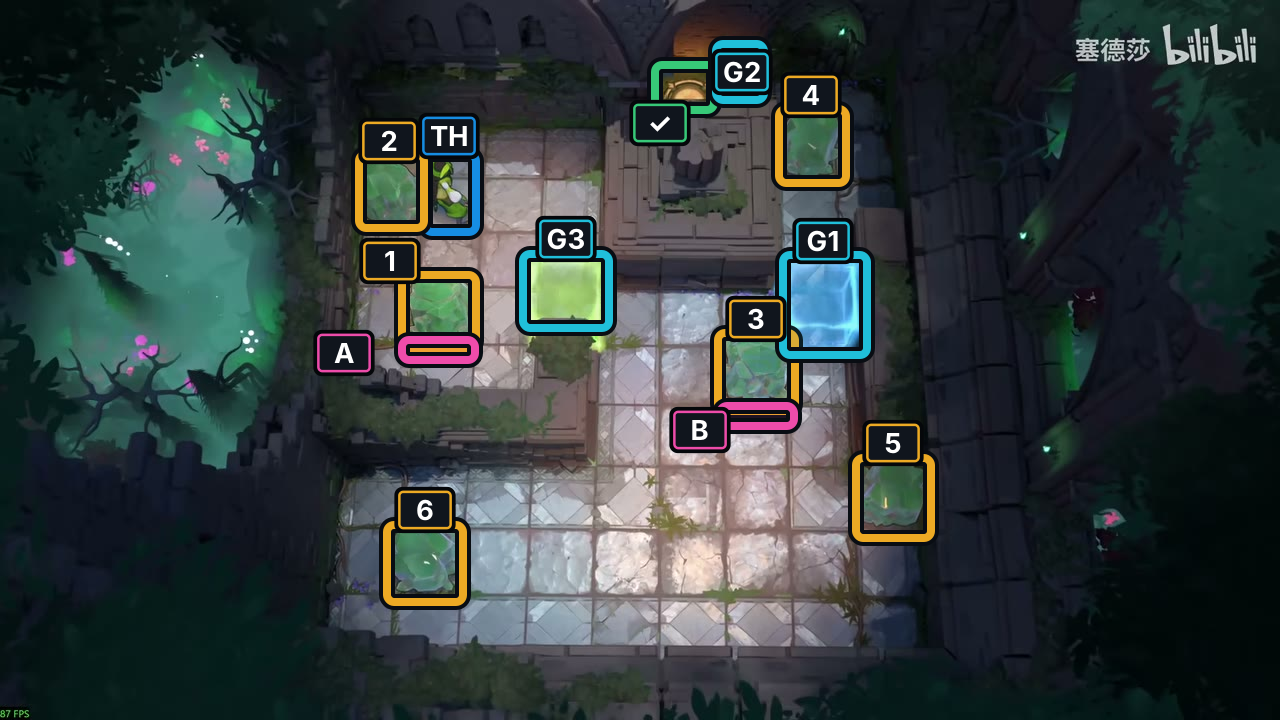
- Crystals 1–6
- Switches A–B
- Gates G1–G3
- Exit
- TH Thief
Images show selected video checkpoints; the first frame is the starting position.
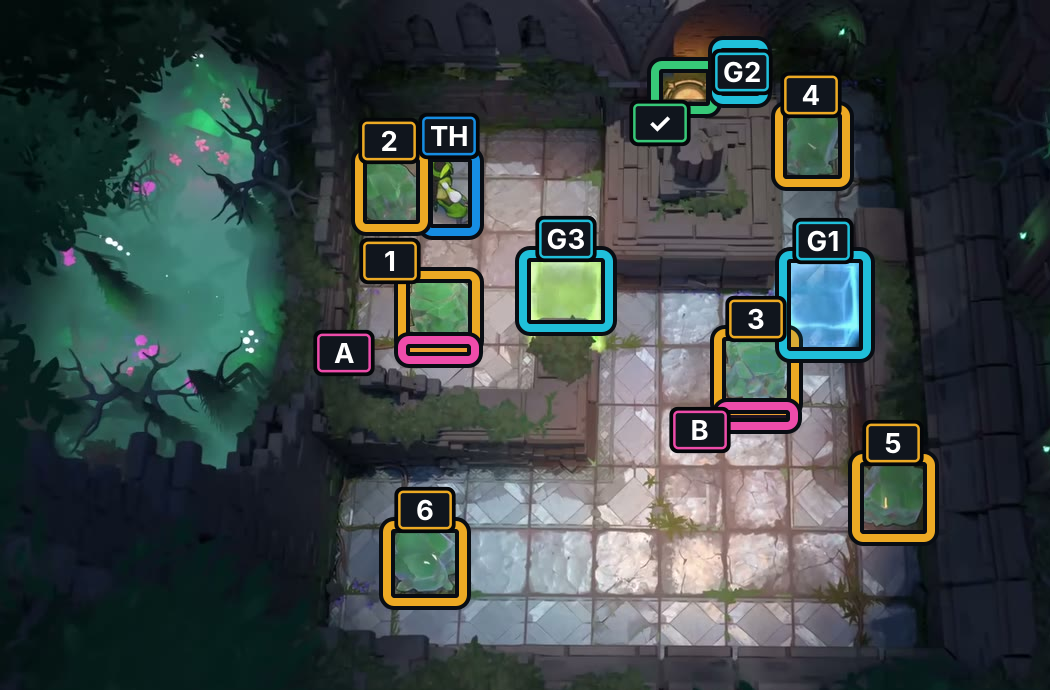
At 43:11, the Thief and six Crystals match the starting layout.
Check: The top exit and nearby gate remain visible at the crop edge; no route is recovered.
Open full-size image in a new tabHint
The green A starts weighted. Pull C1 into the Thief’s row to clear it, then pull C3 one tile down to clear B; that opens G3 and G1. Stage C1 beside G1 and C2 inside G3, leaving A empty. Feed C4, C5, C3 and C6 through G1 in that order, stepping onto B for each row shove. Leave B before pulling the next crystal, and take the final exit through G2.
Solution
- Clear A and B. Step down once, then up twice to pull C1 into the starting row. Circle below C3 and step down once to pull it off B. By step 16, A and B are clear and G3 and G1 are open.
- Stage the first pair. Move C1 to just left of blue G1 and pull C2 into green G3. By step 66, keep A empty; the gaps between C1 and C2 will fill as the other crystals enter.
- Feed C4 through G1. Pull C4 down the far-right column into G1, then step left onto B. The row shifts left with C4 and C1; this first shove is complete by step 76.
- Fetch C5 from the pocket. Pull C5 out of the far-right bottom pocket into the column, draw it up to the small upper-right alcove, loop around, then pull it down into G1 and press B. By step 108, C5 is in the row; the trip also pulls C3 one more tile down, so leave C3 there for the next trip.
- Bring C3 through next. Move C3 into the same far-right column and repeat the up-to-alcove loop, then pull it down into G1 and press B. The third row shove is complete by step 138.
- Finish the train with C6. Bring C6 from the bottom-left along the lower route into the column, then repeat the same loop and B shove. By step 170, the fourth shove sends C2 onto A while G3 moves C4 up. All six crystals remain: five are in the lane, with C4 above G3.
- Reach G2. Step right off B, go up the far-right column and left through G2 to the exit, finishing at step 178. A stays weighted, B is free, G1 and G2 are open, and G3 is closed.
Leave B before pulling the next crystal through G1. Use the lower route to get around the packed lane when fetching each crystal. If a queued crystal behind the Thief is pulled out of order, Undo to just before that pull and restore the sequence before continuing.
Full direction sequence
- TH Thief
↓ ↑ ↑ → ↓ ↓ ↓ → → → → ← ↓ ↓ → ↓ → ↑ ↑ ← ← ↑ ← ← ↑ ↑ ← → ↓ ← ↓ ↓ ← ↑ ↑ → → ↓ → → → → ↓ ← ← ← ↑ ← ↑ ↑ ← ← → → ↓ ← ↓ ↓ ← ↑ ↑ → → ↓ → ↓ → → → ↑ ↑ ↑ ↓ ↓ ↓ ← ← ← ↓ ↓ → → → ← ↓ ← ← ↑ ↑ ↑ → → → ↓ ↑ ↑ ↑ ↑ ↑ ↑ → ↓ ↓ ← ↓ ↓ ↓ ← → ↓ ↓ → ↓ ← ← ← ↑ ← ↑ ↑ → → → ↓ ↑ ↑ ↑ ↑ ↑ ↑ → ↓ ↓ ← ↓ ↓ ↓ ← → ↓ ↓ ↓ ← ← ← ← ← → → → → → → ↑ ← ↑ ↑ ↑ ↑ ↑ ↑ ↑ → ↓ ↓ ← ↓ ↓ ↓ ← → ↑ ↑ ↑ ↑ ↑ ← ←
Thief gate relay
Section titled “Thief gate relay”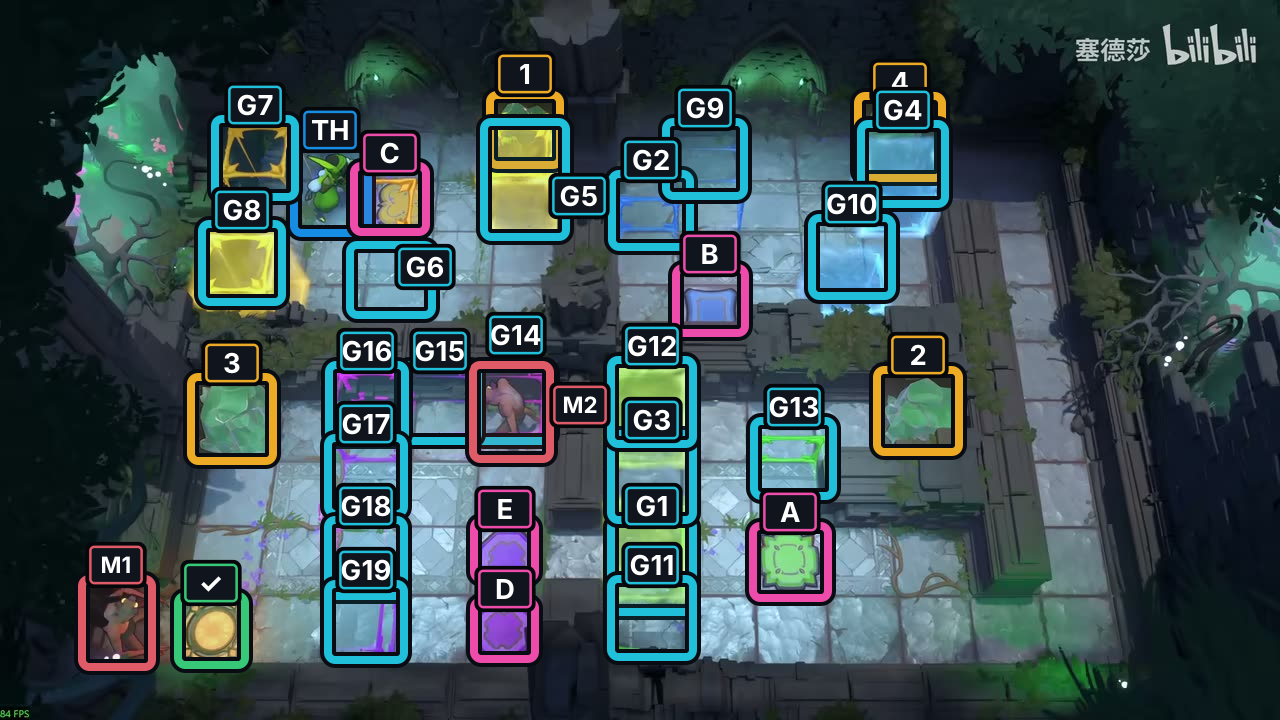
- Crystals 1–4
- Switches A–E
- Gates G1–G19
- Exit
- TH Thief
- Goblins M1–M2
Images show selected video checkpoints; the first frame is the starting position.
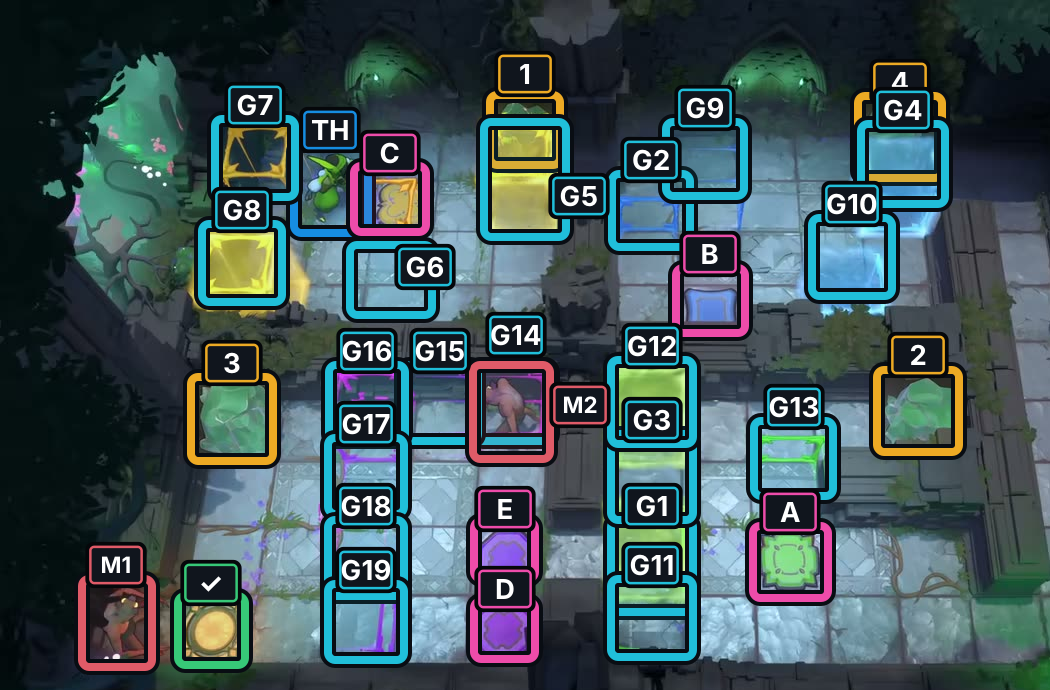
At 37:52.500, the Thief stands in the five-switch relay’s starting layout.
Check: The lower exit and gates remain visible at the crop edge; no route is recovered.
Open full-size image in a new tabHint
Leave C1 on gold C and C4 on blue B. Use C2 to weight A and route the Thief through green G13 and G1 into the pink half. Alternate lower D and upper E to move M2 toward the portal. Then bring C3 from its right through G16 and use G19 to push it left. Keep C1 and C4 on their switches while moving the remaining crystals.
Solution
- Set C1 on C. Pull C1 left, circle below and pull down, then circle to its left and pull left onto gold C. It is in place by step 10.
- Bring C4 to G9. Pull C4 left three times along the top, circle below it, then pull down once into G9 by step 27.
- Push from B. From below G9, walk left, down and right onto B. This detour keeps the Thief from pulling C4 back out of G9. G9 shifts C4 left above G2 at step 30.
- Pull C4 through G2. Step left off B, up into G2, then down below it to pull C4 into the gate at step 33.
- Set C4 on B. Step right onto B to push C4 down, immediately left of B; step right again to pull C4 onto B at step 35. Leave C4 there.
- Stage C2 above G13. Take the upper and outer-right passage to the lower hall, then loop below the inner wall to C2’s left. Pull C2 left twice; it is above G13 by step 60.
- Move C2 onto A. Stand below C2 inside G13 and step down onto A. The row shift puts C2 on A and the Thief below A at step 63.
- Enter the pink half. Circle left of C2, then step left into G1 to pull C2 off A. G1 shifts the Thief left into the pink half by step 66; C2 ends left of A.
- Move M2 toward the portal. Step left onto upper E, then make three down-to-D and up-to-E round trips (six moves). M2 leaves pink L and reaches the portal approach by step 73.
- Bring C3 into G16. Go to C3’s right and pull right twice into G16 by step 80. Return down, right, down from its right side; this keeps C3 inside G16 at step 83.
- Move C3 through G19. Step down onto D, up onto E, down onto D and up onto E once more. The last G19 shove moves C3 left: at step 87 C3 is one tile right of the portal and M2 is on the portal.
- Reach the exit. Step left from E at step 88, then continue left across the row above the portal and down into the exit at step 92.
If C1 is not on C, C4 is not on B, or C2 is not staged above G13 before the relay, undo and restore those placements. Keep C3 inside G16 while returning from its right side; if it leaves the gate, undo to the setup before that return.
Full direction sequence
- TH Thief
↑ → → ← ↓ → ↓ ← ↑ ← ↑ → → → ↓ → → → → → ↑ ← ← ← ↓ → ↓ ← ↓ → ← ↑ ↓ → → ↑ → → ↑ → → ↓ ↓ ↓ ↓ ↓ ↓ ↓ ← ← ← ← ↑ ← ↑ → ↑ → ← ← ↓ → ↓ ← ↑ ← ← ↓ ↑ ↓ ↑ ↓ ↑ ↑ ↑ ← ← ← → → ↓ → ↓ ↓ ↑ ↓ ↑ ← ← ← ← ↓
Warrior and three Dragons
Section titled “Warrior and three Dragons”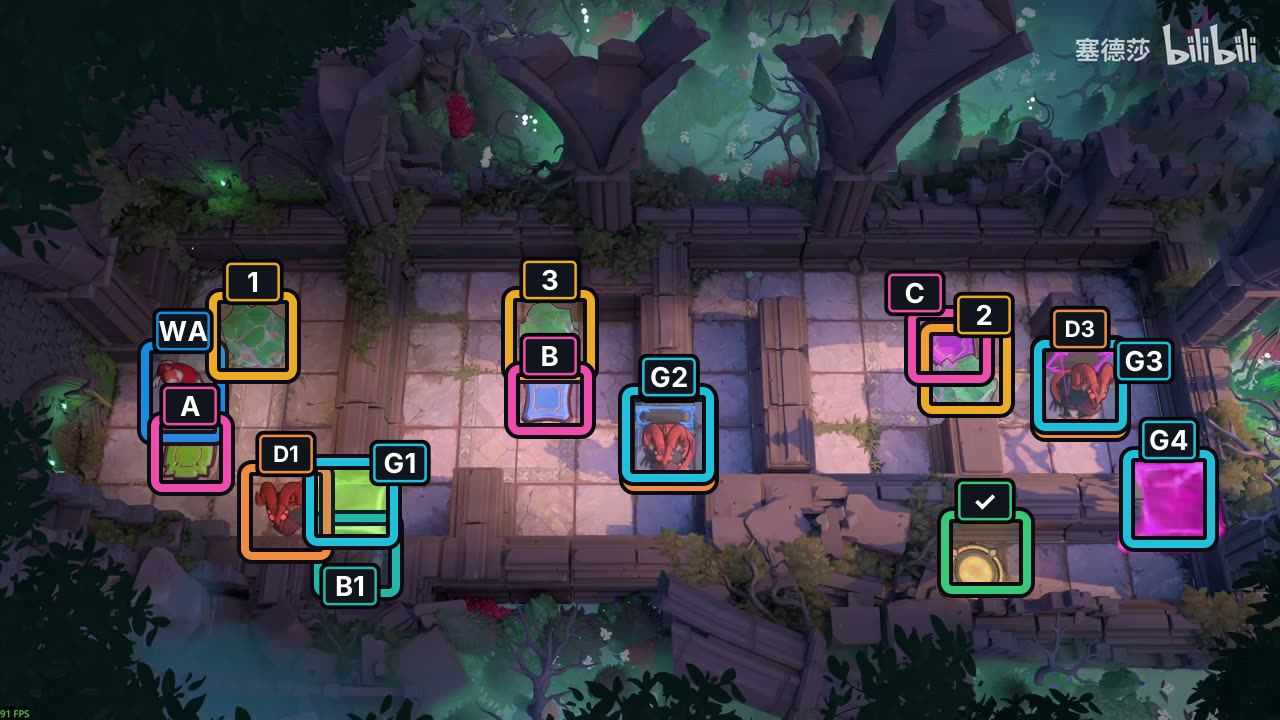
- Crystals 1–3
- Boulder B1
- Switches A–C
- Gates G1–G4
- Exit
- WA Warrior
- Dragons D1–D3
Images show selected video checkpoints; the first frame is the starting position.
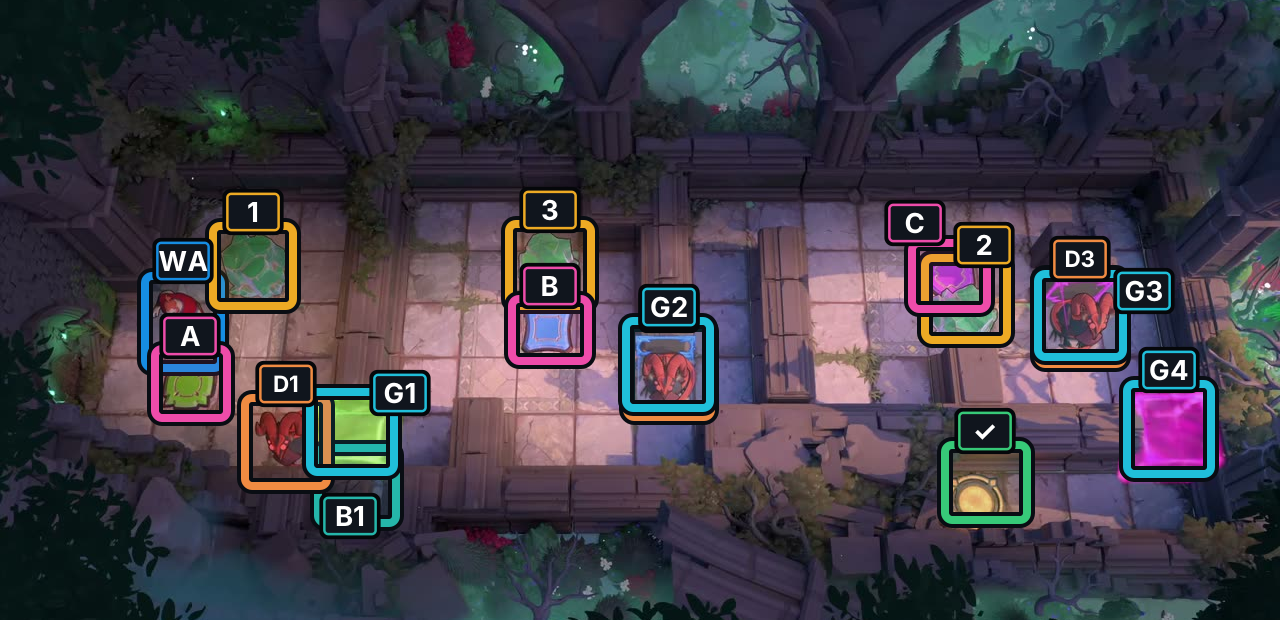
At 42:00, the Warrior, Crystals and Dragons occupy the starting layout.
Check: The far-right gate remains in the crop; no route is recovered.
Open full-size image in a new tabHint
Keep C1 on A as you leave the first chamber. Put C3 below G2 before stepping on blue B. In the right chamber, move D3 aside, place C2 below G3, then bring D3 back to the gate and press C. The crystal placements line up the Dragon pushes without moving the Warrior off the intended route.
Solution
- Set C1 on A. From above C1, push it down twice. Circle to its right and push left onto A by step 8.
- Shift D1 into G1. Stand left of D1 and push right once, moving it into G1 by step 10.
- Clear D1 with G1. Circle to C1’s left and push right to move it off A; then step left off A yourself. After the Warrior leaves A, G1 closes with B1 blocking the escape. D1 is cleared by the closure at step 16.
- Restore the A weight. Circle to C1’s right and push left back onto A by step 22. Leave C1 there while crossing G1.
- Stage C3 in the lower lane. Use the lower corridor to reach C3’s right without stepping on B. Push C3 left once, get above it, then push down twice. By step 37, C3 is on G2’s row, three tiles to its left.
- Line C3 up with the gate. From C3’s left, push right twice at step 41. Circle above it without touching B, push down once at step 48, then push right once from its left at step 51. These moves place C3 directly below G2, not in the gate. Keep B unweighted until this setup is complete.
- Clear D2. Step on B at step 54; D2 is cleared while C3 remains below G2. Leave B and take the upper-right corridor to the right chamber by step 62.
- Move D3 and prepare C2. Approach D3 from the right along the upper outside path and push left twice; the second push also nudges C2 one tile left. Get below C2 and push it up once by step 80.
- Move D3 into the left pocket. Circle to D3’s right and push left once at step 89. Then stand left of C2 and push right twice; C2 is on the row to C’s right by step 96.
- Set C2 below G3. Get above C2 and push it down once. Circle left and push right once into G3 at step 102. Step up, then left onto C. When G3 closes, it pushes C2 down one tile below the gate at step 104.
- Open G4. Leave C to the left, left again, then down to stand left of D3. Push D3 right three times back into G3 by step 112. Step up, then left onto C; when G3 closes, C2 blocks D3’s escape, D3 is cleared and G4 opens at step 114.
- Reach the exit. Go up once, right three times, down five tiles, passing through G4, then left three times to the exit at step 126. C1 remains on A, C3 below G2 and C2 below G3.
If C1 is not on A before leaving the first chamber, undo to the push that places it there. Before stepping on B, make sure C3 is below G2. If G4 stays closed after the D3 and C2 setup, realign those two pieces before taking the exit corridor.
Full direction sequence
- WA Warrior
↑ ↑ → ↓ ↓ → ↓ ← ↓ → ← ← ← ↑ → ← → ↑ → → ↓ ← → ↓ → → ↑ → → → ↑ ↑ ← ↑ ← ↓ ↓ ← ↓ → → ← ↑ ↑ → → ↓ ↓ ← ↓ → ↑ ↑ ← → ↓ → → ↑ ↑ ↑ → → → → → → → ↓ ↓ ← ← ↑ ← ← ← ↓ ↓ → ↑ ← ↑ ↑ → → → ↓ ↓ ← ↑ ↑ ← ← ↓ → → ↑ → ↓ ← ↓ → ↑ ← ↑ ← ← ↓ ↓ → → → ↑ ← ↑ → → → ↓ ↓ ↓ ↓ ↓ ← ← ←
Sources and credits
Room layout and labels: PC r67121 game files. The 90-, 178-, 92- and 126-step routes were replayed in scoped rules models; the 126-step check uses room-scoped gate-crushing and facing projections. Selected video frames show matching starts and checkpoints, not exact inputs or native gameplay. Video: 塞德莎, Heroes 3, part 4. Board artwork: Thekla, Inc.
- Sideways-gates native source records (PC r67121) — Documentation
- Supplemental sideways-gates route check (bounded model) — Documentation · sideways-gates-bounded-checks-2026-10-17
- Supplemental six-Crystal multipush route check (bounded model) — Documentation · sideways-gates-multipush-bounded-checks-2026-10-17
- Supplemental Thief-side-slide route check (bounded model) — Documentation · sideways-gates-thief-bounded-checks-2026-10-17
- Supplemental Side-kick Warrior route check (bounded model) — Documentation · sideways-gates-warrior-bounded-checks-2026-10-17
- Sideways-gates visual samples, part 4 / 横向闸门画面观察,第4部分 — Observed in-game
- Joric's PuzzleScript movement-rule port — Documentation · commit-4e6e0784727d95c7337d50f6d5b3ef912aa0e8ae
- Character portraits and selected puzzle-board images (PC r67121) — Extracted data
- Sideways gates sideways-gates-side_slide_intro_v2 selected P4 starting-layout screenshot — Observed in-game · screenshots-reviewed-2026-10-21
- Sideways gates multipush_for_me2 selected P4 starting-layout screenshot — Observed in-game · screenshots-reviewed-2026-10-21
- Sideways gates side_kick selected P4 starting-layout screenshot — Observed in-game · screenshots-reviewed-2026-10-21
- Sideways gates dragon_on_the_wall selected P4 starting-layout screenshot — Observed in-game · screenshots-reviewed-2026-10-21
Unofficial fan wiki, not affiliated with Thekla, Inc. / Arc Games / Gamirror Games. Game content belongs to its owners.
Comments & feedback
Share a tip or suggest a correction. Comments are public. Guest names are unverified; verified accounts show their account username. All language pages share this discussion. Please keep personal information private.