
 Order of the Sinking Star
Heroes working together

These nine opening rooms ask you to coordinate two or three named heroes. Select the hero you want to move with the character-selection control shown in your controls, then use its bound movement keys or stick.  Thief retreats pull crystals,
 Warrior steps push them, and
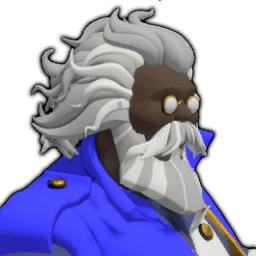 Wizard swaps can move other board pieces. Each screenshot shows a result state after its instructions; the first frame shows the starting board. Every room has one marked exit per hero; finish with each hero on a different exit at the same time. The maps label heroes by role, exits E1–E3, crystals, switches and gates. For one-character rooms, see the solo opening walkthroughs.
Arrows in the solutions show screen directions, not literal keys. A normal movement step advances one tile; the Wizard may swap with a farther visible object. The folded route lists group consecutive directions by the hero who acts, so the handoff points are easy to follow.
Wizard and Warrior: two switches
Section titled “Wizard and Warrior: two switches”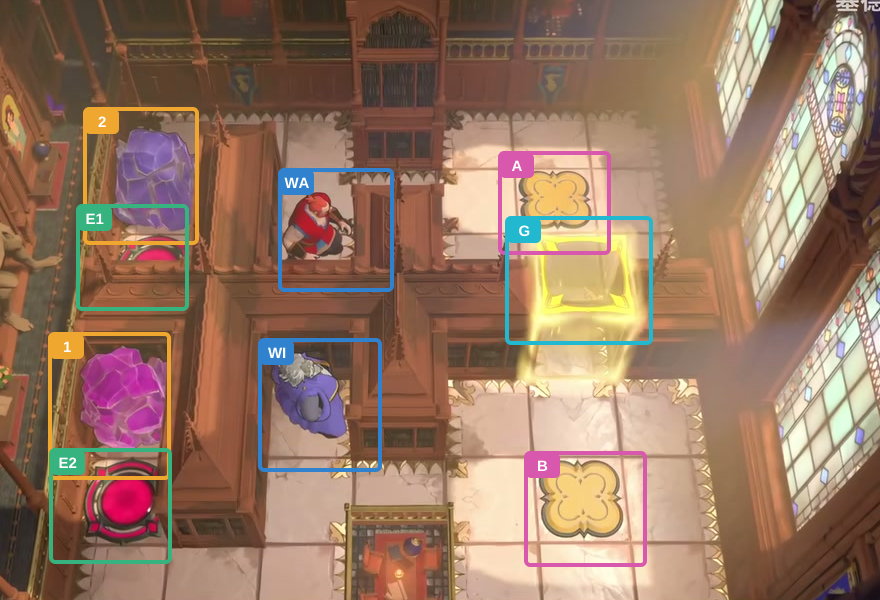
- Crystals 1–2
- Switches A–B
- Gate
- Exits E1–E2
- WI Wizard
- WA Warrior
Hint
Move the Warrior first: ↑ → → → puts it on switch A. Then select the Wizard and move ↓ → → → to switch B. Once both switches are held, the Wizard swaps with the Warrior and continues toward exit E1; send the Warrior to E2.
Step-by-step solution
Images show selected video checkpoints; the first frame is the starting position.
Start with the Warrior above the Wizard.
Check: Both heroes and crystals are in their starting places; both switches are empty and the gate is closed.
Open full-size image in a new tab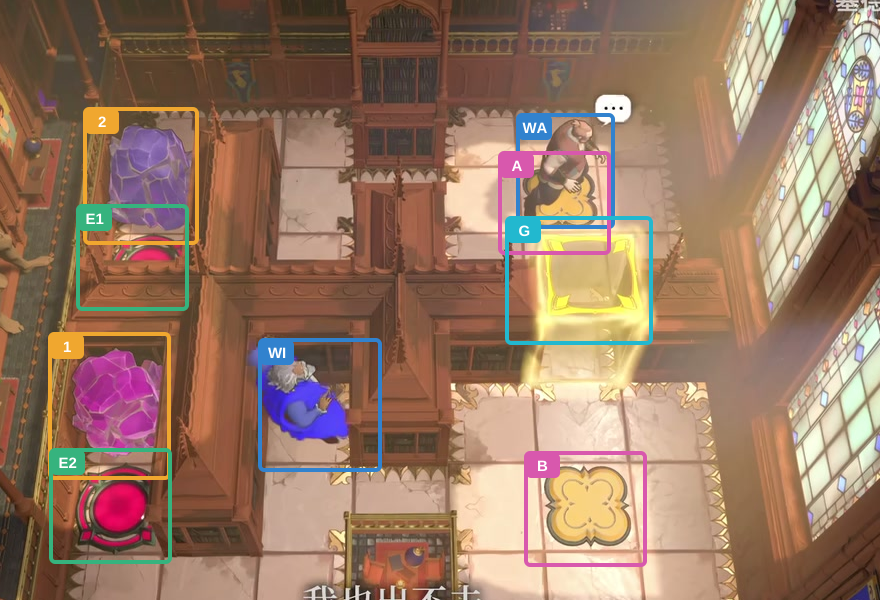
Warrior: go up once, then right three times to Switch A.
Check: Warrior occupies Switch A; Switch B is empty and the gate stays closed.
Open full-size image in a new tab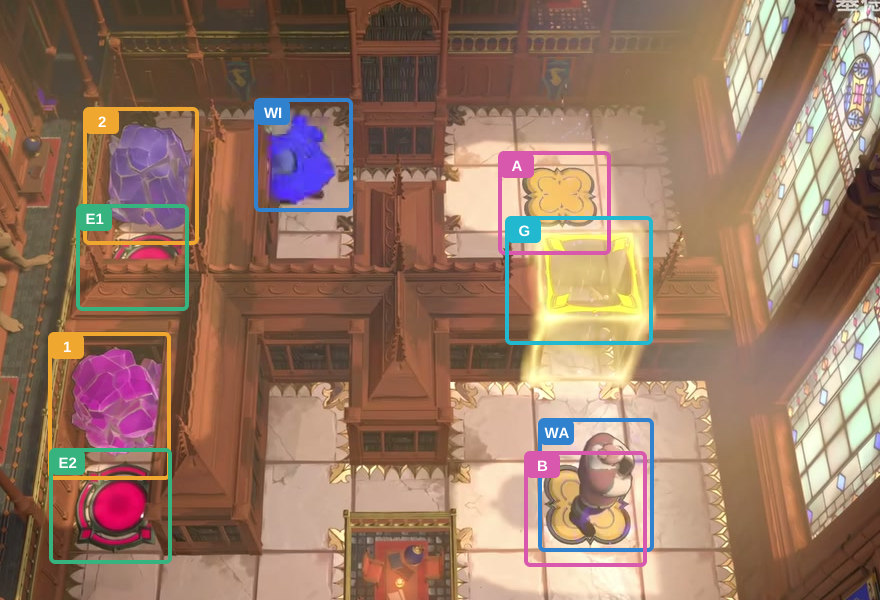
Wizard: down once, right three, up to swap with Warrior, then left three.
Check: Warrior now holds Switch B; Wizard is on the upper-left path. Switch A is empty and the gate is closed.
Open full-size image in a new tab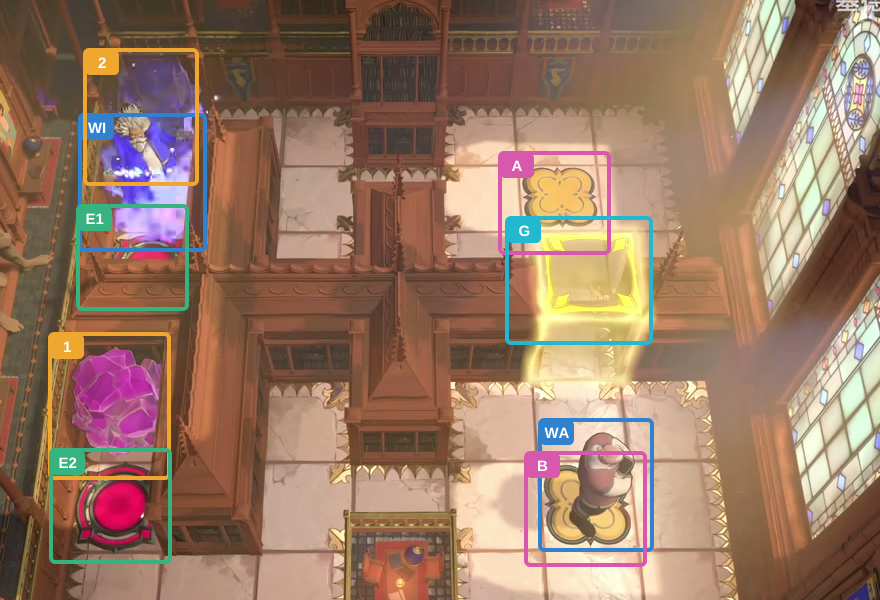
Wizard: go up once, left twice, then down to swap with Crystal 2.
Check: Crystal 2 moves one tile up; Wizard stands above Exit 1.
Open full-size image in a new tab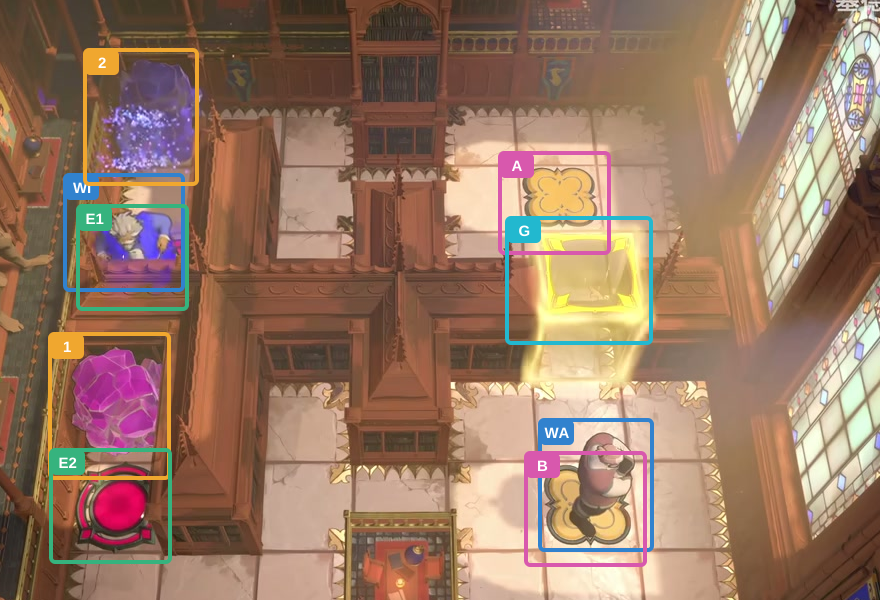
Wizard: go down once to Exit 1.
Check: Wizard occupies Exit 1; Warrior remains on Switch B.
Open full-size image in a new tab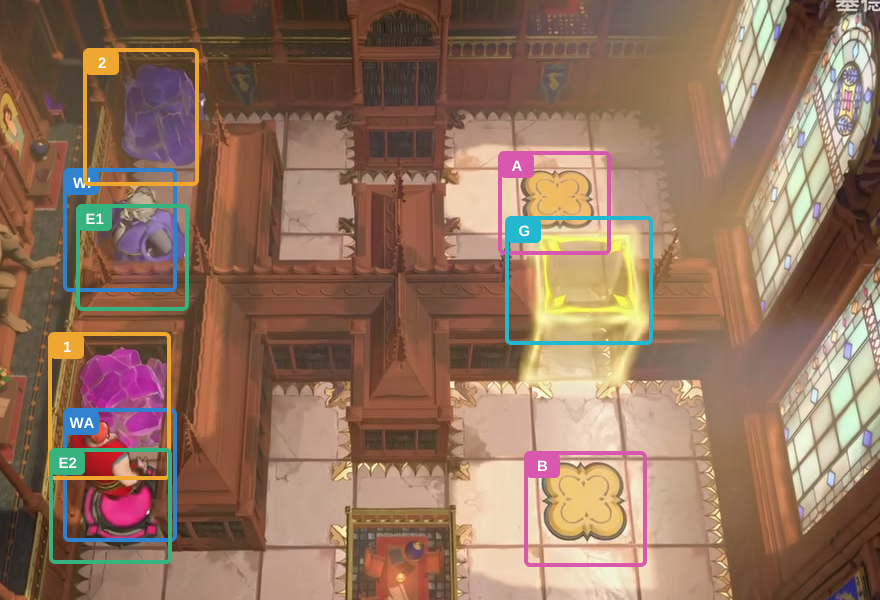
Warrior: go left three, down once, left twice, then up to Exit 2.
Check: Both exits are occupied; the team finishes.
Open full-size image in a new tabActor-by-actor direction route
Full direction sequence
- WA Warrior
↑ → → → - WI Wizard
↓ → → → ↑ ← ← ← ↑ ← ← ↓ ↓ - WA Warrior
← ← ← ↓ ← ← ↑
Thief and Warrior: a crystal train
Section titled “Thief and Warrior: a crystal train”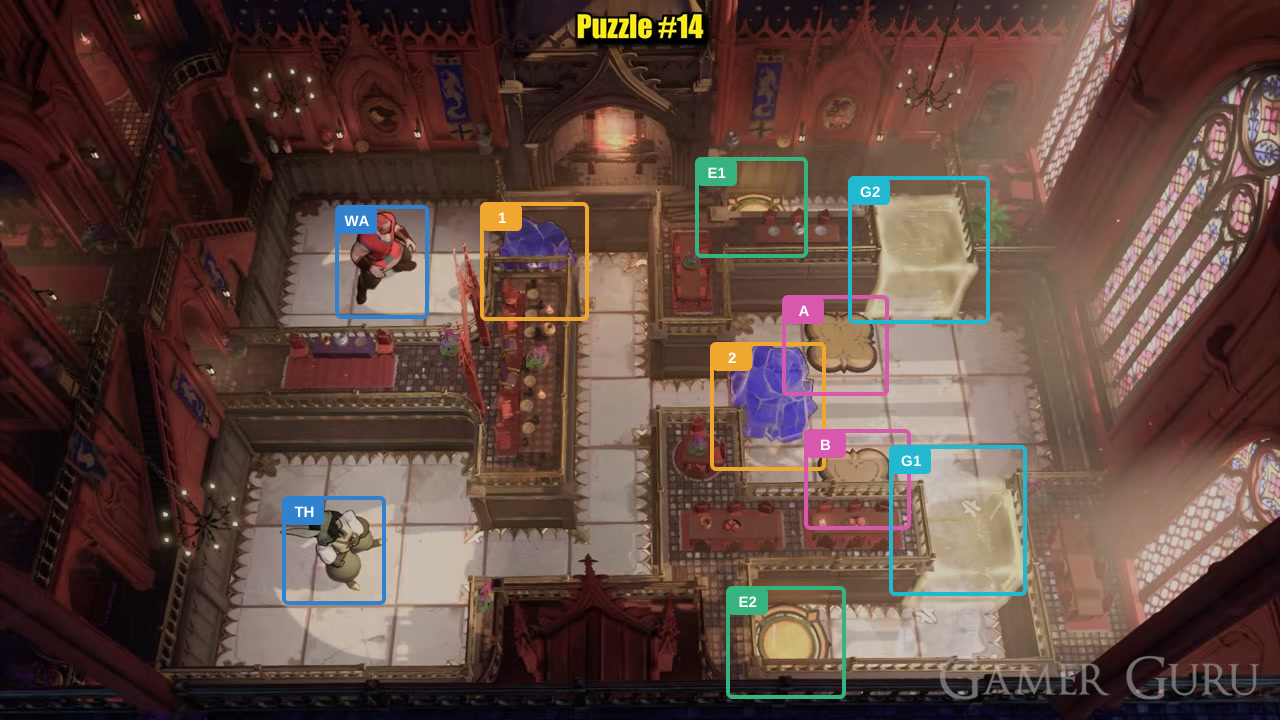
- Crystals 1–2
- Switches A–B
- Gates G1–G2
- Exits E1–E2
- TH Thief
- WA Warrior
Hint
Start with the Warrior, pushing Crystal 1 right twice. The Thief then circles to pull it down while the Warrior moves Crystal 2 into the far-right lane. Later put Crystal 1 on A and finish by returning Crystal 2 to B. The Warrior exits at upper E1; the Thief exits at lower E2.
Step-by-step solution
Images show selected video checkpoints; the first frame is the starting position.
Start with the Thief below the Warrior.
Check: Both heroes and crystals are in their starting places; both switches are empty and both gates are closed.
Open full-size image in a new tab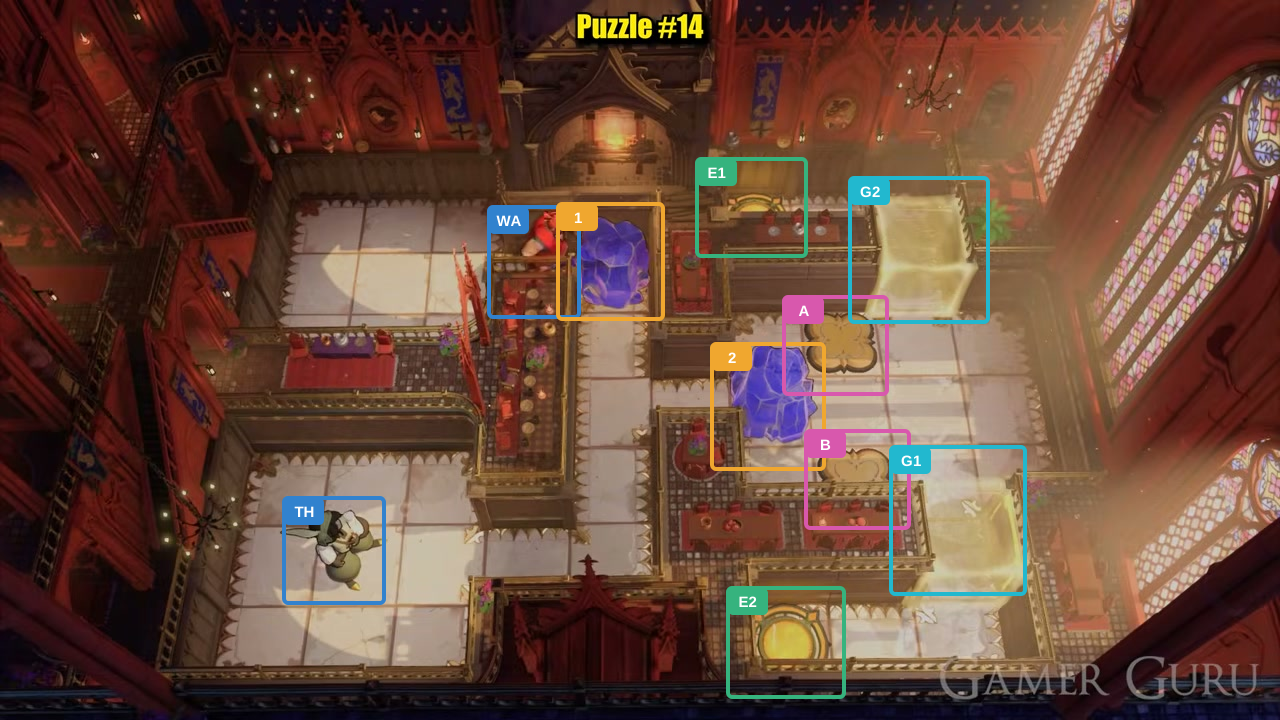
Warrior: move right twice, pushing Crystal 1 right on the second move.
Check: Warrior is two tiles right of his start; Crystal 1 has moved right once.
Open full-size image in a new tab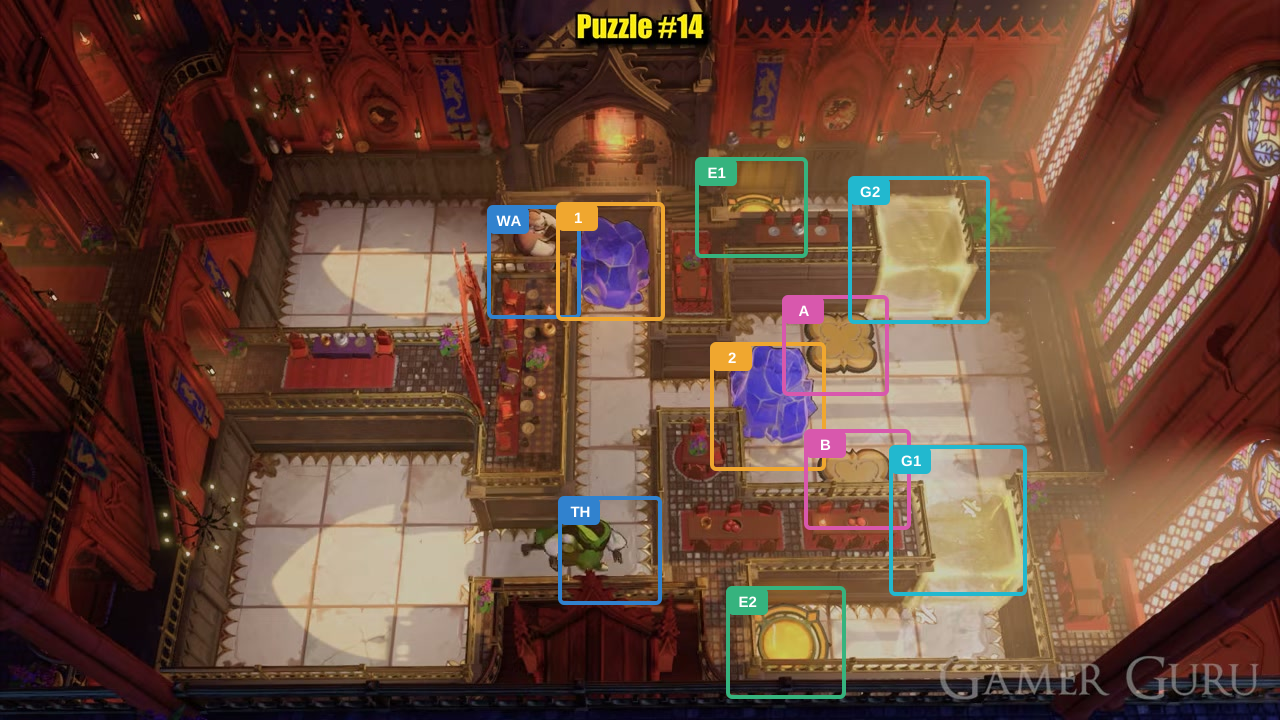
Thief: move right three times.
Check: The Thief reaches the lower passage beside Crystal 1.
Open full-size image in a new tab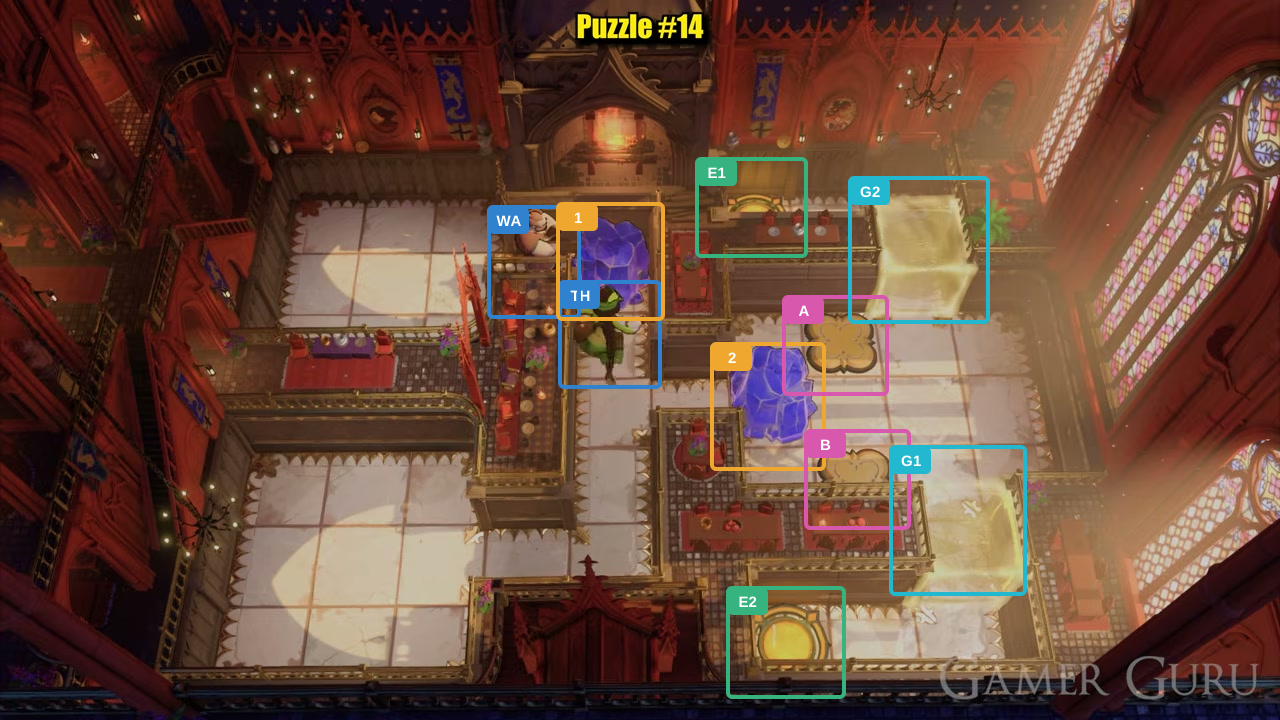
Thief: move up three times.
Check: The Thief reaches the upper passage; Crystal 1 remains in place.
Open full-size image in a new tab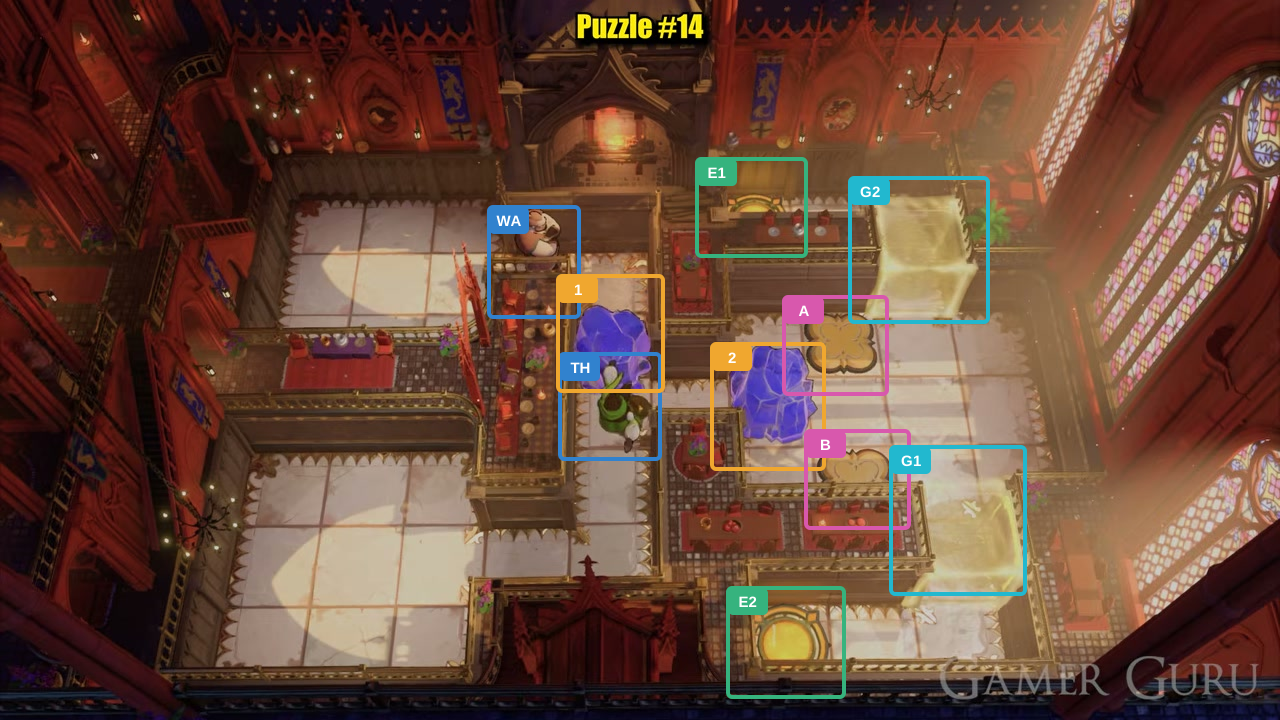
Thief: move down once to pull Crystal 1 down.
Check: Crystal 1 moves one tile down.
Open full-size image in a new tab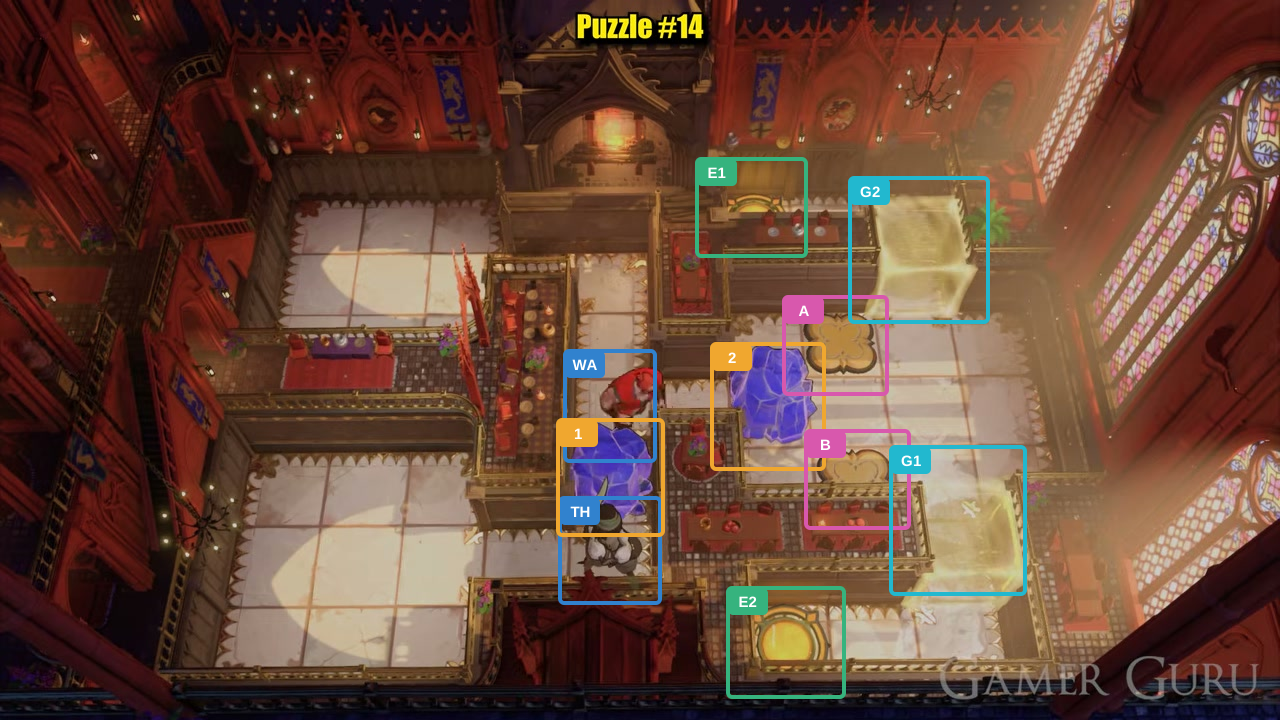
Warrior: move right once and down twice to push Crystal 1 down.
Check: Crystal 1 reaches the lower lane.
Open full-size image in a new tab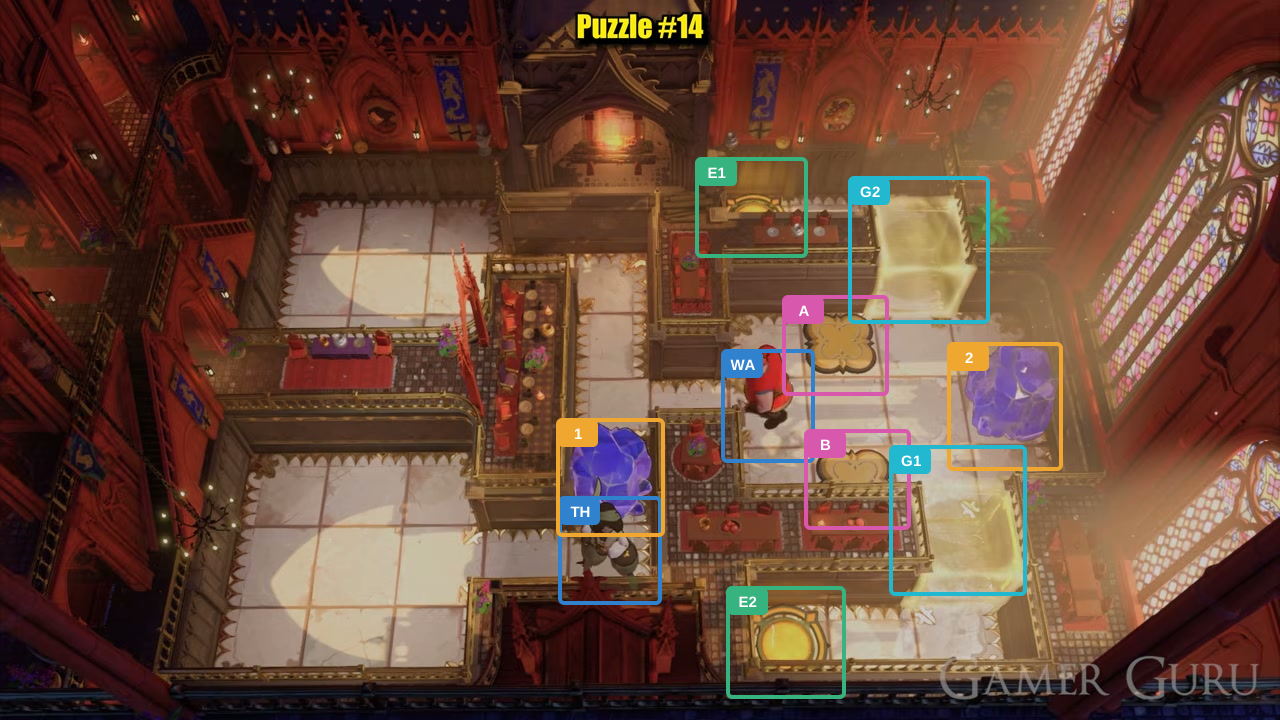
Warrior: move right four times, then left twice to reposition.
Check: Crystal 2 reaches the far-right lane; the Warrior returns toward the middle.
Open full-size image in a new tab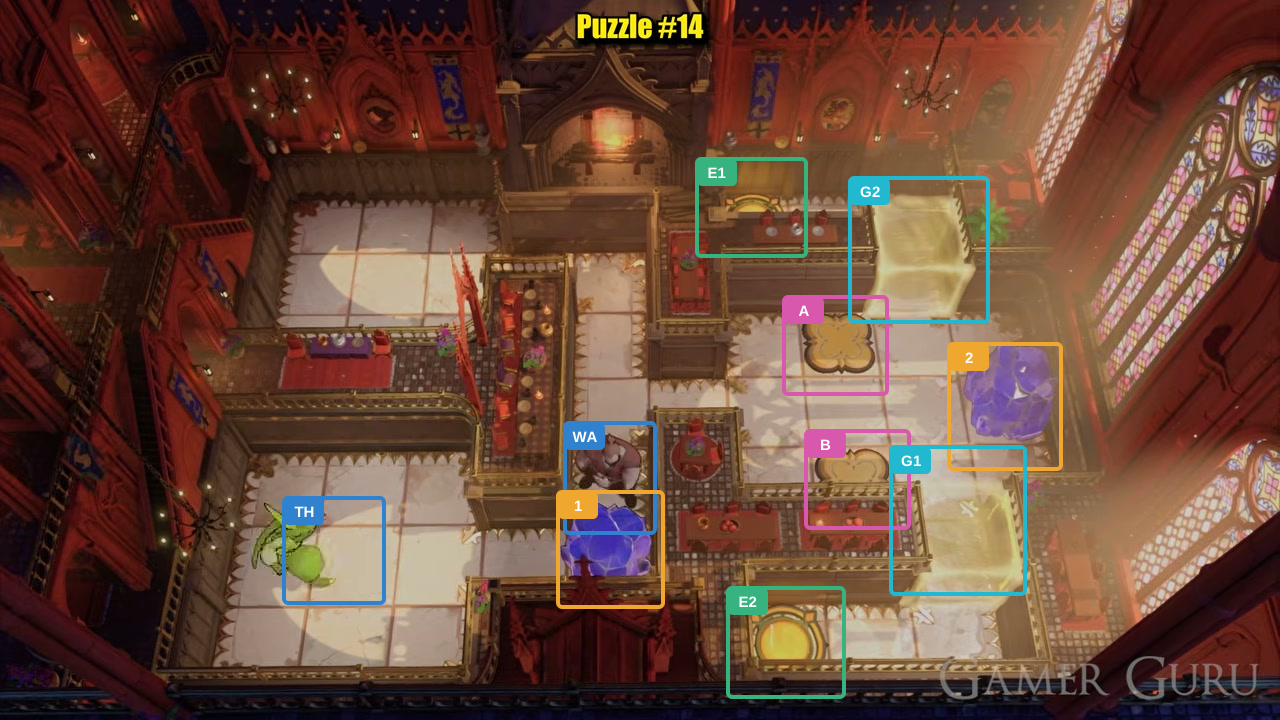
Thief: move left three times. Warrior: move left twice, then down once.
Check: Crystal 1 reaches the lower-left lane; Crystal 2 remains at the right edge.
Open full-size image in a new tab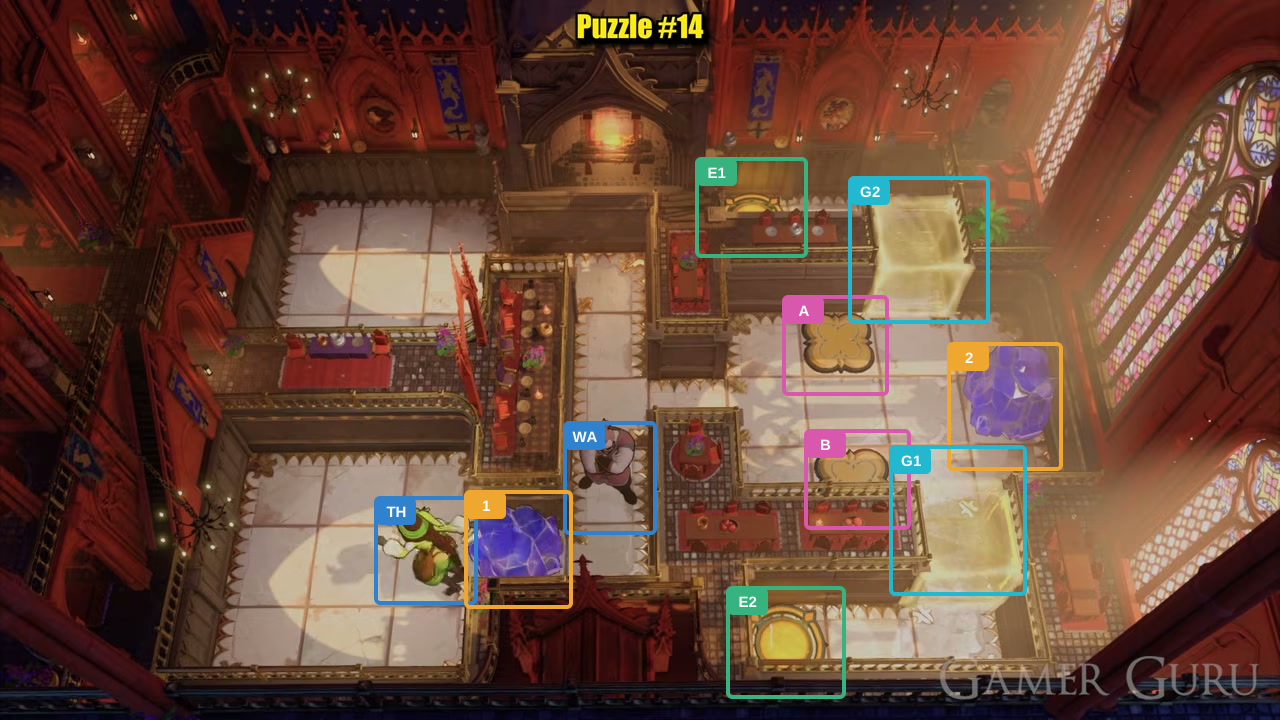
Thief: move right twice, then left once.
Check: Crystal 1 shifts one tile left.
Open full-size image in a new tab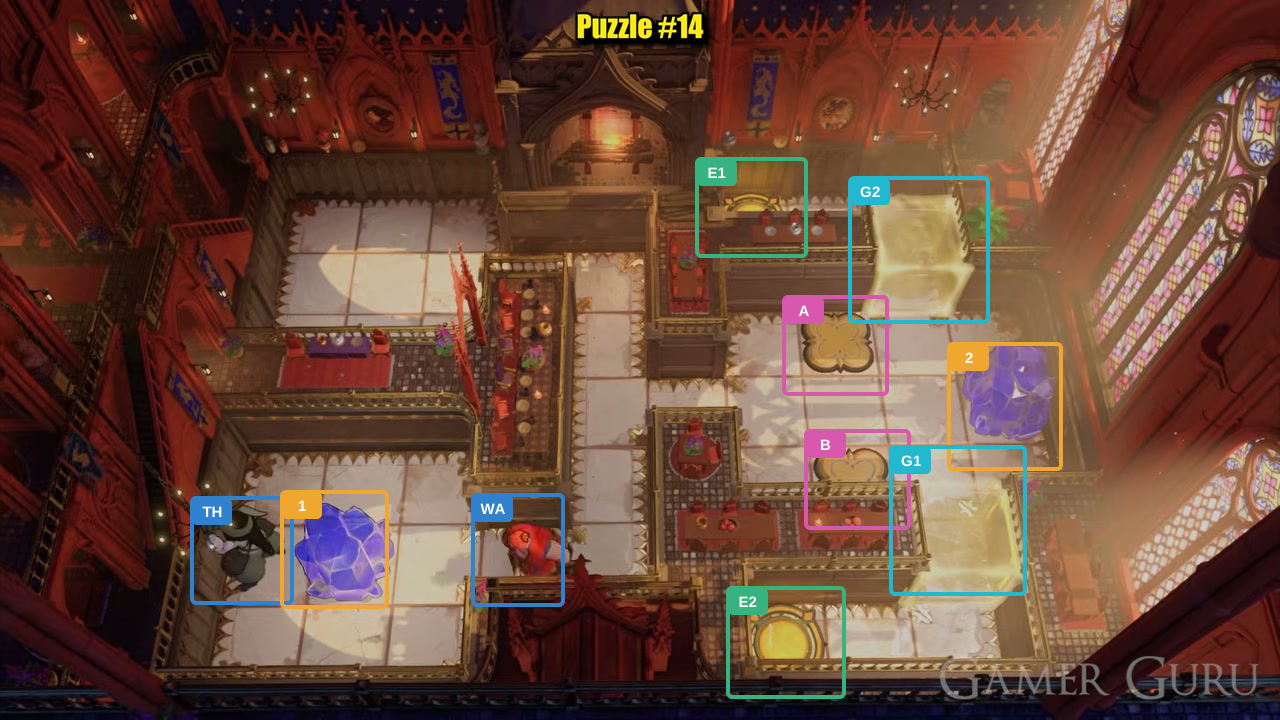
Warrior: move down, then left. Thief: move left once.
Check: Crystal 1 reaches the far-left lane.
Open full-size image in a new tab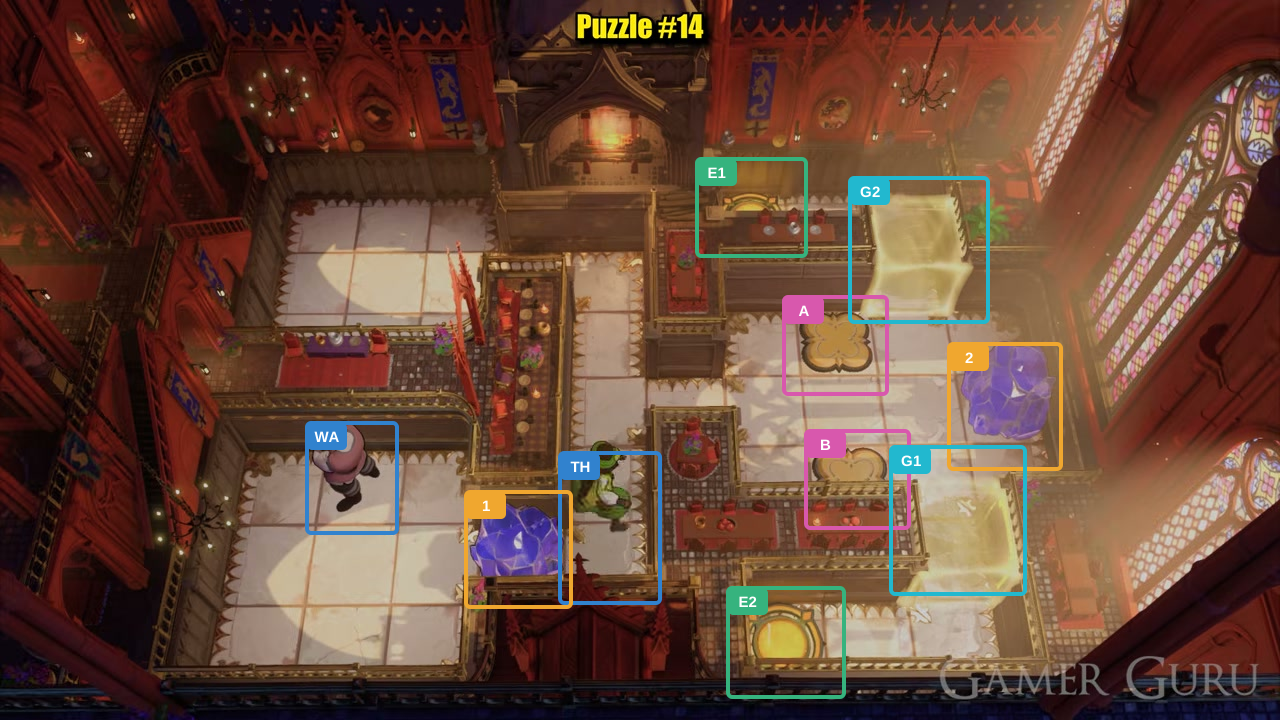
Warrior: left, then up. Thief: up, right, left, down twice, right twice, up, then right twice.
Check: The Thief returns to the center route; Crystal 1 is in the lower lane.
Open full-size image in a new tab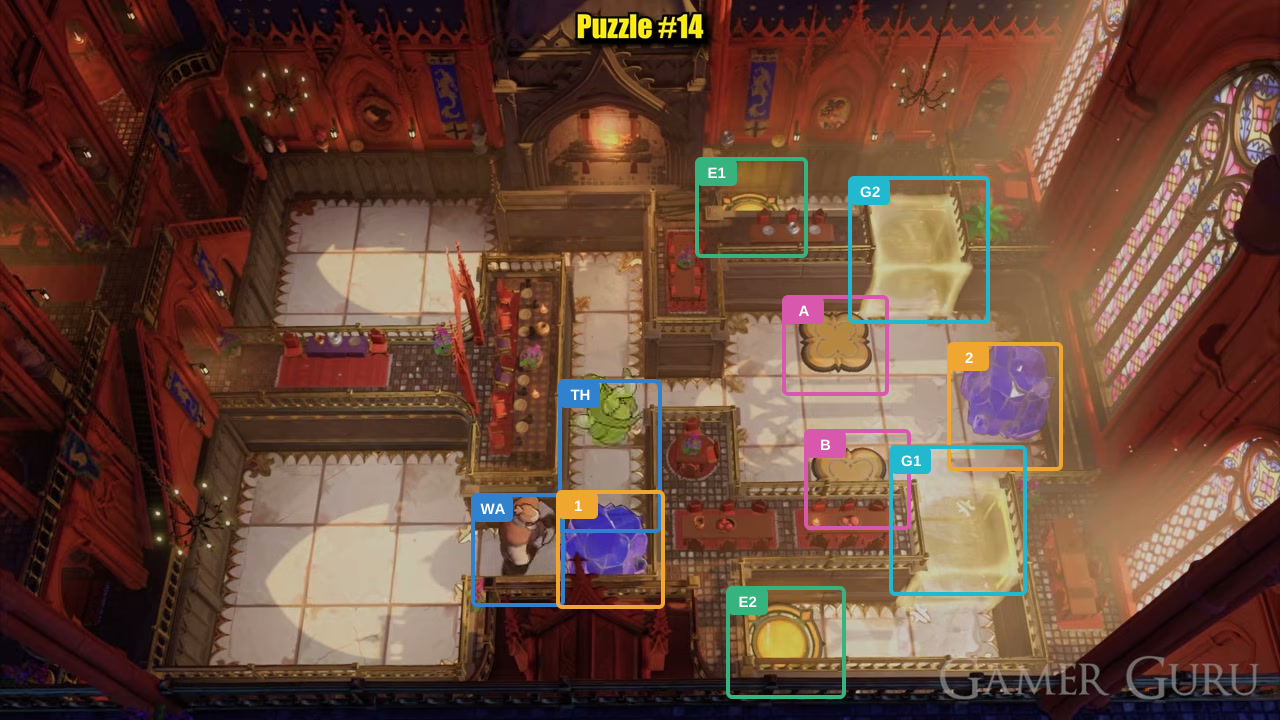
Thief: move up once. Warrior: move down, then right twice.
Check: Crystal 1 moves right along the lower route.
Open full-size image in a new tab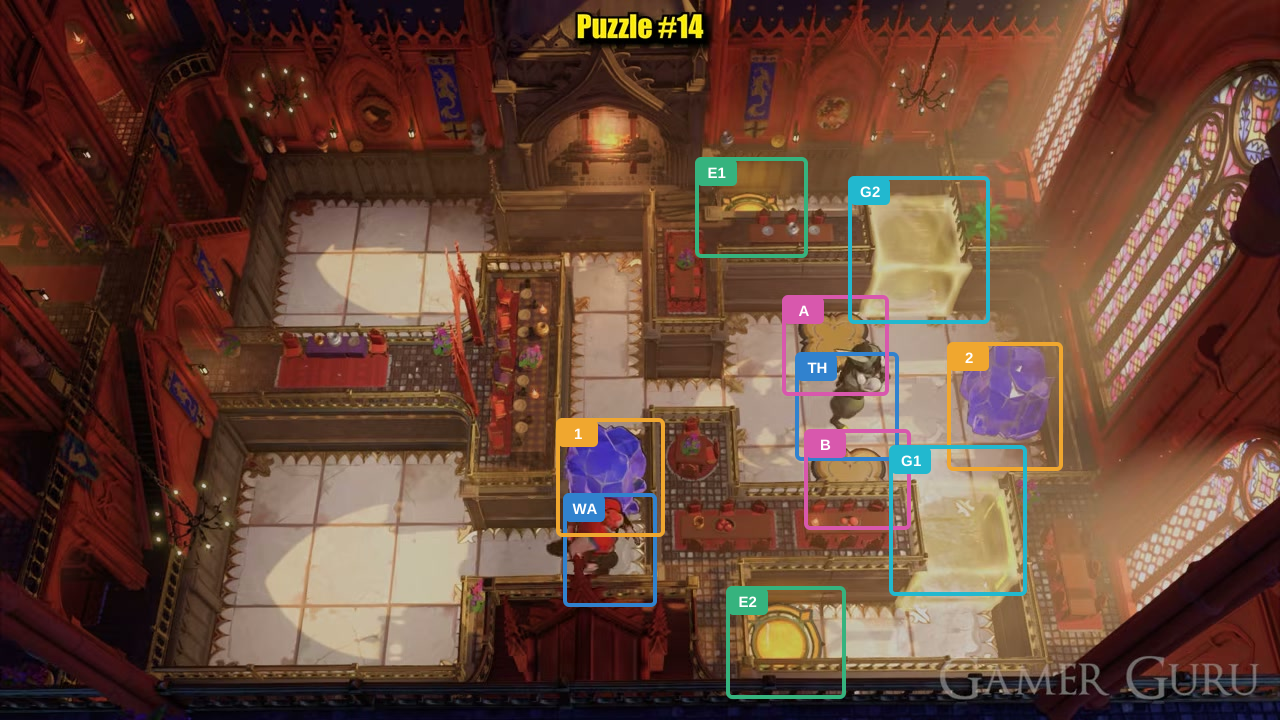
Thief: move up, then right three times. Warrior: move right once.
Check: The Thief reaches the upper-right route.
Open full-size image in a new tab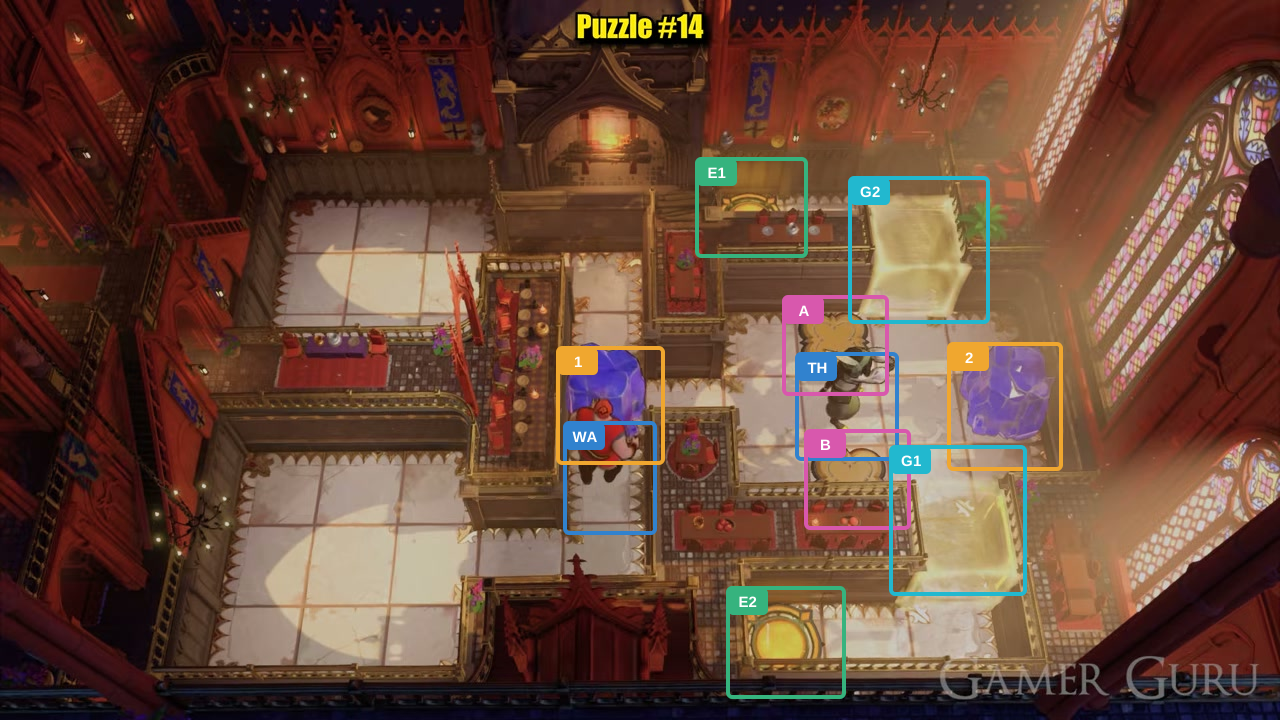
Warrior: move up once.
Check: The Warrior steps above the lower approach.
Open full-size image in a new tab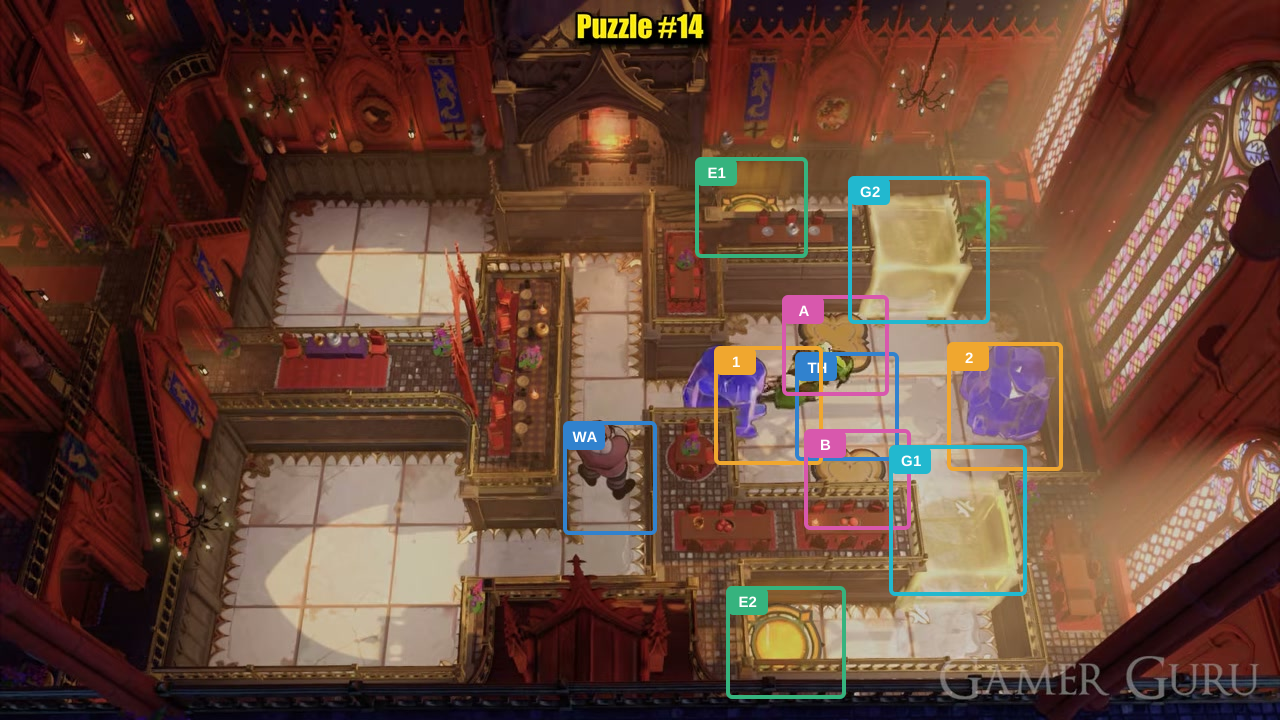
Thief: move left twice, then right twice.
Check: Crystal 1 moves to the right-side approach.
Open full-size image in a new tab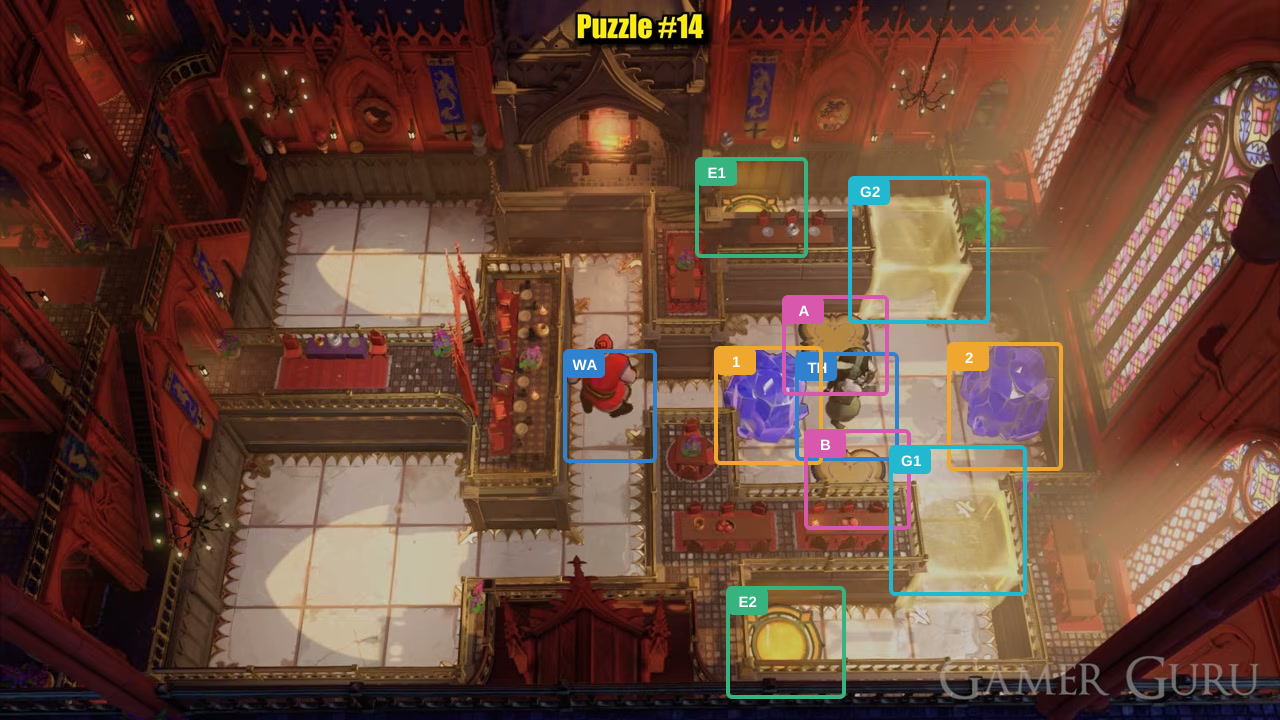
Warrior: move up once.
Check: The Warrior reaches the upper approach.
Open full-size image in a new tab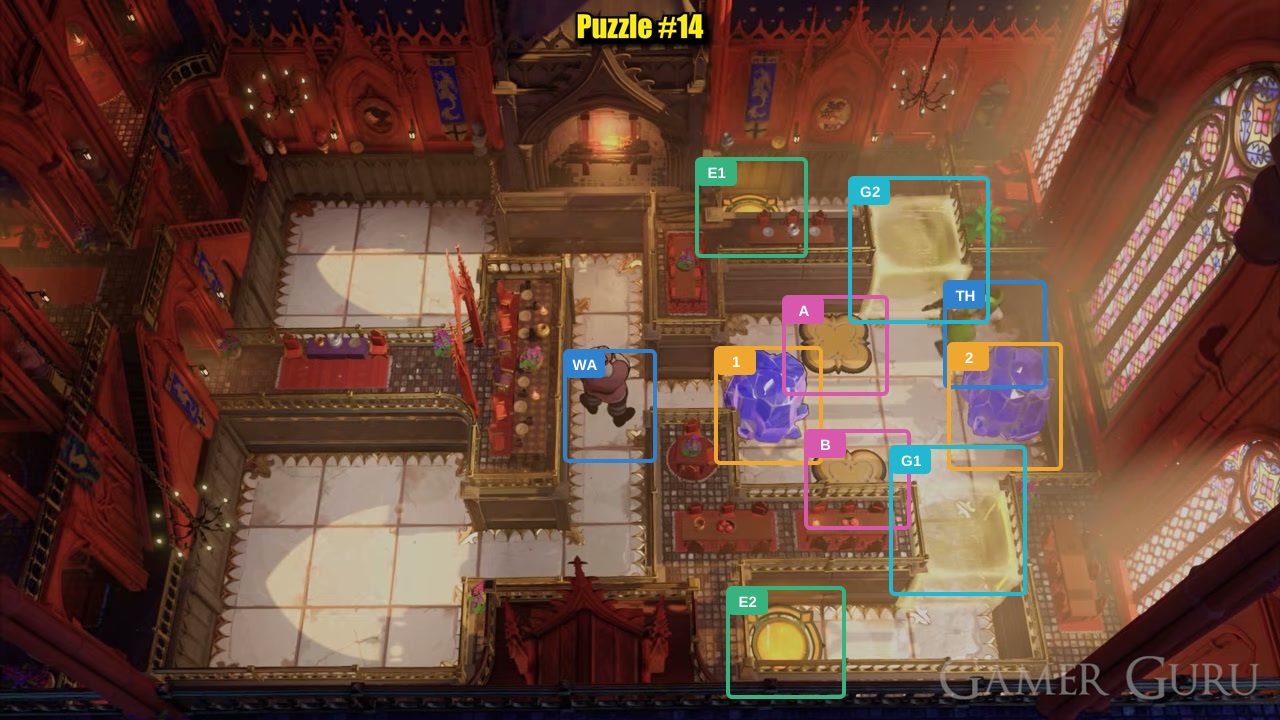
Thief: move up once, then right twice.
Check: The Thief clears space for Crystal 1.
Open full-size image in a new tab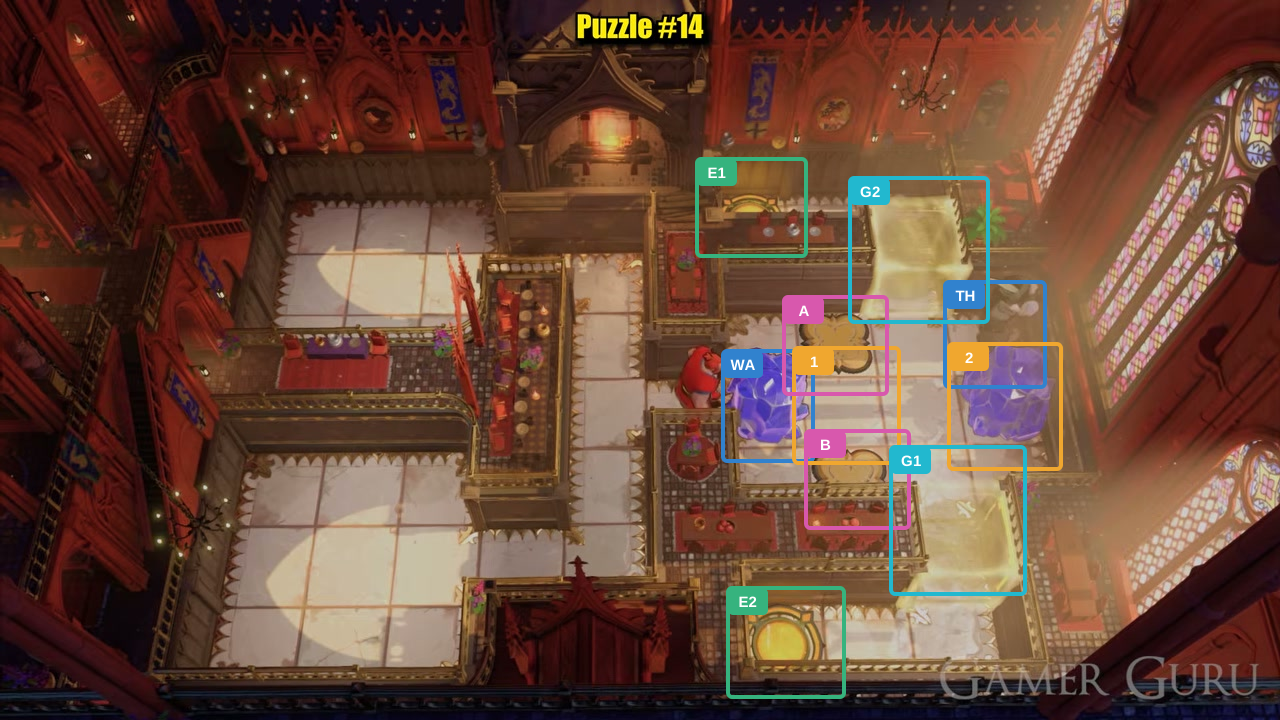
Warrior: move right twice to push Crystal 1 right.
Check: Crystal 1 reaches the upper-right lane.
Open full-size image in a new tab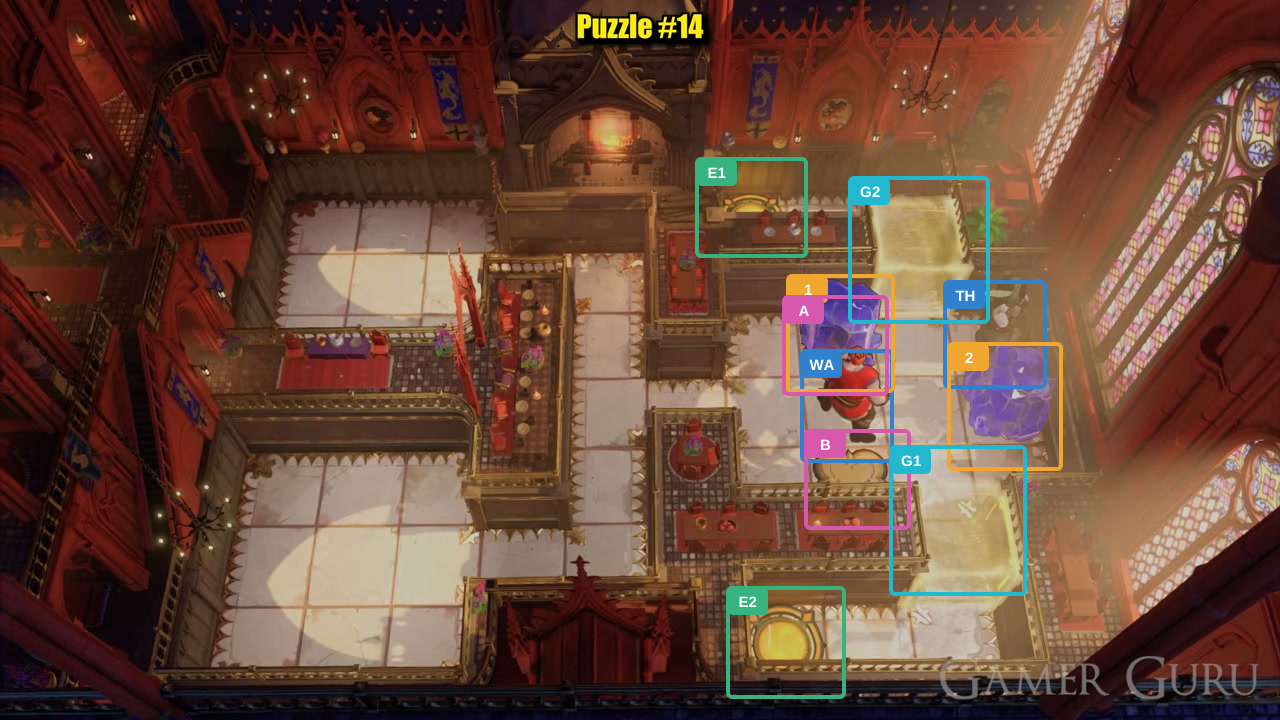
Warrior: move down, right, then up to place Crystal 1 on Switch A.
Check: Crystal 1 holds Switch A.
Open full-size image in a new tab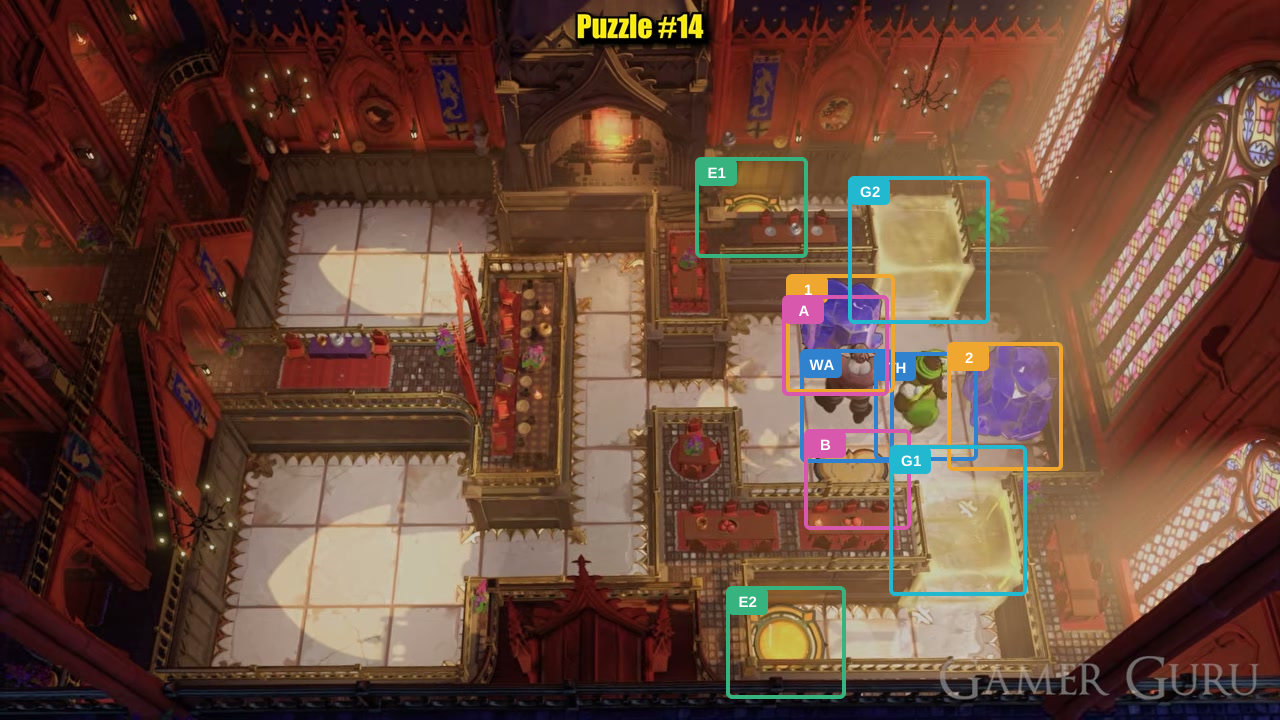
Thief: move left, then down.
Check: The Thief moves beside Crystal 2.
Open full-size image in a new tab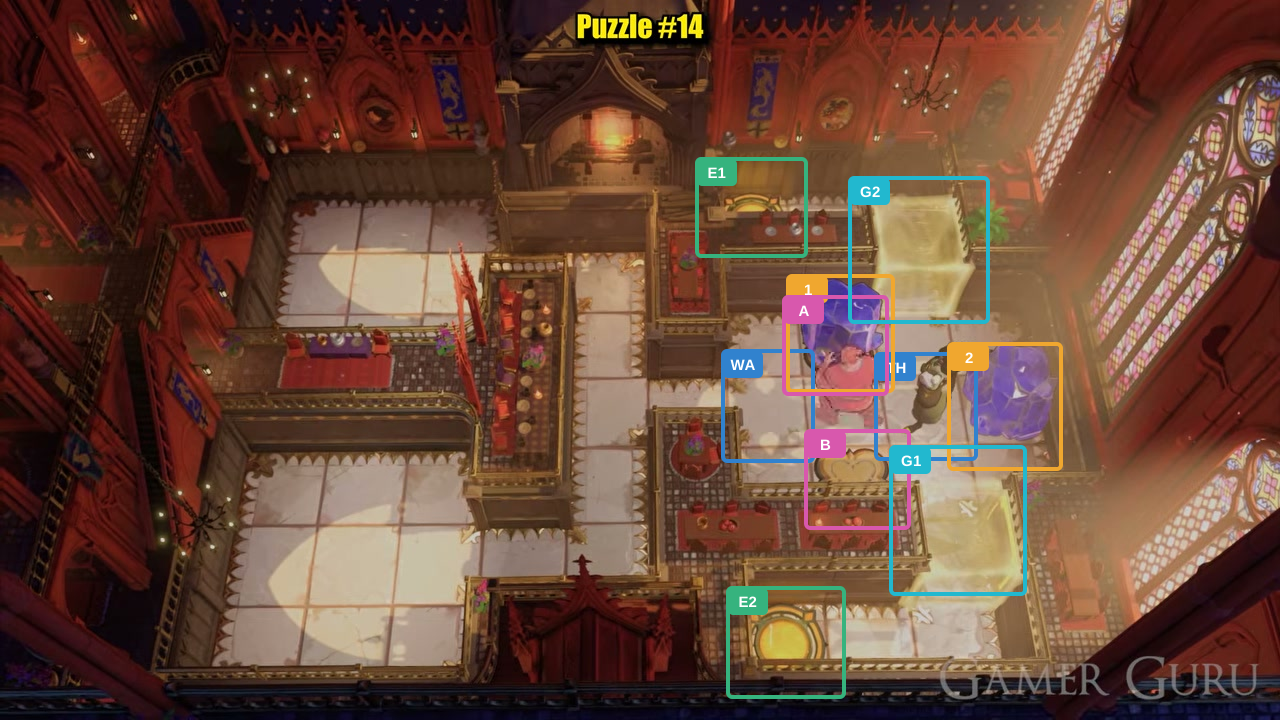
Warrior: move left once.
Check: Crystal 1 stays on Switch A.
Open full-size image in a new tab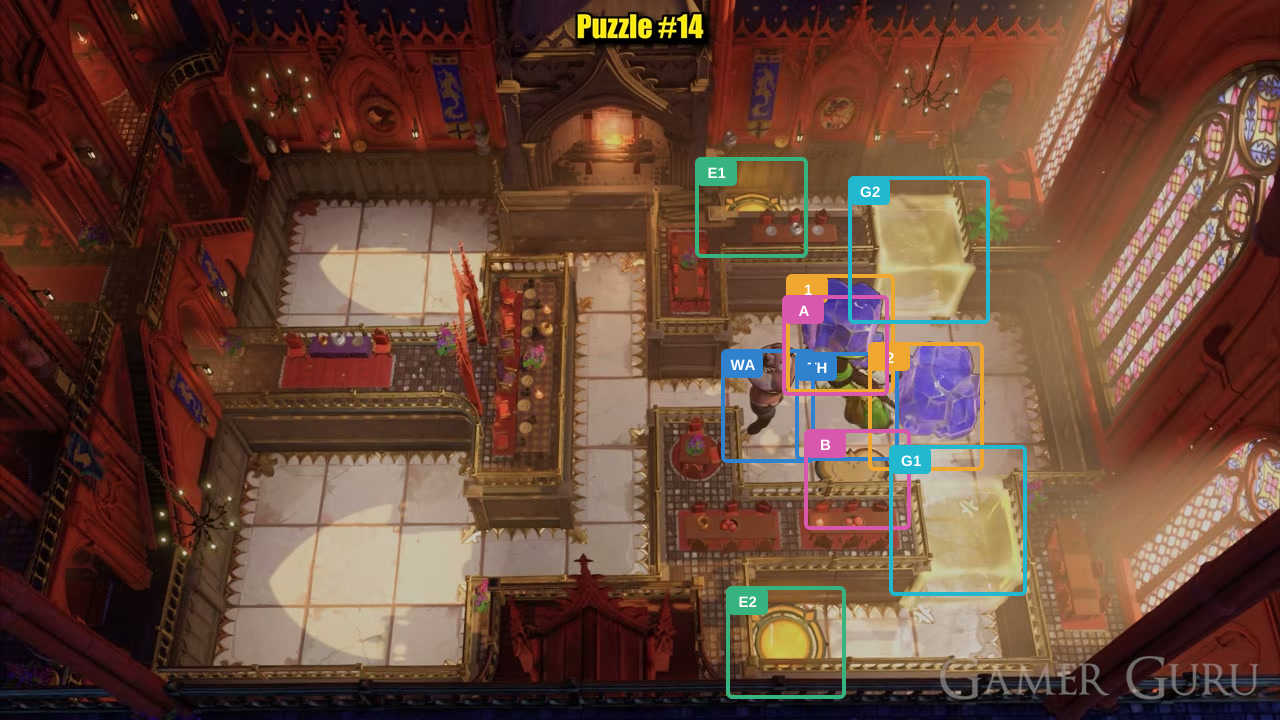
Thief: move left once to pull Crystal 2 left.
Check: Crystal 2 moves one tile left.
Open full-size image in a new tab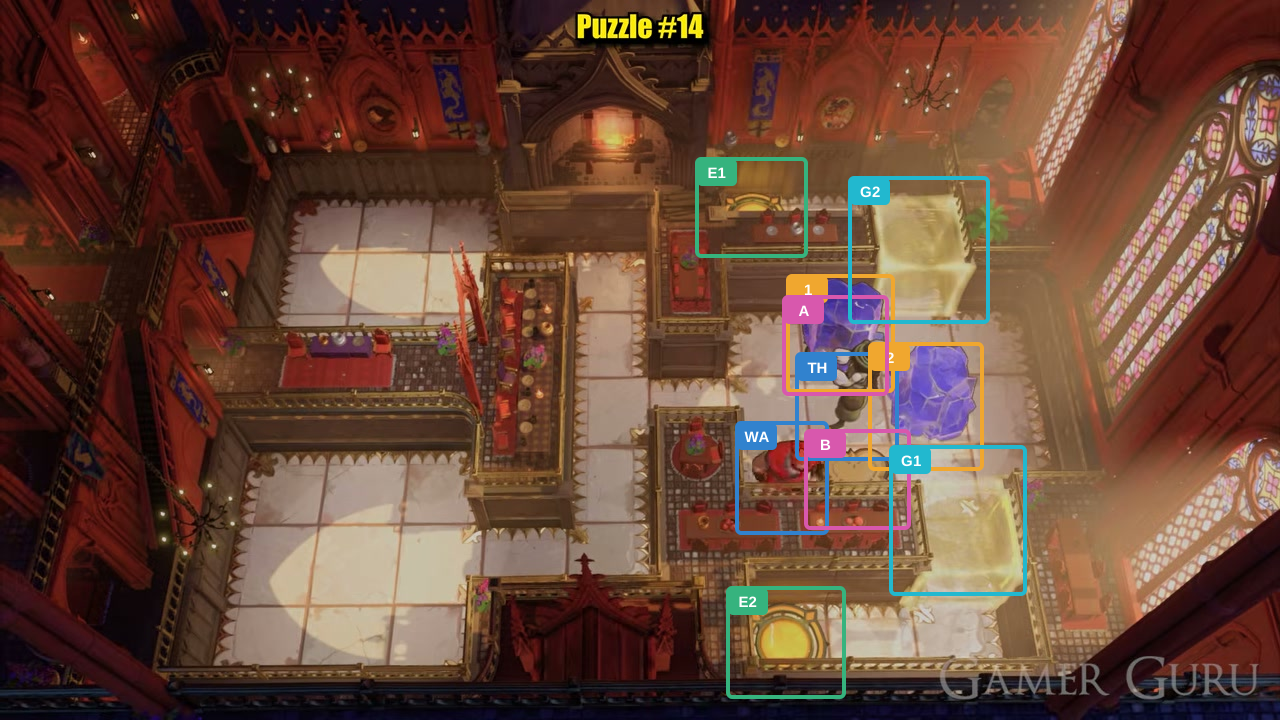
Warrior: move down once.
Check: The Warrior moves to the lower path; Crystal 1 remains on Switch A.
Open full-size image in a new tab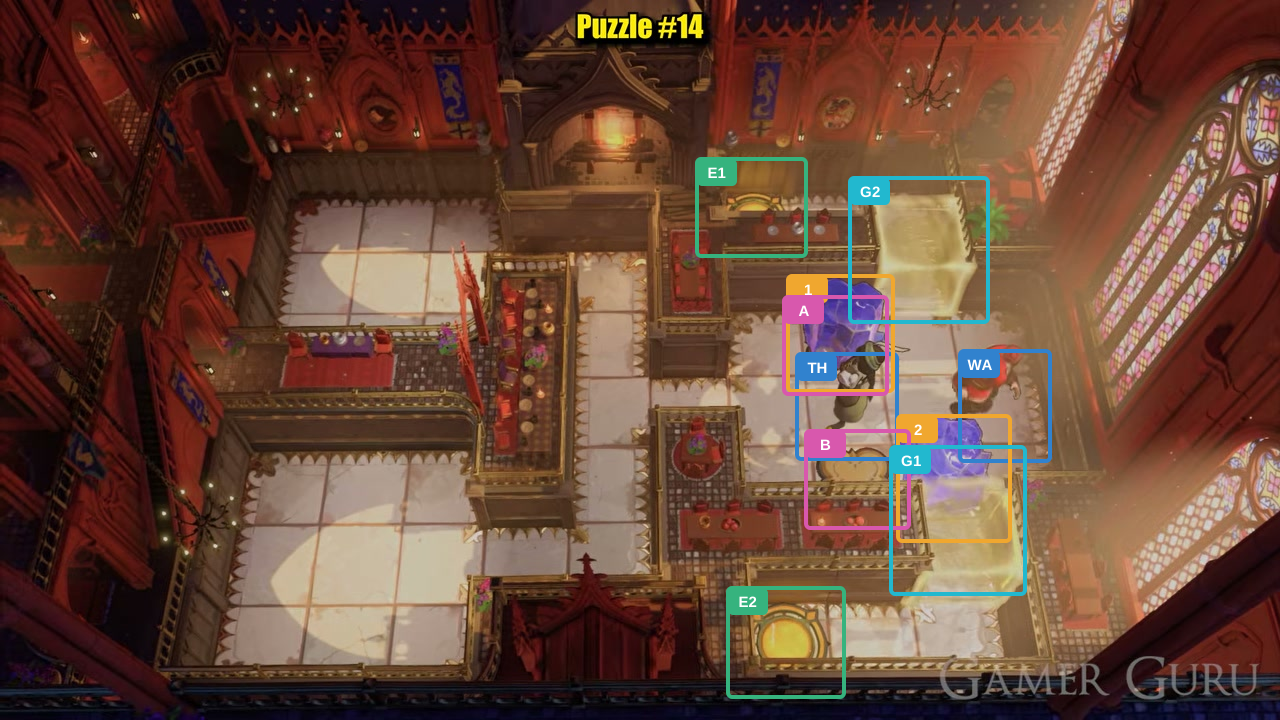
Warrior: move right three times, up twice, left, down, then right.
Check: The Warrior stands above Crystal 2, which is beside Switch B.
Open full-size image in a new tab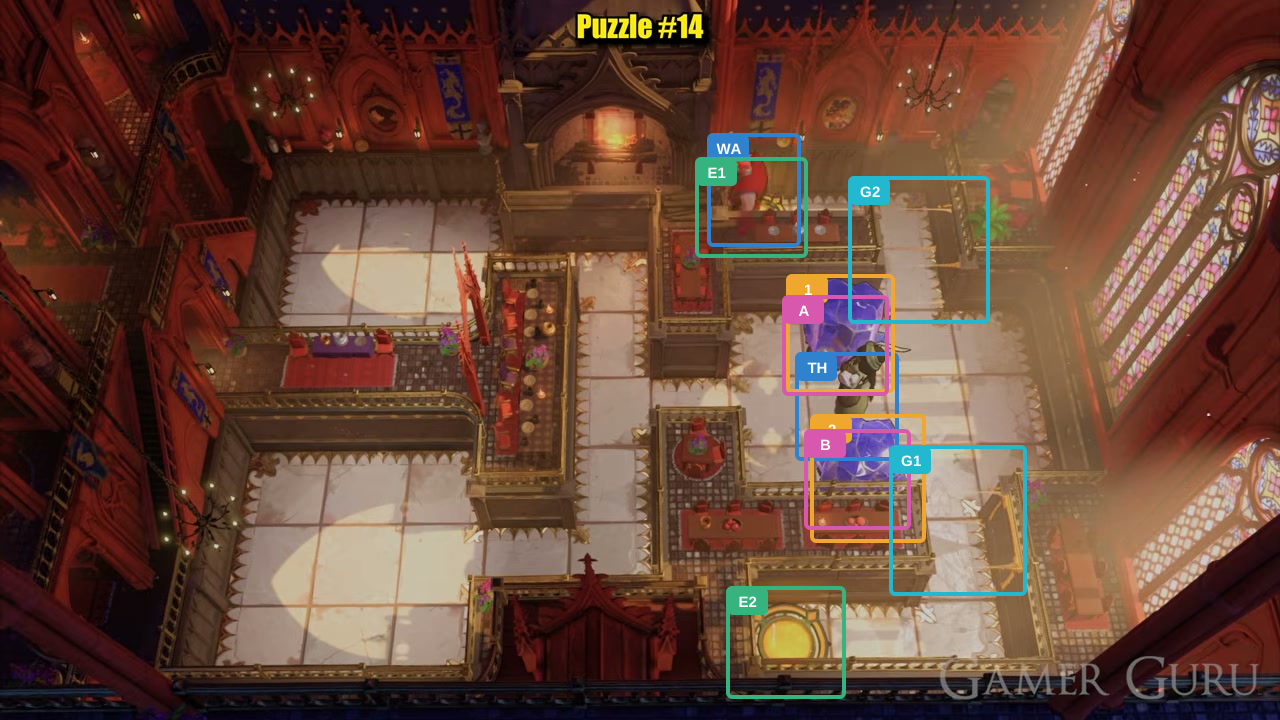
Warrior: move down, left, up four times, then left twice.
Check: Warrior reaches Exit 1; both switches are held and both gates are open.
Open full-size image in a new tab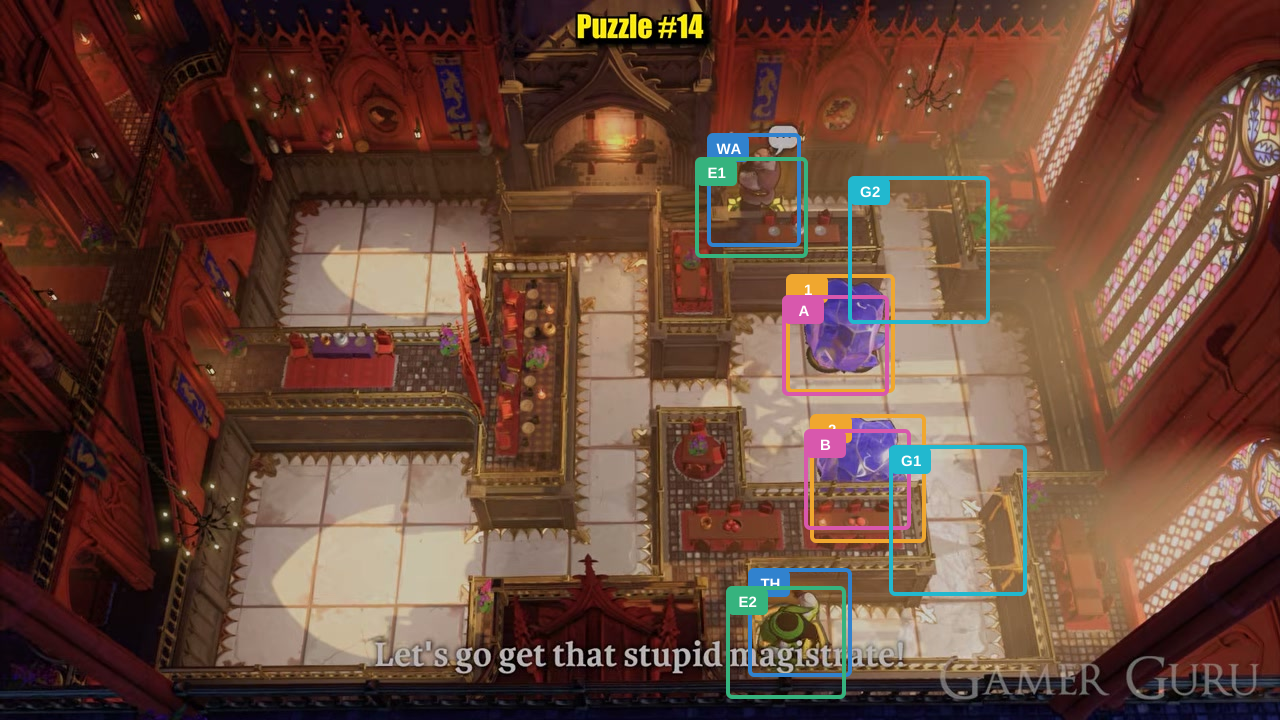
Thief: move right, down three times, then left twice to Exit 2.
Check: Both heroes occupy separate exits; the team finishes.
Open full-size image in a new tabActor-by-actor direction route
Full direction sequence
- WA Warrior
→ → - TH Thief
→ → → ↑ ↑ ↑ ↓ - WA Warrior
→ ↓ ↓ → → → → ← ← - TH Thief
← ← ← - WA Warrior
← ← ↓ - TH Thief
→ → ← - WA Warrior
↓ ← - TH Thief
← - WA Warrior
← ↑ - TH Thief
↑ → ← ↓ ↓ → → ↑ → → ↑ - WA Warrior
↓ → → - TH Thief
↑ → → → - WA Warrior
→ ↑ - TH Thief
← ← → → - WA Warrior
↑ - TH Thief
↑ → → - WA Warrior
→ → ↓ → ↑ - TH Thief
← ↓ - WA Warrior
← - TH Thief
← - WA Warrior
↓ → → → ↑ ↑ ← ↓ → ↓ ← ↑ ↑ ↑ ↑ ← ← - TH Thief
→ ↓ ↓ ↓ ← ←
Thief and Wizard: two movement styles
Section titled “Thief and Wizard: two movement styles”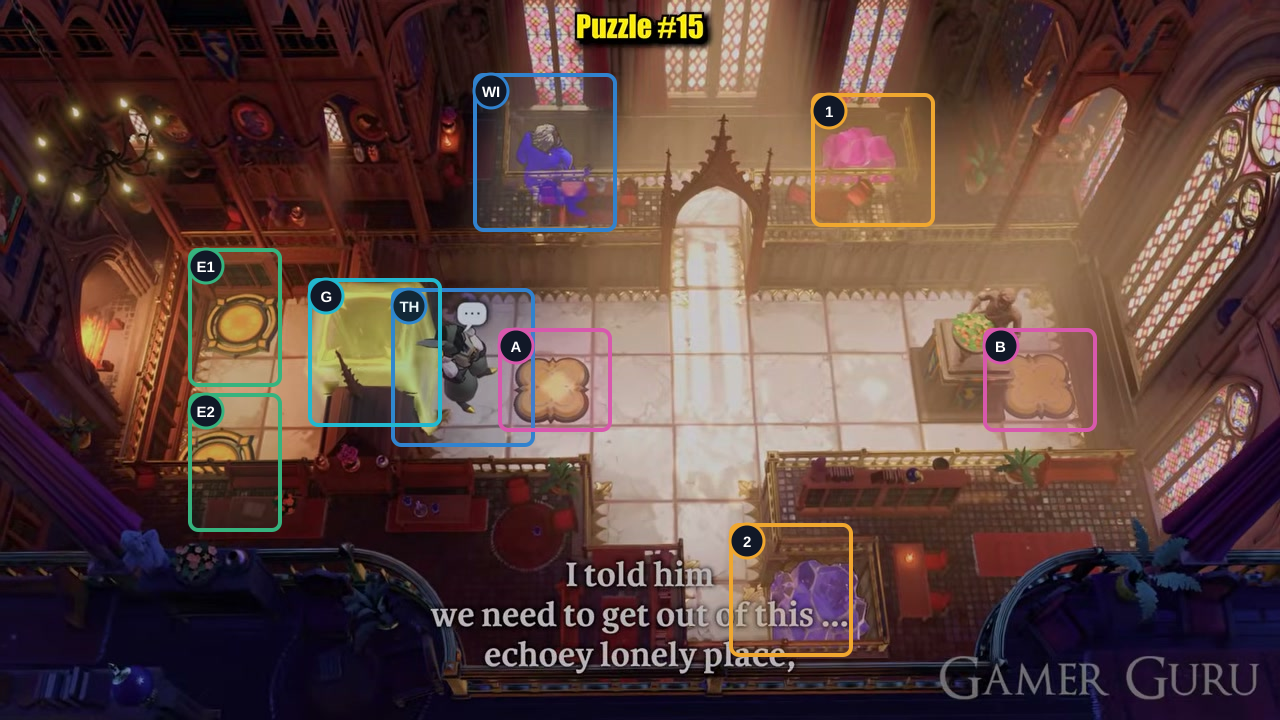
- Crystals 1–2
- Switches A–B
- Gate
- Exits E1–E2
- TH Thief
- WI Wizard
Hint
Use the Thief to pull Crystal 1 one tile left, then have the Wizard swap into the upper passage. Put Crystal 2 on Switch A first and Crystal 1 on B later; finish with the Thief at E1 and the Wizard at E2.
Step-by-step solution
Images show selected video checkpoints; the first frame is the starting position.
Starting positions. The Thief begins the route.
Check: The Thief and Wizard are in their starting positions; both crystals are in place.
Open full-size image in a new tab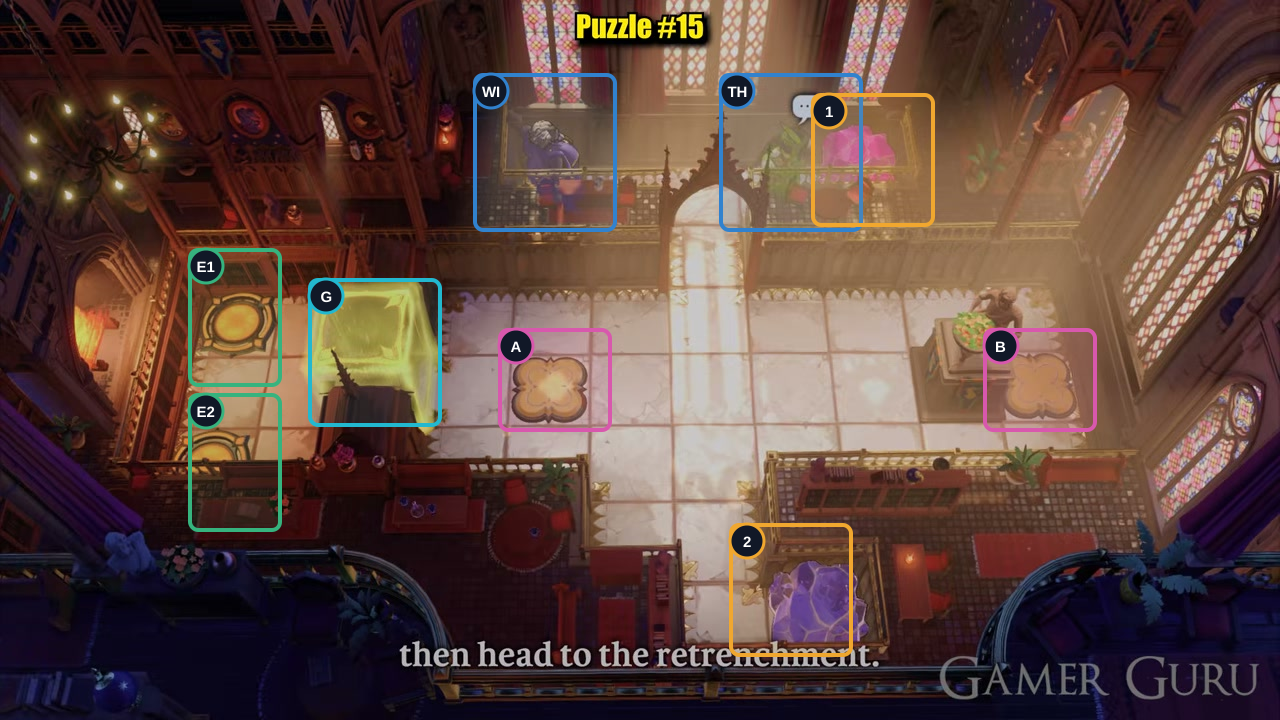
Thief: move up, right three times, up twice, then right.
Check: The Thief reaches the upper lane; both crystals remain in place.
Open full-size image in a new tab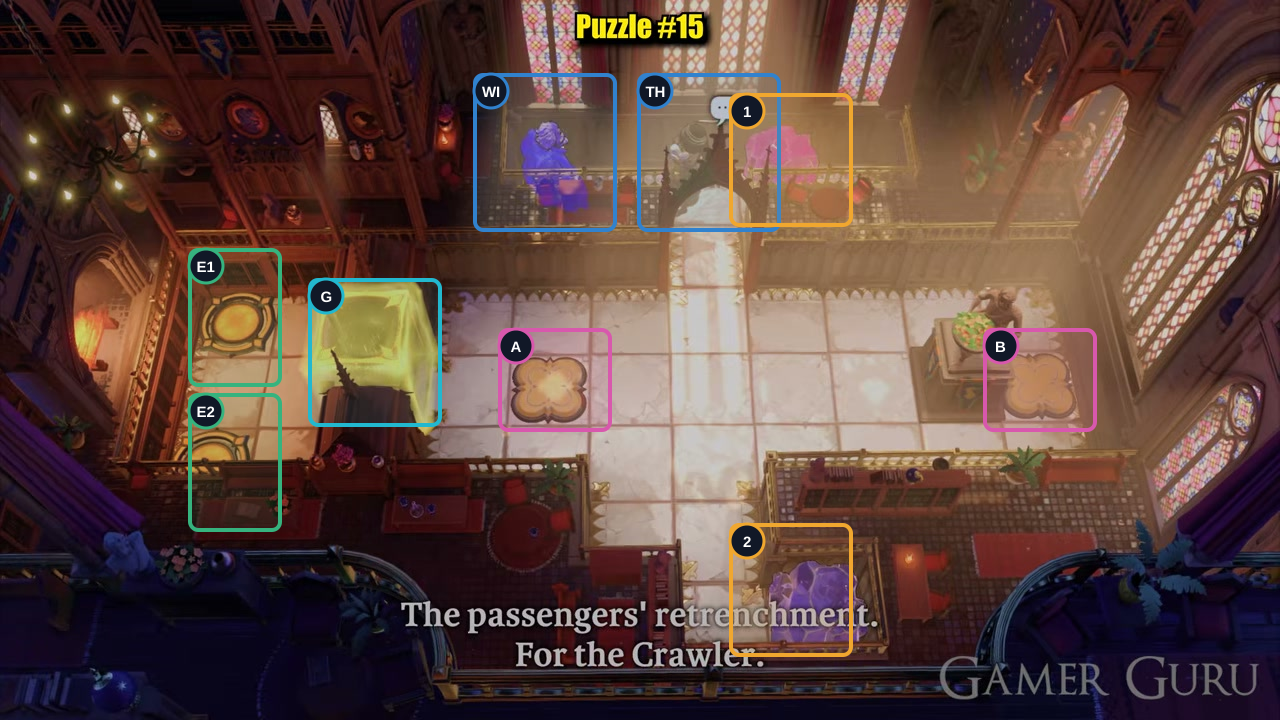
Thief: move left.
Check: The Thief moves one tile left; Crystal 1 shifts left as well.
Open full-size image in a new tab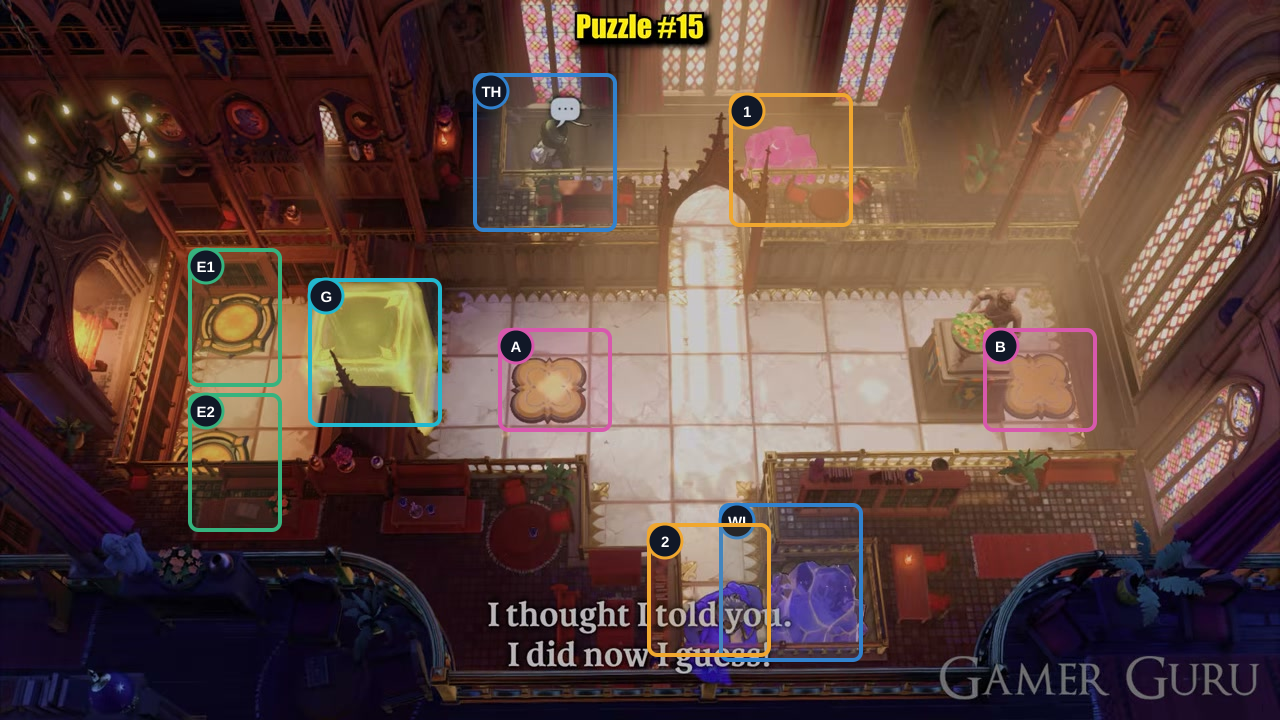
Wizard: move right, down six times, then right.
Check: The Thief is on the upper lane; the Wizard reaches the lower-right crystal lane.
Open full-size image in a new tab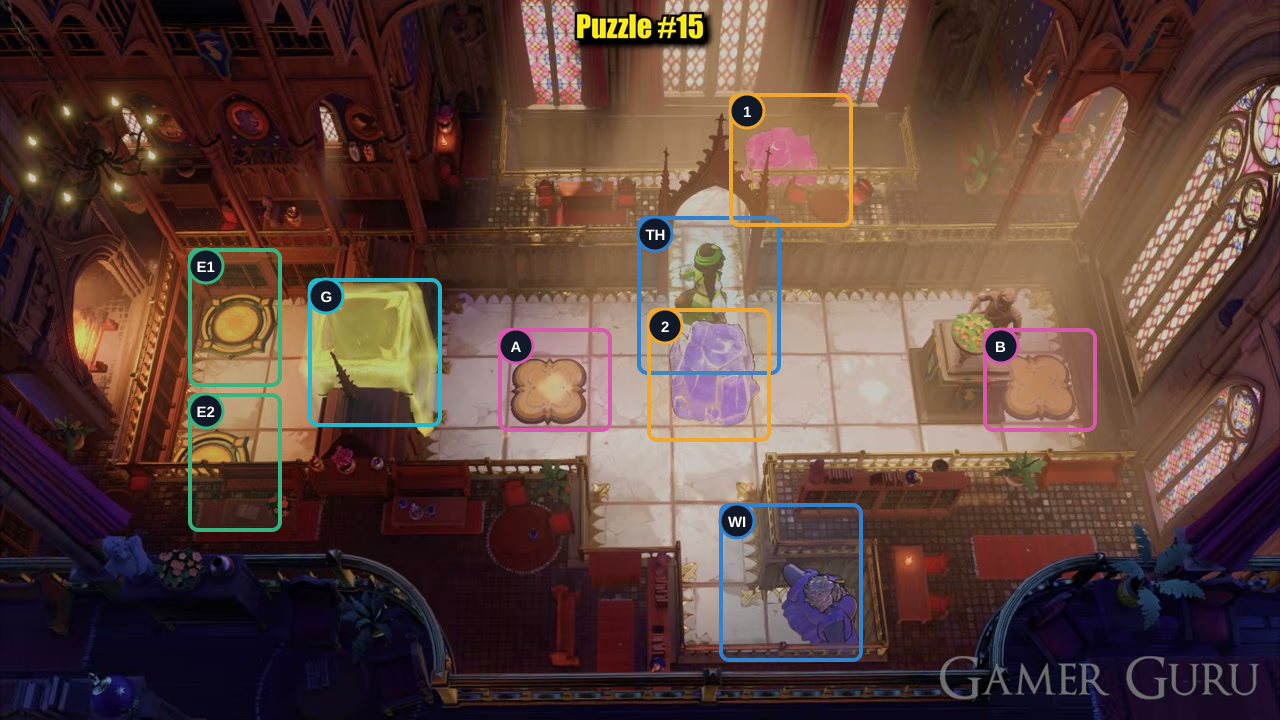
Thief: move right twice, down five times, then up three times.
Check: The Thief reaches the center passage; Crystal 2 moves into the same horizontal row as Switch A.
Open full-size image in a new tab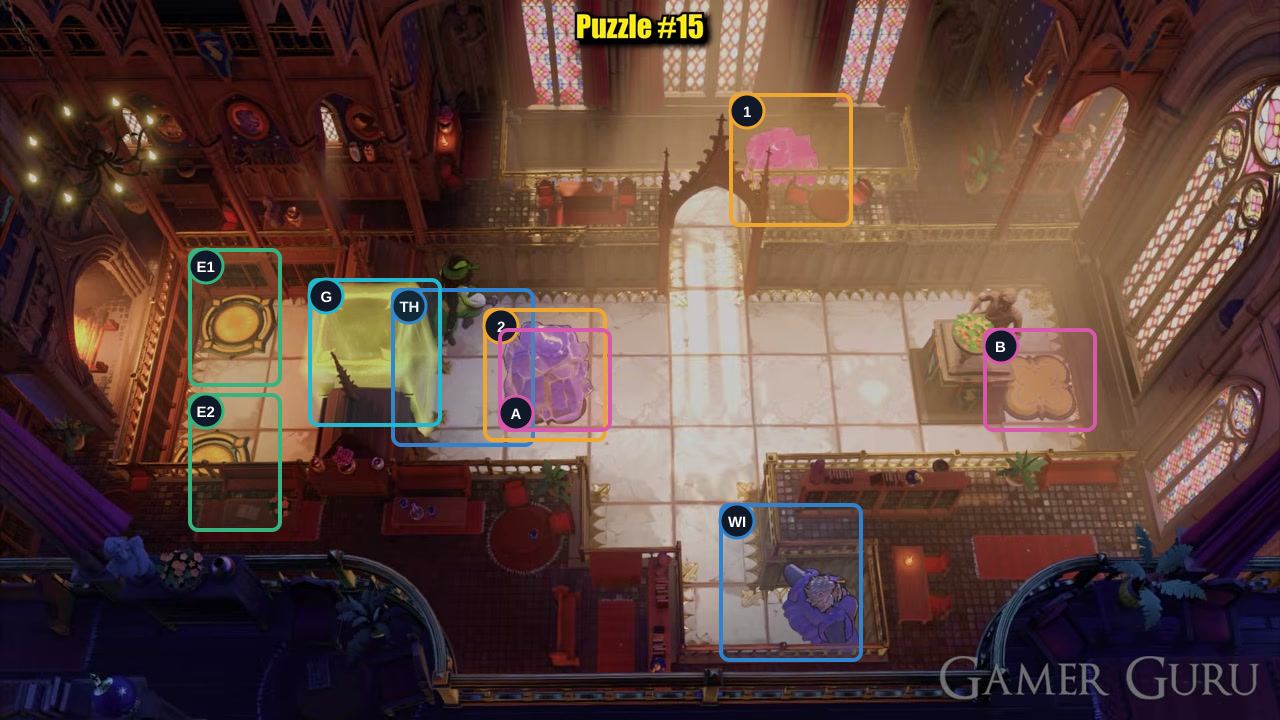
Thief: move left, down, then left twice to place Crystal 2 on Switch A.
Check: Crystal 2 holds Switch A; the gate remains closed until Switch B is occupied.
Open full-size image in a new tab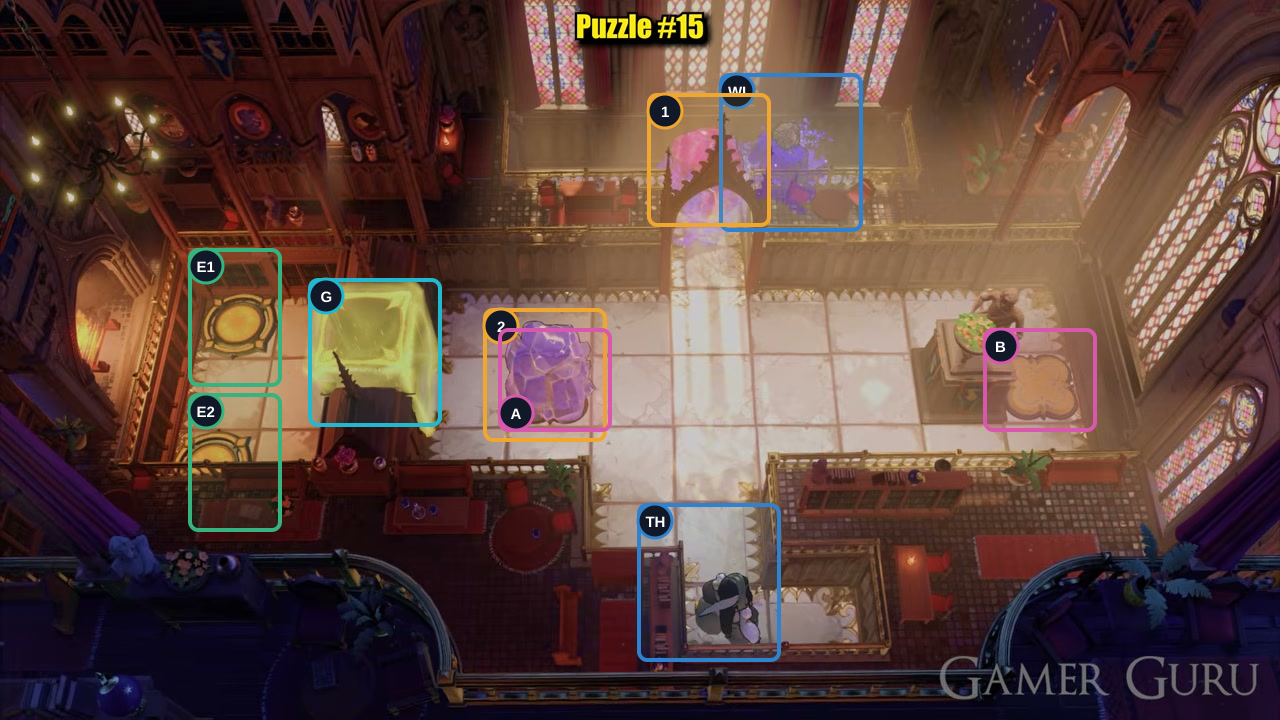
Thief: move up, right three times, then up twice. Wizard: move left, up, then right to swap with Crystal 1.
Check: The Wizard swaps with Crystal 1, moving it left; the Thief is in the lower lane.
Open full-size image in a new tab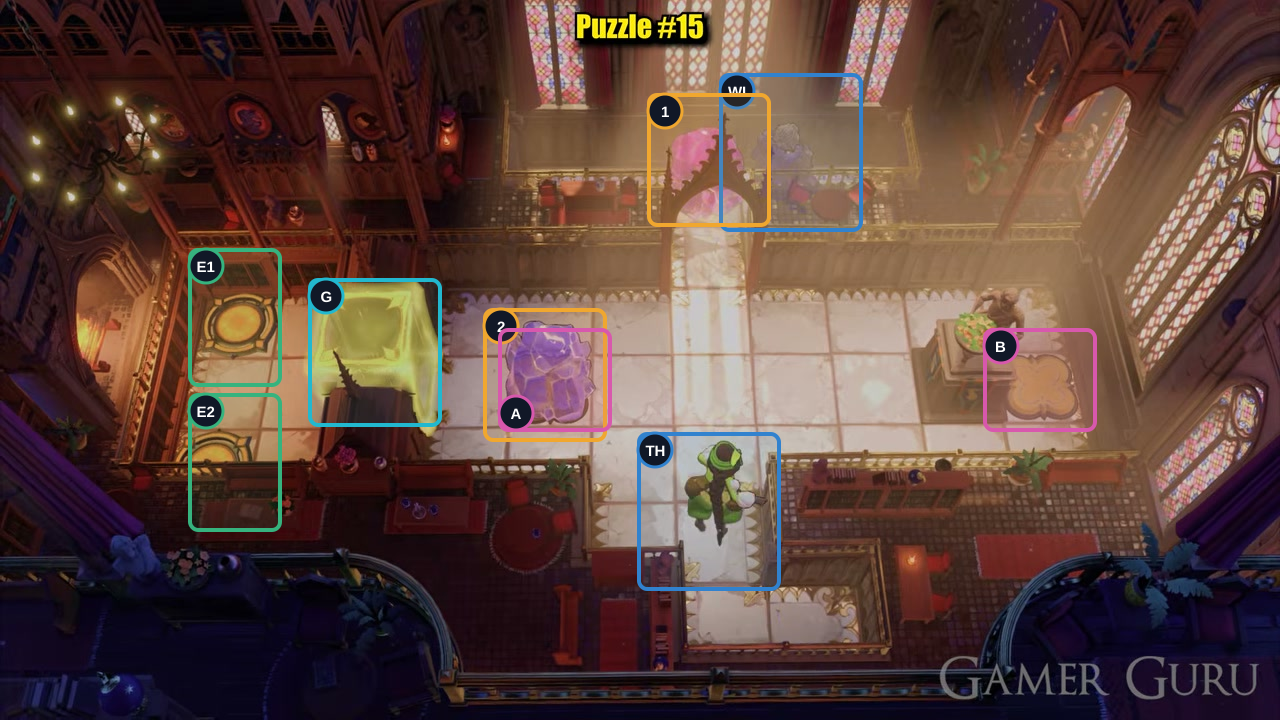
Thief: move up one tile.
Check: The Thief moves up one tile.
Open full-size image in a new tab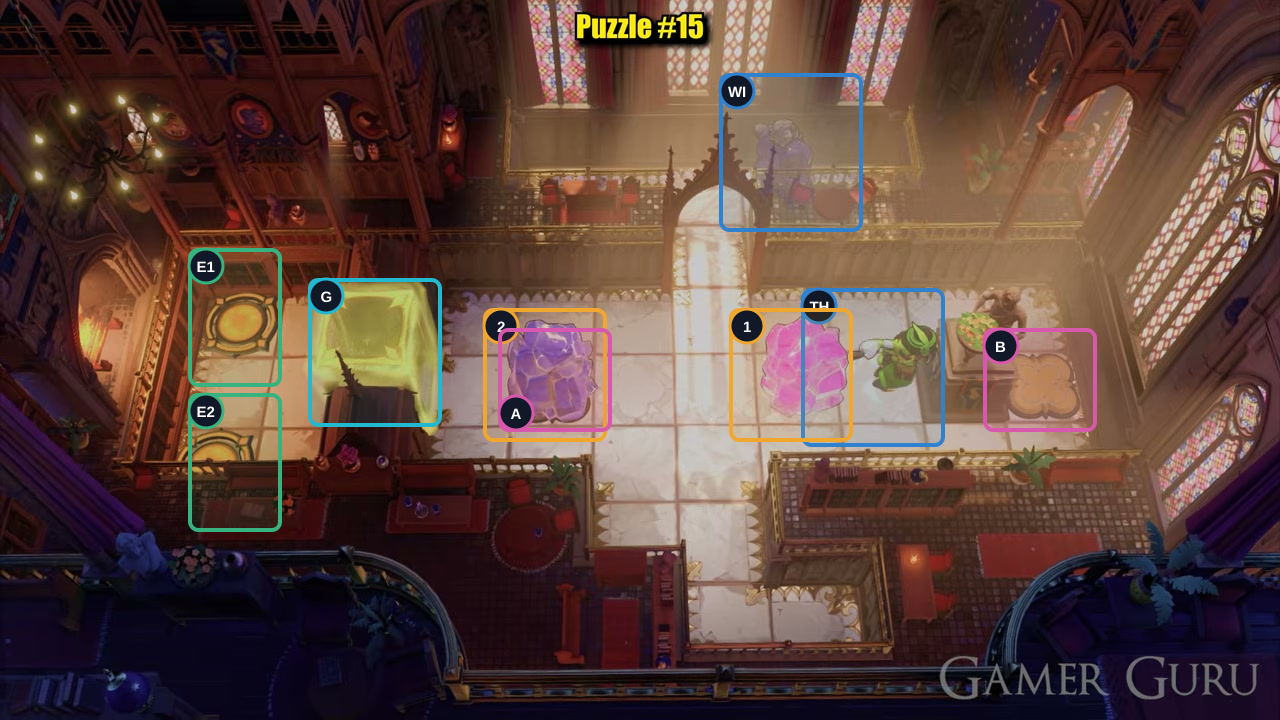
Thief: move up four times, down three times, right, up, then right.
Check: The Thief reaches the right-hand passage; Crystal 2 still holds Switch A.
Open full-size image in a new tab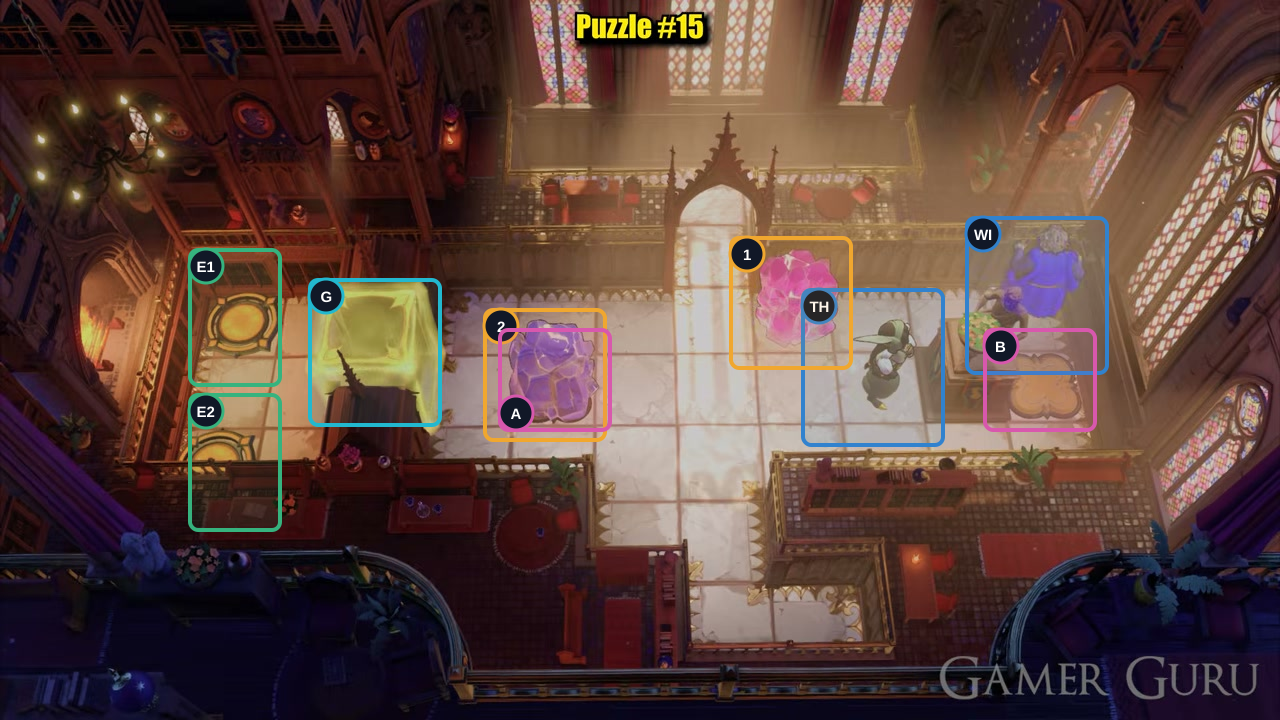
Wizard: left, down twice, right, down twice, right three times, then up twice.
Check: The Wizard swaps with Crystal 1 and moves it upward; the Thief remains at the junction.
Open full-size image in a new tab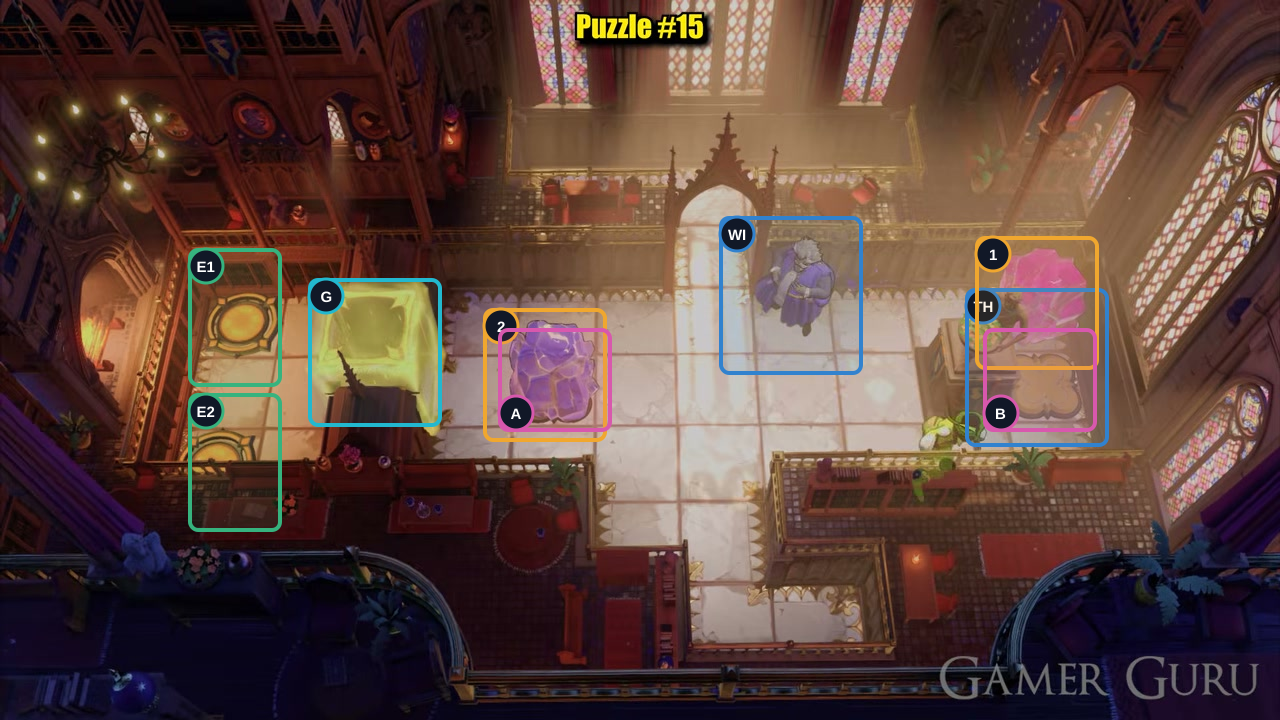
Thief: down, right twice, then up. Wizard: move left to swap with Crystal 1.
Check: Crystal 1 is above Switch B; the Thief holds B while the Wizard waits to the left.
Open full-size image in a new tab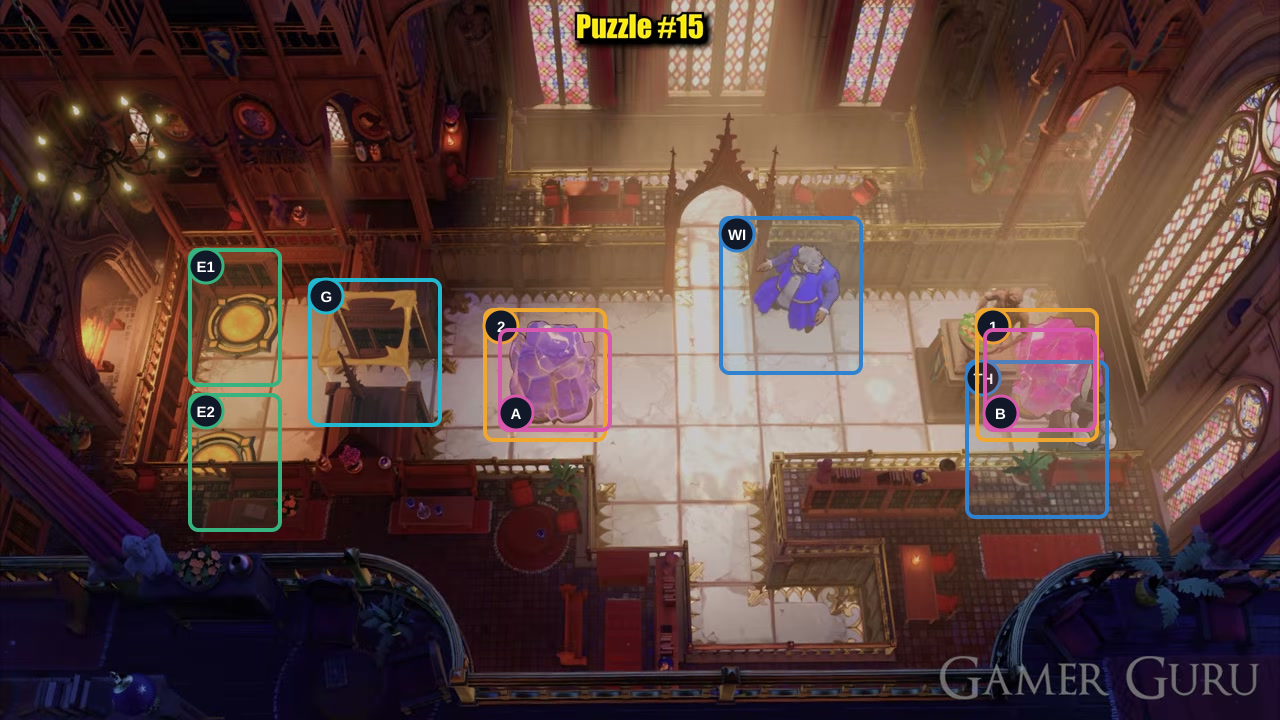
Thief: move down to leave Switch B, pulling Crystal 1 onto it.
Check: Crystal 1 now holds Switch B; both switches open Gate G.
Open full-size image in a new tab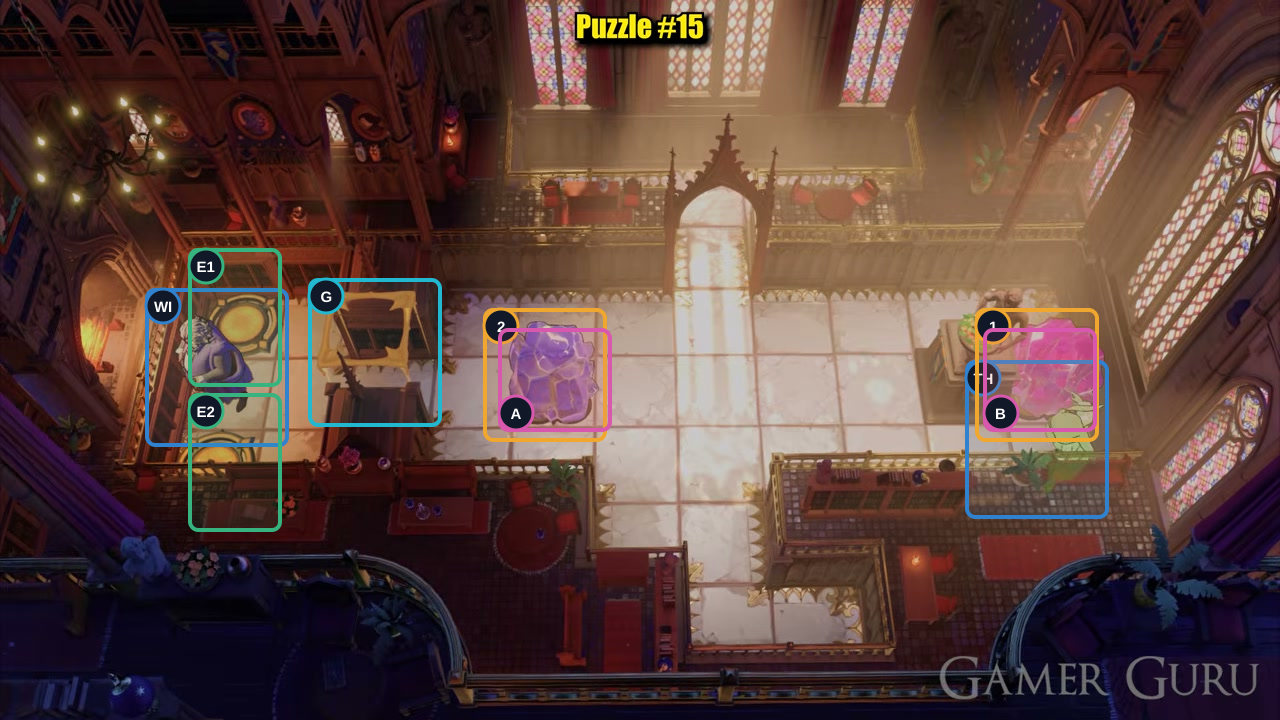
Wizard: move left four times, down, then left three times into the exit chamber.
Check: The Wizard waits by the exits; both crystals keep Gate G open.
Open full-size image in a new tab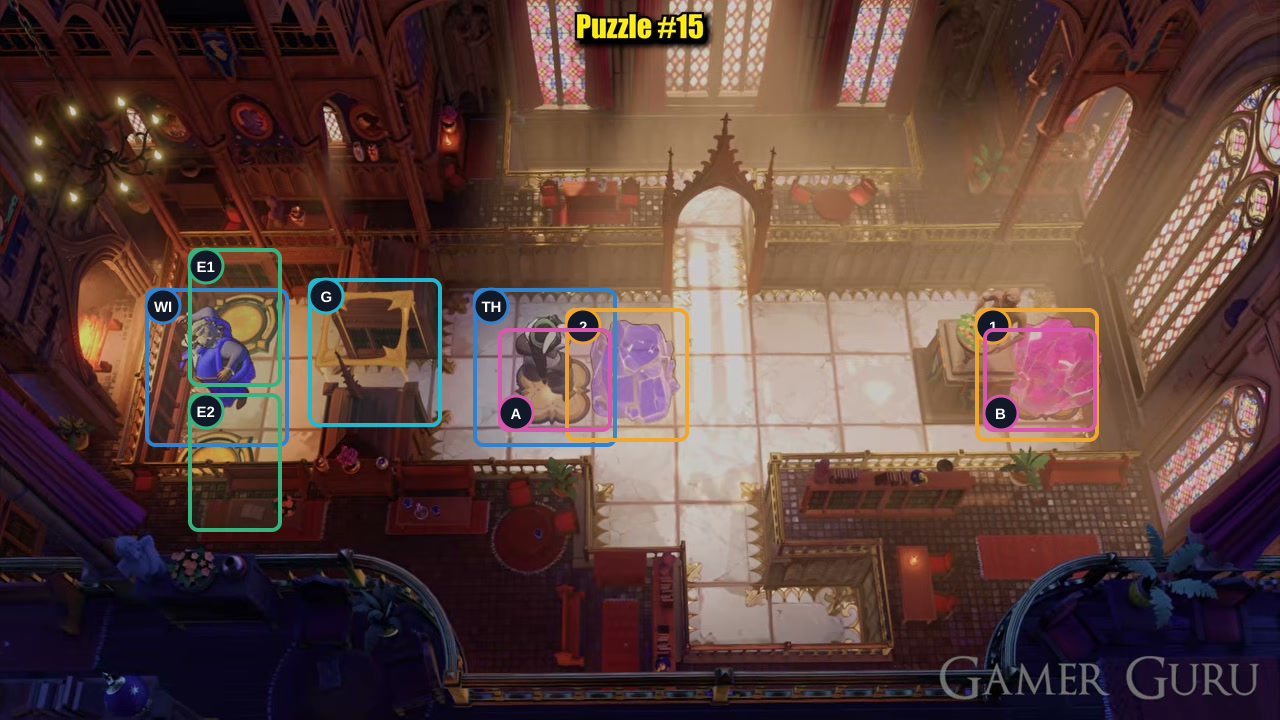
Thief: left twice, up, left three times, right, up, then left twice and down.
Check: The Thief holds Switch A while Crystal 2 is one tile right; the Wizard waits at the exits.
Open full-size image in a new tab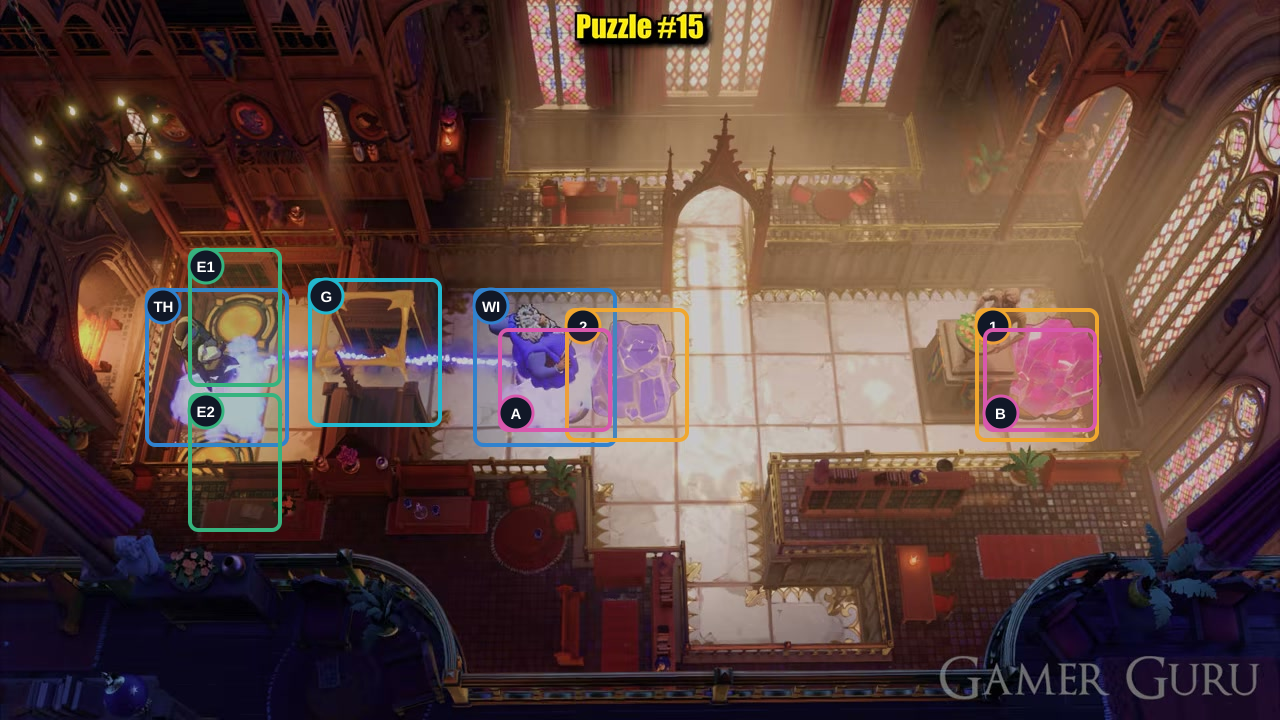
Wizard: move right to swap places with the Thief.
Check: The Wizard holds Switch A while the Thief reaches the exit chamber; Crystal 2 remains beside A.
Open full-size image in a new tab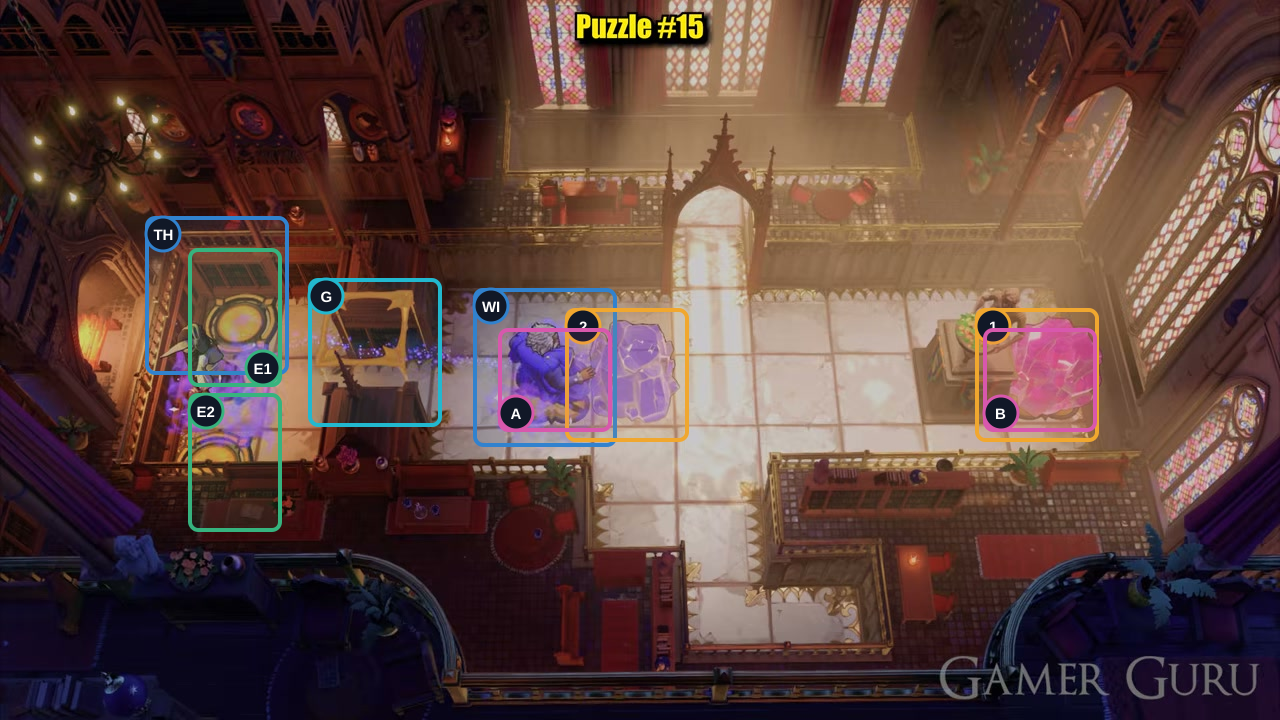
Thief: move up to Exit 1.
Check: The Thief reaches Exit 1; the Wizard stands on Switch A while Crystal 2 is beside it.
Open full-size image in a new tab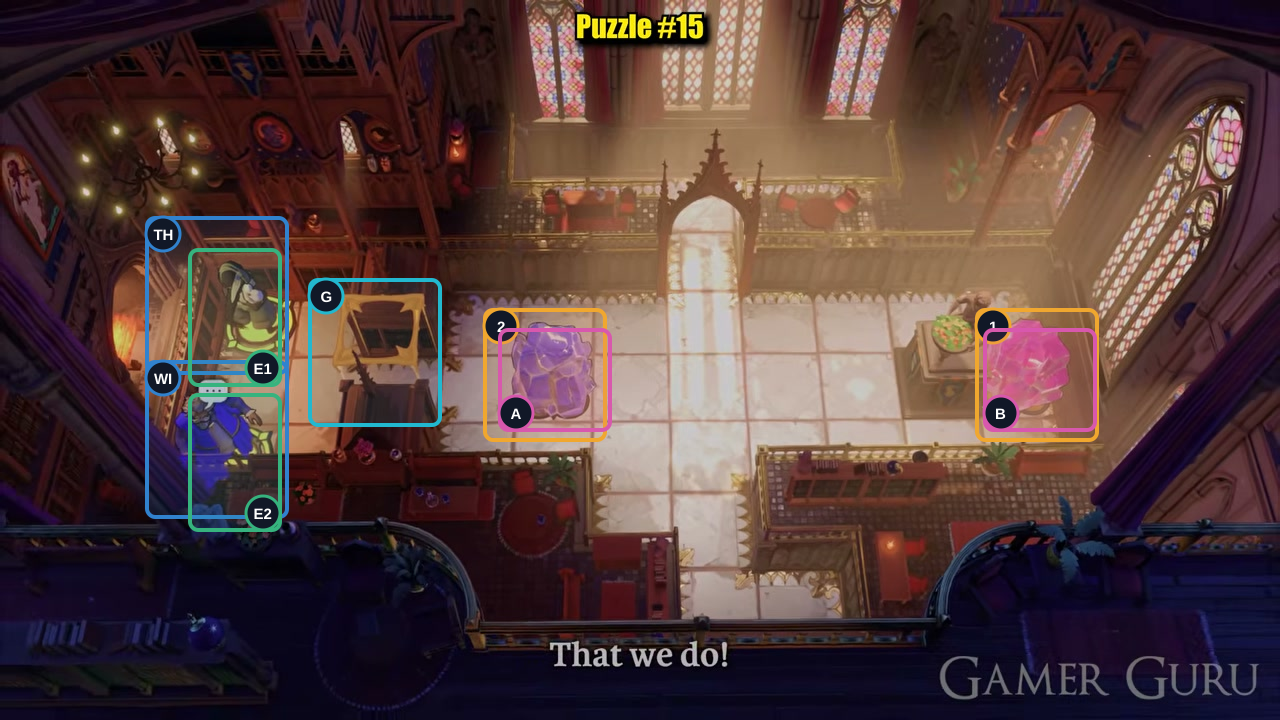
Wizard: move right to swap Crystal 2 onto Switch A, then down, left twice, up, left three times, and down to Exit 2.
Check: The Wizard reaches Exit 2; the Thief remains at Exit 1.
Open full-size image in a new tabActor-by-actor direction route
Full direction sequence
- TH Thief
↑ → → → ↑ ↑ → ← - WI Wizard
→ ↓ ↓ ↓ ↓ ↓ ↓ → - TH Thief
→ → ↓ ↓ ↓ ↓ ↓ ↑ ↑ ↑ ← ↓ ← ← ↑ → → → ↑ ↑ - WI Wizard
← ↑ → - TH Thief
↑ ↑ ↑ ↑ ↑ ↓ ↓ ↓ → ↑ → - WI Wizard
← ↓ ↓ → ↓ ↓ → → → ↑ ↑ - TH Thief
↓ → → ↑ - WI Wizard
← - TH Thief
↓ - WI Wizard
← ← ← ← ↓ ← ← ← - TH Thief
← ← ↑ ← ← ← → ↑ ← ← ↓ - WI Wizard
→ - TH Thief
↑ - WI Wizard
→ ↓ ← ← ↑ ← ← ← ↓
Warrior and Wizard: a side gate
Section titled “Warrior and Wizard: a side gate”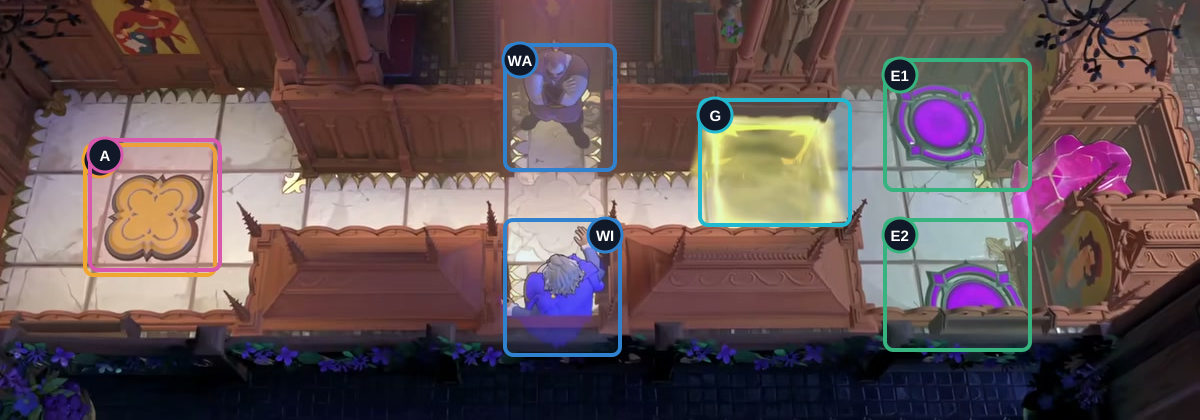
- Crystal 1
- Switch A
- Gate
- Exits E1–E2
- WA Warrior
- WI Wizard
Hint
Move the Warrior down, then left four times onto A. The Wizard swaps onto A; after the Warrior clears the lane, the Wizard swaps Crystal 1 onto A. Finish by splitting toward E1 and E2.
Step-by-step solution
Images show selected video checkpoints; the first frame is the starting position.
Start from these positions. The Warrior opens the route first.
Check: Both heroes and Crystal 1 are in their starting positions; Gate G is closed.
Open full-size image in a new tab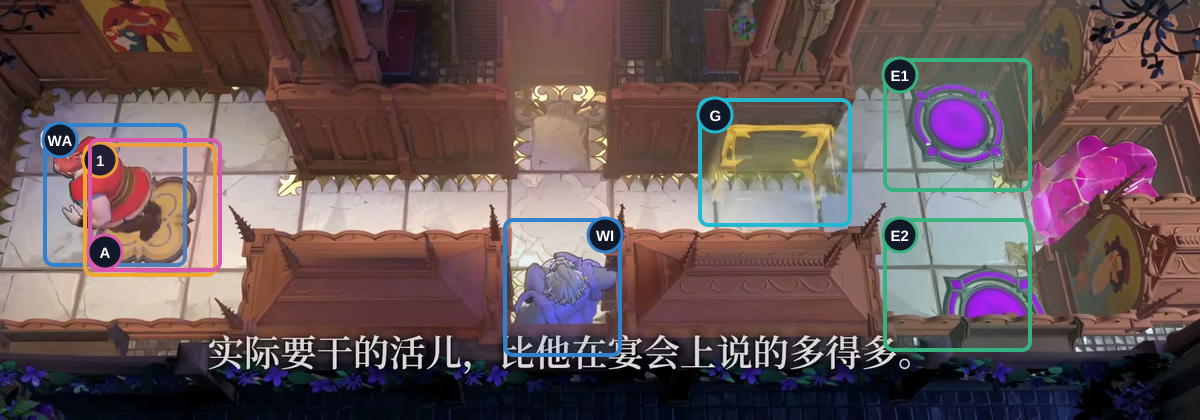
Warrior: move down, then left four times onto Switch A.
Check: The Warrior stands on Switch A and opens Gate G.
Open full-size image in a new tab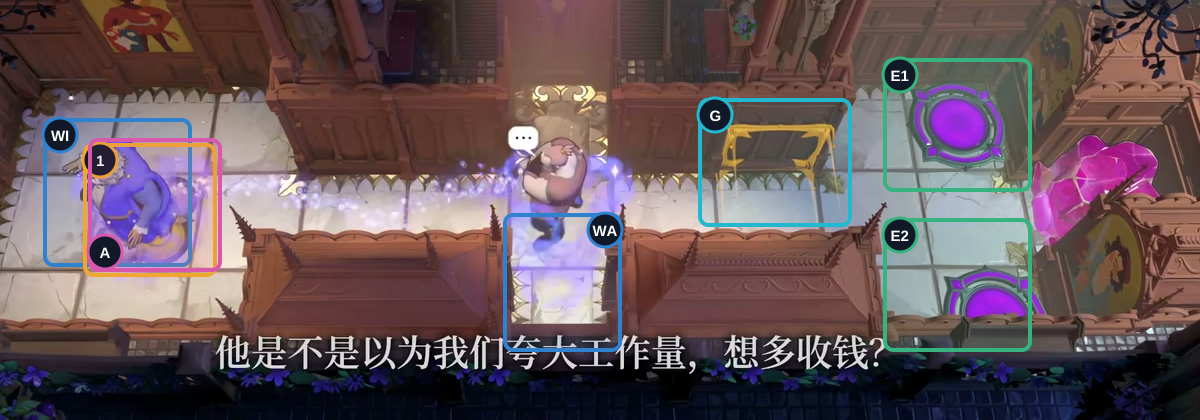
Wizard: move up, then left to swap with the Warrior on Switch A.
Check: The Wizard swaps onto Switch A; the Warrior waits in the center.
Open full-size image in a new tab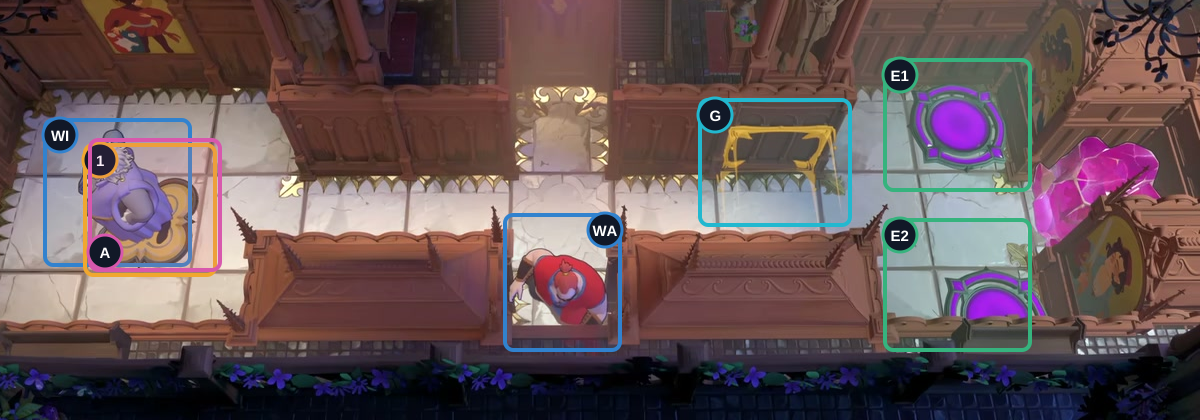
Warrior: move down one tile.
Check: The Warrior moves to the lower lane. The Wizard still holds Switch A, and Crystal 1 remains at the far side.
Open full-size image in a new tab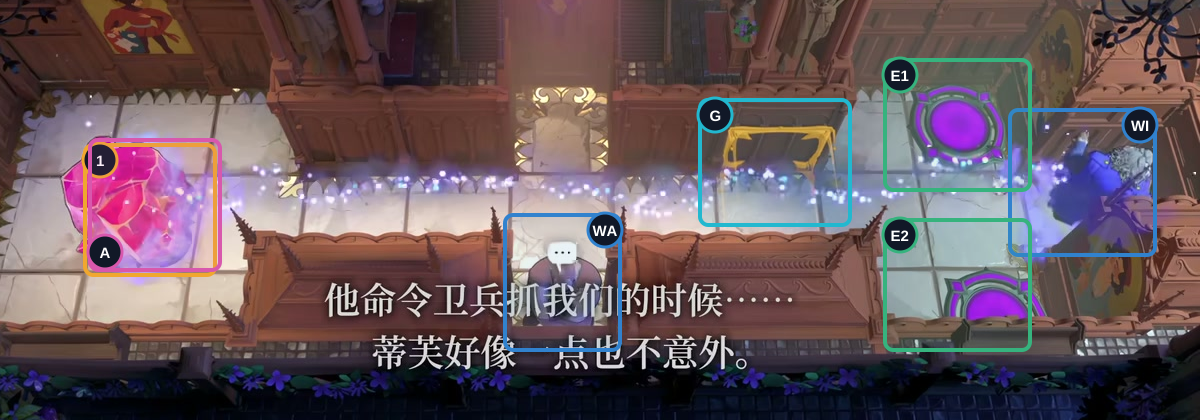
Wizard: move right to swap with Crystal 1 onto Switch A.
Check: Crystal 1 now holds Switch A; the Wizard is at the far side and the Warrior stays in the lower lane.
Open full-size image in a new tab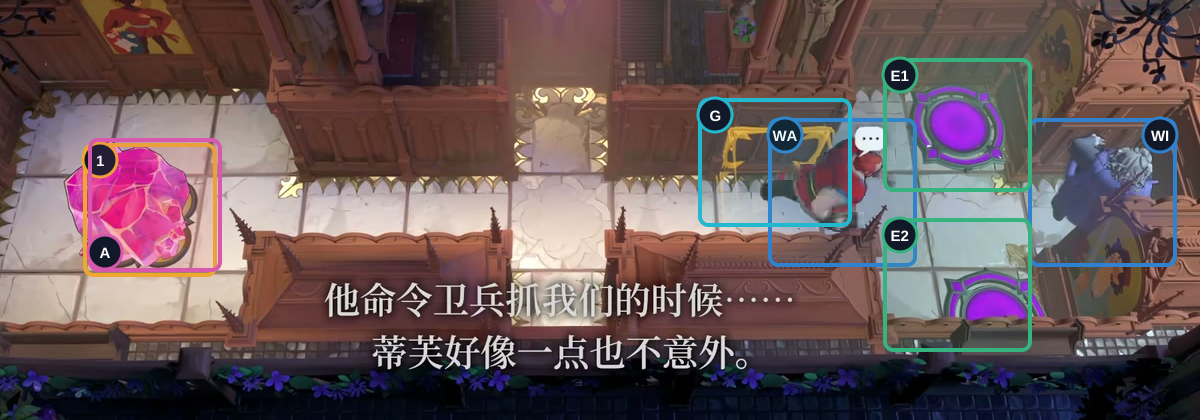
Warrior: move up, then right four times through Gate G.
Check: The Warrior reaches the right junction; Crystal 1 keeps Switch A occupied.
Open full-size image in a new tab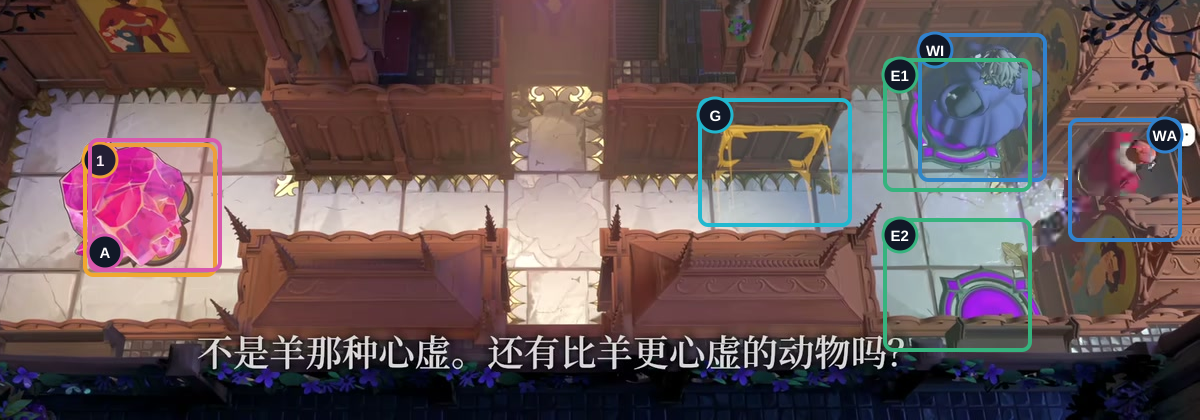
Wizard: move left to swap with the Warrior, then up to Exit 1.
Check: The Wizard reaches Exit 1; the Warrior waits at the right junction.
Open full-size image in a new tab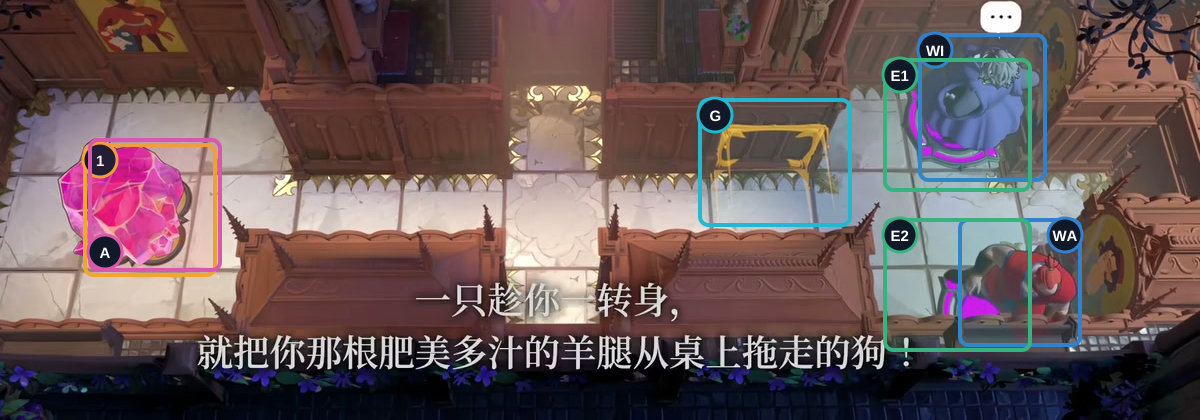
Warrior: move left, then down to Exit 2.
Check: Both heroes occupy their exits; the route is complete.
Open full-size image in a new tabActor-by-actor direction route
Full direction sequence
- WA Warrior
↓ ← ← ← ← - WI Wizard
↑ ← - WA Warrior
↓ - WI Wizard
→ - WA Warrior
↑ → → → → - WI Wizard
← ↑ - WA Warrior
← ↓
Wizard, Thief and Warrior: switches, gates and crystal losses
Section titled “Wizard, Thief and Warrior: switches, gates and crystal losses”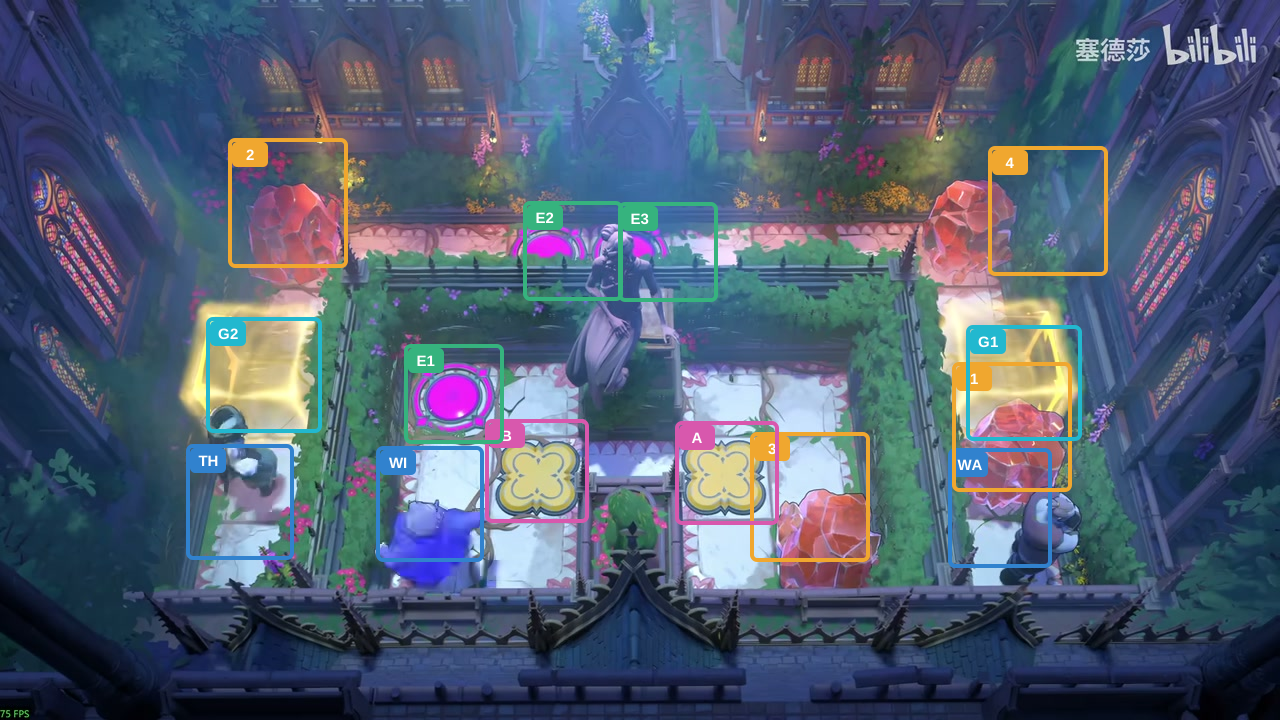
- Crystals 1–4
- Switches A–B
- Gates G1–G2
- Exits E1–E3
- WA Warrior
- WI Wizard
- TH Thief
Hint
The Wizard sets up switches A and B with Crystal 3. Leaving A closes the gates, so time that move for when Crystal 1 or Crystal 2 is on a gate. The route uses this to clear both gates, then brings Crystal 4 to G2. Keep Crystal 3 for the final switch move.
Step-by-step solution
Images show selected video checkpoints; the first frame is the starting position.
Start with all three heroes and four crystals in their starting places; both switches are empty and both gates are closed.
Check: The heroes and crystals are in their starting places; both switches are empty and the gates are closed.
Open full-size image in a new tab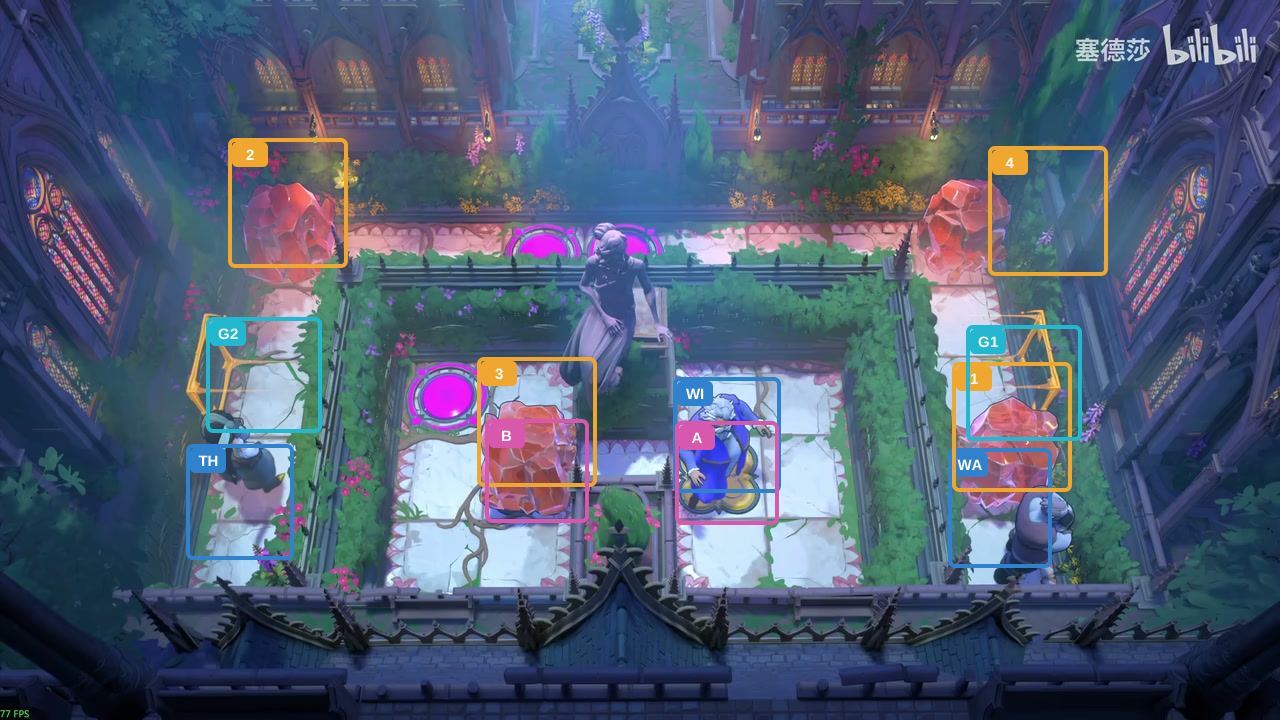
Wizard: go up, right four, down, left, up, left twice, right, up, left, then down onto Switch A.
Check: Wizard holds Switch A, Crystal 3 holds Switch B, and both gates are open.
Open full-size image in a new tab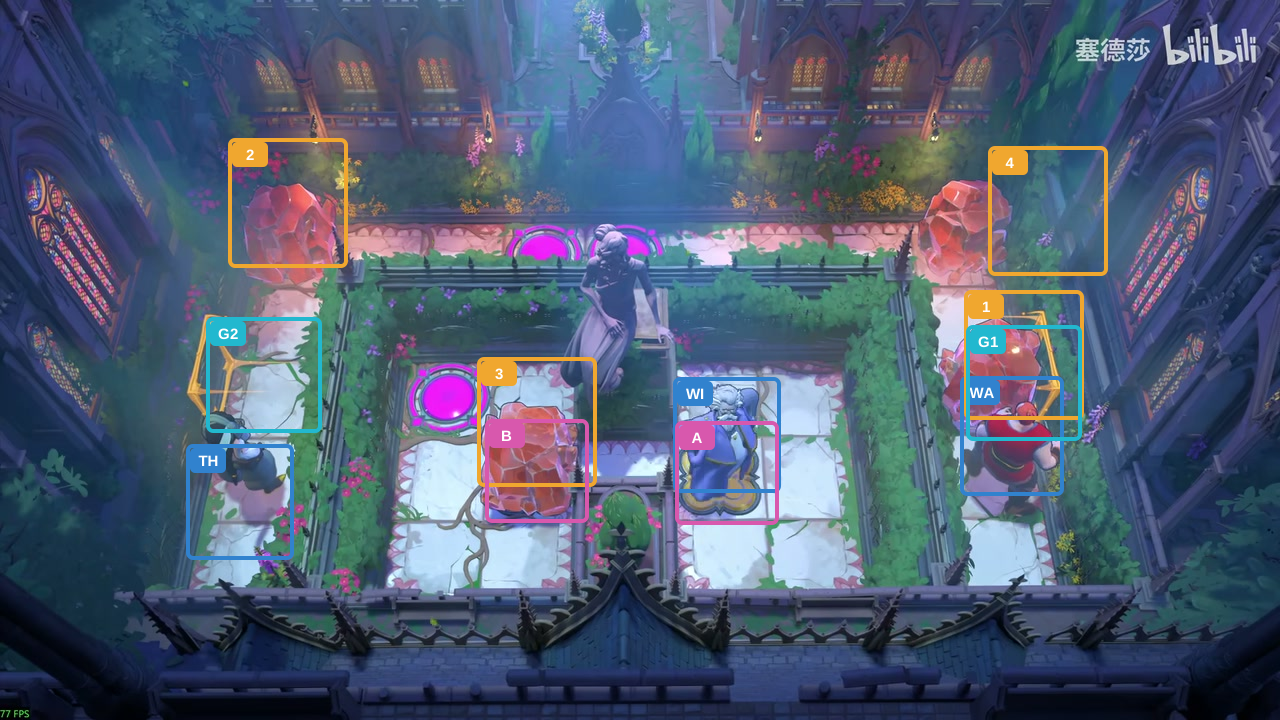
Warrior: go up once and push Crystal 1 onto Gate G1.
Check: Crystal 1 is on G1; the other crystal and switch placements remain in place.
Open full-size image in a new tab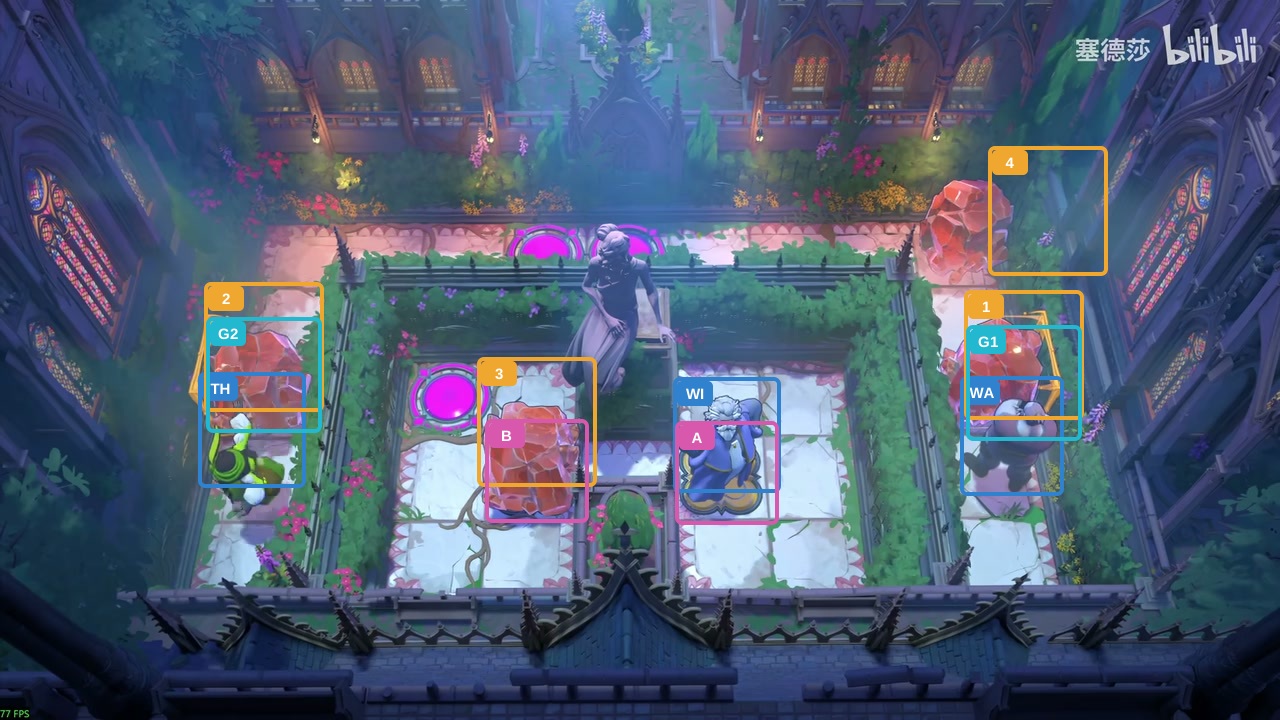
Thief: go up three, then down twice to pull Crystal 2 onto Gate G2.
Check: Crystal 2 is on G2; Wizard remains on Switch A and both gates stay open.
Open full-size image in a new tab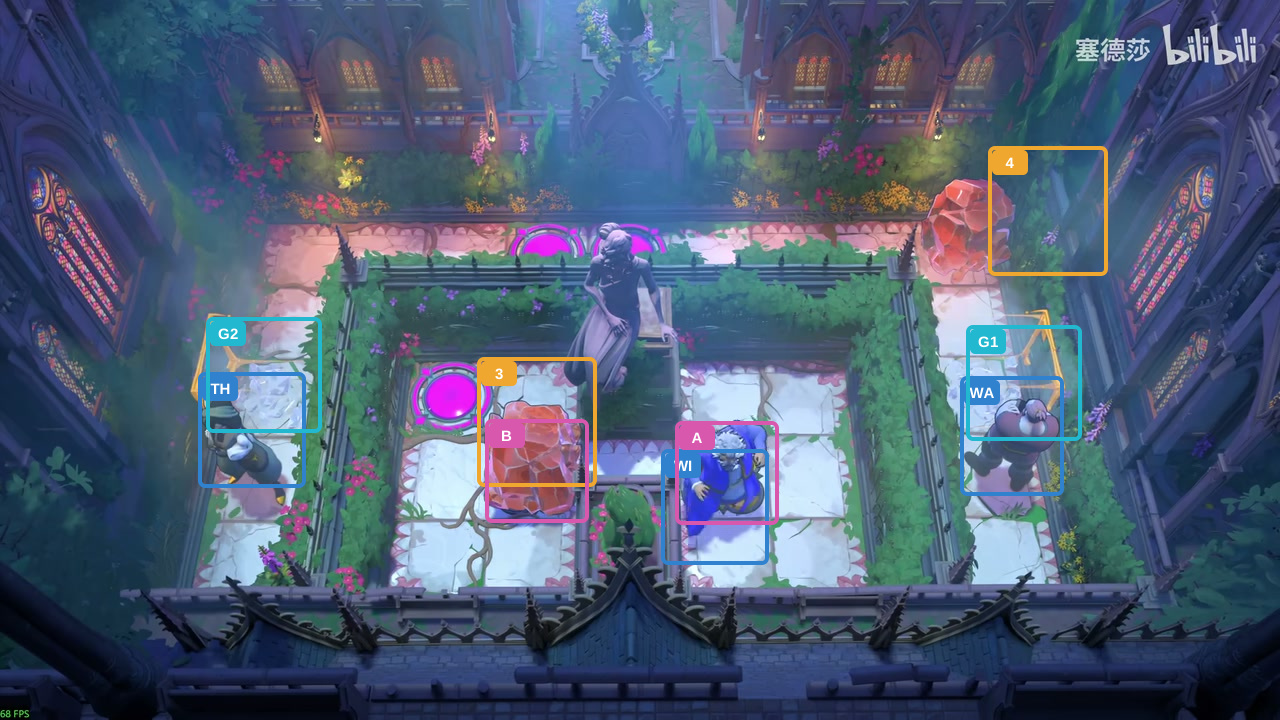
Wizard: step down off Switch A to close both gates.
Check: Wizard leaves Switch A; both gates close and crush Crystals 1 and 2.
Open full-size image in a new tab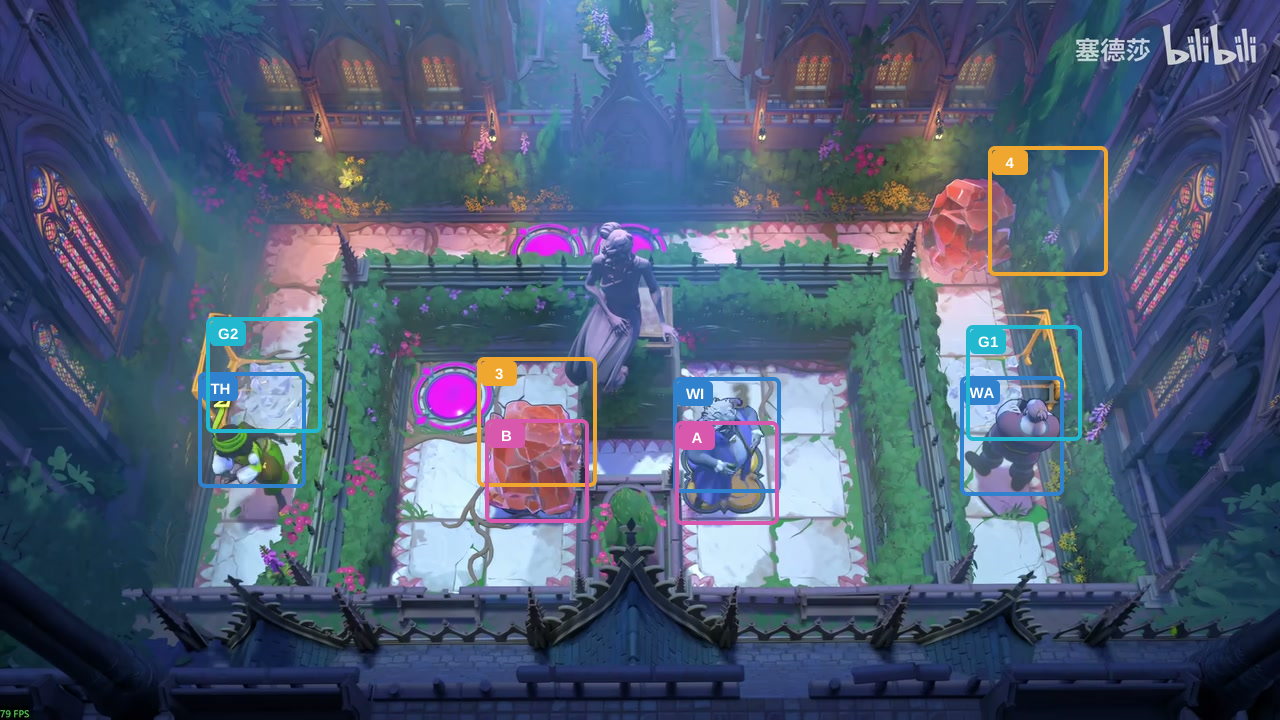
Wizard: return to Switch A.
Check: Wizard returns to Switch A and both gates reopen; Crystals 1 and 2 are gone.
Open full-size image in a new tab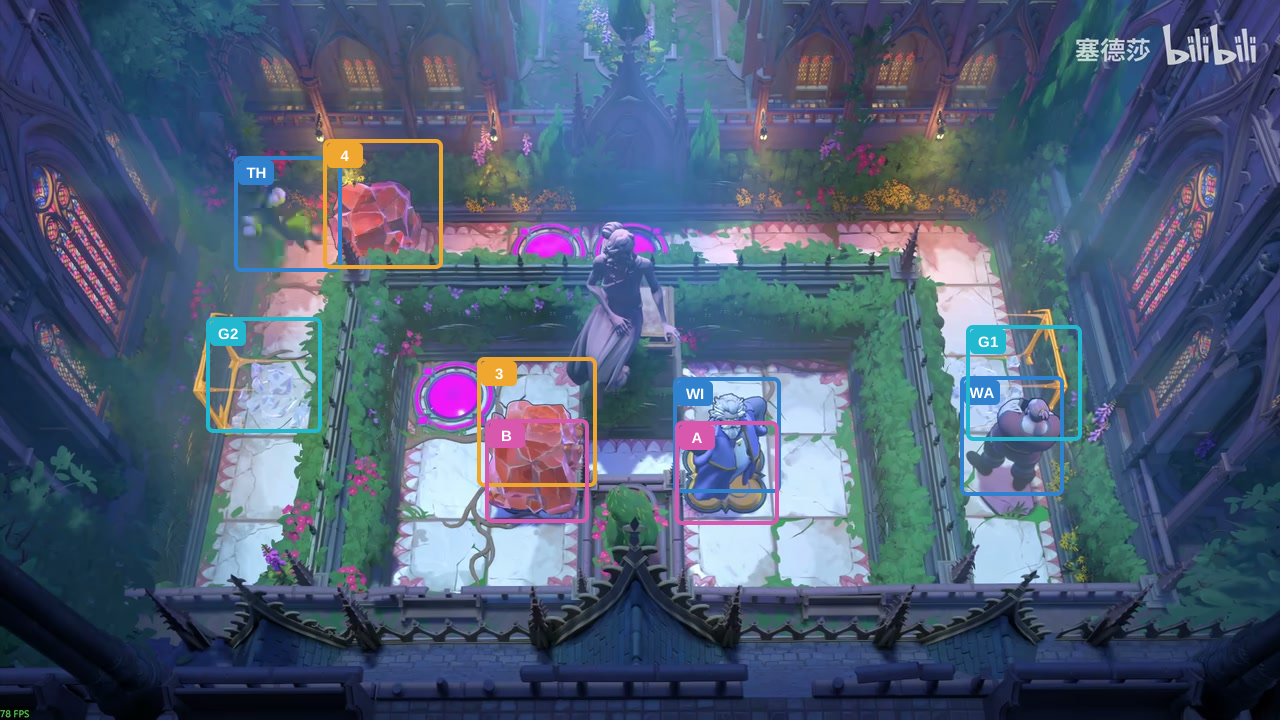
Thief: go up three, right seven, then left seven to bring Crystal 4 across the upper lane.
Check: Crystal 4 reaches the upper lane; Crystal 3 still holds Switch B.
Open full-size image in a new tab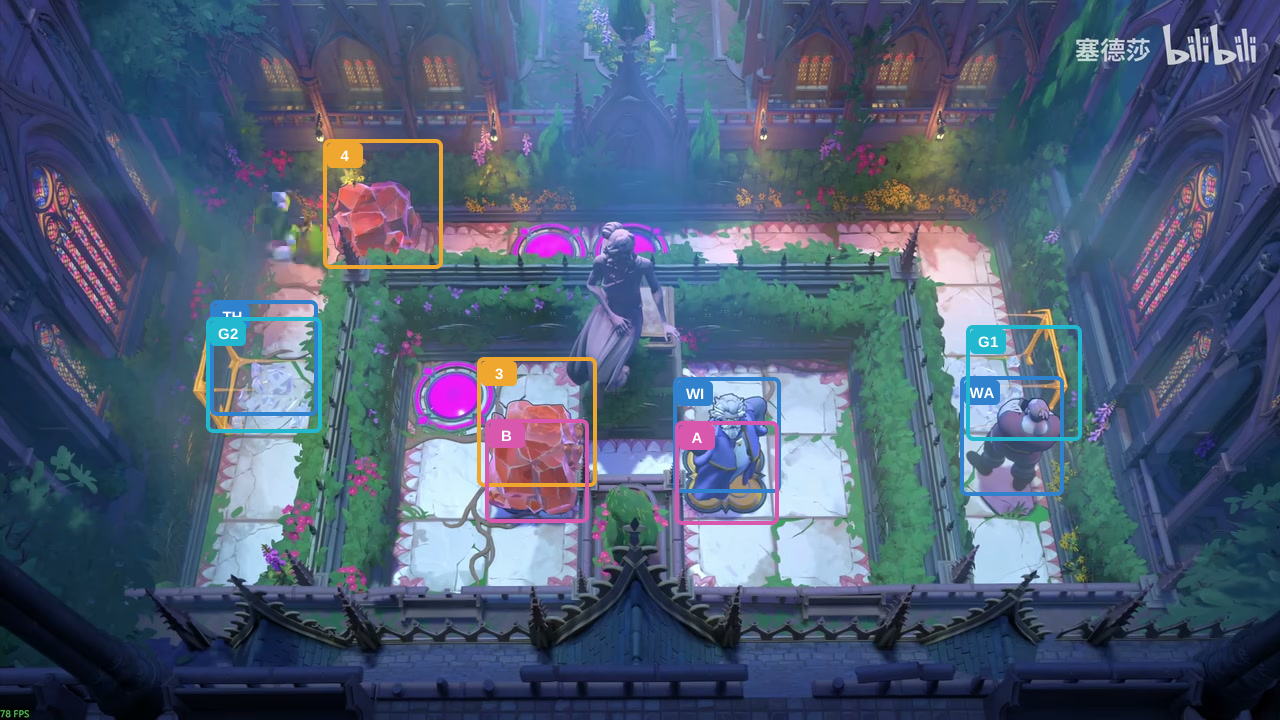
Thief: go down twice toward G2.
Check: Thief is below the upper lane; Crystal 4 remains on the lane and both gates stay open.
Open full-size image in a new tab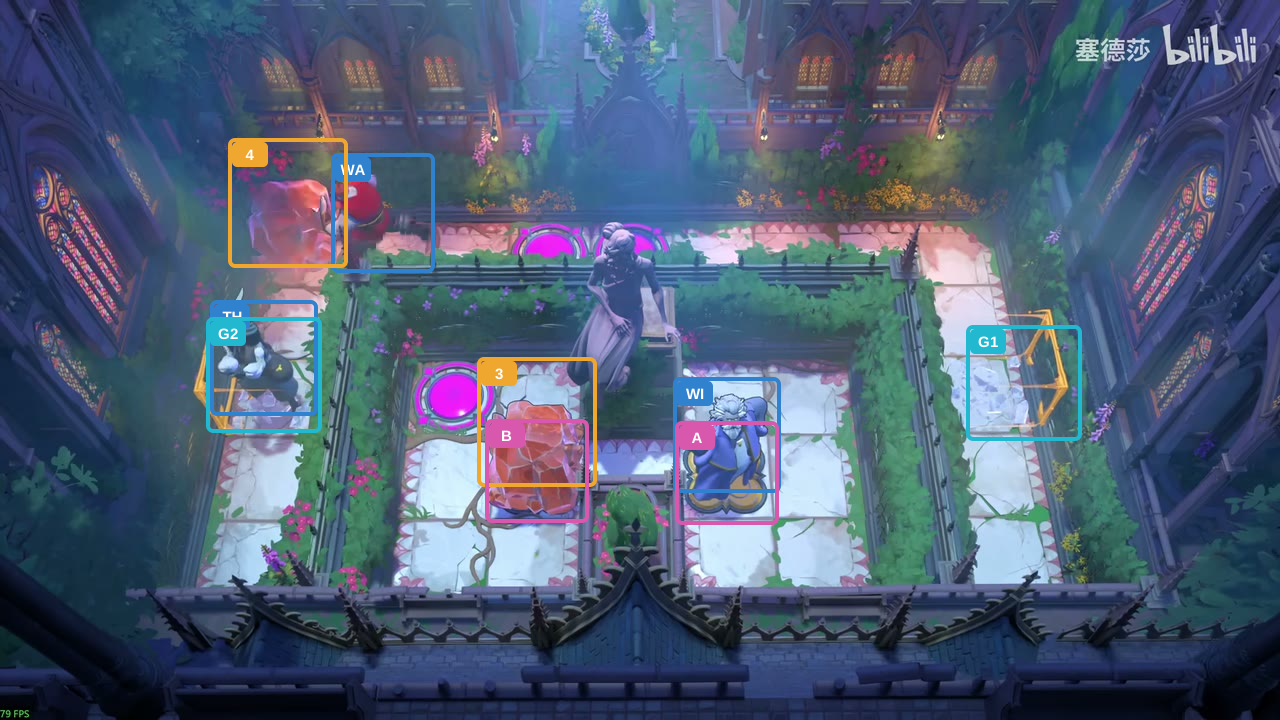
Warrior: go up three, then left seven to push Crystal 4 one tile left.
Check: Warrior pushes Crystal 4 left; Thief waits beside G2.
Open full-size image in a new tab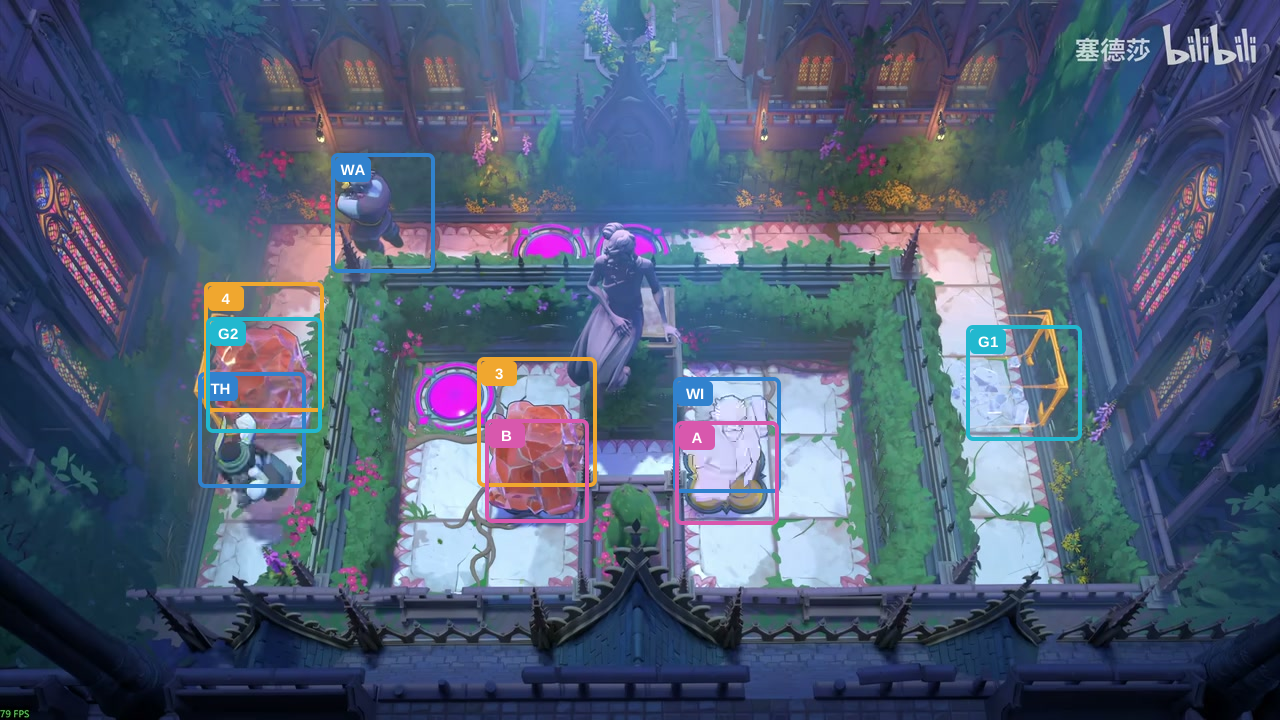
Thief: go up once, then down twice to pull Crystal 4 onto G2.
Check: Crystal 4 is on G2; both switches still hold the gates open.
Open full-size image in a new tab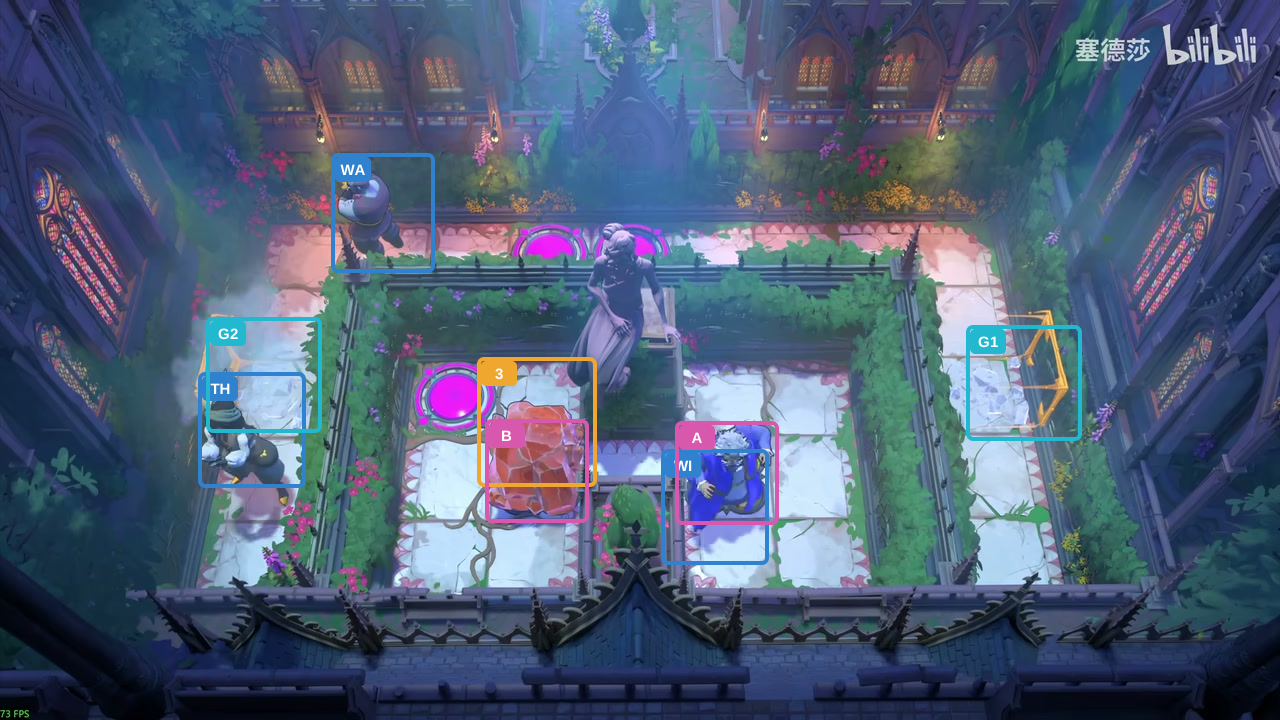
Wizard: step down off Switch A to close the gates and crush Crystal 4.
Check: Crystal 4 is crushed as G2 closes; Wizard leaves Switch A.
Open full-size image in a new tab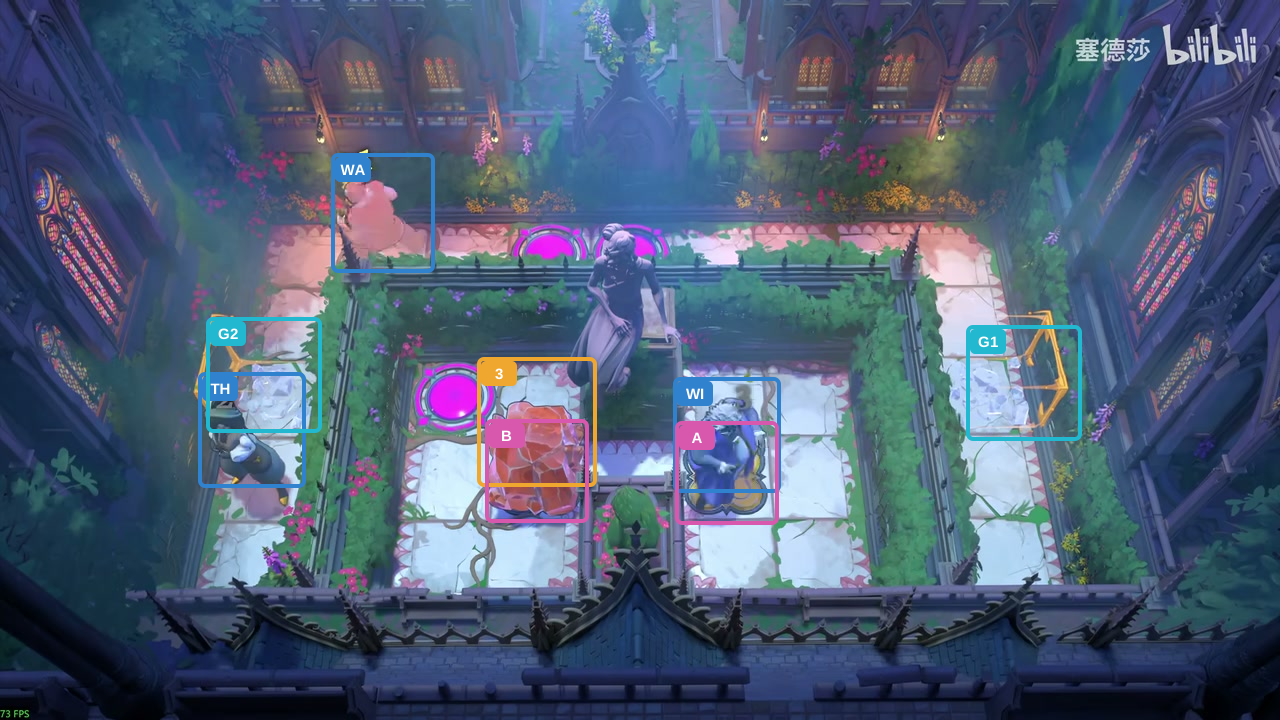
Wizard: return to Switch A to reopen both gates.
Check: Wizard returns to Switch A and the gates reopen; Crystal 4 is gone.
Open full-size image in a new tab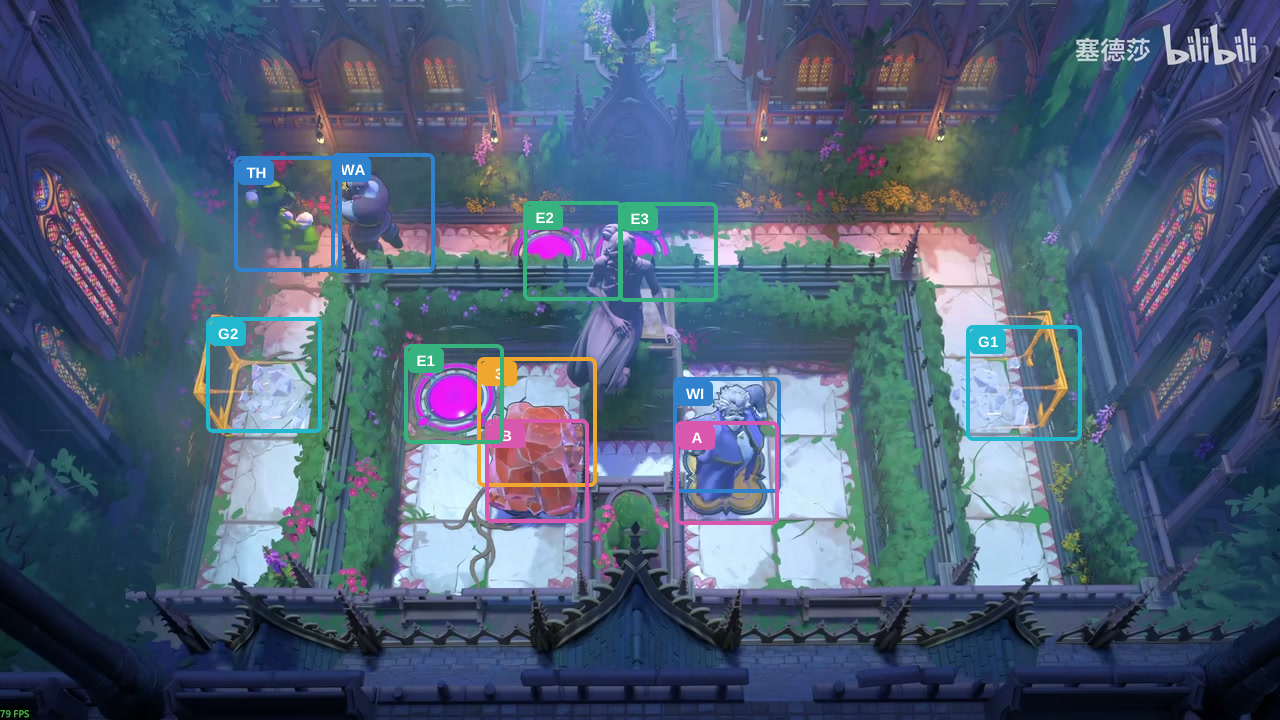
Thief: go up three through the reopened G2 passage.
Check: Thief reaches the upper lane; Warrior remains on the left side of the lane and Wizard holds Switch A.
Open full-size image in a new tab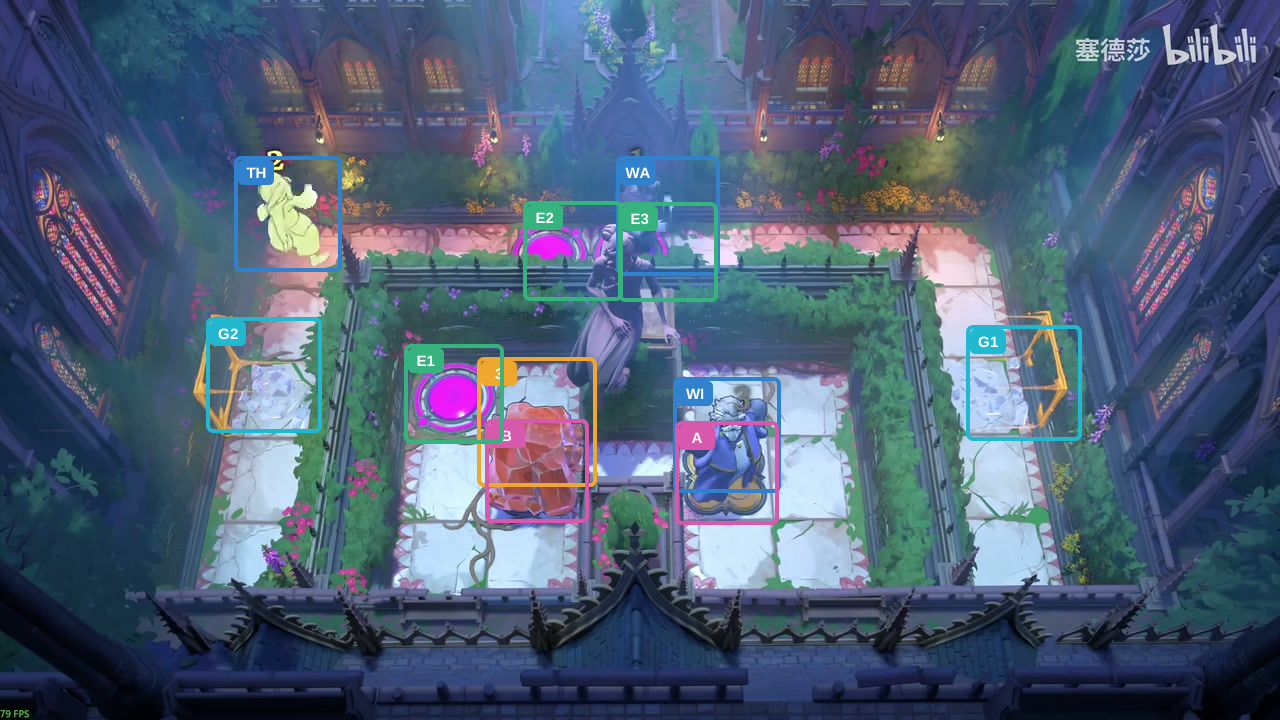
Warrior: move right three to Exit 3.
Check: Warrior occupies Exit 3; Thief waits on the upper lane.
Open full-size image in a new tab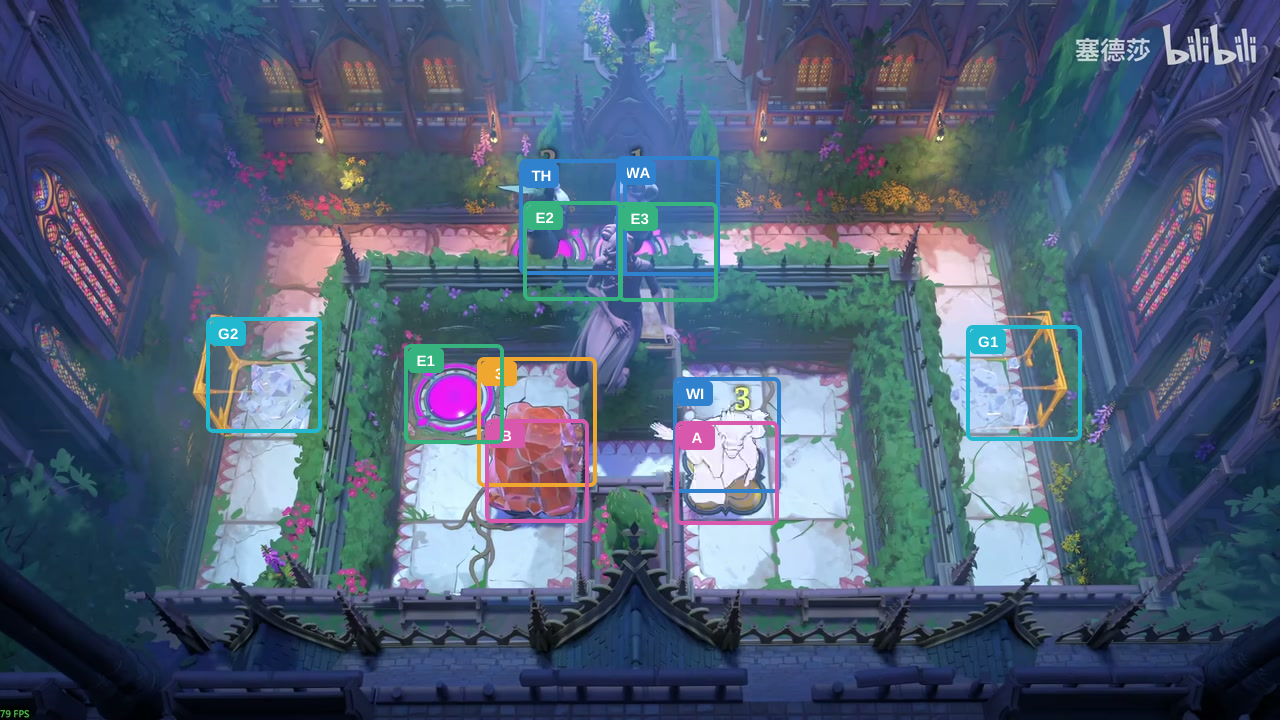
Thief: move right three to Exit 2.
Check: Thief occupies Exit 2; Warrior holds Exit 3.
Open full-size image in a new tab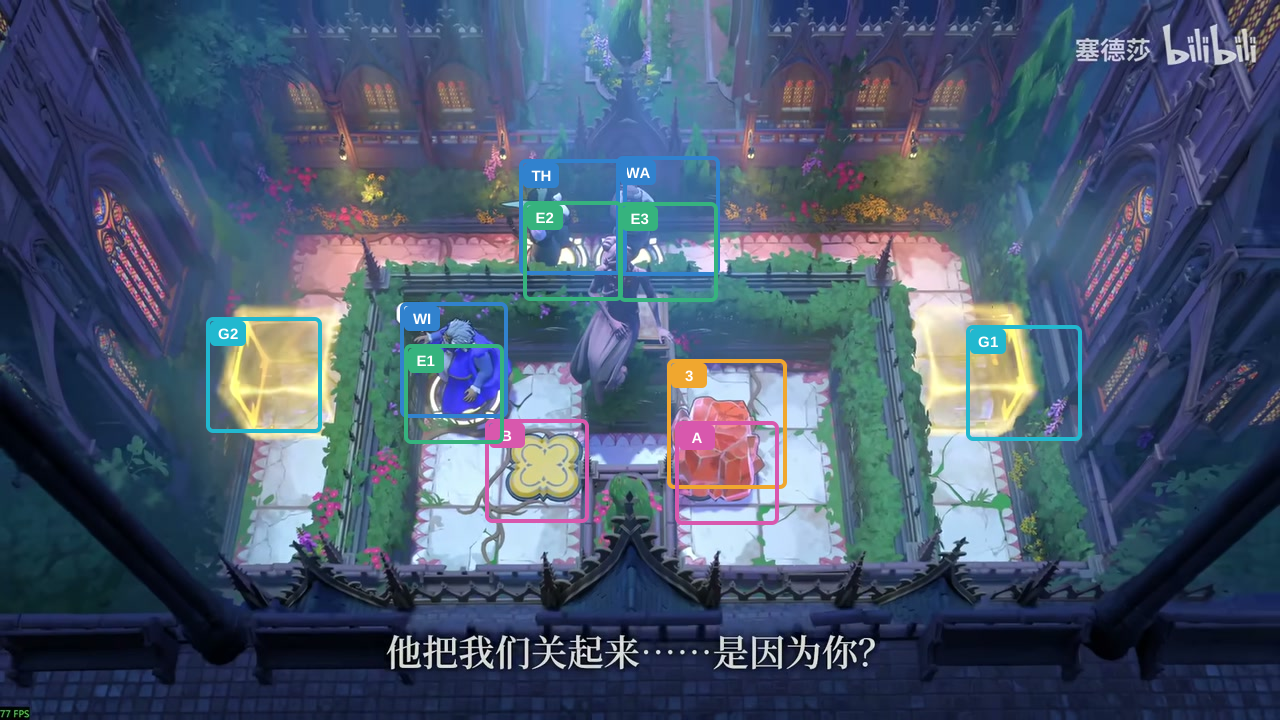
Wizard: go left, up, then left to Exit 1.
Check: All three heroes occupy their exits; Crystal 3 holds Switch A and both gates are closed.
Open full-size image in a new tabActor-by-actor direction route
Full direction sequence
- WI Wizard
↑ → → → → ↓ ← ↑ ← ← → ↑ ← ↓ - WA Warrior
↑ - TH Thief
↑ ↑ ↑ ↓ ↓ - WI Wizard
↓ ↑ - TH Thief
↑ ↑ ↑ → → → → → → → ← ← ← ← ← ← ← ↓ ↓ - WA Warrior
↑ ↑ ↑ ← ← ← ← ← ← ← - TH Thief
↑ ↓ ↓ - WI Wizard
↓ ↑ - TH Thief
↑ ↑ ↑ - WA Warrior
→ → → - TH Thief
→ → → - WI Wizard
← ↑ ←
Warrior, Thief and Wizard: one switch and three exits
Section titled “Warrior, Thief and Wizard: one switch and three exits”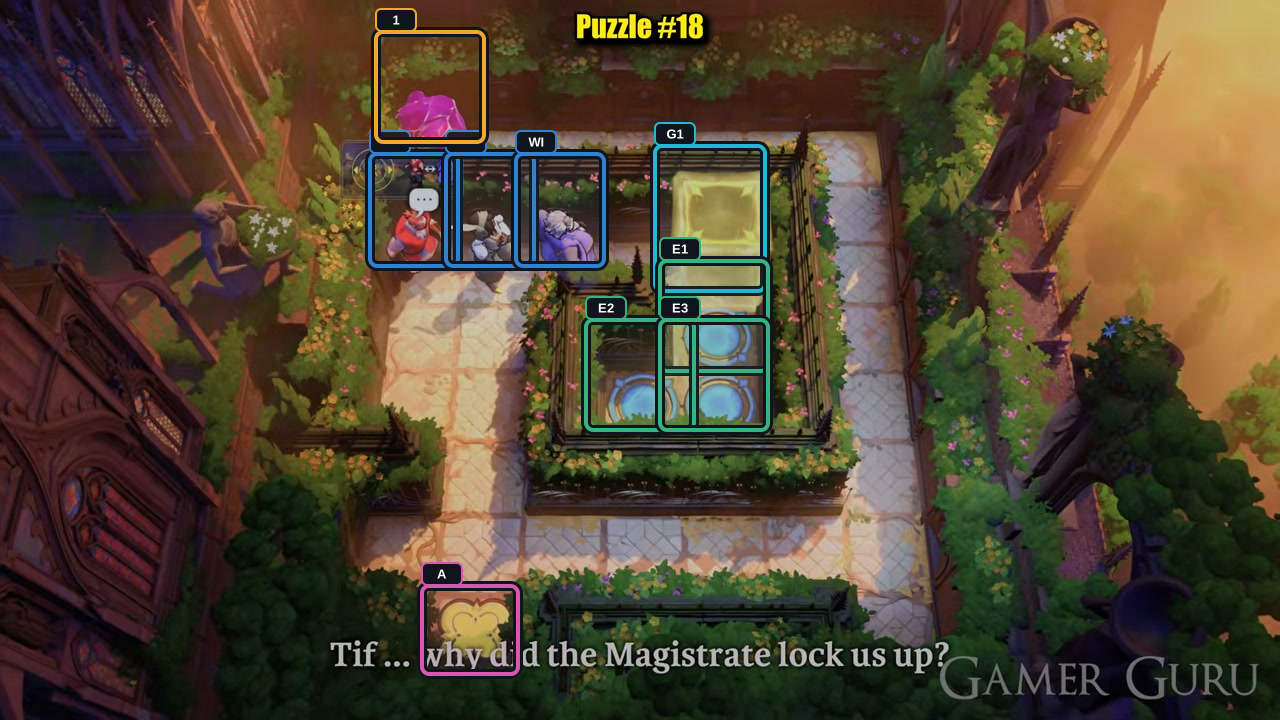
- Crystal 1
- Switch A
- Gate
- Exits E1–E3
- WA Warrior
- TH Thief
- WI Wizard
Hint
The Thief circles the opening loop while the Wizard walks into position. Use the Wizard’s swaps to move Crystal 1 across, then have the Warrior push it onto A to open the gate. Send the Warrior to left exit E2. In the final handoff, the Thief moves down to E3 and pulls the Wizard from Gate G1 onto E1.
Step-by-step solution
Images show selected video checkpoints; the first frame is the starting position.
Start at the clear room view, then follow the handoffs below.
Check: All three heroes, Crystal 1, the switch, gate and exits are visible.
Open full-size image in a new tab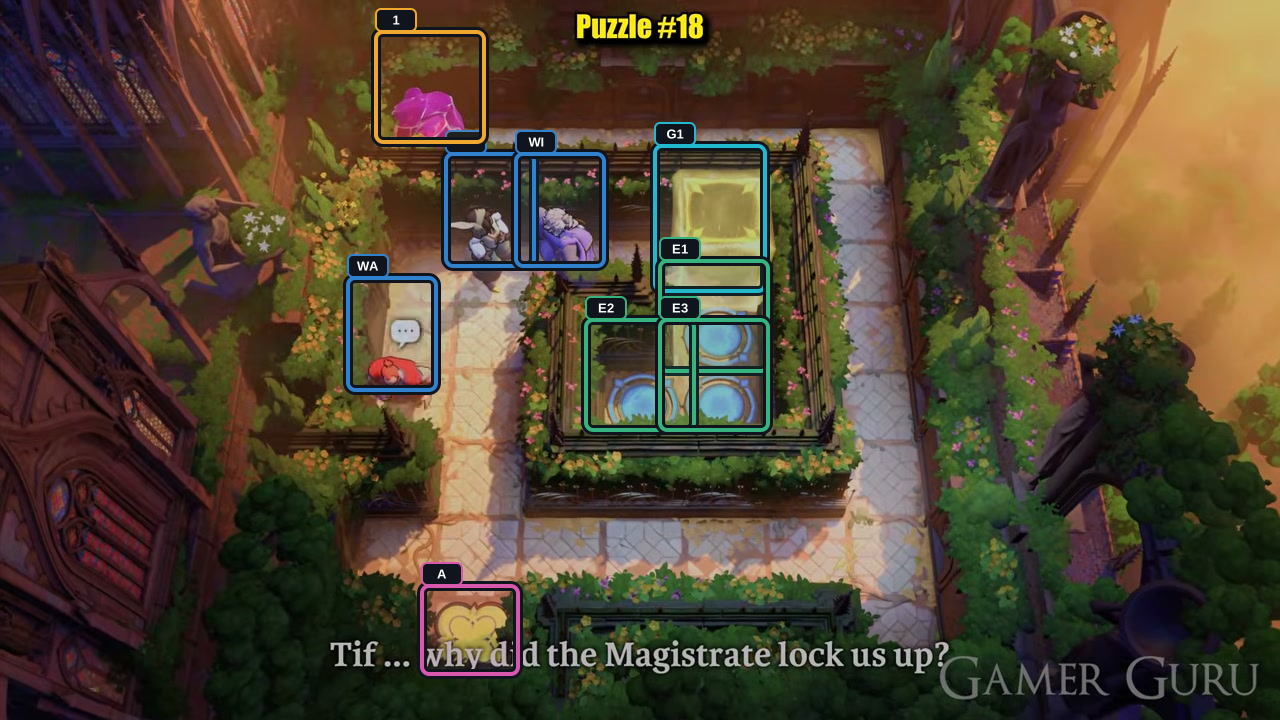
Warrior: down once.
Check: The Warrior moves onto the left path; the Thief and Wizard stay put.
Open full-size image in a new tab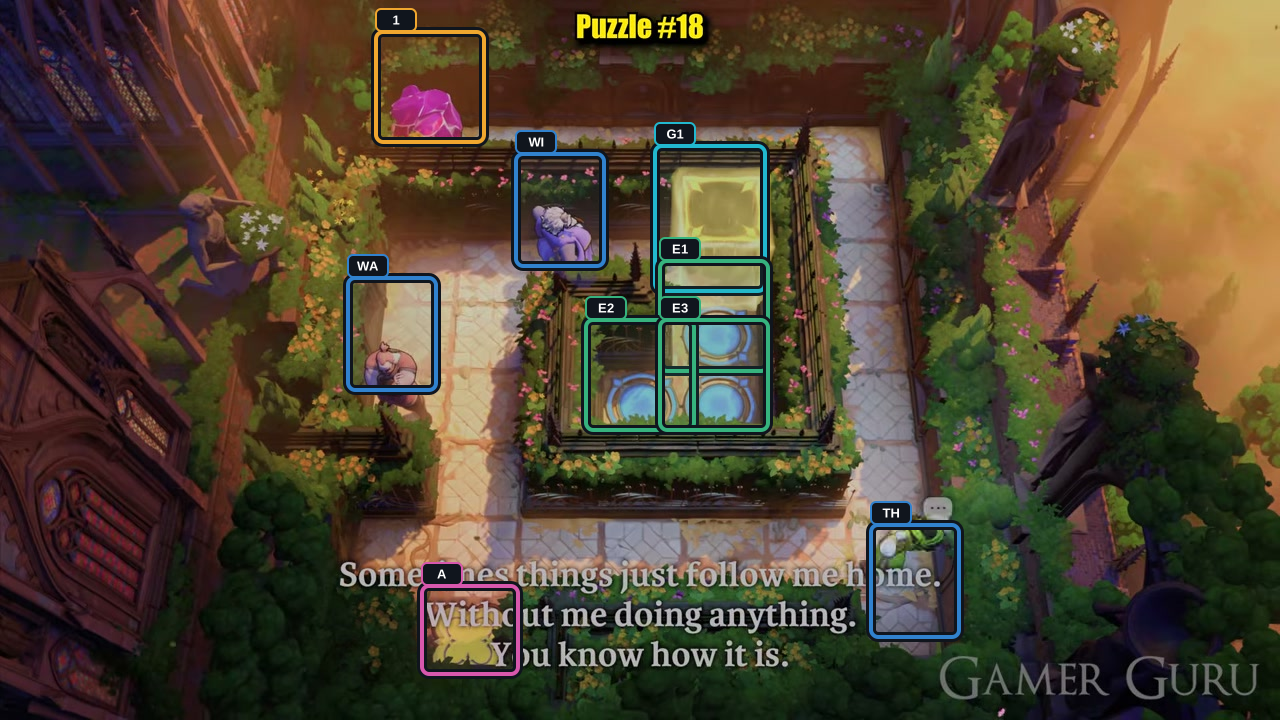
Thief: down four, right five, then down once.
Check: The Thief reaches the lower-right edge; the Warrior and Wizard hold their positions.
Open full-size image in a new tab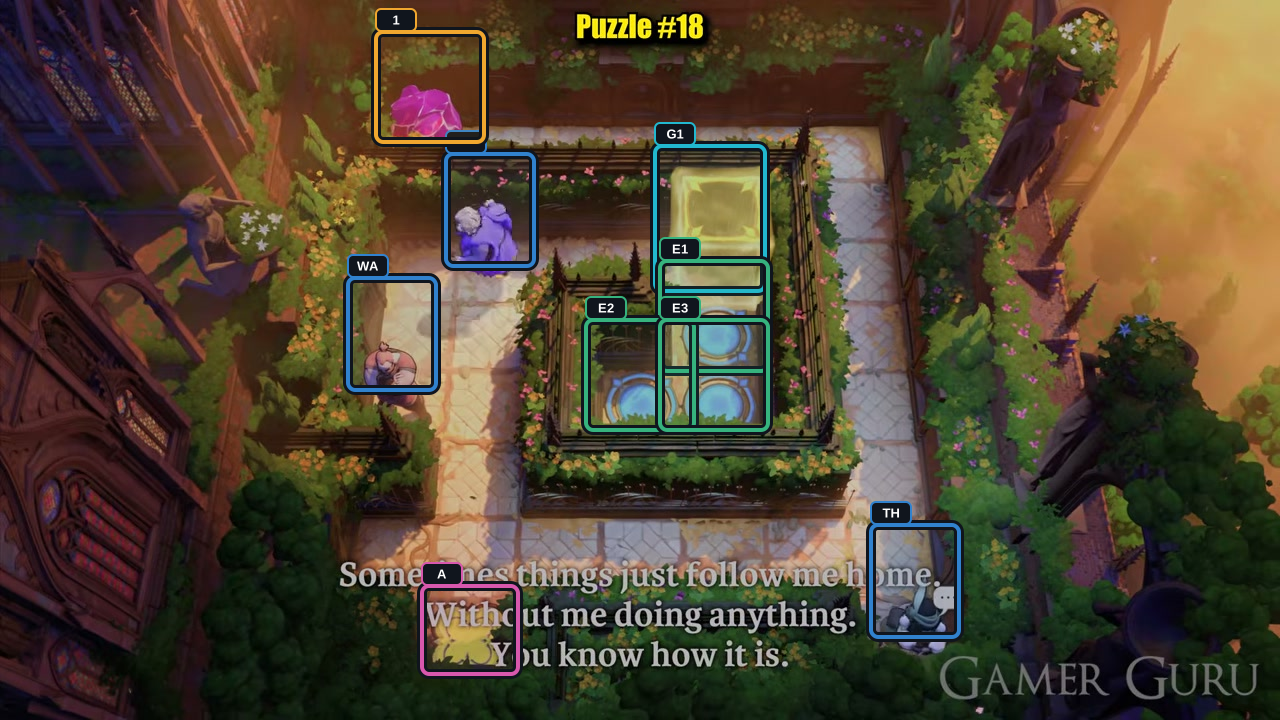
Wizard: left once.
Check: The Wizard moves to the upper-left lane.
Open full-size image in a new tab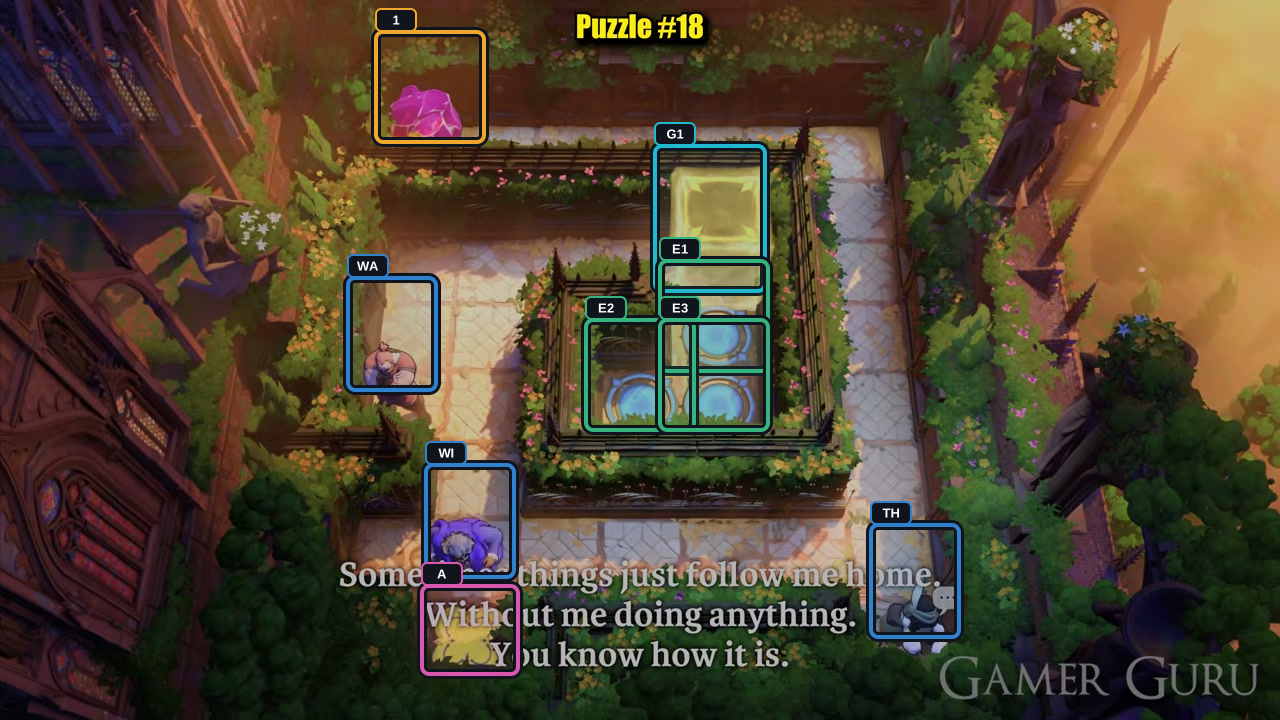
Wizard: down four.
Check: The Wizard reaches the lower-left passage while the Thief waits at the right edge.
Open full-size image in a new tab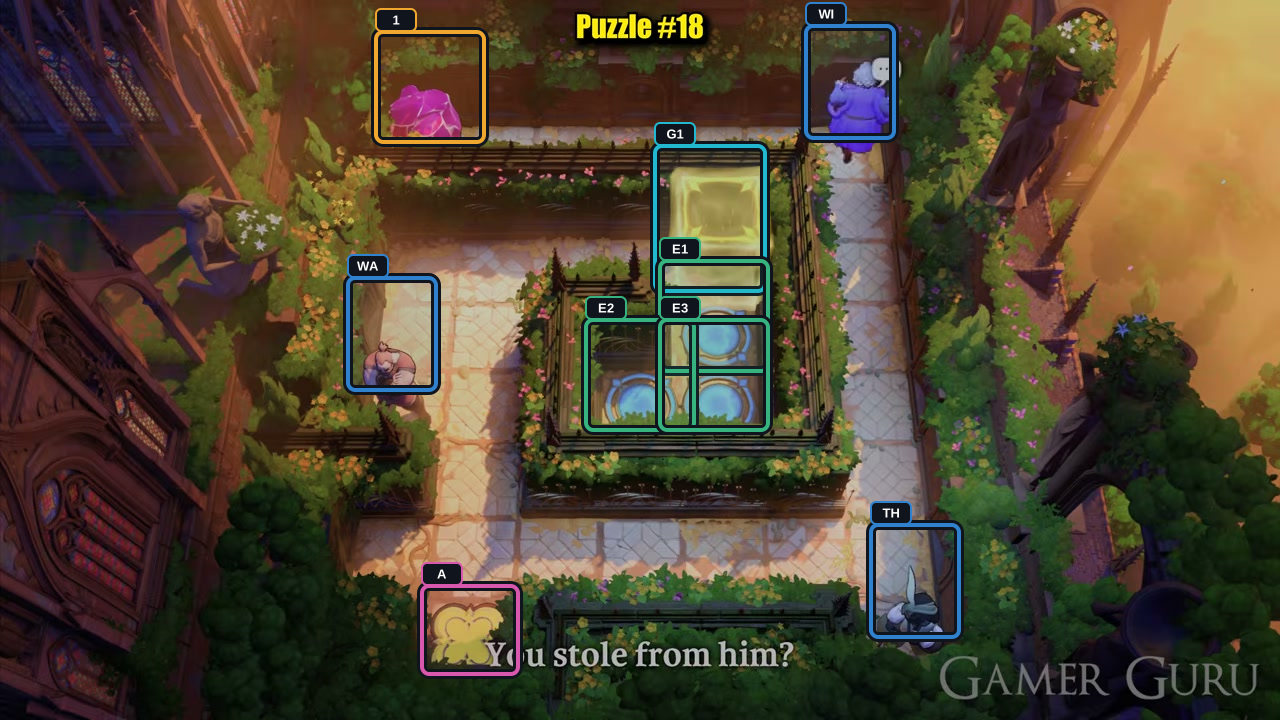
Wizard: right five, then up six.
Check: The Wizard reaches the upper-right edge; Crystal 1 remains upper-left.
Open full-size image in a new tab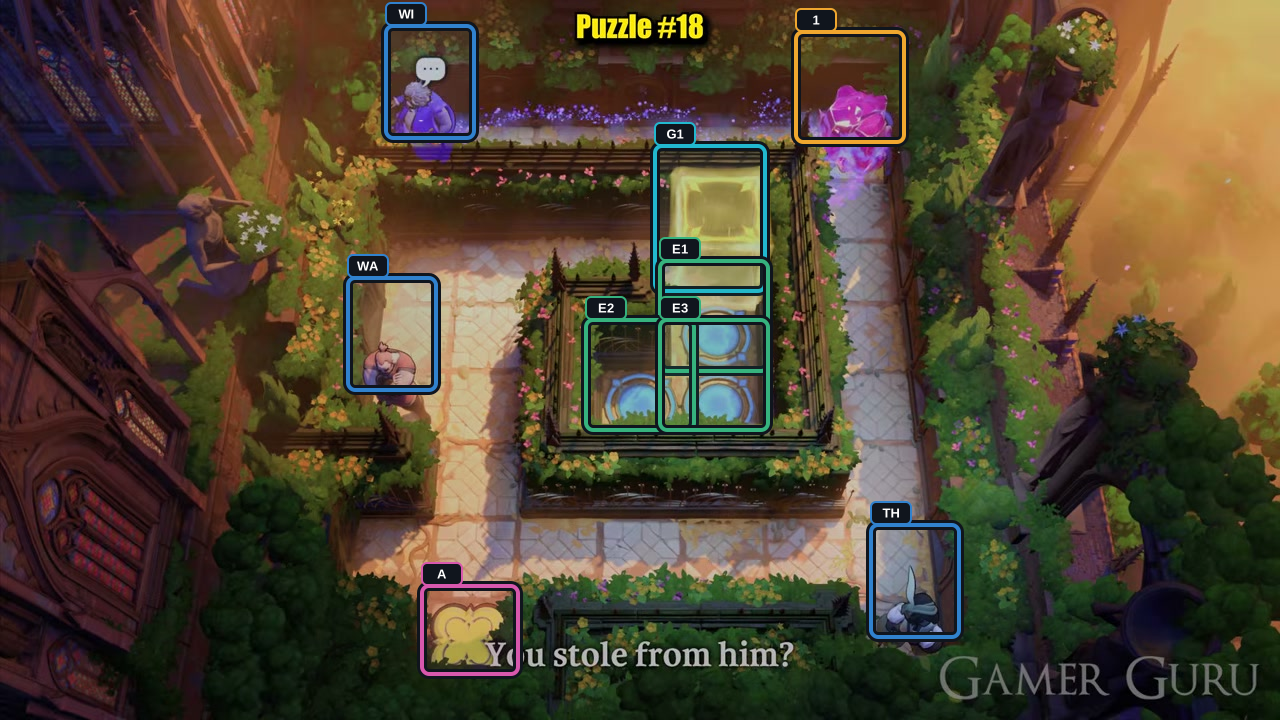
Wizard: left once to swap with Crystal 1.
Check: The Wizard reaches the upper-left tile and Crystal 1 moves to the upper-right.
Open full-size image in a new tab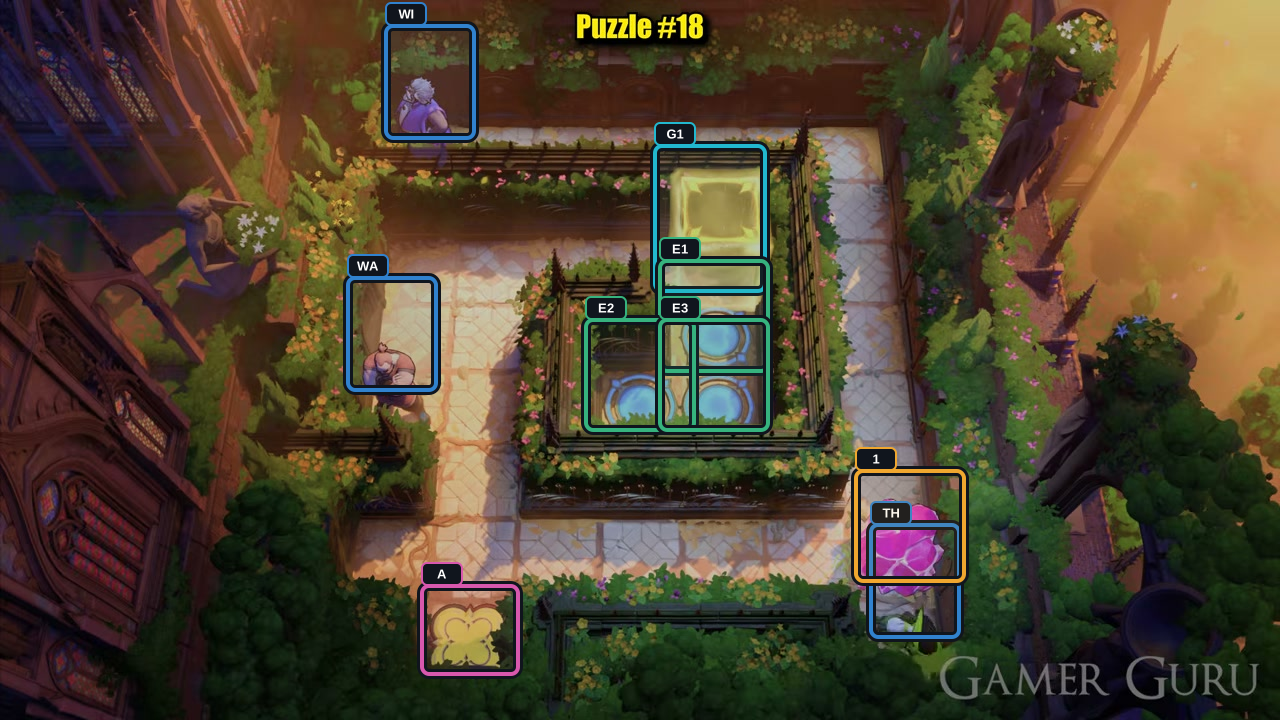
Thief: up six, then down six to pull Crystal 1.
Check: The Thief returns to the lower-right edge with Crystal 1 above.
Open full-size image in a new tab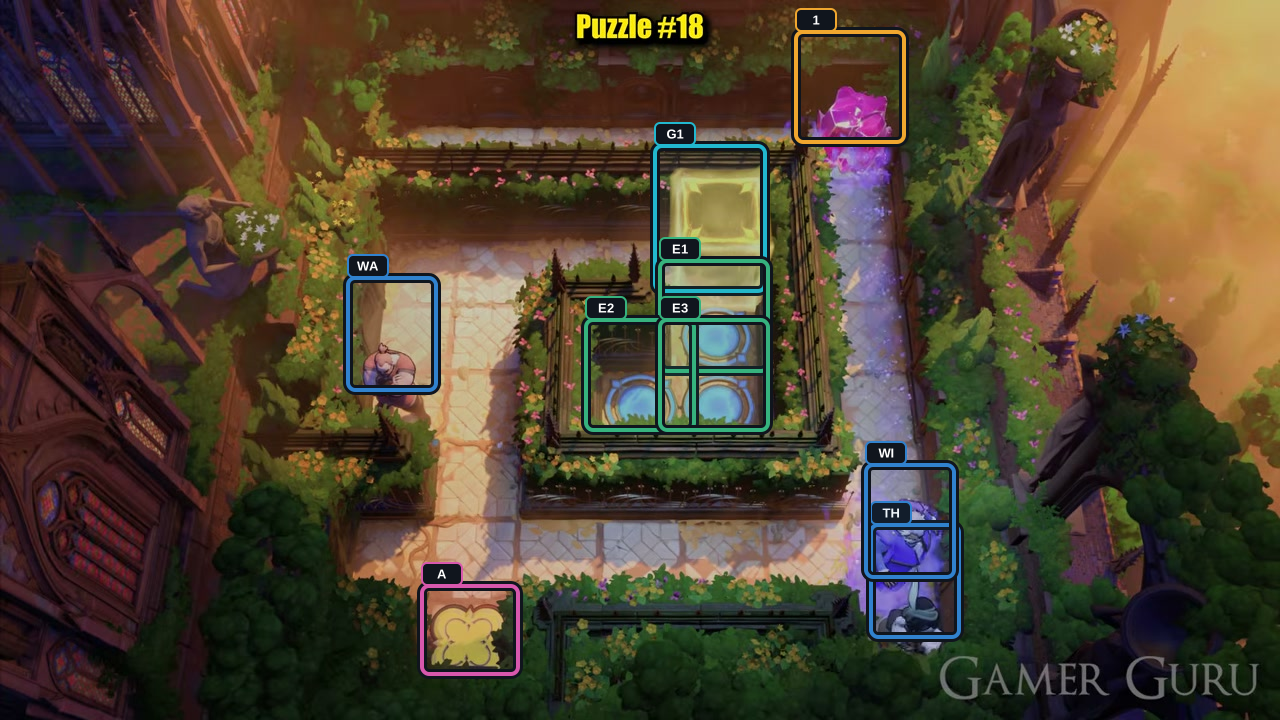
Wizard: right six, then down to swap with Crystal 1.
Check: The Wizard reaches the lower-right lane and Crystal 1 returns to the upper-right.
Open full-size image in a new tab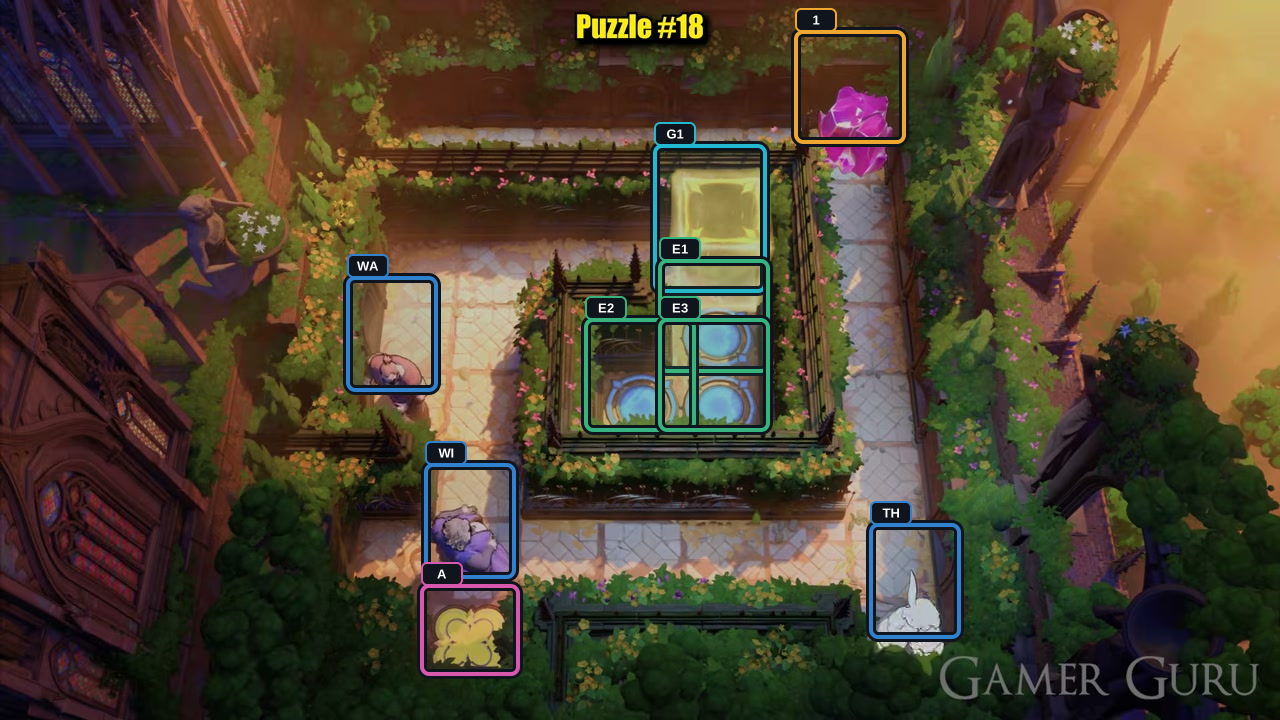
Wizard: left five.
Check: The Wizard reaches the lower-left passage; the Thief remains at the right edge.
Open full-size image in a new tab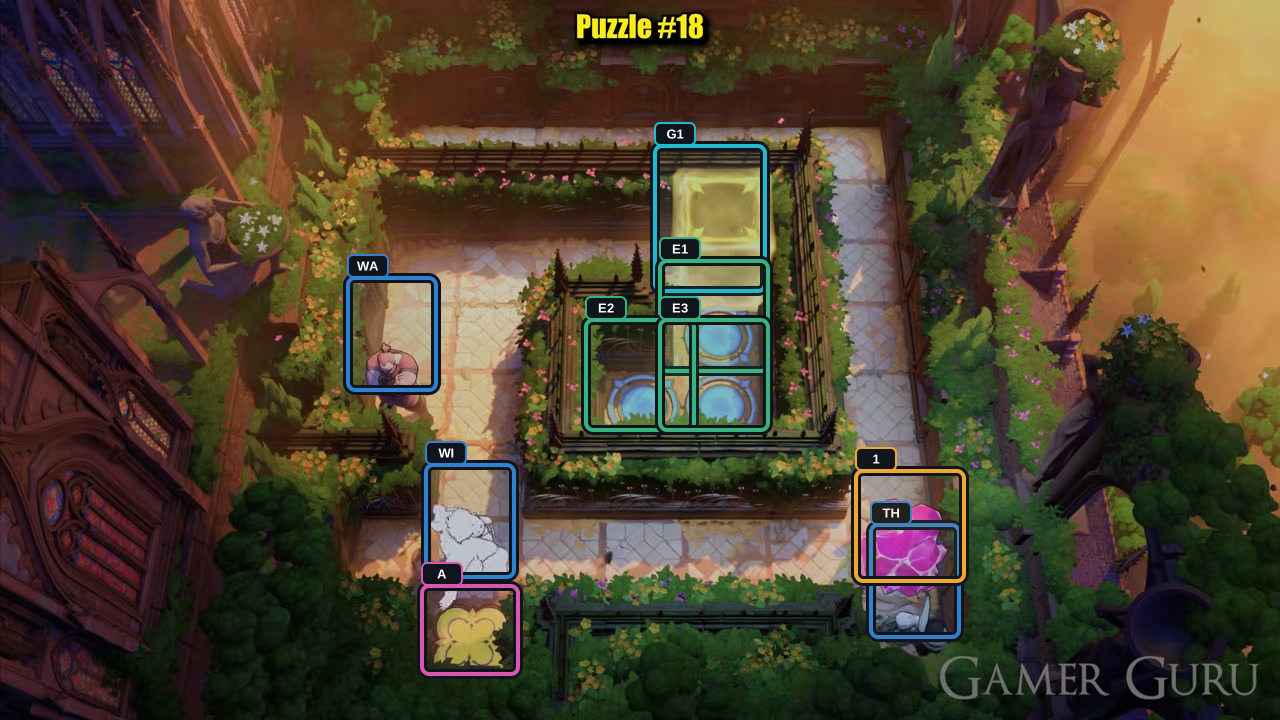
Thief: up six, then down six to pull Crystal 1.
Check: The Thief returns to the lower-right edge with Crystal 1 above.
Open full-size image in a new tab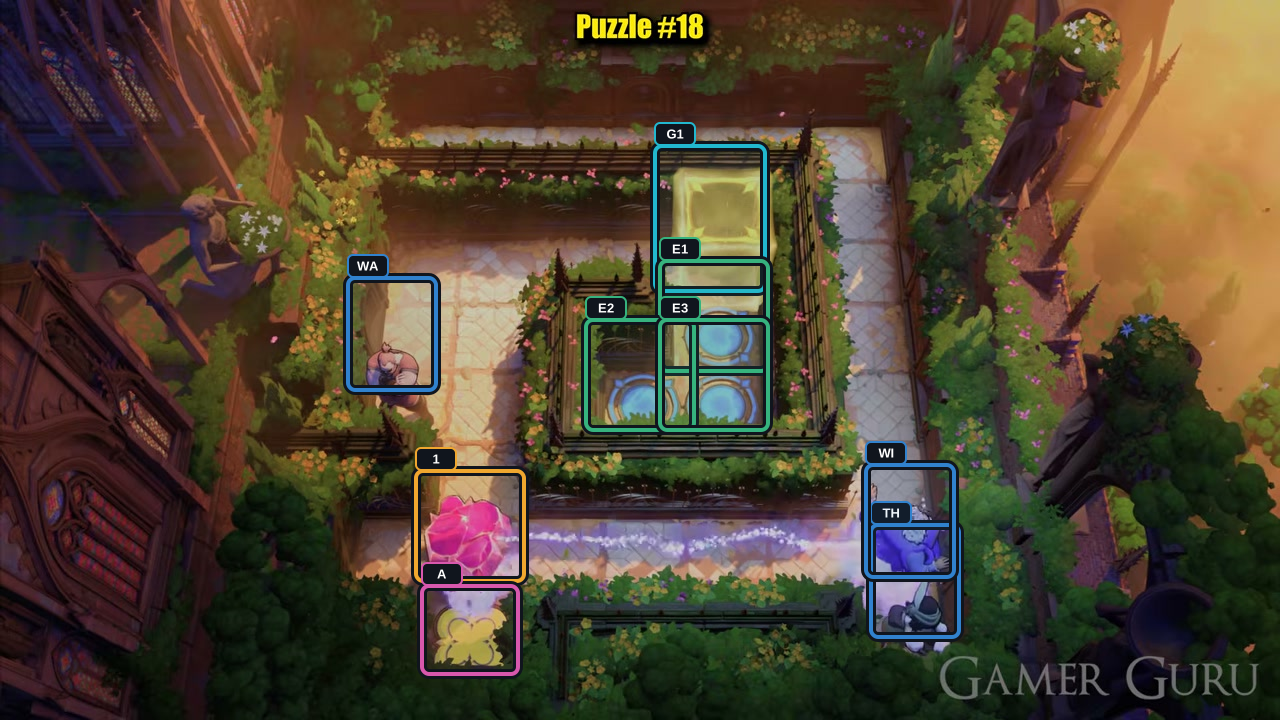
Wizard: right once to swap with Crystal 1.
Check: The Wizard reaches the right lane and Crystal 1 moves to the lower-left path.
Open full-size image in a new tab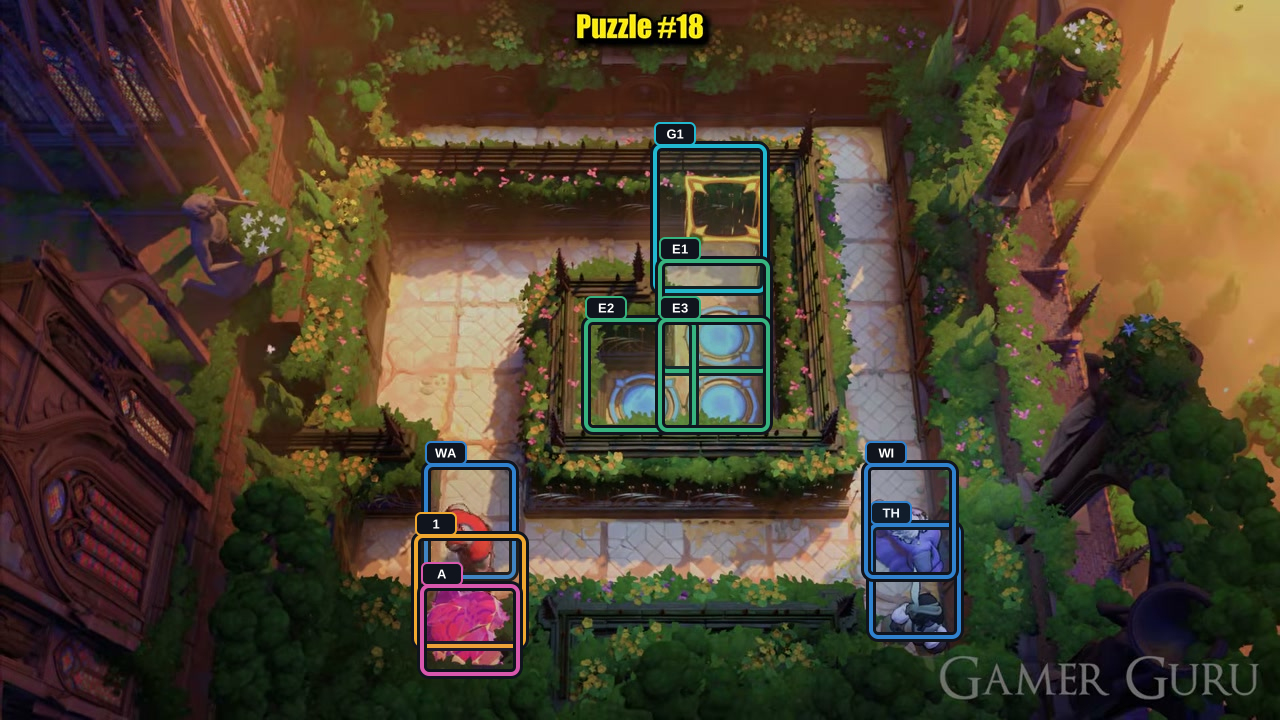
Warrior: right once, then down three to push Crystal 1 onto Switch A.
Check: Crystal 1 holds Switch A and the gate opens.
Open full-size image in a new tab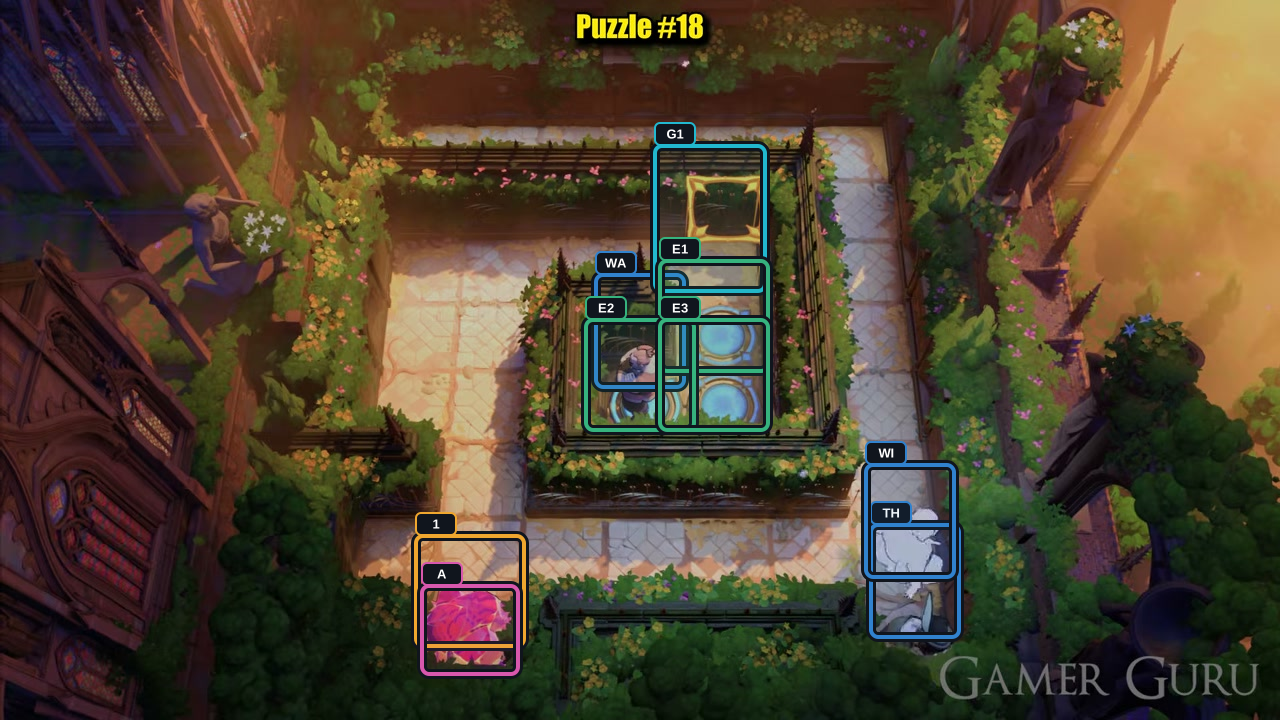
Warrior: up four, right three, down twice, then left once onto the exit.
Check: The Warrior reaches the left exit while Crystal 1 keeps the gate open.
Open full-size image in a new tab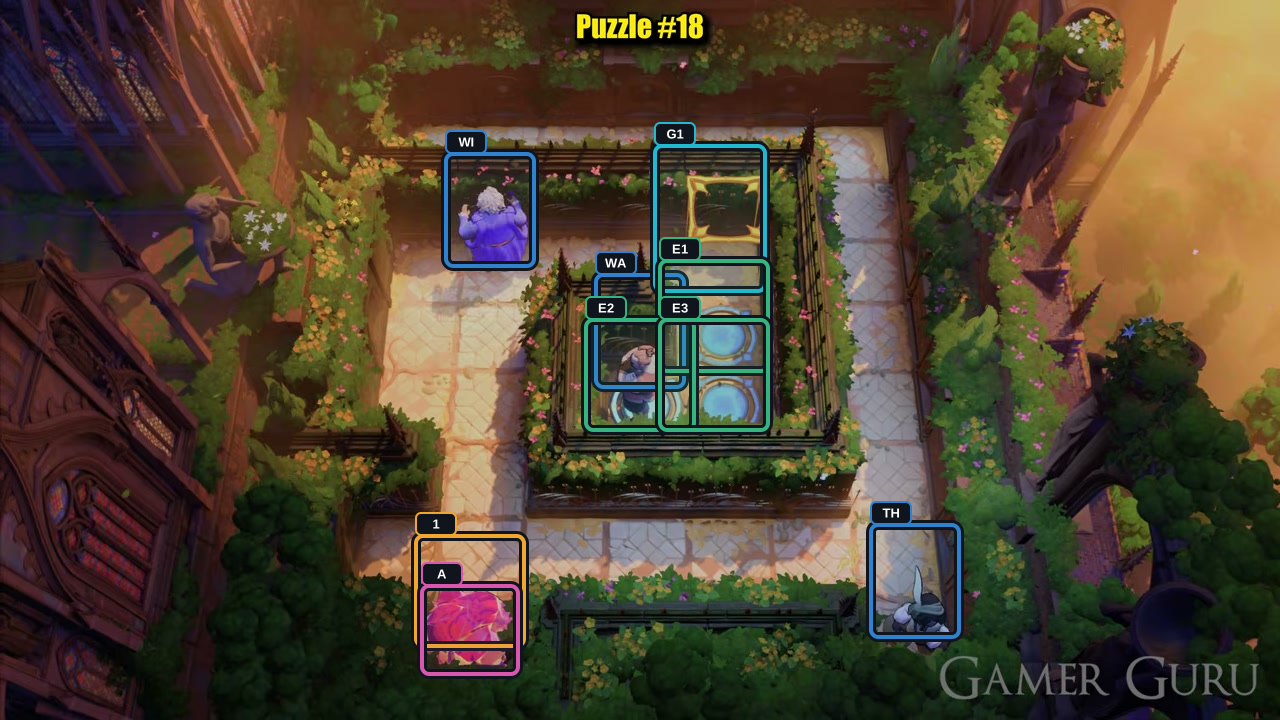
Wizard: left five, then up four.
Check: The Wizard reaches the upper-left approach; the Warrior stays on the left exit.
Open full-size image in a new tab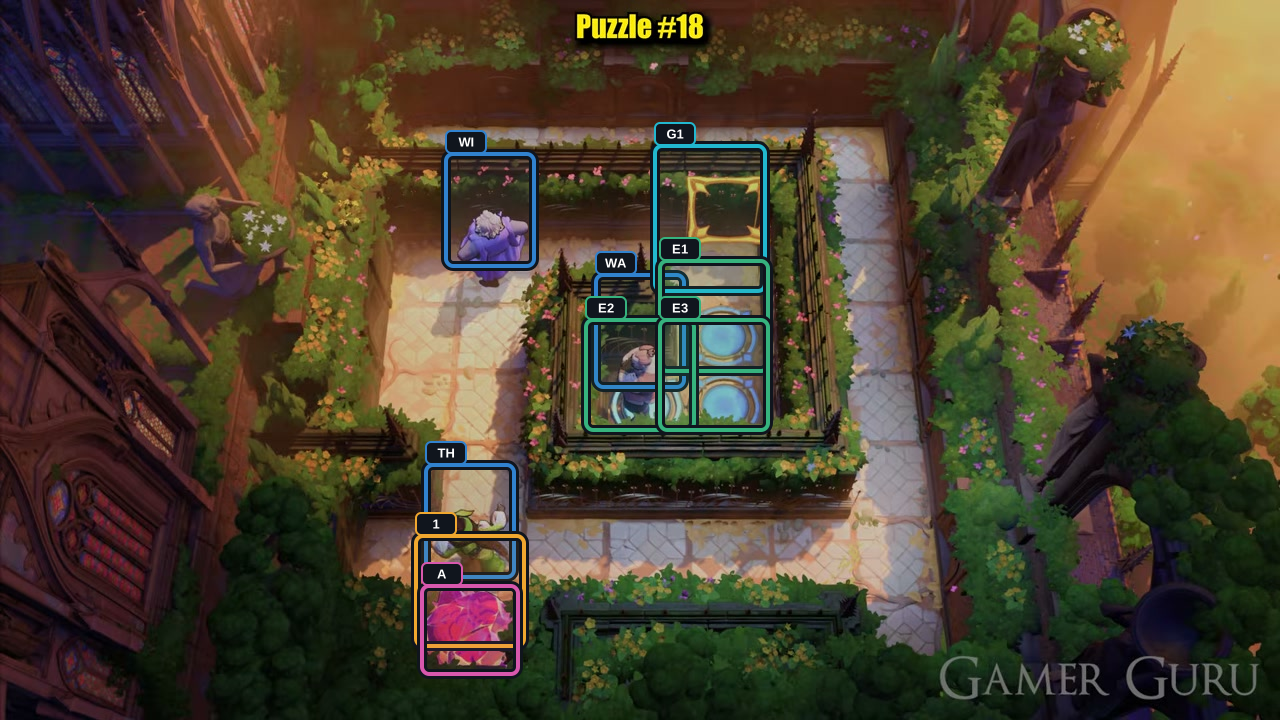
Thief: up once, then left five.
Check: The Thief reaches the lower-left approach.
Open full-size image in a new tab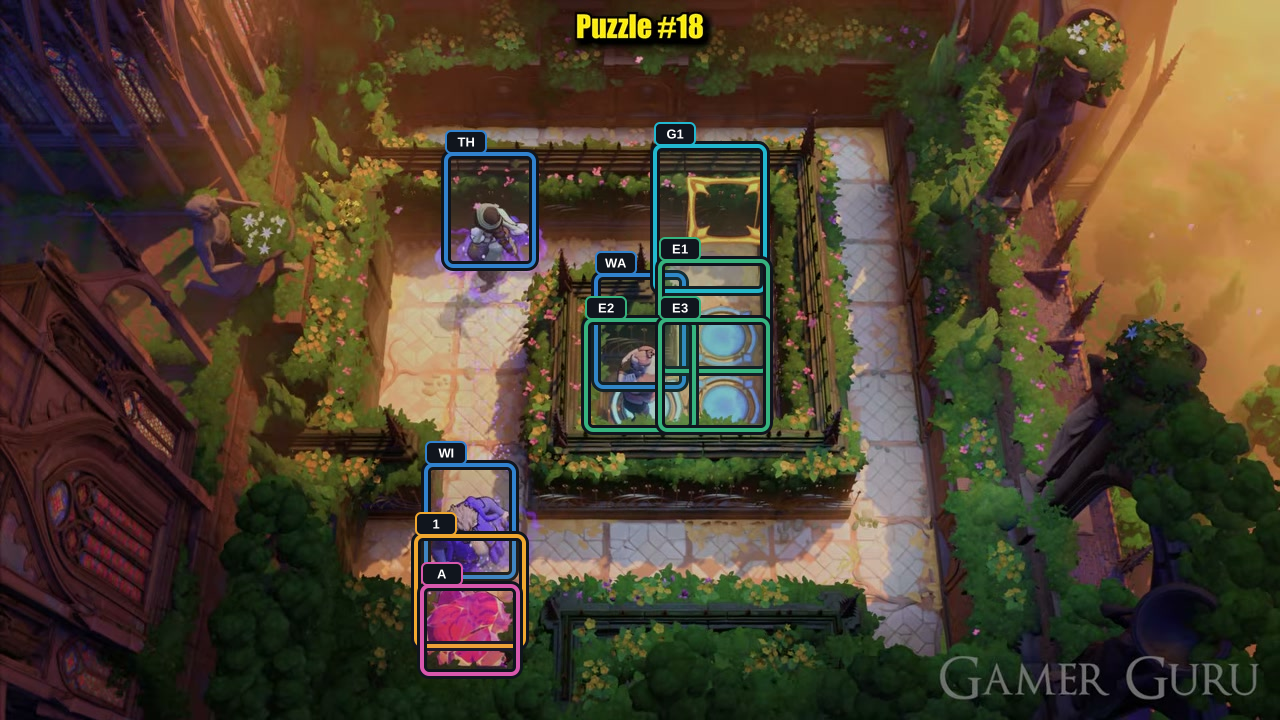
Wizard: down once to swap places with the Thief.
Check: The Wizard moves to the lower-left approach and the Thief reaches the upper-left lane.
Open full-size image in a new tab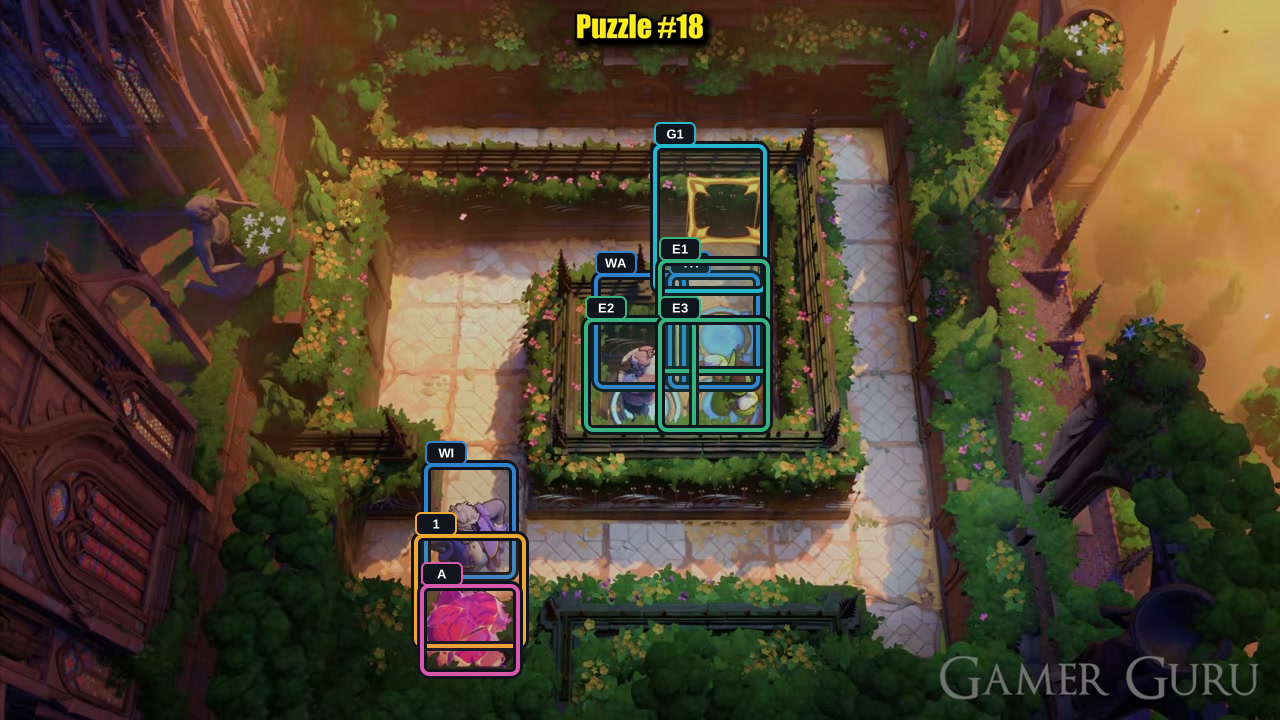
Thief: right three, then down twice onto Exit E3.
Check: The Thief reaches the right exit; the Wizard stays on the lower-left route.
Open full-size image in a new tab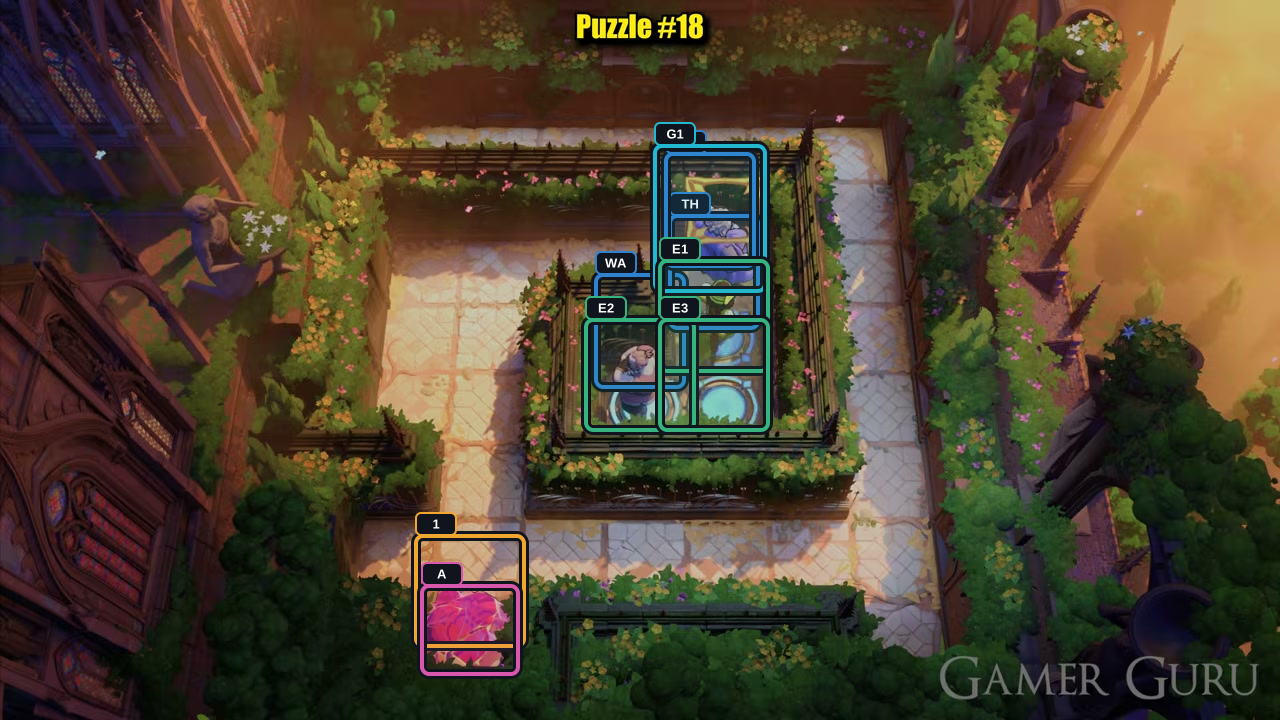
Thief: up once. Wizard: up four, then right three onto the open Gate G1.
Check: The Wizard stands at Gate G1 behind the Thief at E1; the Warrior holds E2.
Open full-size image in a new tab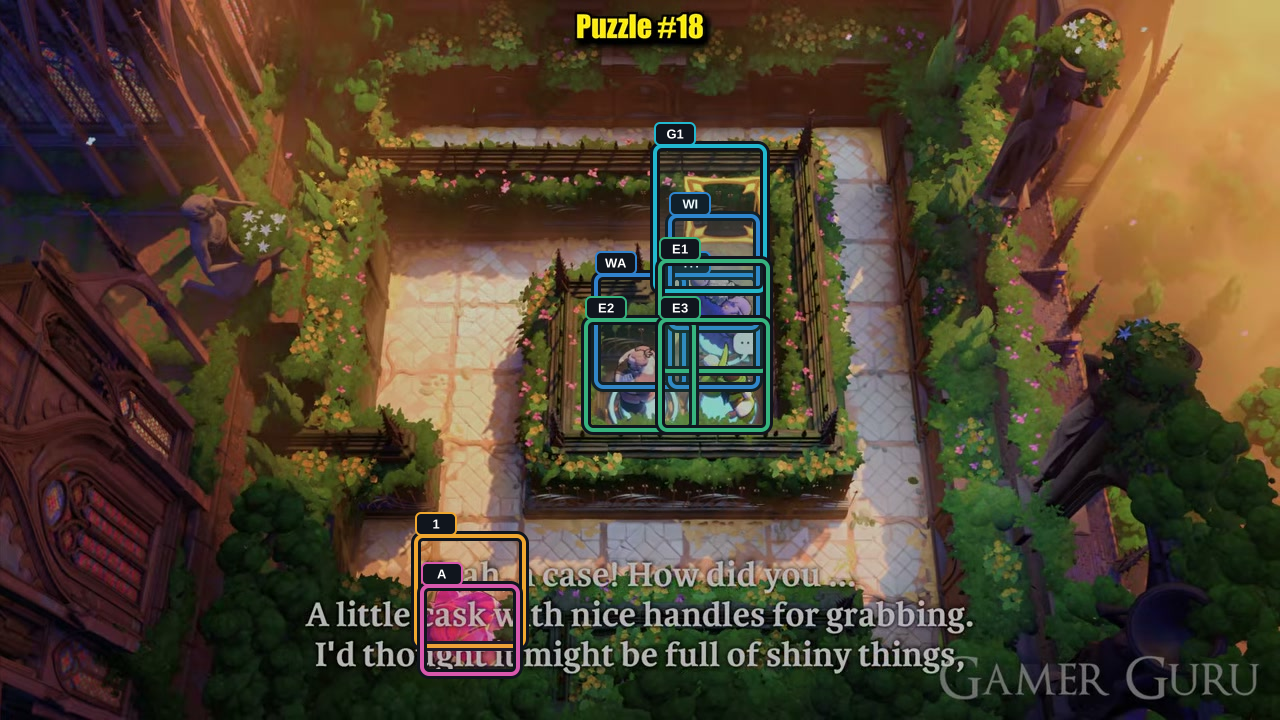
Thief: down once to reach E3 and pull the Wizard from Gate G1 onto E1.
Check: The Warrior holds E2, the Wizard reaches E1, and the Thief reaches E3 together.
Open full-size image in a new tabActor-by-actor direction route
Full direction sequence
- WA Warrior
↓ - TH Thief
↓ ↓ ↓ ↓ → → → → → ↓ - WI Wizard
← ↓ ↓ ↓ ↓ → → → → → ↑ ↑ ↑ ↑ ↑ ↑ ← - TH Thief
↑ ↑ ↑ ↑ ↑ ↑ ↓ ↓ ↓ ↓ ↓ ↓ - WI Wizard
→ → → → → → ↓ ← ← ← ← ← - TH Thief
↑ ↑ ↑ ↑ ↑ ↑ ↓ ↓ ↓ ↓ ↓ ↓ - WI Wizard
→ - WA Warrior
→ ↓ ↓ ↓ ↑ ↑ ↑ ↑ → → → ↓ ↓ ← - WI Wizard
← ← ← ← ← ↑ ↑ ↑ ↑ - TH Thief
↑ ← ← ← ← ← - WI Wizard
↓ - TH Thief
→ → → ↓ ↓ ↑ - WI Wizard
↑ ↑ ↑ ↑ → → → - TH Thief
↓
Warrior, Thief and Wizard: three switches and two gates
Section titled “Warrior, Thief and Wizard: three switches and two gates”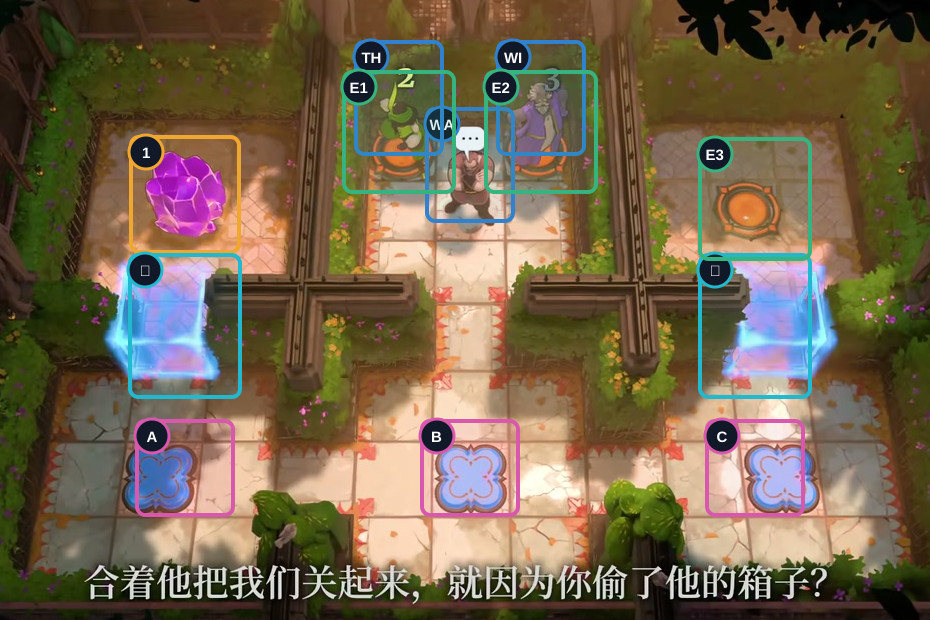
- Crystal 1
- Switches A–C
- Gates G1–G2
- Exits E1–E3
- WA Warrior
- TH Thief
- WI Wizard
Hint
The Wizard goes to A first. The Thief’s run to C pulls the Warrior away, so return the Warrior to B. Then the Wizard swaps Crystal 1 onto A, and the Warrior pushes it from A to B before returning to A. Keep the three switches occupied until the Warrior reaches E3; the final exits are Thief E1, Wizard E2 and Warrior E3.
Step-by-step solution
Images show selected video checkpoints; the first frame is the starting position.
Start at the first frame. Follow the Wizard, Thief, and Warrior handoffs.
Check: All three heroes and Crystal 1 are at their starting tiles; the gates are closed.
Open full-size image in a new tab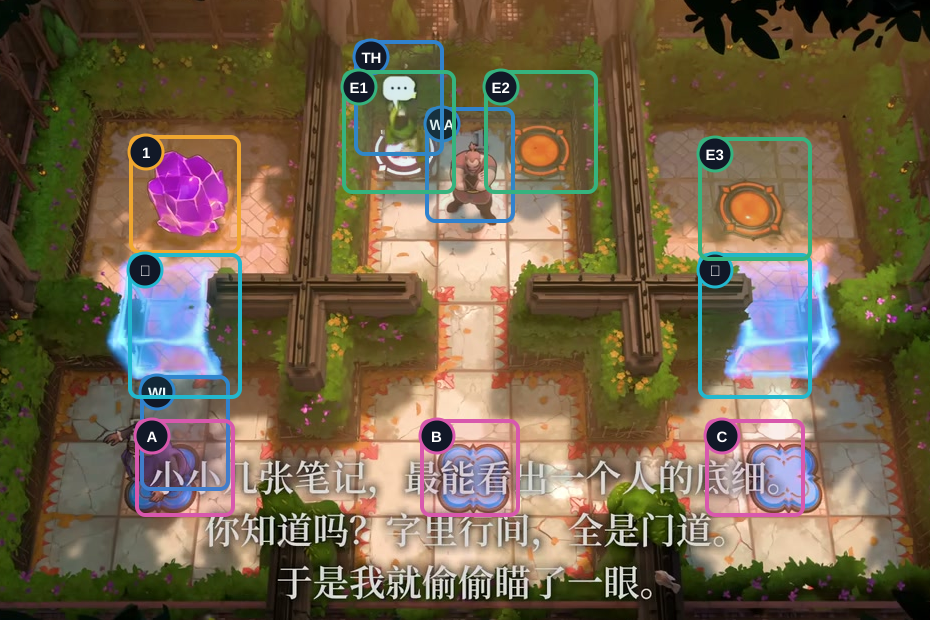
Wizard: move down twice, left once, down three times, then left four times onto Switch A.
Check: The Wizard holds Switch A; the Warrior and Thief remain at the start.
Open full-size image in a new tab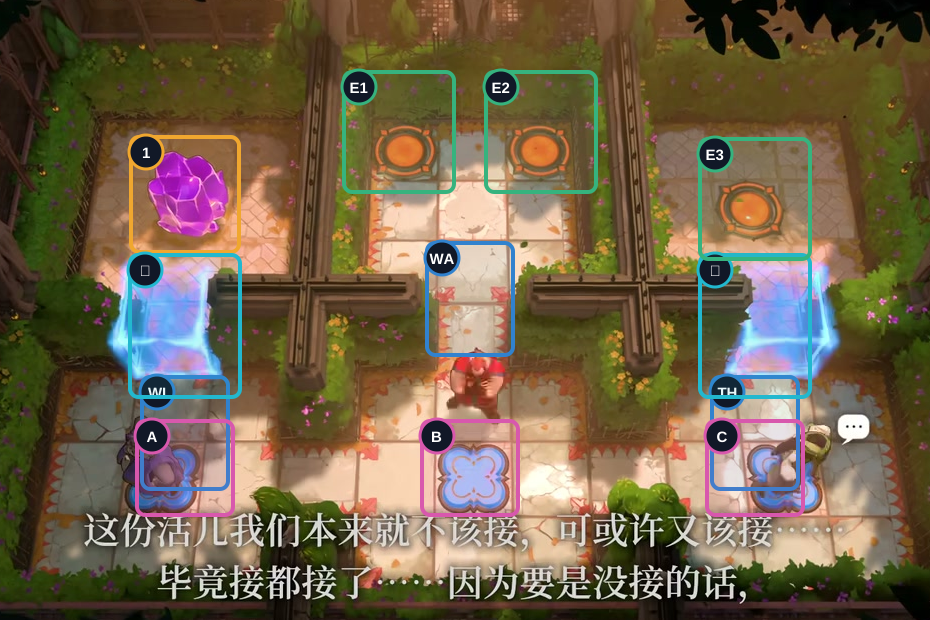
Thief: go down twice, right, down twice, right, down, then right three times.
Check: The Thief holds Switch C and pulls the Warrior down to the lower passage.
Open full-size image in a new tab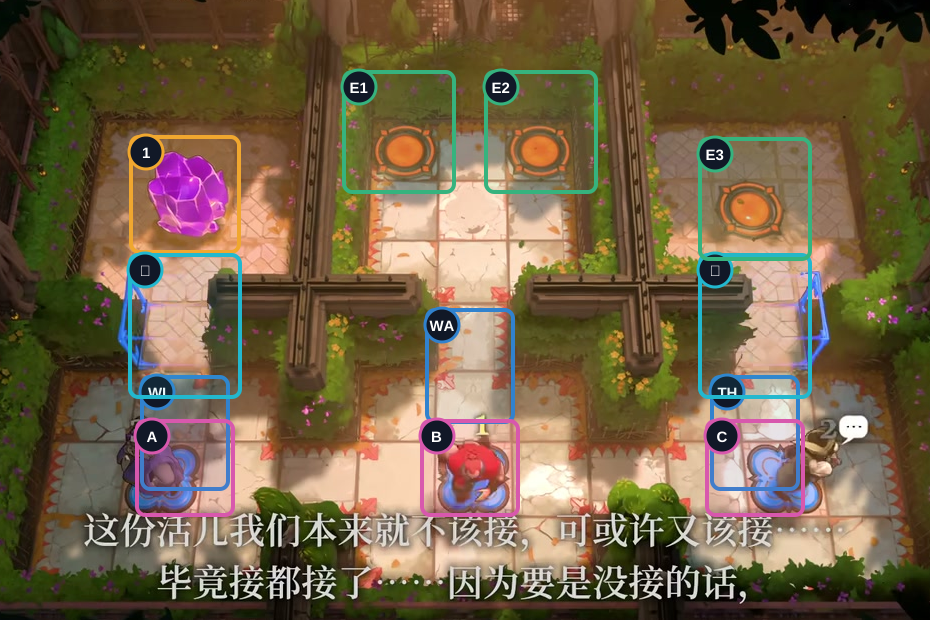
Warrior: move down one tile.
Check: The Warrior is one tile above Switch B.
Open full-size image in a new tab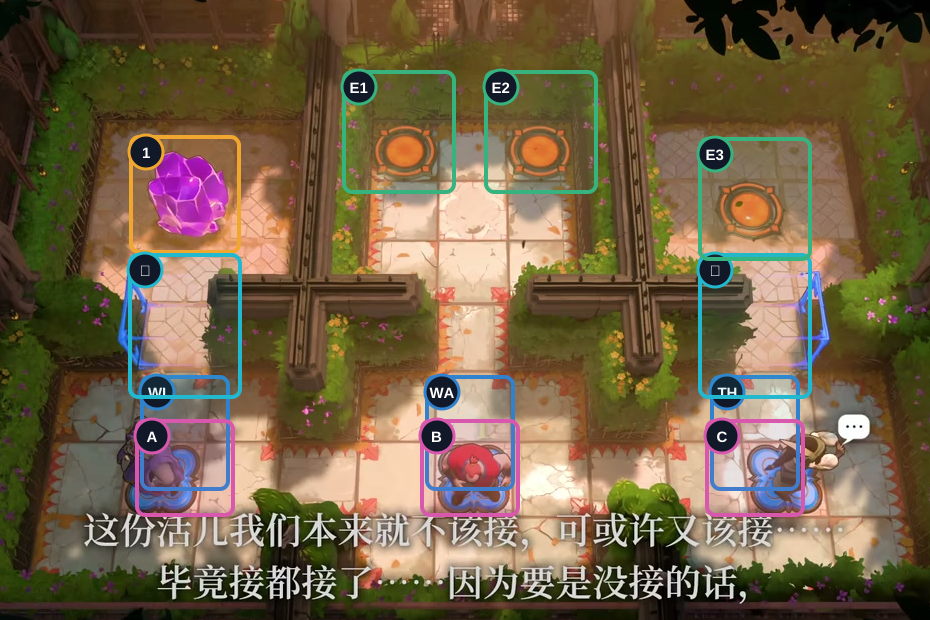
Warrior: move down one more tile onto Switch B.
Check: All three switches are occupied, so both gates open.
Open full-size image in a new tab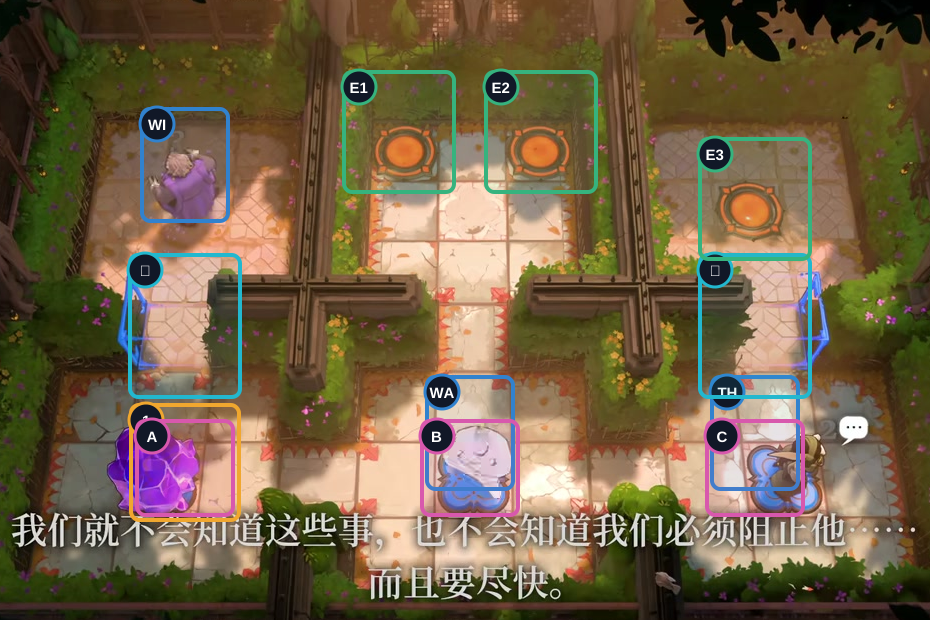
Wizard: move up to swap places with Crystal 1 on the upper-left platform.
Check: Crystal 1 moves onto Switch A; the Wizard reaches the upper-left platform.
Open full-size image in a new tab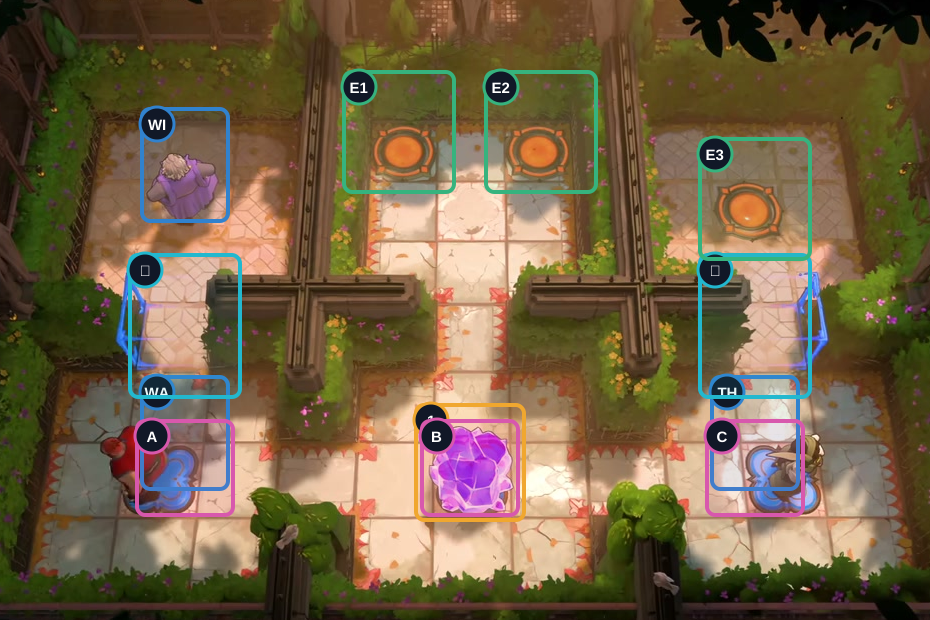
Warrior: move left three, up one, left two, down one, right four to push Crystal 1 onto Switch B, then left three onto Switch A.
Check: The Warrior holds A, Crystal 1 holds B, and the Thief holds C; both gates stay open.
Open full-size image in a new tab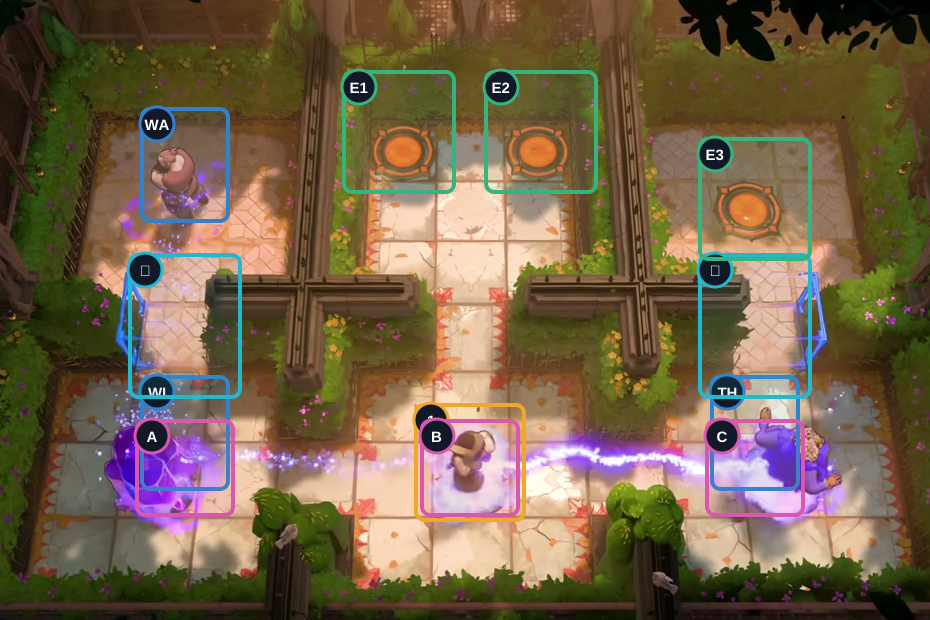
Wizard: move down to swap places with the Warrior.
Check: The Warrior reaches the upper-left platform while the Wizard returns to Switch A.
Open full-size image in a new tab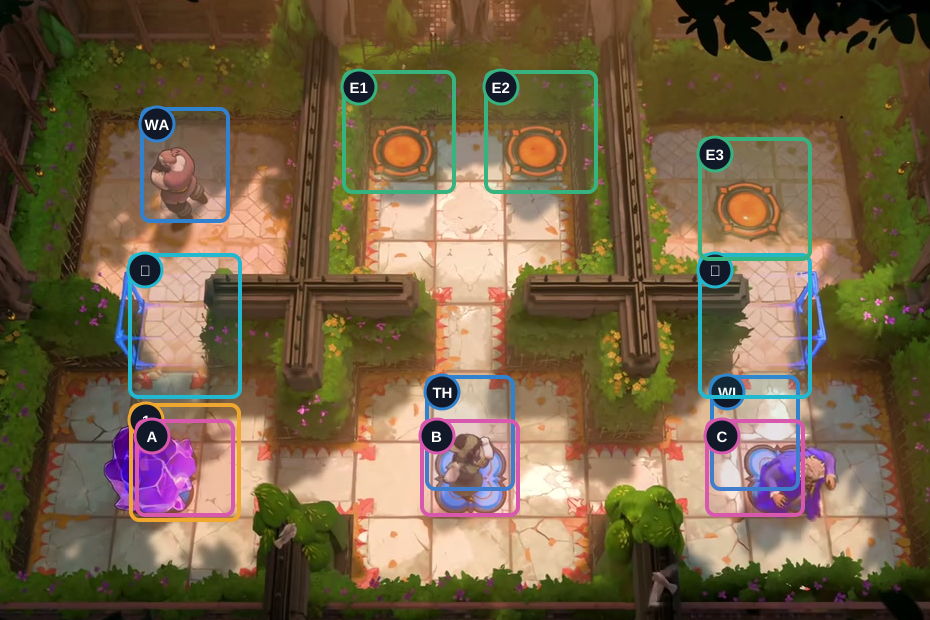
Wizard: move right twice.
Check: The Wizard reaches the right-hand path; Crystal 1 remains on A.
Open full-size image in a new tab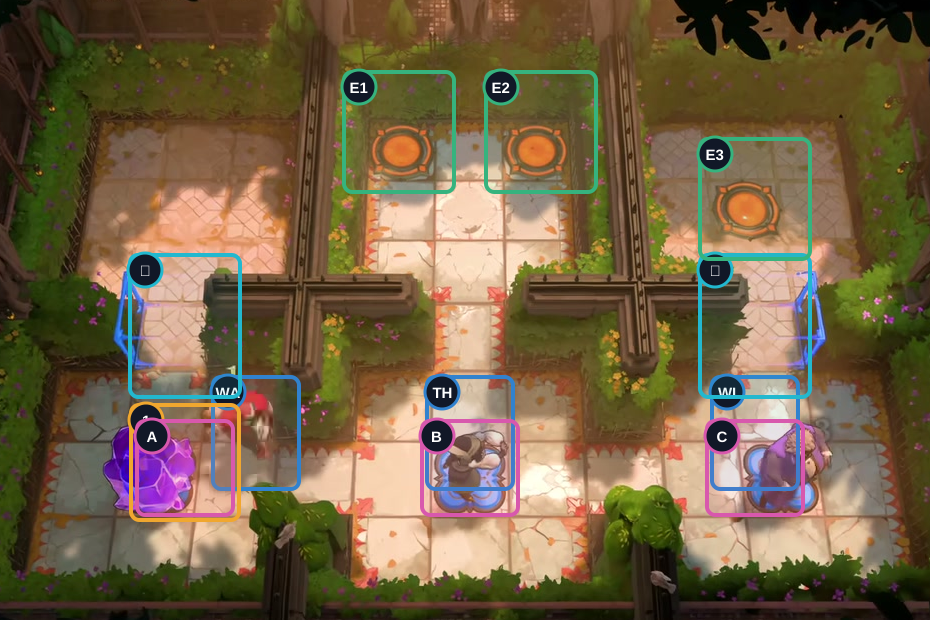
Warrior: move down three, right, then down.
Check: The Warrior reaches the lower passage.
Open full-size image in a new tab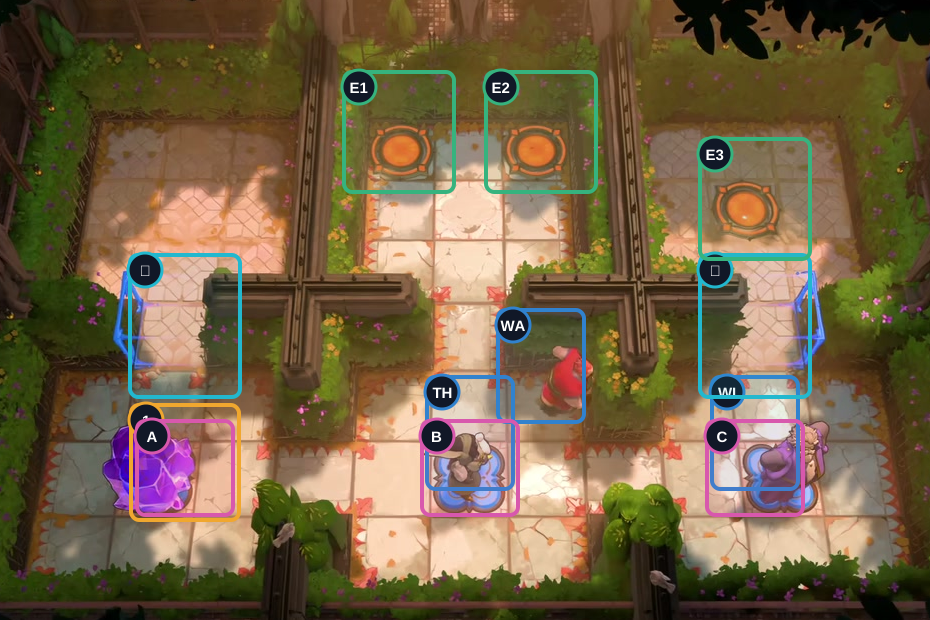
Warrior: move right twice, up, then right twice.
Check: The Warrior continues along the passage.
Open full-size image in a new tab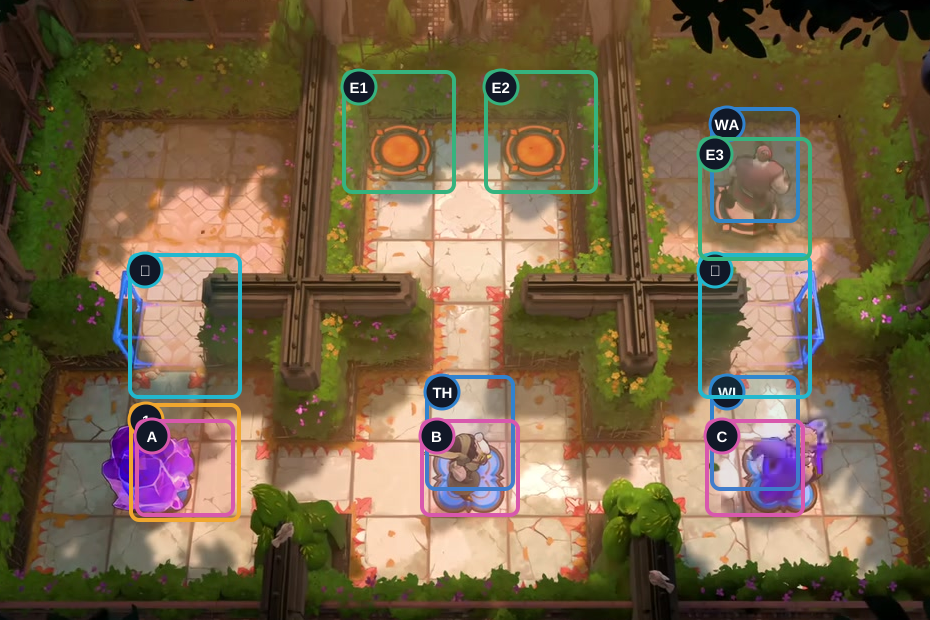
Warrior: move down, right twice, up, right, then up three onto Exit E3.
Check: The Warrior reaches E3; the Thief remains on Switch B and the Wizard on Switch C.
Open full-size image in a new tab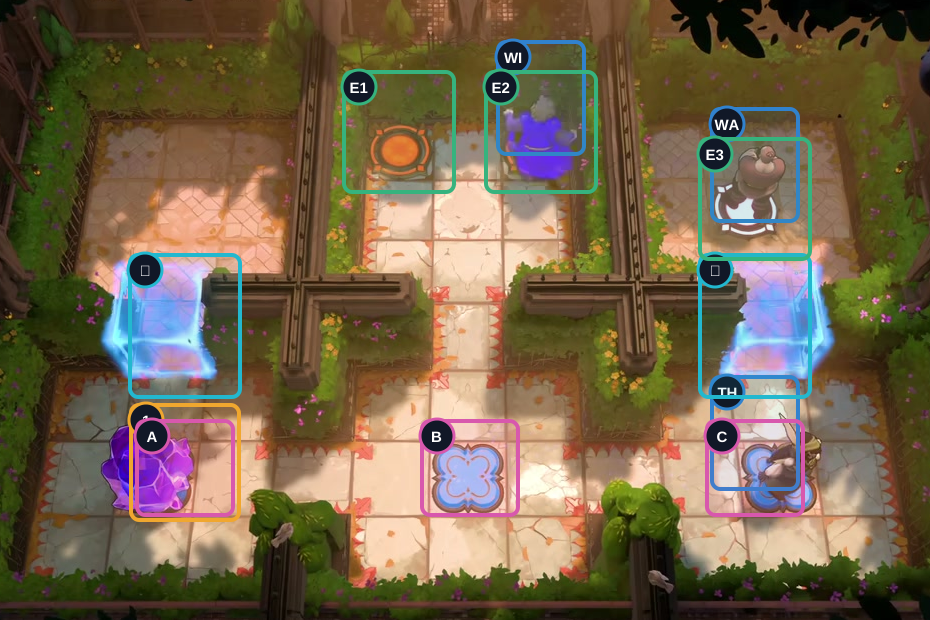
Wizard: move left, up five, then right onto Exit E2.
Check: The Wizard reaches E2 and swaps the Thief onto Switch C; the Warrior stays at E3.
Open full-size image in a new tab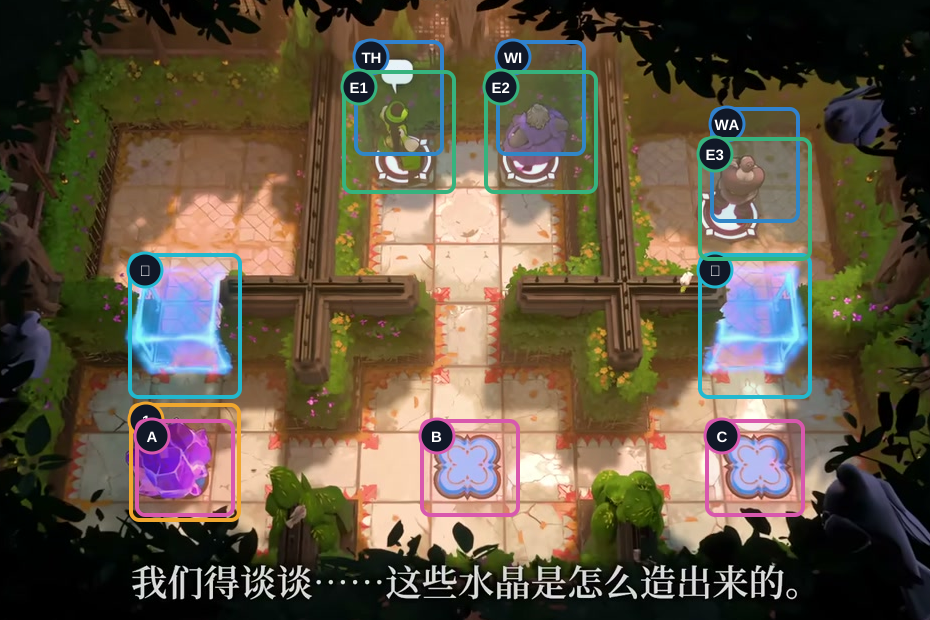
Thief: move left three, up, left, up three, left, then up to Exit E1.
Check: All three heroes occupy the three exits together.
Open full-size image in a new tabActor-by-actor direction route
Full direction sequence
- WI Wizard
↓ ↓ ← ↓ ↓ ↓ ← ← ← ← - TH Thief
↓ ↓ → ↓ ↓ → ↓ → → → - WA Warrior
↓ ↓ - WI Wizard
↑ - WA Warrior
← ← ← ↑ ← ← ↓ → → → → ← ← ← - WI Wizard
↓ → → - WA Warrior
↓ ↓ ↓ → ↓ → → ↑ → → ↓ → → ↑ → ↑ ↑ ↑ - WI Wizard
← ↑ ↑ ↑ ↑ ↑ → - TH Thief
← ← ← ↑ ← ↑ ↑ ↑ ← ↑
Thief, Wizard and Warrior: free the caged heroes
Section titled “Thief, Wizard and Warrior: free the caged heroes”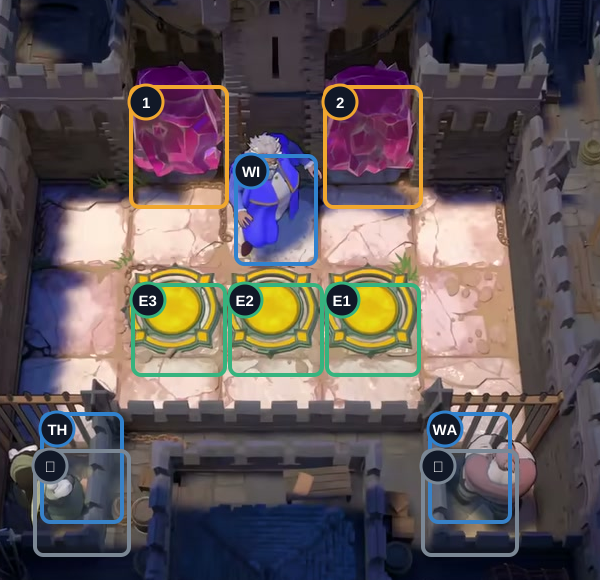
- Crystals 1–2
- Exits E1–E3
- TH Thief
- WI Wizard
- WA Warrior
Hint
Only the Wizard’s swaps release the caged heroes in this route. Free the Thief first, then place Crystal 1 in the left cage and free the Warrior from the right cage. The final swap puts Crystal 2 in the right cage. The final exits are Thief E1 on the right, Wizard E2 in the center and Warrior E3 on the left; the gold pads are exits, not switches.
Step-by-step solution
Images show selected video checkpoints; the first frame is the starting position.
Start here. The Wizard can swap with the trapped Thief.
Check: The Thief and Warrior are in cages; both crystals and the Wizard are on their starting tiles.
Open full-size image in a new tab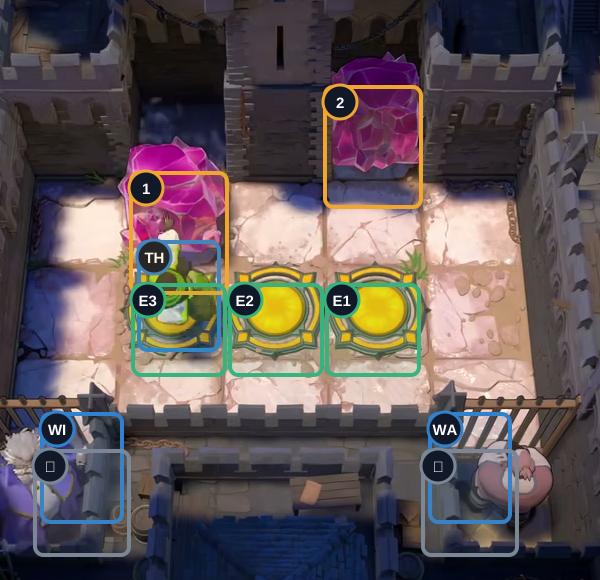
Wizard: move left twice, then down to free the Thief. Thief: move right, then down onto Exit E3.
Check: The Thief reaches E3; Crystal 1 moves to the tile above the exit row.
Open full-size image in a new tab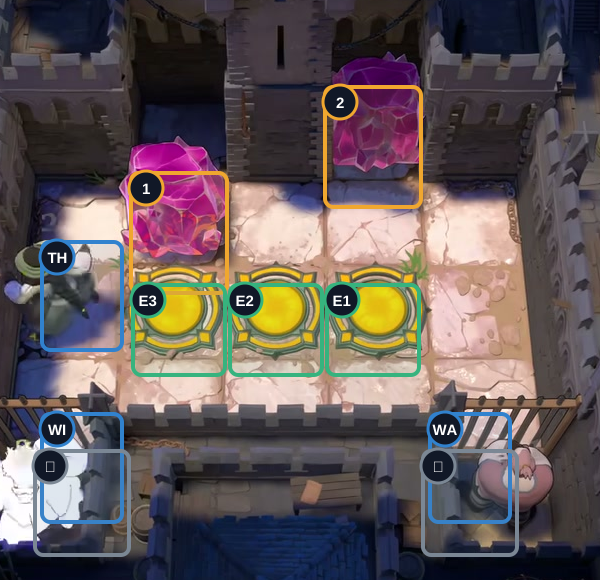
Thief: move left one tile.
Check: The Thief moves to the left passage.
Open full-size image in a new tab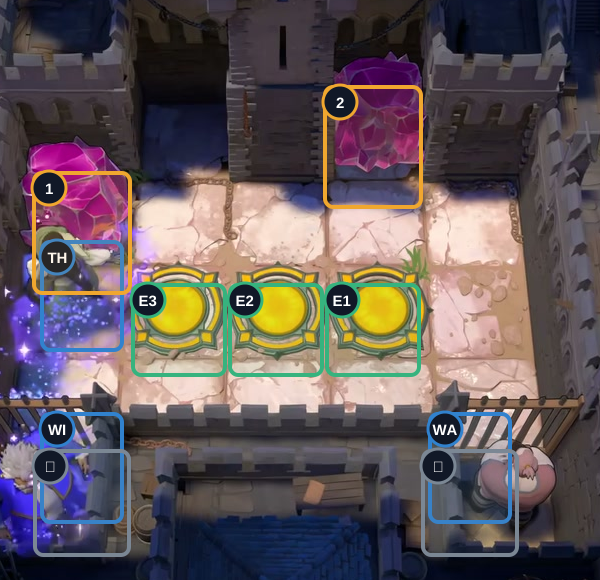
Thief: move up. Wizard: move up, right, down, left, then down to move Crystal 1 onto the left bridge.
Check: Crystal 1 reaches the bridge while the Wizard remains in the left cage.
Open full-size image in a new tab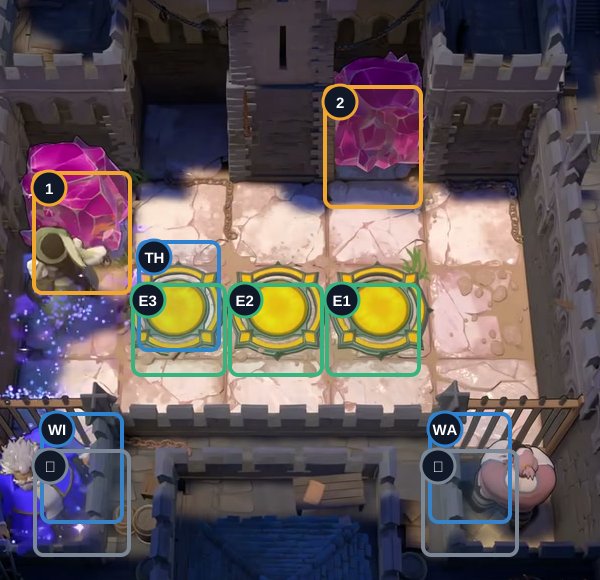
Thief: move right one tile onto Exit E3.
Check: The Thief stands on the left exit E3.
Open full-size image in a new tab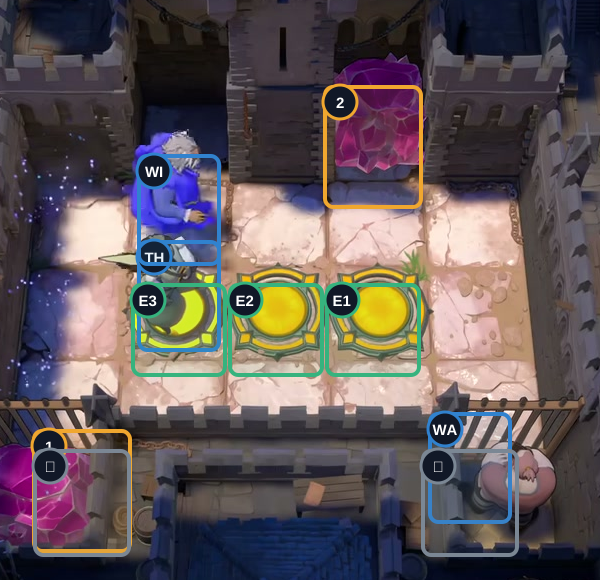
Wizard: move up to swap Crystal 1 into the left cage, then move right once.
Check: Crystal 1 occupies the left cage and the Wizard stands above Exit E3.
Open full-size image in a new tab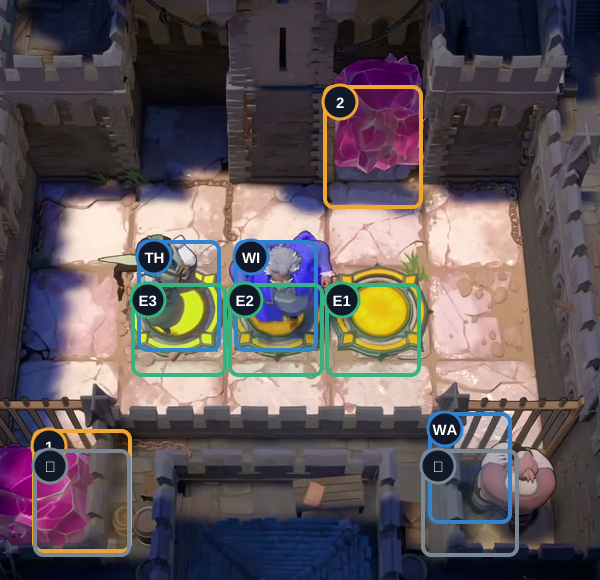
Wizard: move right once, then down.
Check: The Wizard reaches the center exit tile.
Open full-size image in a new tab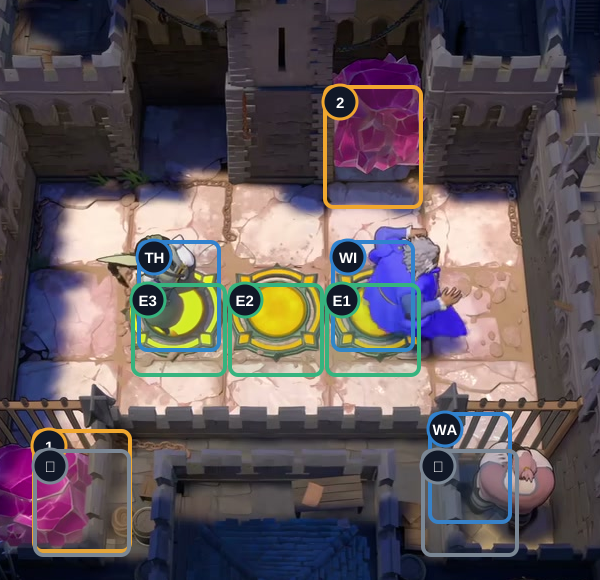
Wizard: move right one tile.
Check: The Wizard advances along the exit row.
Open full-size image in a new tab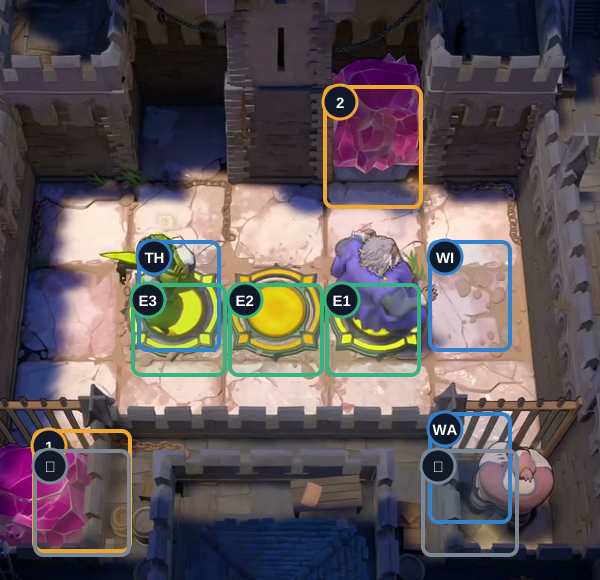
Wizard: move right one tile.
Check: The Wizard reaches the right-hand route.
Open full-size image in a new tab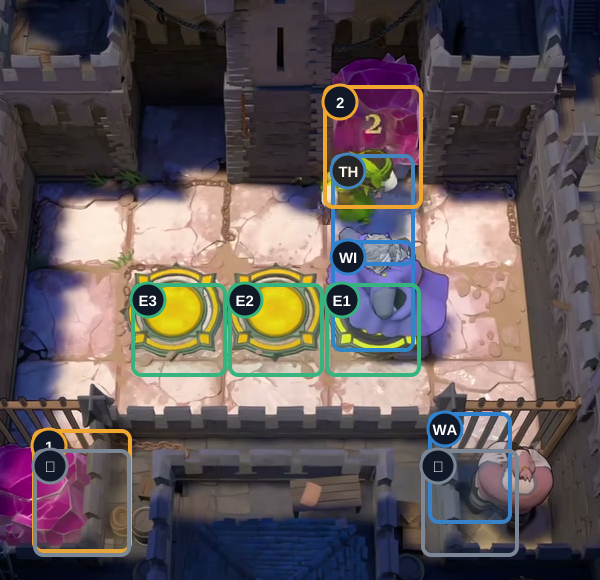
Thief: move up, then right twice. Wizard: move left one tile.
Check: The Thief is above the exits and the Wizard returns to the middle lane.
Open full-size image in a new tab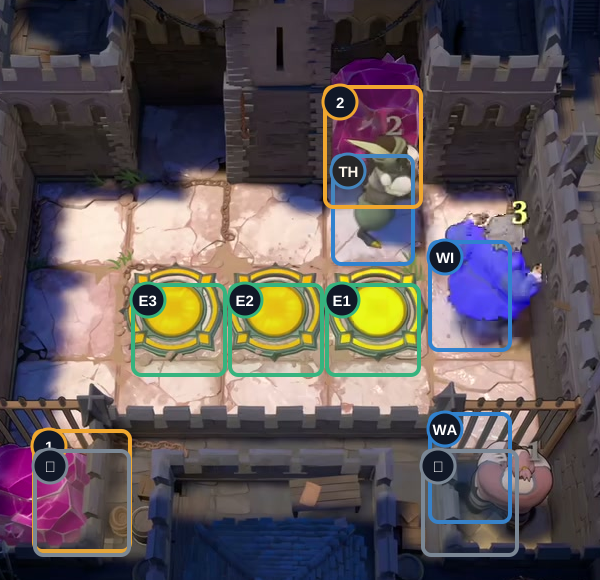
Wizard: move right one tile.
Check: The Wizard reaches the right-hand lane.
Open full-size image in a new tab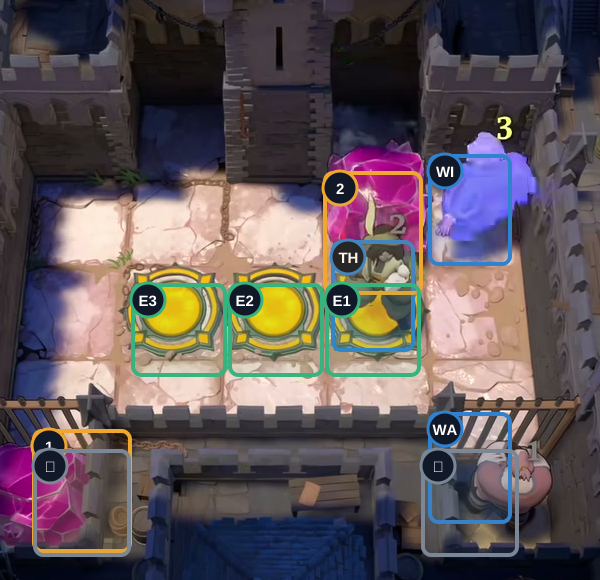
Thief: move down. Wizard: move up one tile.
Check: Crystal 2 sits above the Thief; the Wizard is in the right-hand lane.
Open full-size image in a new tab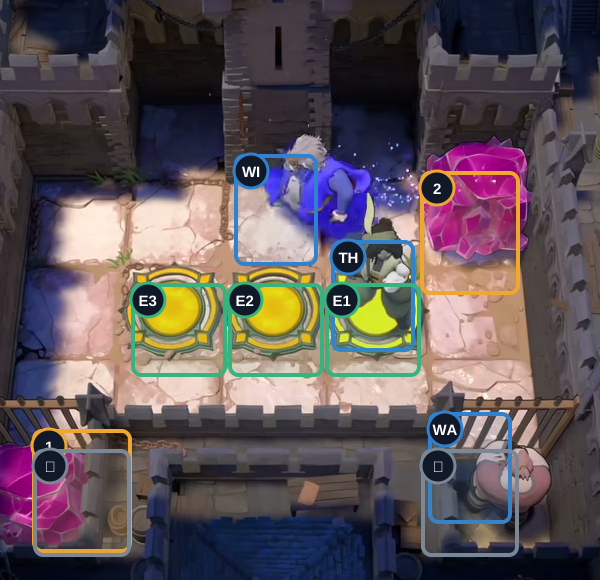
Wizard: move left twice.
Check: Crystal 2 is on the right bridge and the Wizard is in the central lane.
Open full-size image in a new tab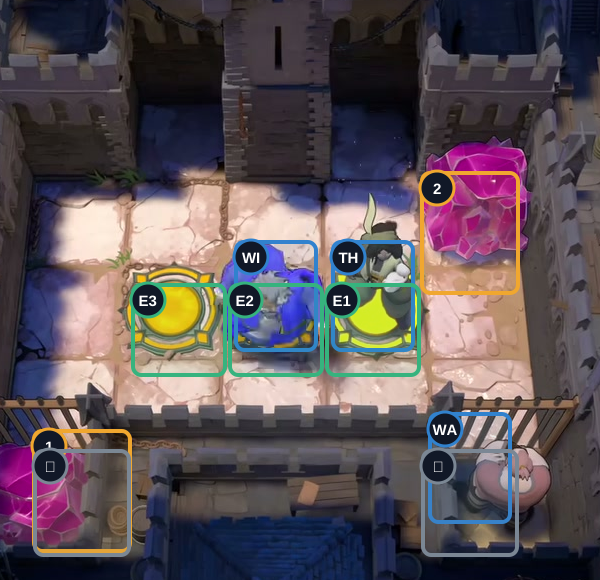
Wizard: move down one tile.
Check: The Wizard reaches the center exit row.
Open full-size image in a new tab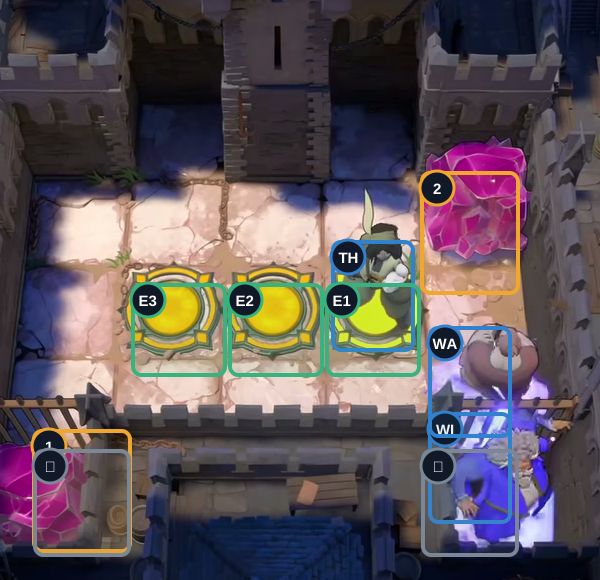
Wizard: move down, right twice, then down into the right cage.
Check: The Wizard frees the Warrior and becomes trapped in the right cage.
Open full-size image in a new tab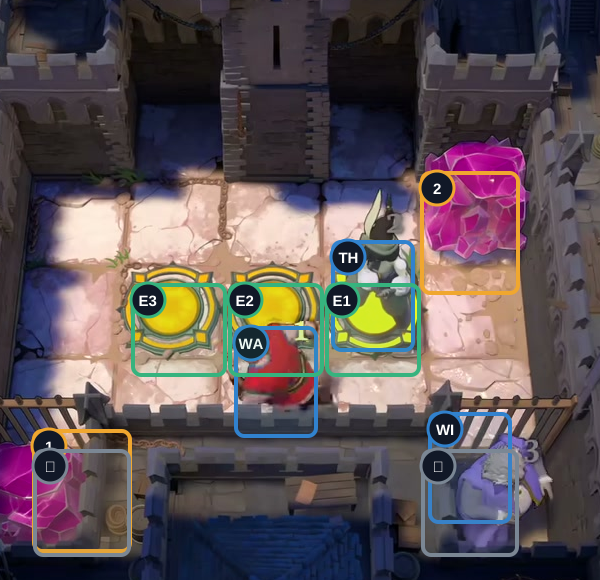
Warrior: move left twice.
Check: The Warrior stands below the center exit.
Open full-size image in a new tab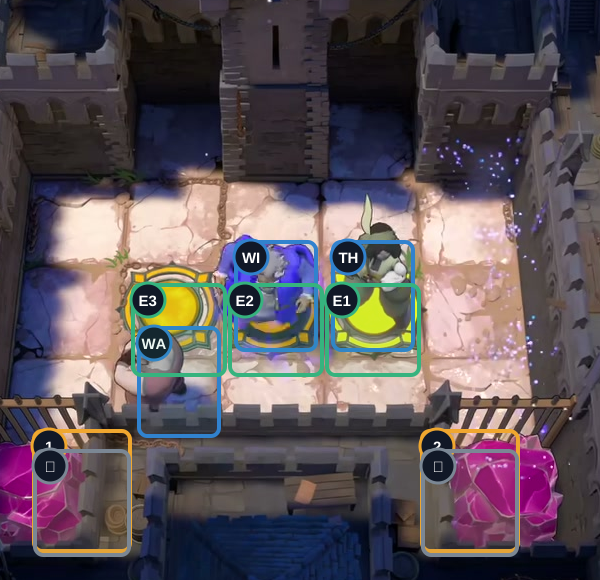
Warrior: move left one tile. Wizard: move up, left twice, then down.
Check: The Warrior stands below Exit E3 and the Wizard reaches the middle exit.
Open full-size image in a new tab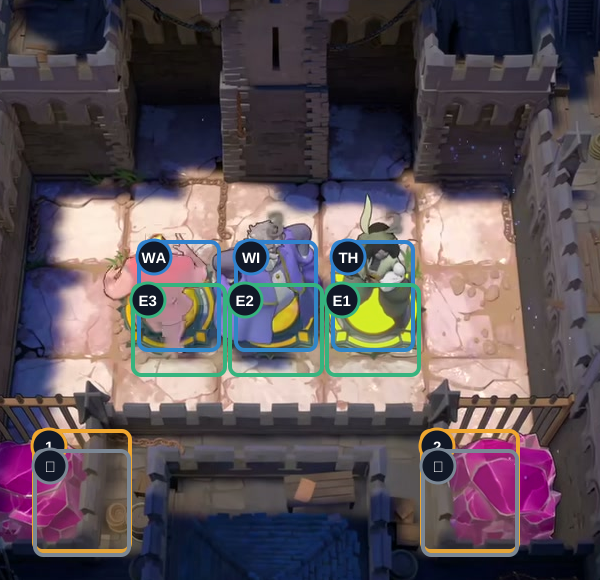
Warrior: move up one tile onto Exit E3.
Check: All three heroes occupy the three exits together.
Open full-size image in a new tabActor-by-actor direction route
Full direction sequence
- WI Wizard
← ← ↓ - TH Thief
→ ↓ ← ↑ - WI Wizard
↑ → ↓ ← ↓ - TH Thief
→ - WI Wizard
↑ → → ↓ → → - TH Thief
↑ → → - WI Wizard
← → - TH Thief
↓ - WI Wizard
↑ ← ← ↓ ↓ → → ↓ - WA Warrior
← ← ← - WI Wizard
↑ ← ← ↓ - WA Warrior
↑
Thief, Wizard and Warrior: six switches and three exits
Section titled “Thief, Wizard and Warrior: six switches and three exits”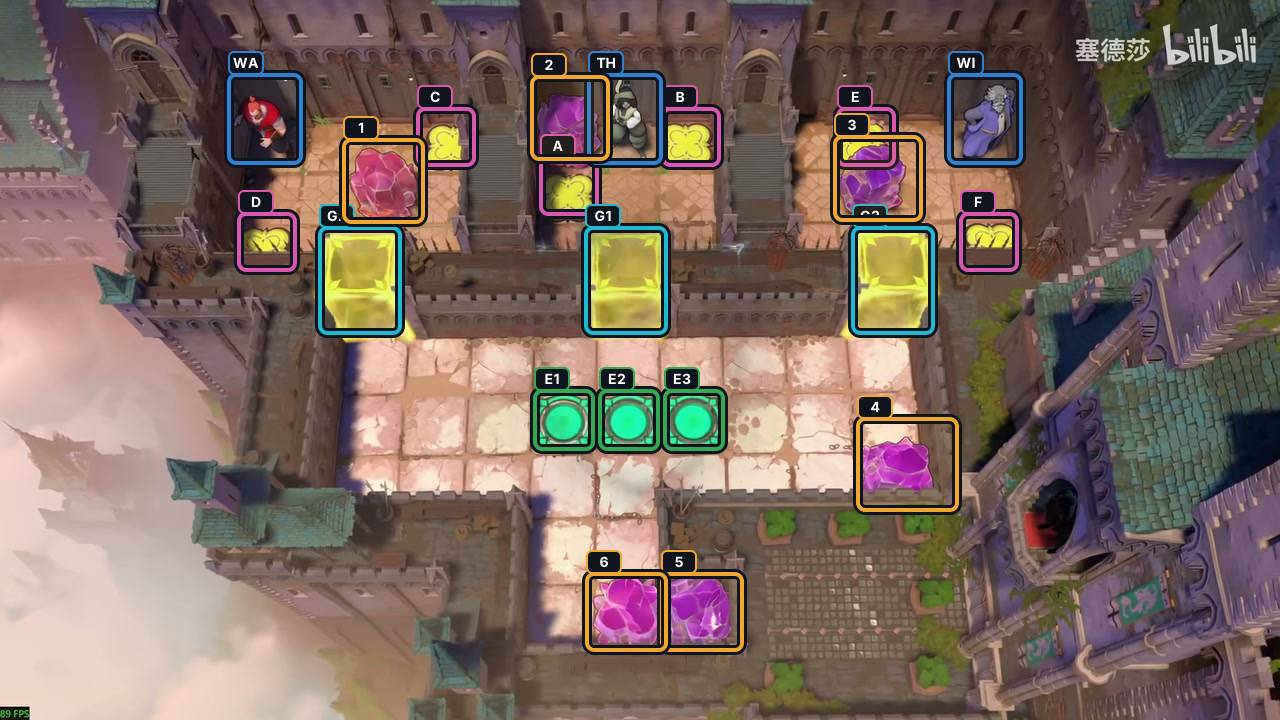
- Crystals 1–6
- Switches A–F
- Gates G1–G3
- Exits E1–E3
- WI Wizard
- TH Thief
- WA Warrior
Hint
The ending leaves Crystal 1 on C, Crystal 2 on A, Crystal 3 on F, Crystal 4 on E, Crystal 5 on B, and Crystal 6 on D. During the middle swaps, A or B may briefly empty and the gates may close; continue the route as the switches refill. The Warrior pushes Crystal 5 through the left gate, then the Wizard swaps it onto D. Once A–F are occupied and the gates reopen, send the Wizard to E1, the Warrior to E2 and the Thief to E3.
Step-by-step solution
Images show selected video checkpoints; the first frame is the starting position.
Inspect the starting layout: Warrior left, Thief center, Wizard right.
Check: All six crystals are in their starts; switches are empty and gates are closed.
Open full-size image in a new tab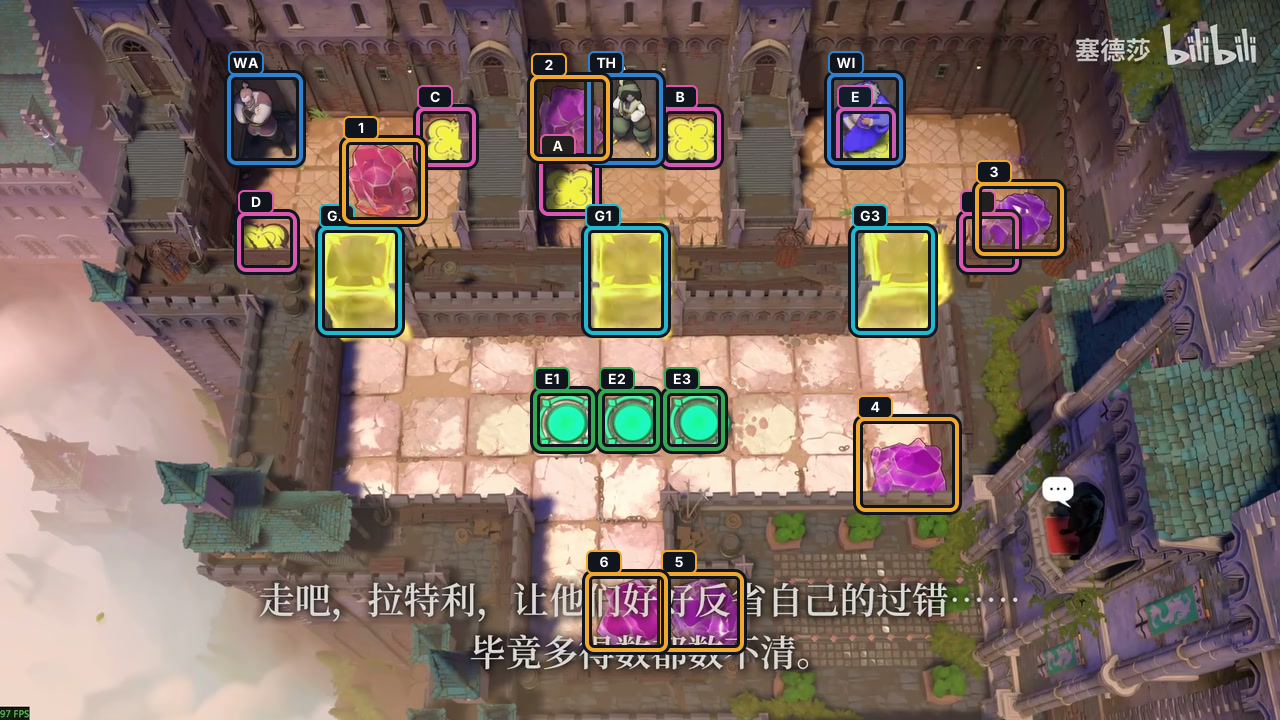
Wizard: left twice, down twice, right twice, up twice, then left. Down, right twice, down, up, then left twice.
Check: Crystal 3 is on F; the Wizard stands on E.
Open full-size image in a new tab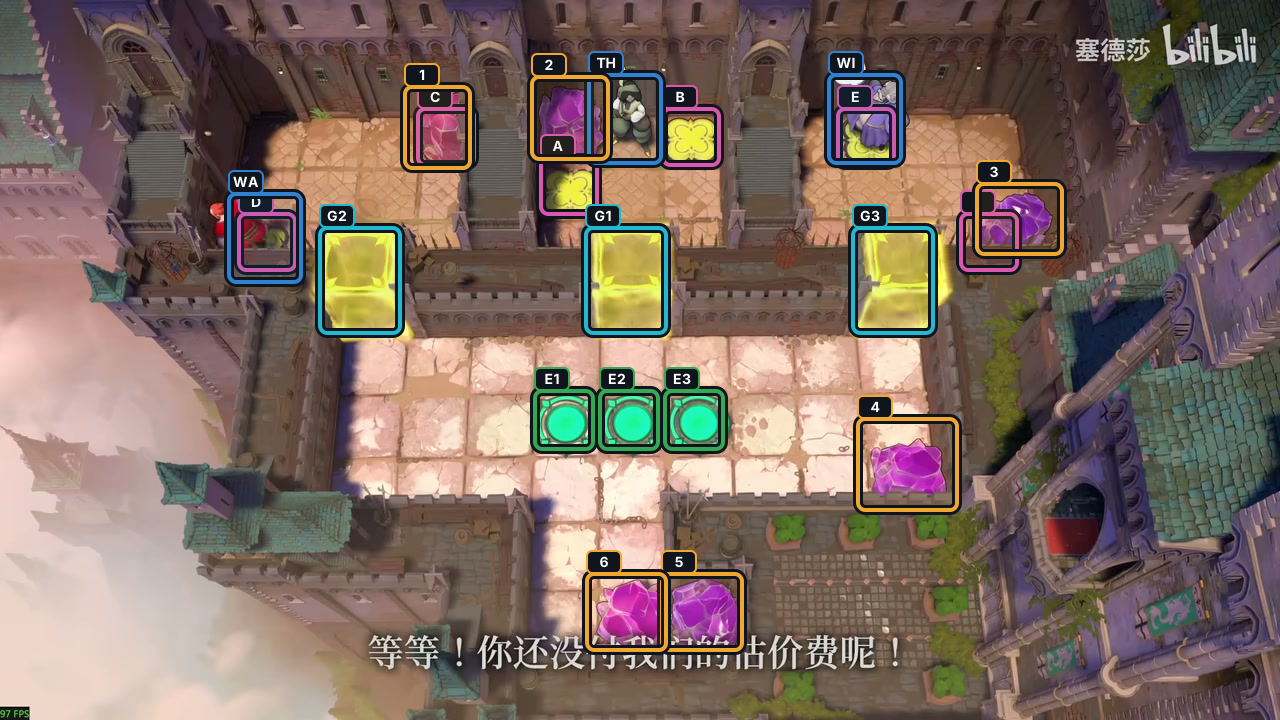
Warrior: down, right twice, down, right, up to push Crystal 1 onto C; then down and left three onto D.
Check: Switch D is occupied and Crystal 1 is on C.
Open full-size image in a new tab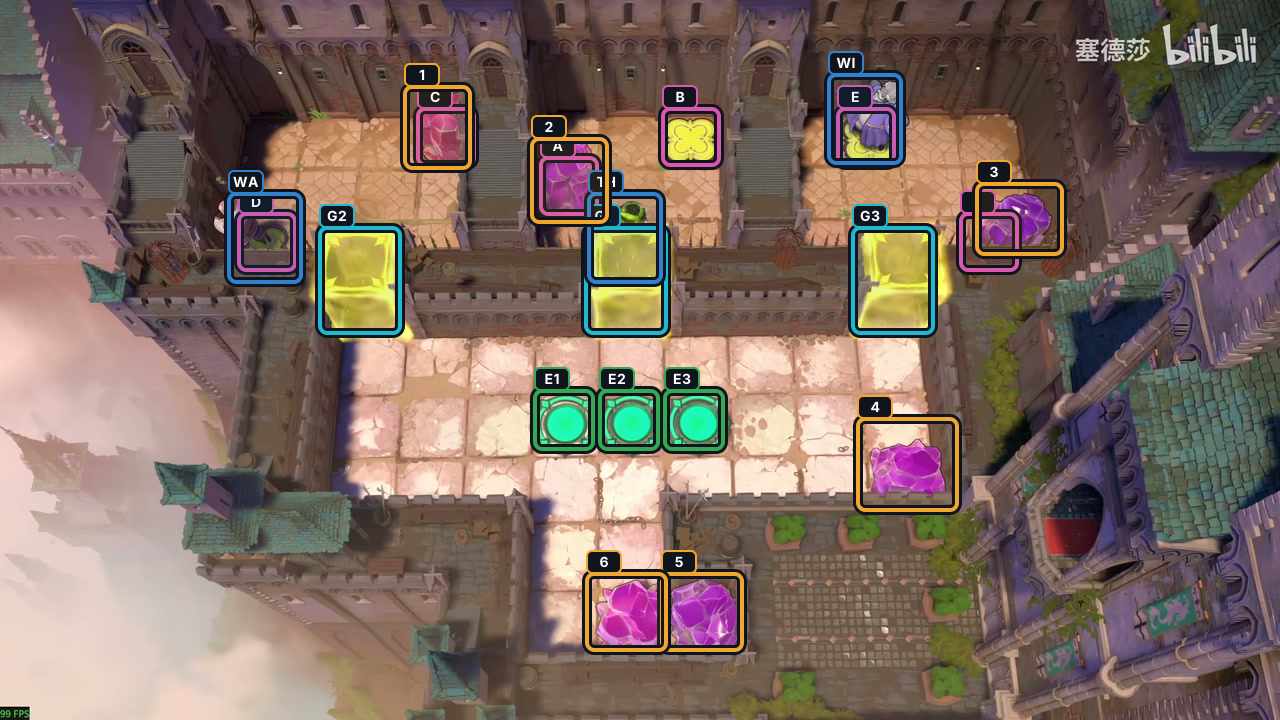
Move the Thief down, left, down, then right through the center.
Check: The Thief reaches the center lane; Switch B is still empty.
Open full-size image in a new tab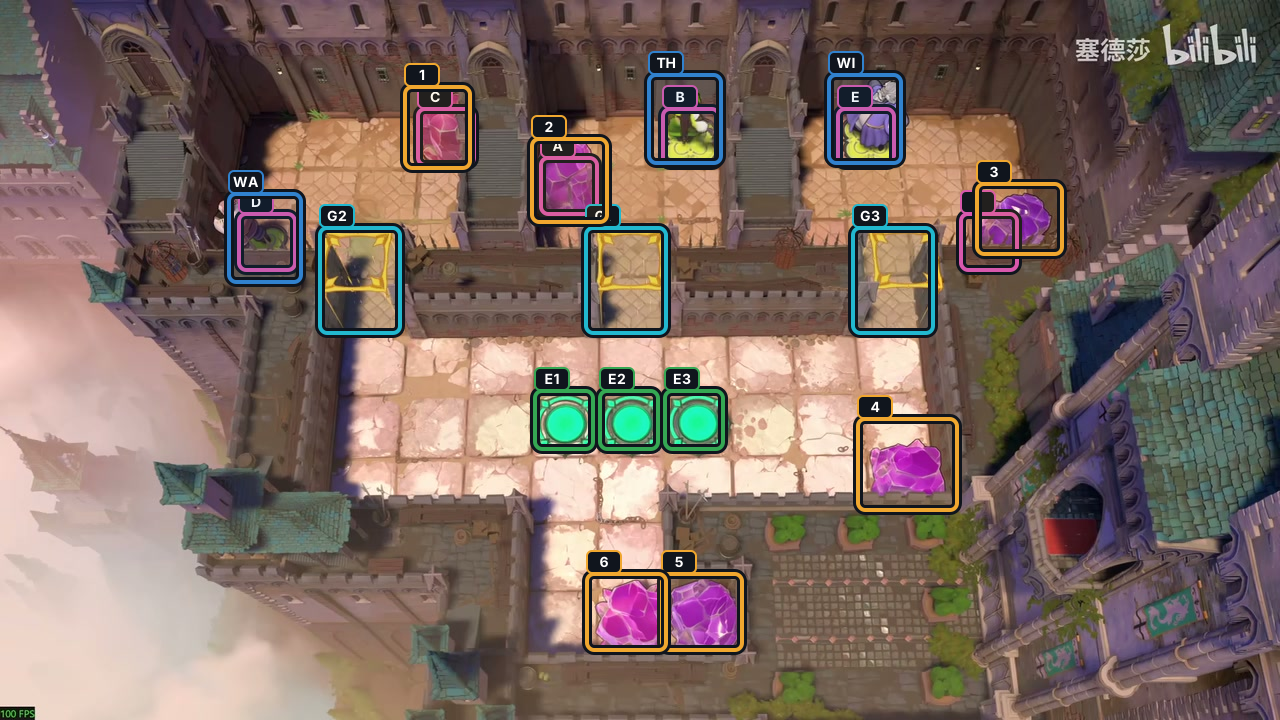
Move the Thief up twice, then right onto Switch B.
Check: B is occupied and all three gates open.
Open full-size image in a new tab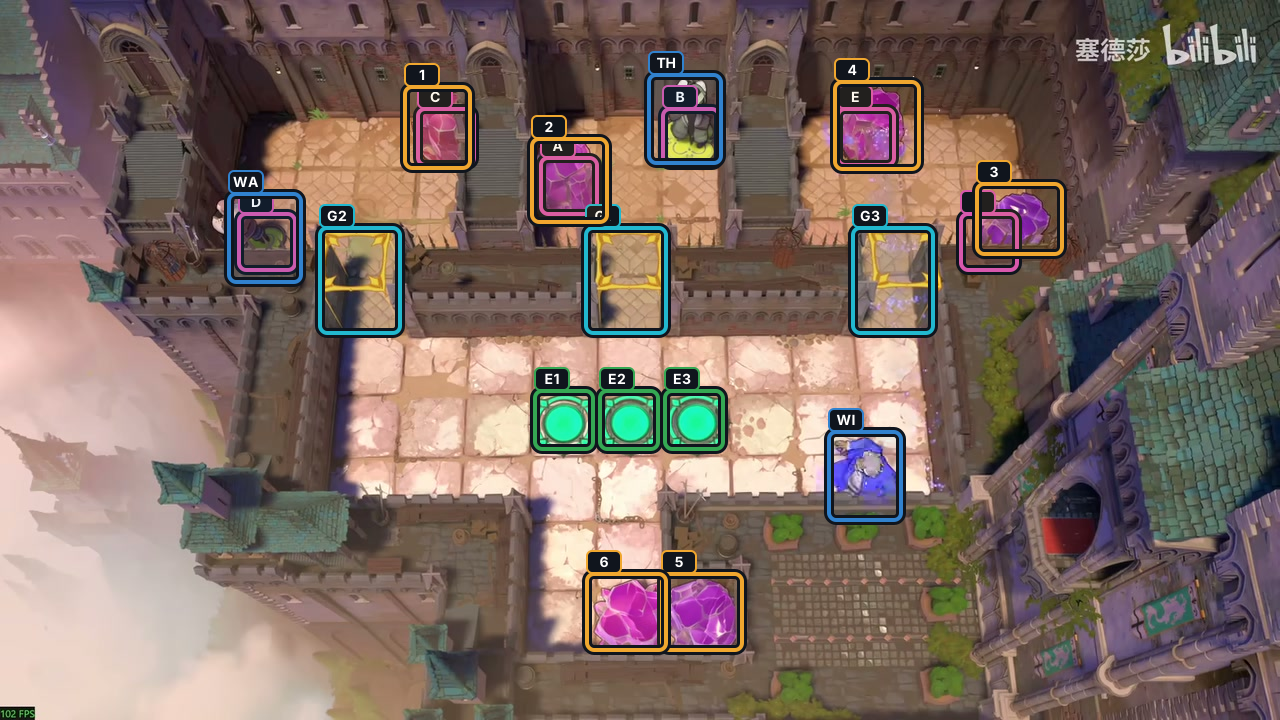
Move the Wizard down, swapping with Crystal 4.
Check: The Wizard reaches the lower right; Crystal 4 takes E.
Open full-size image in a new tab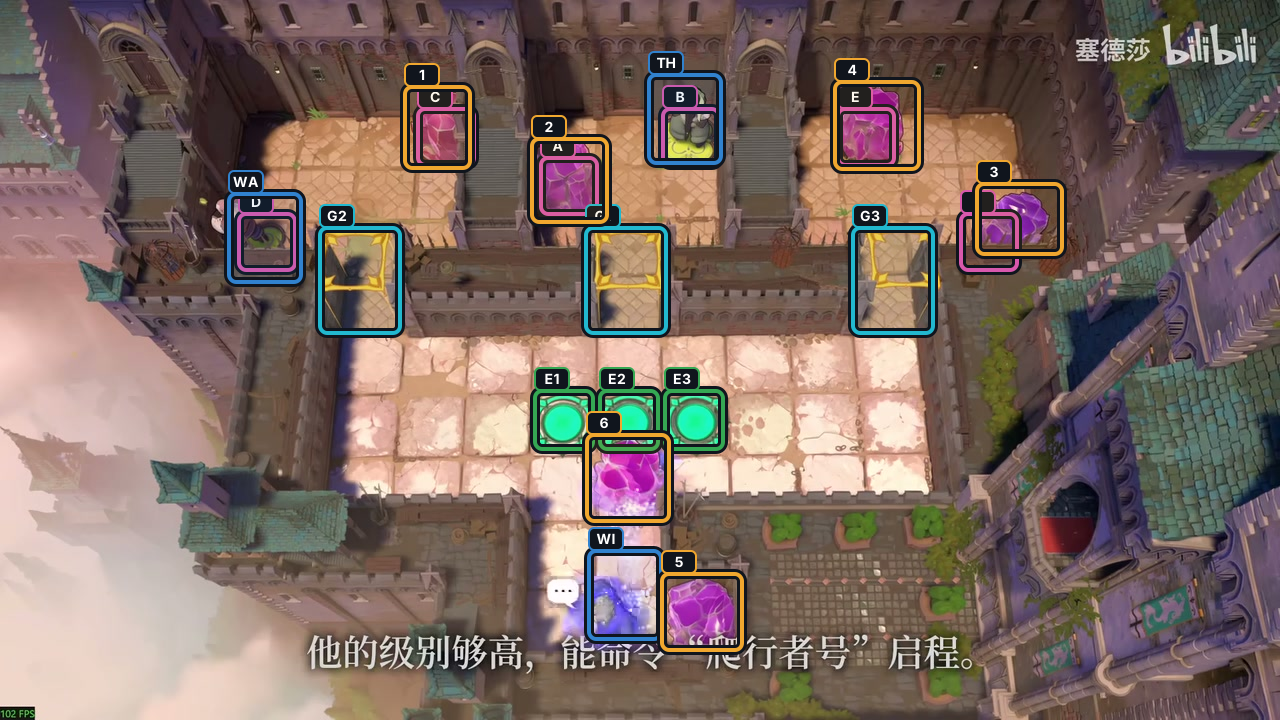
Have the Wizard move left four, then down to swap with pink Crystal 6.
Check: Crystal 6 moves to the center lane as the Wizard lands below it.
Open full-size image in a new tab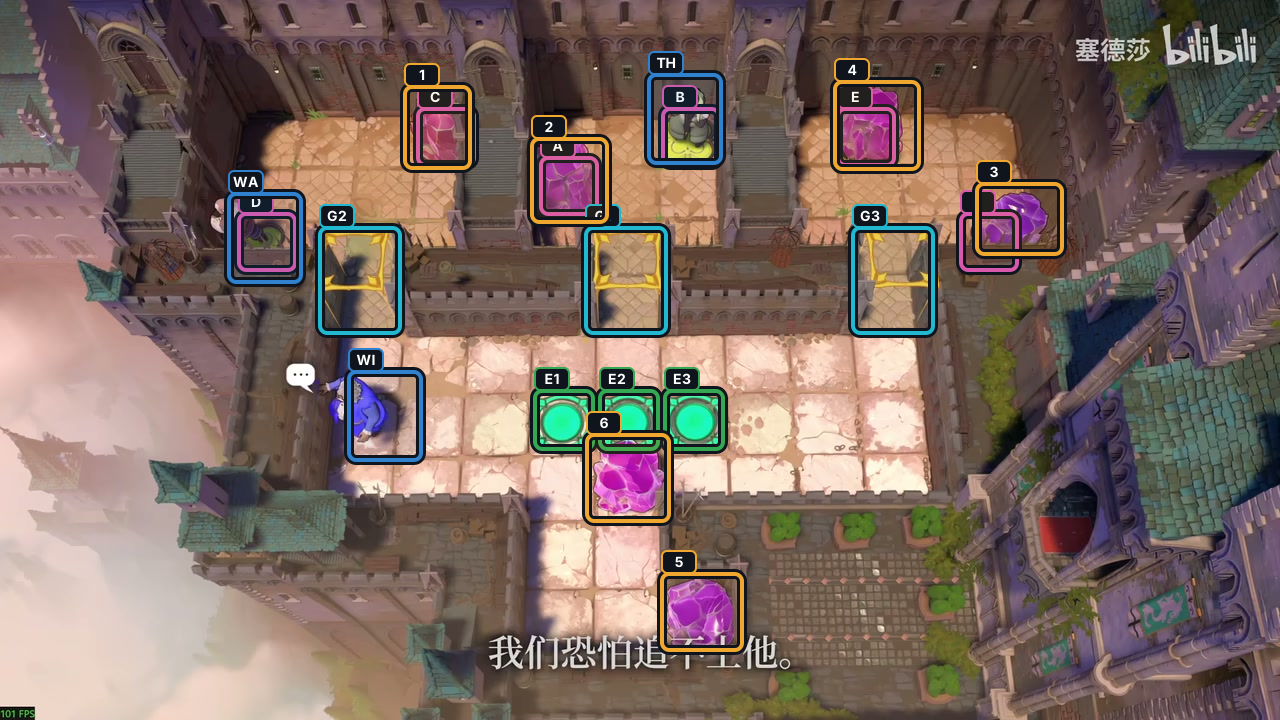
Move the Wizard left, up twice, left three, then up.
Check: The Wizard reaches the left side of the courtyard.
Open full-size image in a new tab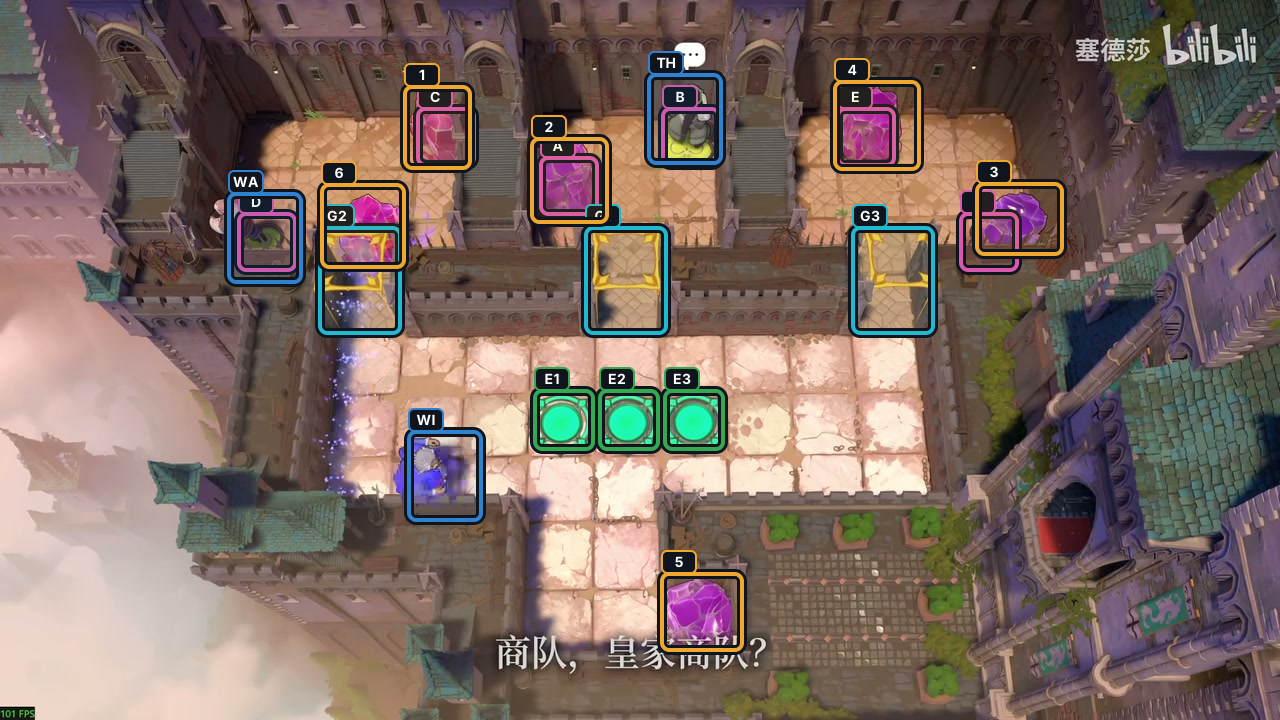
Wizard: down, right to swap with Crystal 6, up twice, left four, up twice, down to swap again, then right.
Check: Crystal 6 reaches the left gate lane; the Wizard is ready to cross.
Open full-size image in a new tab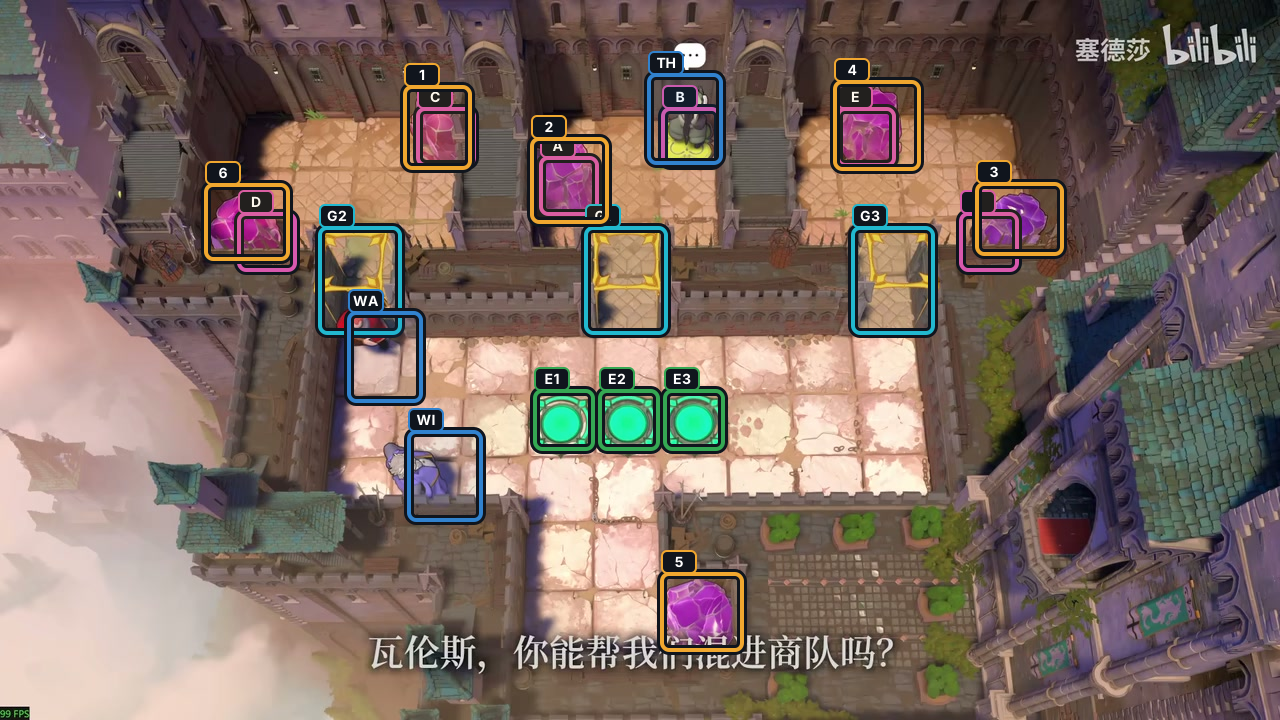
Warrior: up, right three, down, left twice to push Crystal 6 onto D; then right and down twice through the left gate.
Check: Crystal 6 occupies D; the gates remain open.
Open full-size image in a new tab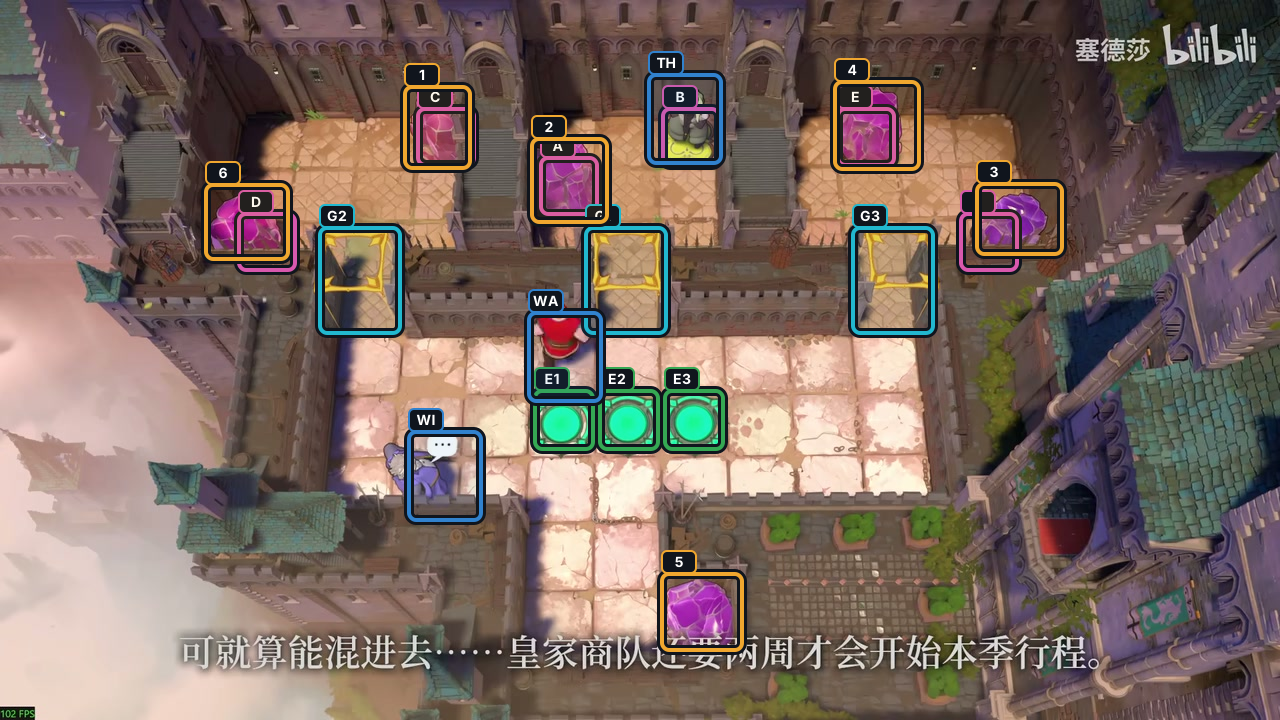
Move the Warrior right three spaces into the center lane.
Check: The Warrior reaches the center approach.
Open full-size image in a new tab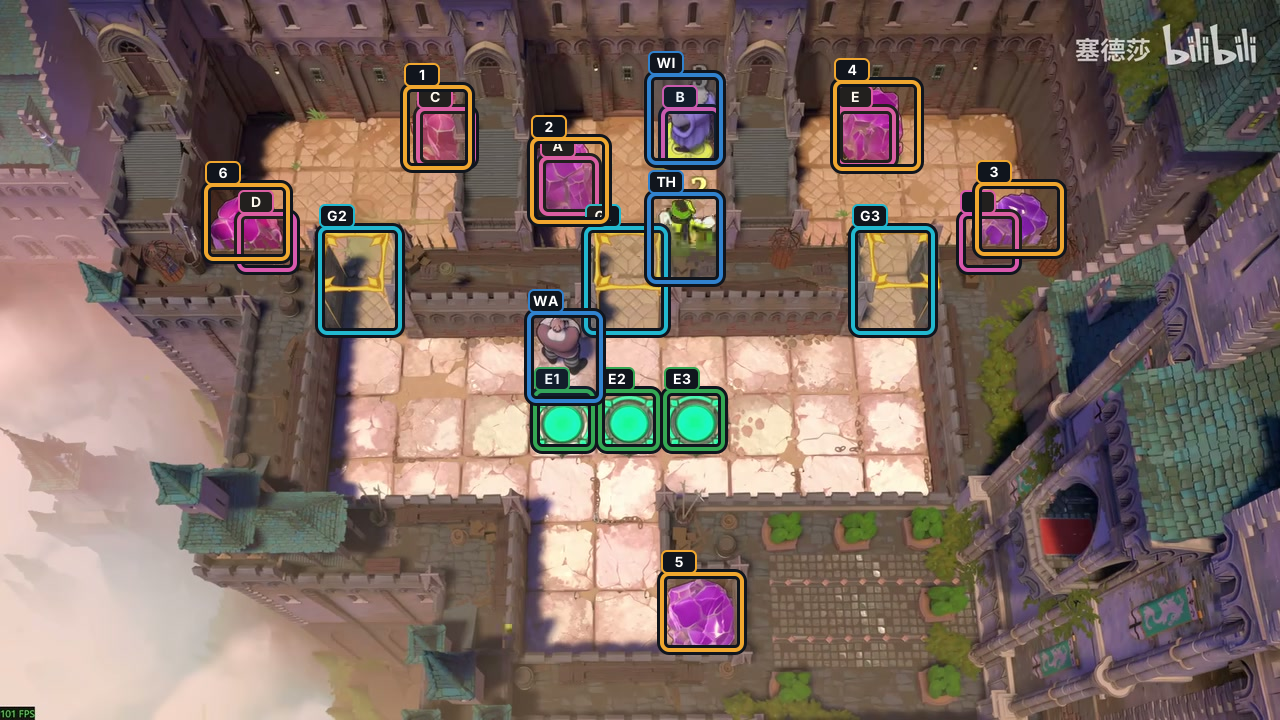
Wizard: right three, up four, right, then up to swap with the Thief.
Check: The Wizard reaches B while the Thief remains below.
Open full-size image in a new tab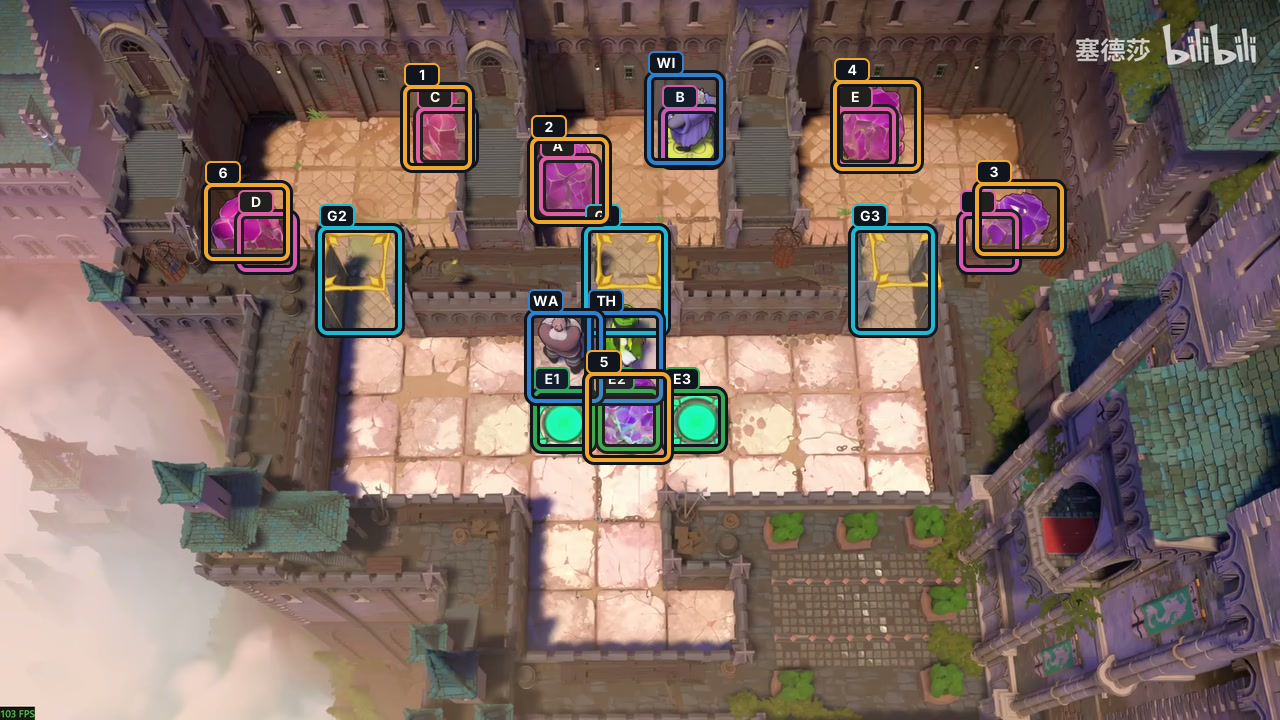
Thief: left, down six, left, up, right, then up three, pulling Crystal 5 onto the middle exit.
Check: Crystal 5 reaches the center exit lane.
Open full-size image in a new tab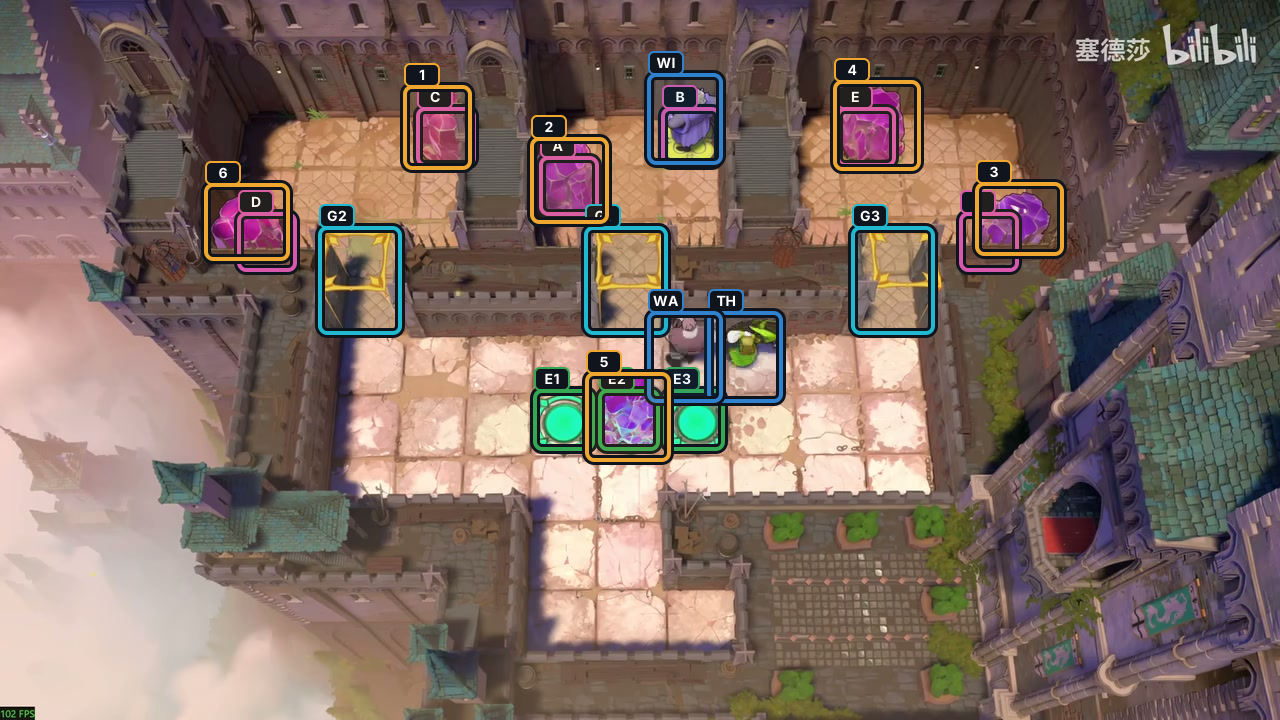
Warrior: right twice to push the Thief aside.
Check: The center lane is ready for the final Crystal 5 move.
Open full-size image in a new tab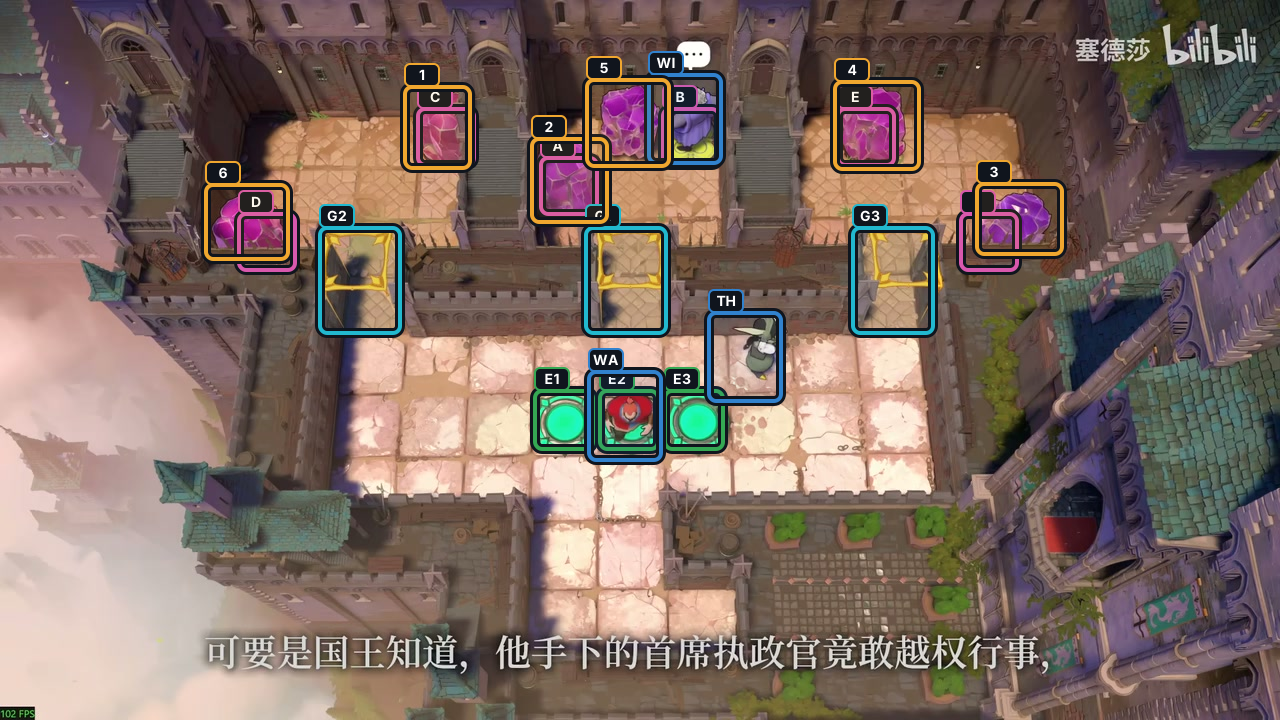
Warrior: down twice, left, up five to push Crystal 5 onto the upper row, then down four onto E2.
Check: Crystal 5 is adjacent to B; the Wizard still occupies B.
Open full-size image in a new tab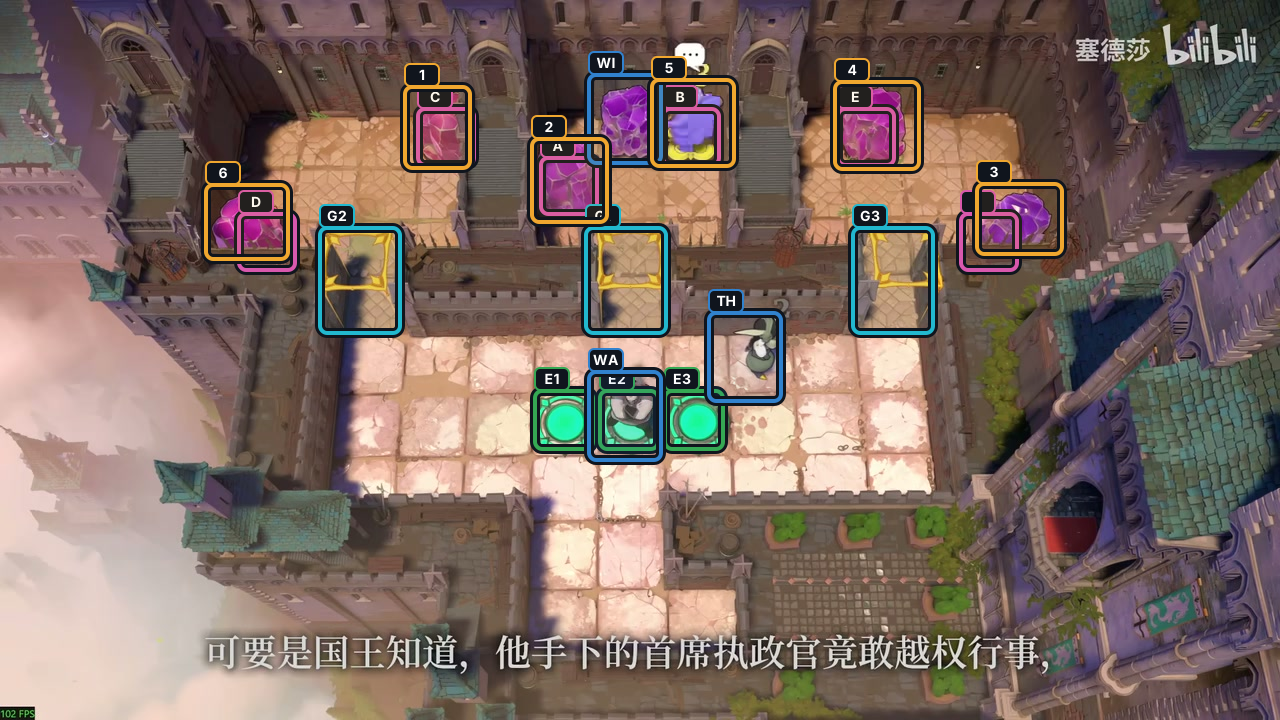
Move the Wizard left to swap Crystal 5 onto B.
Check: Crystal 5 now occupies B.
Open full-size image in a new tab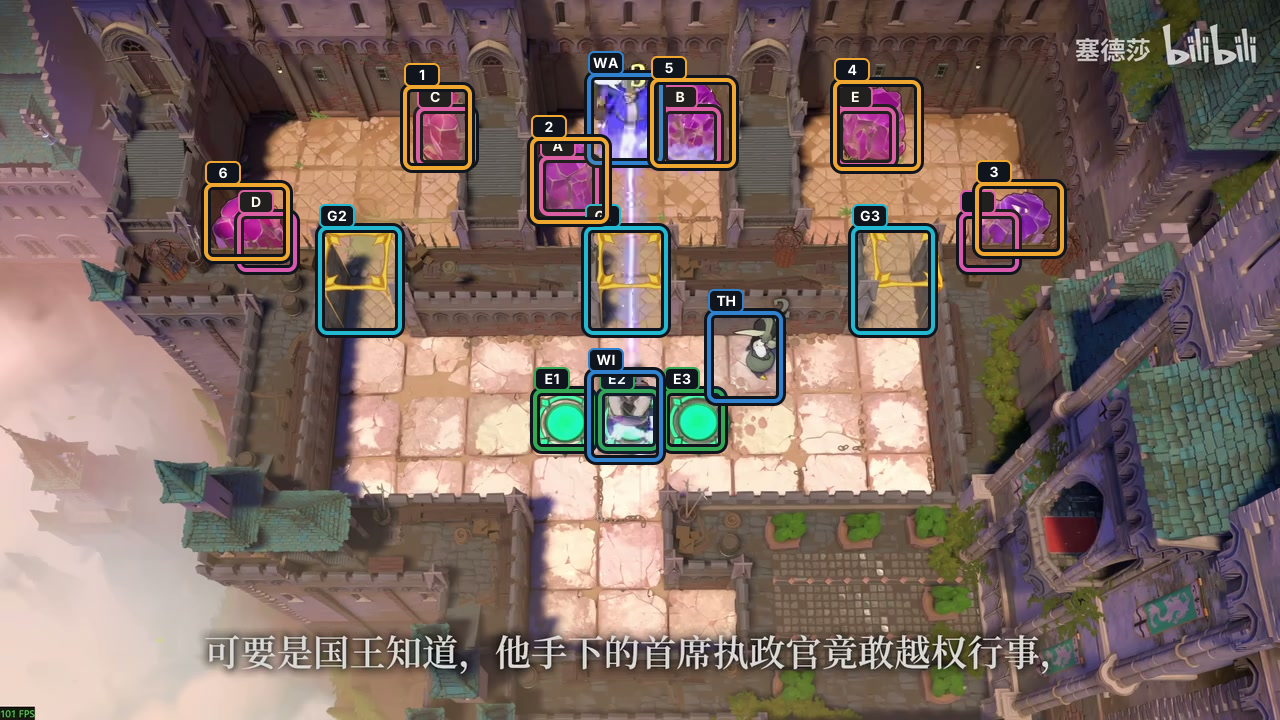
Move the Wizard down to swap places with the Warrior.
Check: The Warrior moves to the upper center; the Wizard reaches the middle exit lane.
Open full-size image in a new tab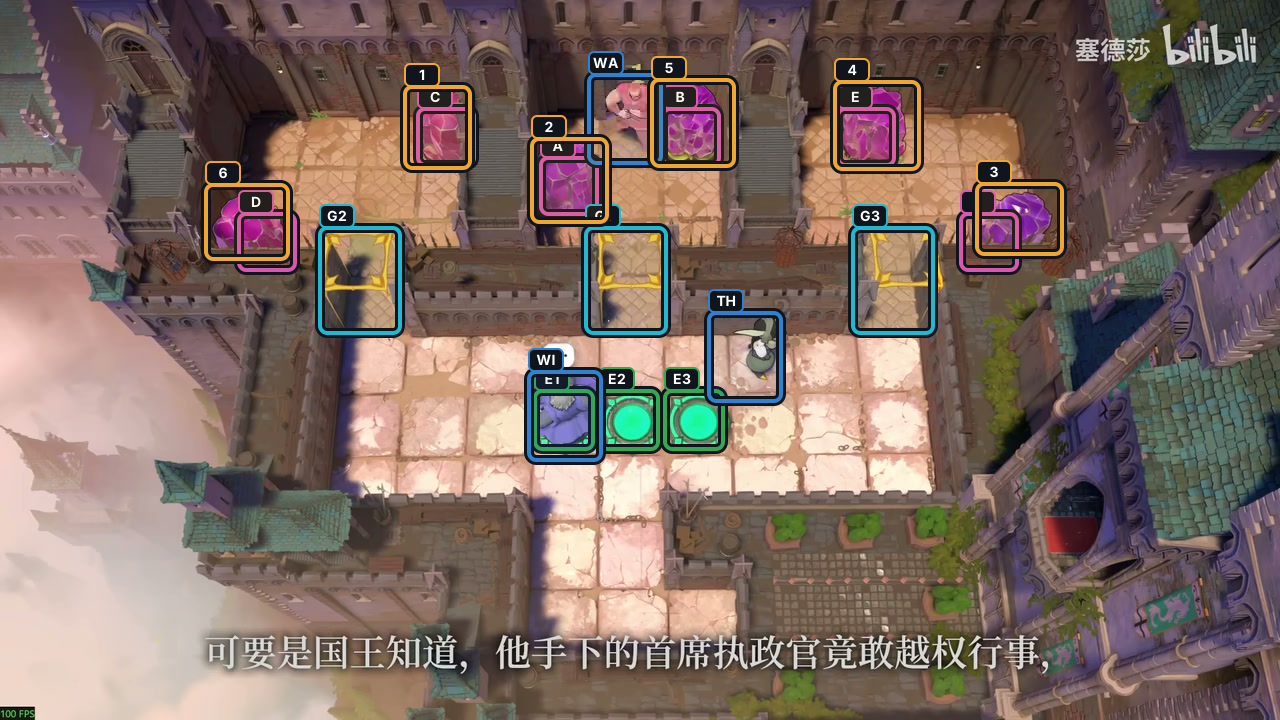
Move the Wizard left onto exit E1.
Check: The Wizard occupies E1.
Open full-size image in a new tab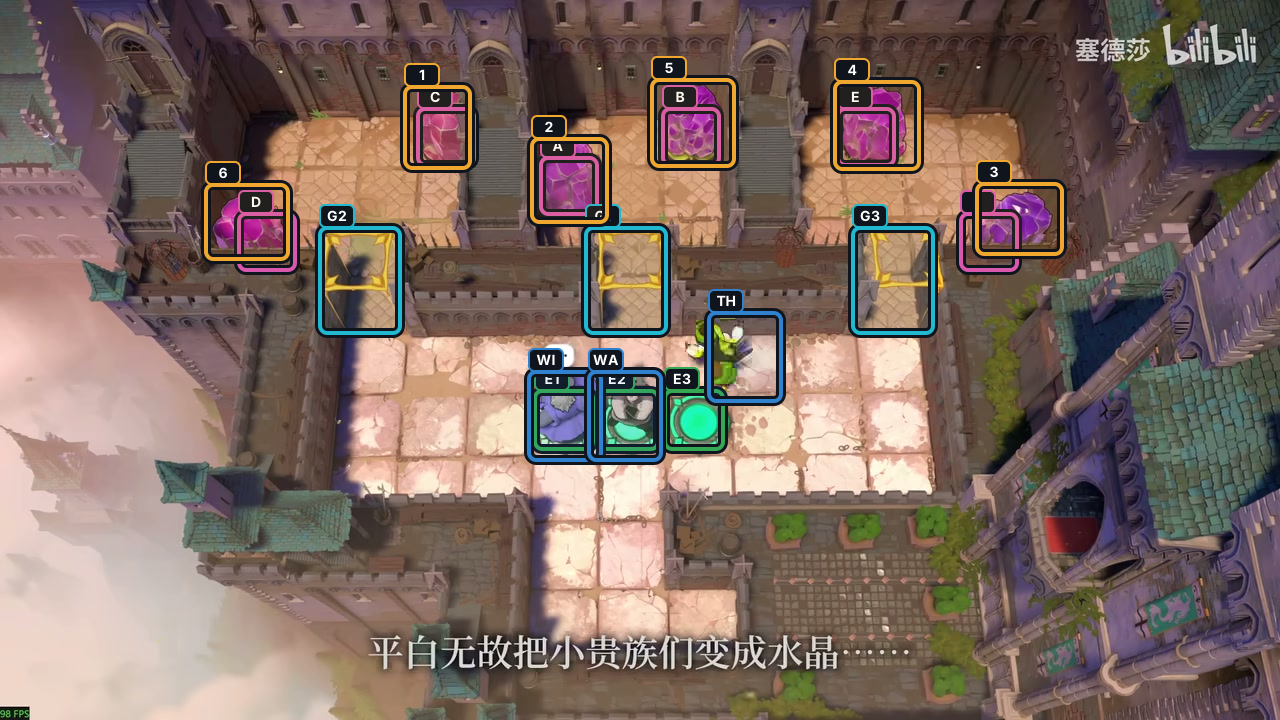
Move the Warrior down five spaces onto E2.
Check: The Warrior occupies E2; only the Thief remains.
Open full-size image in a new tab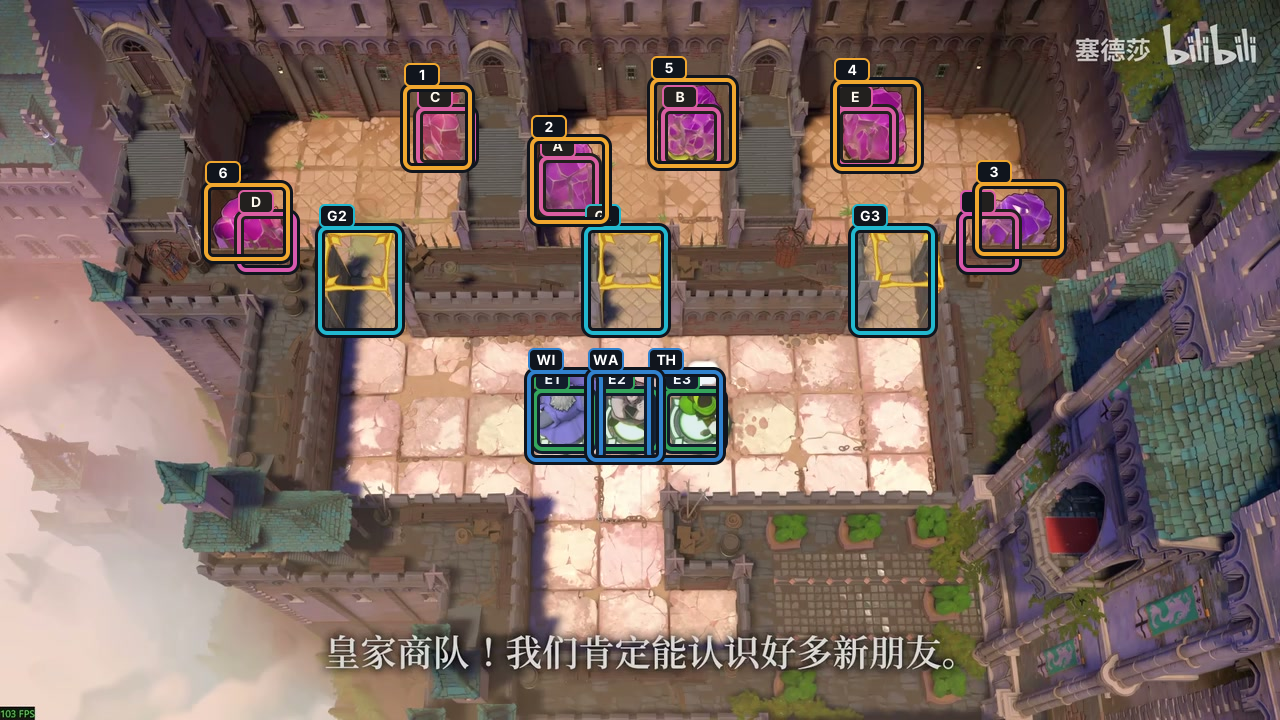
Move the Thief down, then left onto E3.
Check: All three heroes occupy the exits at once.
Open full-size image in a new tabActor-by-actor direction route
Full direction sequence
- WI Wizard
← ← ↓ ↓ → → ↑ ↑ ← ↓ → → ↓ ↑ ← ← - WA Warrior
↓ → → ↓ → ↑ ↓ ← ← ← - TH Thief
↓ ← ↓ → ↑ ↑ → - WI Wizard
↓ ← ← ← ← ↓ ← ↑ ↑ ← ← ← ↑ ↓ → ↑ ↑ ← ← ← ← ↑ ↑ ↓ → - WA Warrior
↑ → → → ↓ ← ← → ↓ ↓ → → → - WI Wizard
→ → → ↑ ↑ ↑ ↑ → ↑ - TH Thief
← ↓ ↓ ↓ ↓ ↓ ↓ ← ↑ → ↑ ↑ ↑ - WA Warrior
→ → ↓ ↓ ← ↑ ↑ ↑ ↑ ↑ ↓ ↓ ↓ ↓ - WI Wizard
← ↓ ← - WA Warrior
↓ ↓ ↓ ↓ ↓ - TH Thief
↓ ←
Sources and credits
Team-room layouts and route notation: PC r67121 team boards. Board images: Thekla, Inc. Creator footage: 塞德莎, Heroes of Hauling, part 2; Gamer Guru, selected team-room checkpoints.
- Heroes working together: multi-hero puzzle data (PC r67121) — Extracted data
- [North] Hero Transporter [North 1 missing 1 / North 2] / 【北】搬运英雄[北1缺1题/北2] — Observed in-game
- Wizard and Warrior two-switch step-by-step screenshots — Observed in-game · screenshots-reviewed-2026-10-18
- Warrior and Wizard side-gate step-by-step screenshots — Observed in-game · screenshots-reviewed-2026-10-18
- Wizard, Thief and Warrior gate-clearing step-by-step screenshots — Observed in-game · screenshots-reviewed-2026-10-18
- Warrior, Thief and Wizard three-switch step-by-step screenshots — Observed in-game · screenshots-reviewed-2026-10-18
- Thief, Wizard and Warrior jail-rescue step-by-step screenshots — Observed in-game · screenshots-reviewed-2026-10-18
- Warrior, Thief and Wizard final-room step-by-step screenshots — Observed in-game · screenshots-reviewed-2026-10-18
- Character portraits and selected puzzle-board images (PC r67121) — Extracted data
- Thief and Wizard two-switch step-by-step screenshots — Observed in-game · screenshots-reviewed-2026-10-18
- Warrior and Thief crystal-train step-by-step screenshots — Observed in-game · screenshots-reviewed-2026-10-18
- Warrior, Thief and Wizard one-switch step-by-step screenshots — Observed in-game · screenshots-reviewed-2026-10-18
Unofficial fan wiki, not affiliated with Thekla, Inc. / Arc Games / Gamirror Games. Game content belongs to its owners.
Comments & feedback
Share a tip or suggest a correction. Comments are public. Guest names are unverified; verified accounts show their account username. All language pages share this discussion. Please keep personal information private.