
 Order of the Sinking Star
Bard puzzles

These five  Bard rooms cover guiding Goblins and maneuvering crystals. The fifth uses the upper street to bring a Dragon into line with a Goblin lane. Each arrow below is one directional input. In these routes, a Goblin within two tiles horizontally and vertically can move one tile with the Bard when its next tile is open; step closer if it falls out of reach. The maps use the displayed orientation: up is toward the top and right is toward the right.
For team rooms, see Bard team puzzles.
Bard: bring two Goblins together
Section titled “Bard: bring two Goblins together”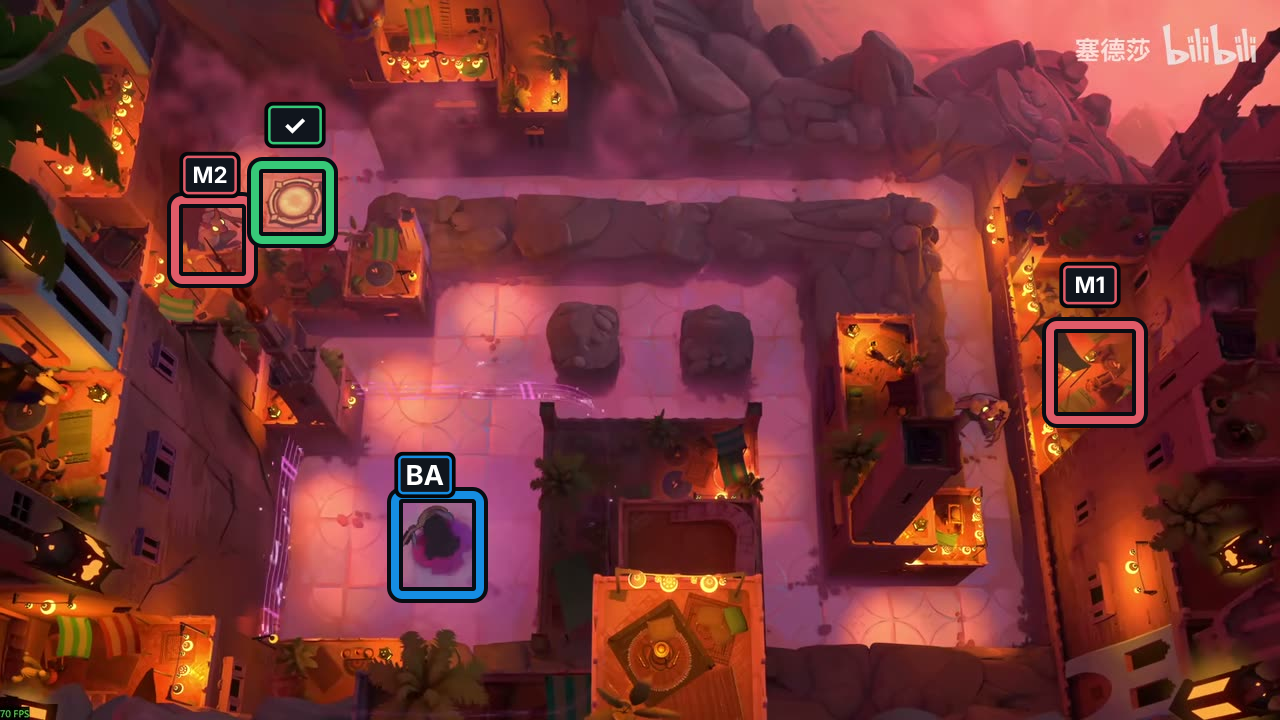
- Exit
- BA Bard
- Goblins M1–M2
Hint
Bring M2 out of the left lane, then loop around the right side toward M1. The route’s last upward run clears both Goblins; keep following it to the exit.
Solution
- Climb and turn left with
↑ ↑ ↑ ← ←(steps 1–5). Move right twice, up once, then right five times:→ → ↑ → → → → →(6–13), drawing M2 across the upper lane. - Go down twice, left four times and up twice:
↓ ↓ ← ← ← ← ↑ ↑(14–21). Continue→ → → →(22–25), then↓ ↓ ↓ ↓ ↓(26–30) around the outside. - Move right three times and up five times:
→ → → ↑ ↑ ↑ ↑ ↑(31–38). M1 and M2 clear on step 38. Continue up twice, then left eleven times:↑ ↑ ← ← ← ← ← ← ← ← ← ← ←(39–51) to the exit.
If either Goblin is out of position before the last upward run, Undo to the earlier turn and guide it along the shown lane before continuing.
Images show selected video checkpoints; the first frame is the starting position.
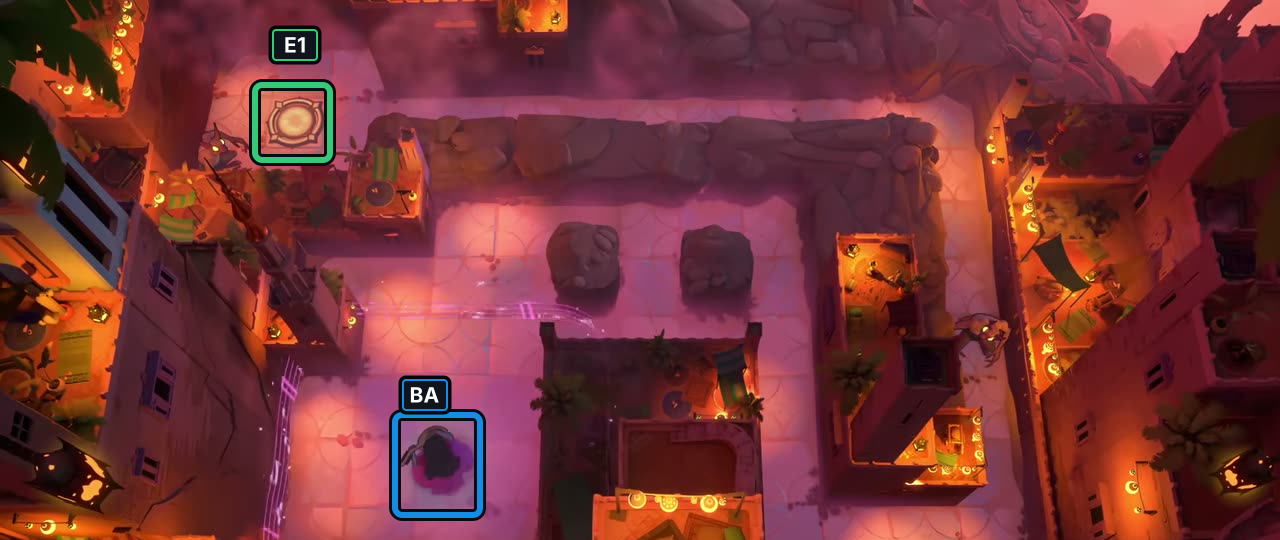
At 13:50, the selected frame shows Bard in the room’s starting layout.
Check: The markers identify the visible heroes and exits; no input sequence or later state is inferred.
Open full-size image in a new tabFull direction sequence
- BA Bard
↑ ↑ ↑ ← ← → → ↑ → → → → → ↓ ↓ ← ← ← ← ↑ ↑ → → → → ↓ ↓ ↓ ↓ ↓ → → → ↑ ↑ ↑ ↑ ↑ ↑ ↑ ← ← ← ← ← ← ← ← ← ← ←
Bard: return M1 to switch A
Section titled “Bard: return M1 to switch A”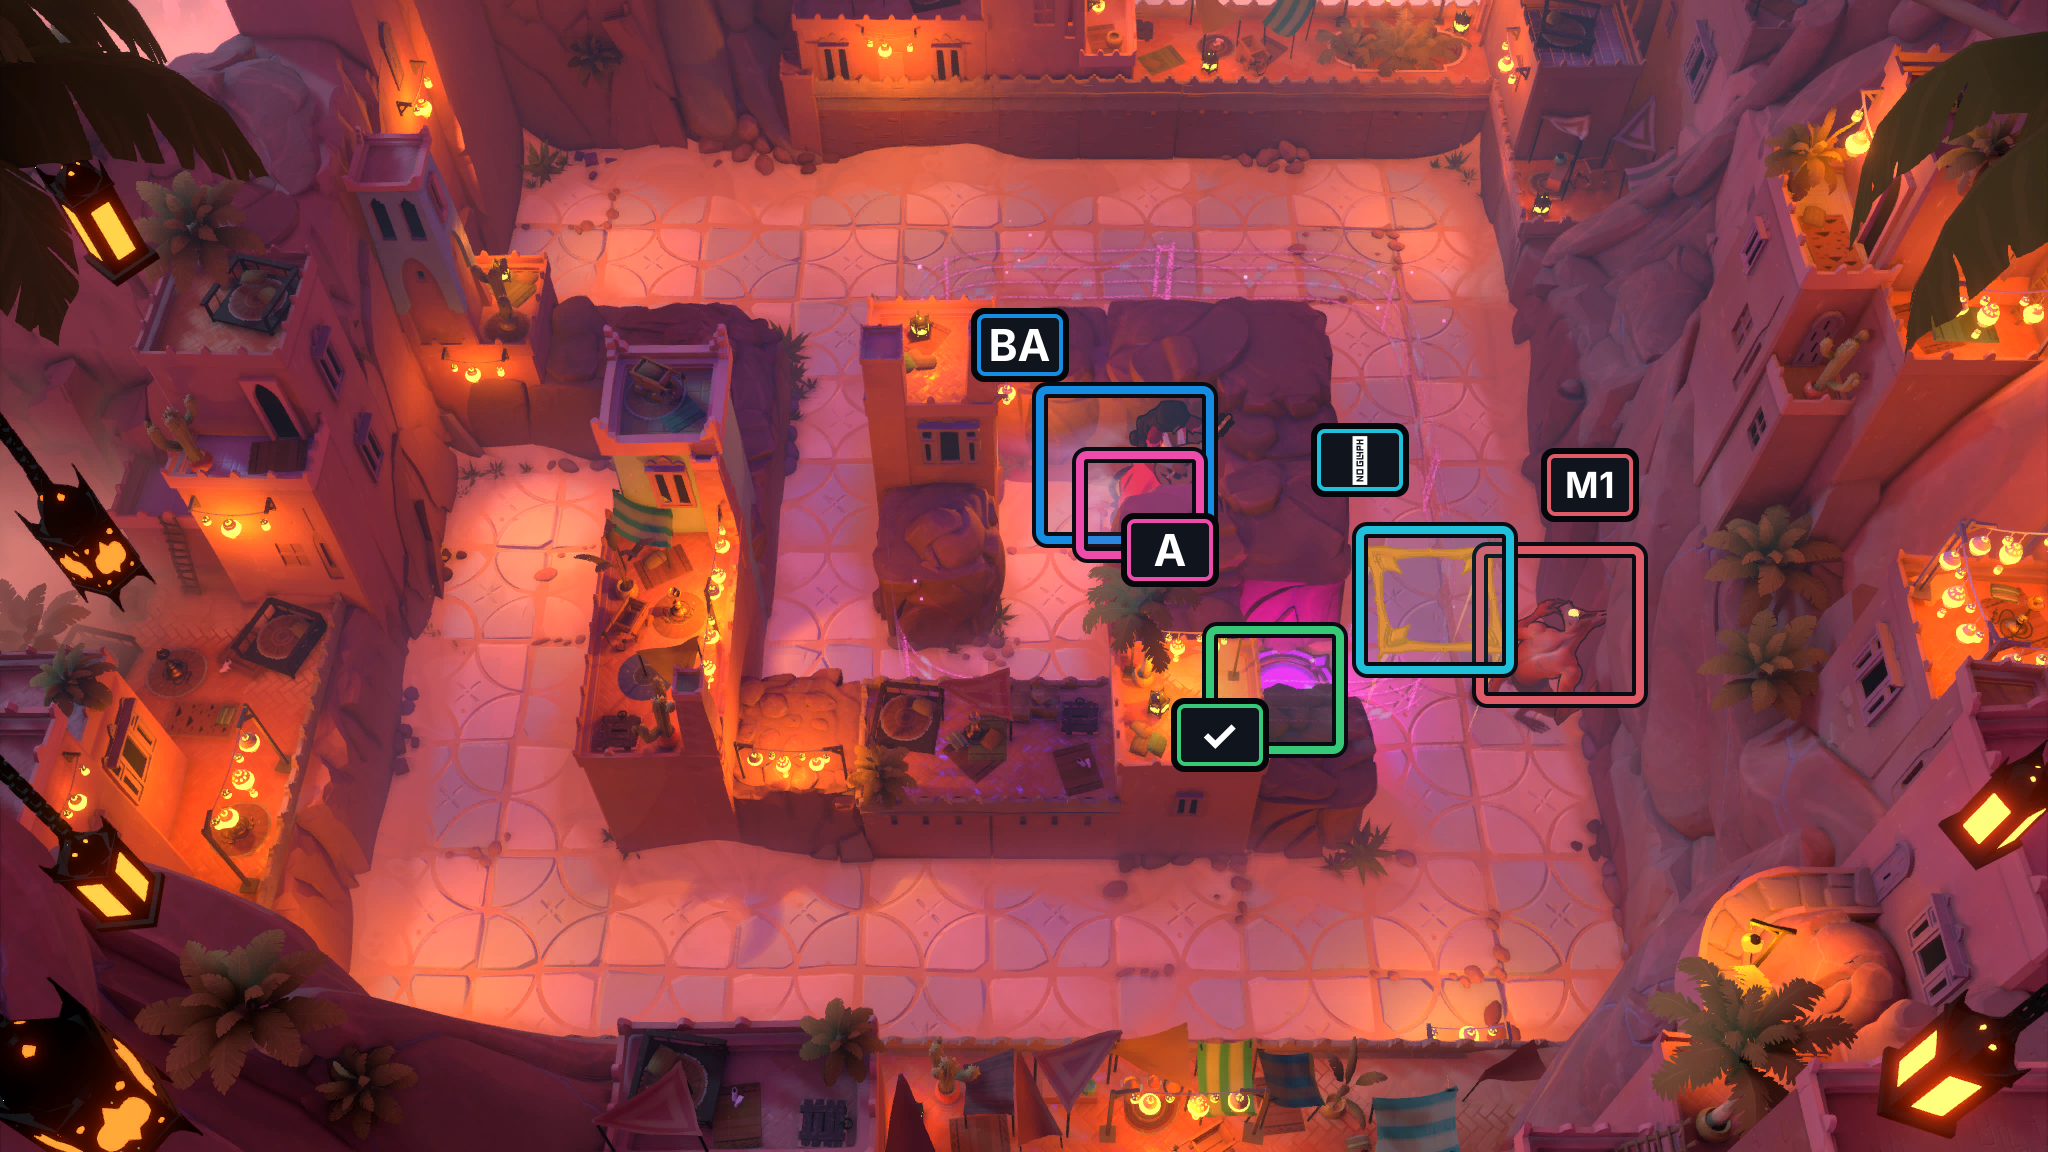
- Switch A
- Gate
- Exit
- BA Bard
- Goblin M1
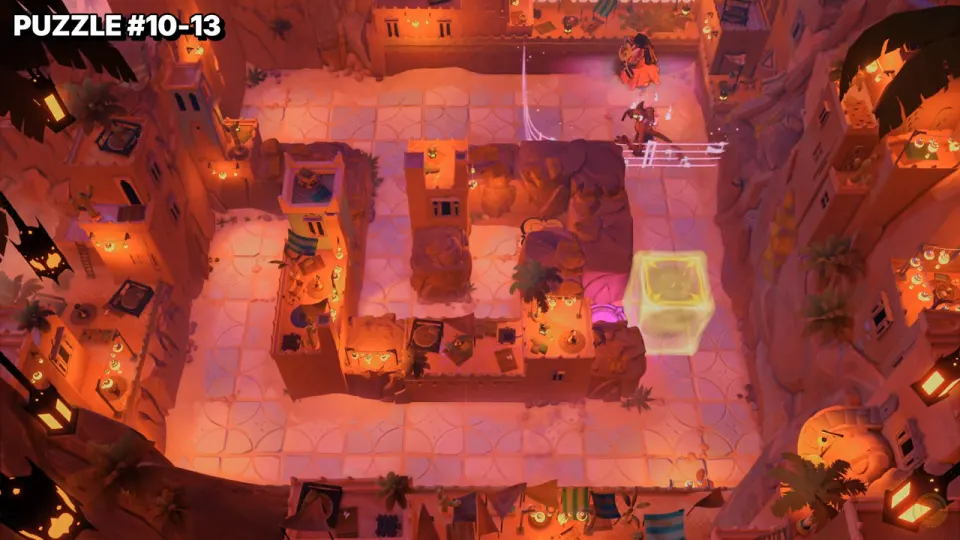
Selected in-progress frame at the P11 9:53 cue; this is not a confirmed initial state.
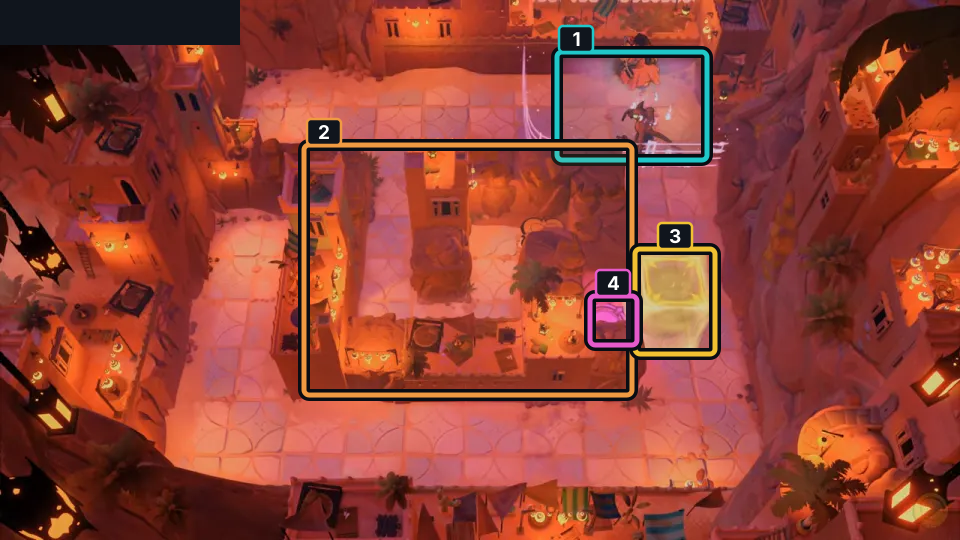
At the P11 cue, focus on the upper lane (1) and U-shaped inner lanes (2). The article says to guide the Goblin through the inner route while the Bard circles outside.
Check: The article reports that one final song opens the yellow cube (3); the magenta pad (4) remains visible beside it.
Open full-size image in a new tabHint
The Bard begins on A, so leaving it closes the gate. Guide M1 back onto A later; once the gate opens, cross it before M1 moves away.
Solution
- Leave A with
← ↓ ↓ ← ← ↑ ↑ ↑ ↑ → → → → → ↓ ↓ ↑ ↑ ↑ ↑(steps 1–20), taking the long path around the upper side. - Continue
← ← ← ← ← ← ↓ ↓ → → → → → → ↓ ↓ ↓ → ↓ ↓(21–40). Then move↓ ← ← ← ← ← ← ← ← ↑ ↑ ↓ ↓ → → → → → → →(41–60) to draw M1 around the lower loop. - Take
↑ → ↑ ↑ ↑ ↑ ↑ ← ← ← ← ← ← ↓ ↓ ↑ ↑(61–77). The first rightward input at step 78 brings M1 back onto A and opens the gate. Move right five times, down four times, then left:→ → → → → ↓ ↓ ↓ ↓ ←(78–87). The Bard crosses the gate at 86 and reaches the exit at 87; M1 leaves A on the final move.
If M1 reaches A before the Bard is lined up with the gate, Undo and complete the return loop before crossing.
Full direction sequence
- BA Bard
← ↓ ↓ ← ← ↑ ↑ ↑ ↑ → → → → → ↓ ↓ ↑ ↑ ↑ ↑ ← ← ← ← ← ← ↓ ↓ → → → → → → ↓ ↓ ↓ → ↓ ↓ ↓ ← ← ← ← ← ← ← ← ↑ ↑ ↓ ↓ → → → → → → → ↑ → ↑ ↑ ↑ ↑ ↑ ← ← ← ← ← ← ↓ ↓ ↑ ↑ → → → → → ↓ ↓ ↓ ↓ ←
Bard: keep all three crystals in play
Section titled “Bard: keep all three crystals in play”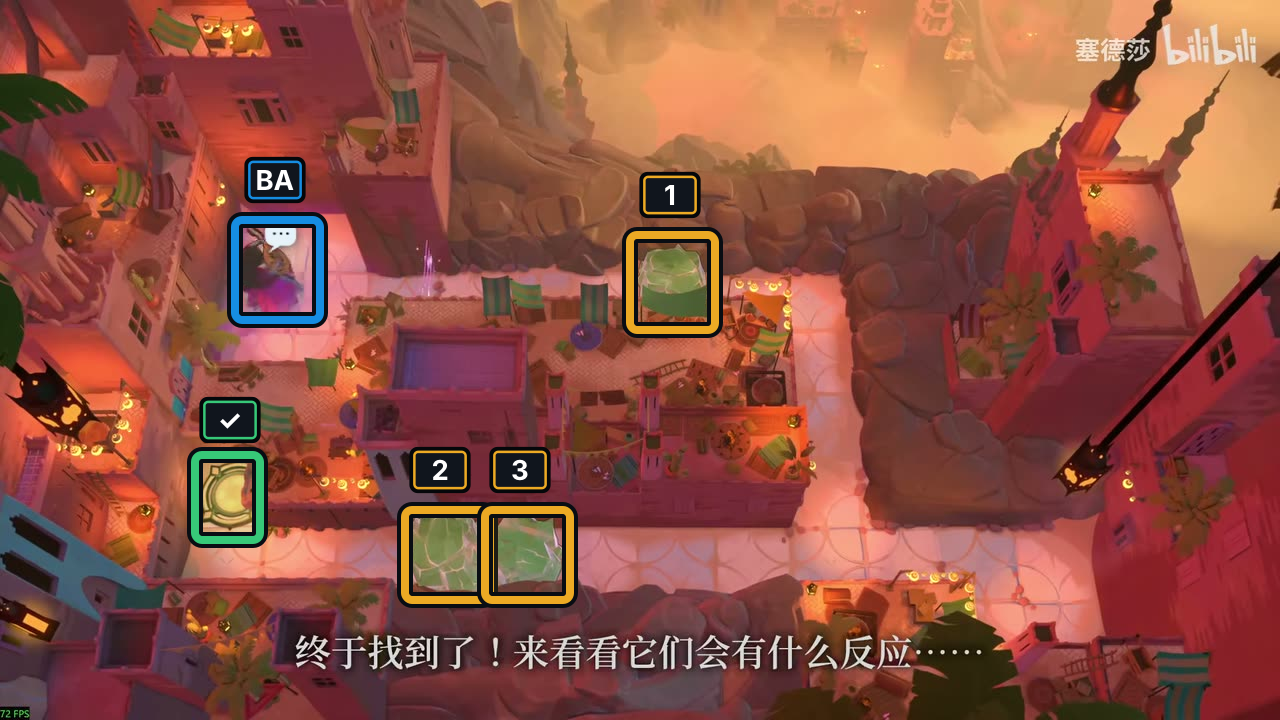
- Crystals 1–3
- Exit
- BA Bard
Hint
Use Crystal 1 to move across the first lane, then circle through the upper and right passages. The route shifts Crystal 2 and Crystal 3 along the right side and returns to the lower-left exit without removing any crystal.
Solution
- Move right seven times, then left six:
→ → → → → → → ← ← ← ← ← ←(1–13). Crystal 1 crosses the upper lane and the Bard returns beside it. - Take
↑ ← ↓ → → → → → → → →(14–24), then↓ ↓ ↓ ↓ ← ← → → → →(25–34) through the upper and right passages. Crystal 3 reaches the right-hand lane by step 34. - Continue
↓ ↑ ← ← ← ← ← → → → → →(35–46), then↓ ↑ ← ← ← ← ← ← ← ← ← ← ↑(47–59). All three crystals remain in play, and the Bard reaches the exit on step 59.
If the crystals are not in the expected right-hand lane after the upper loop, Undo to the start of that loop and follow the route before returning to the exit.
Images show selected video checkpoints; the first frame is the starting position.
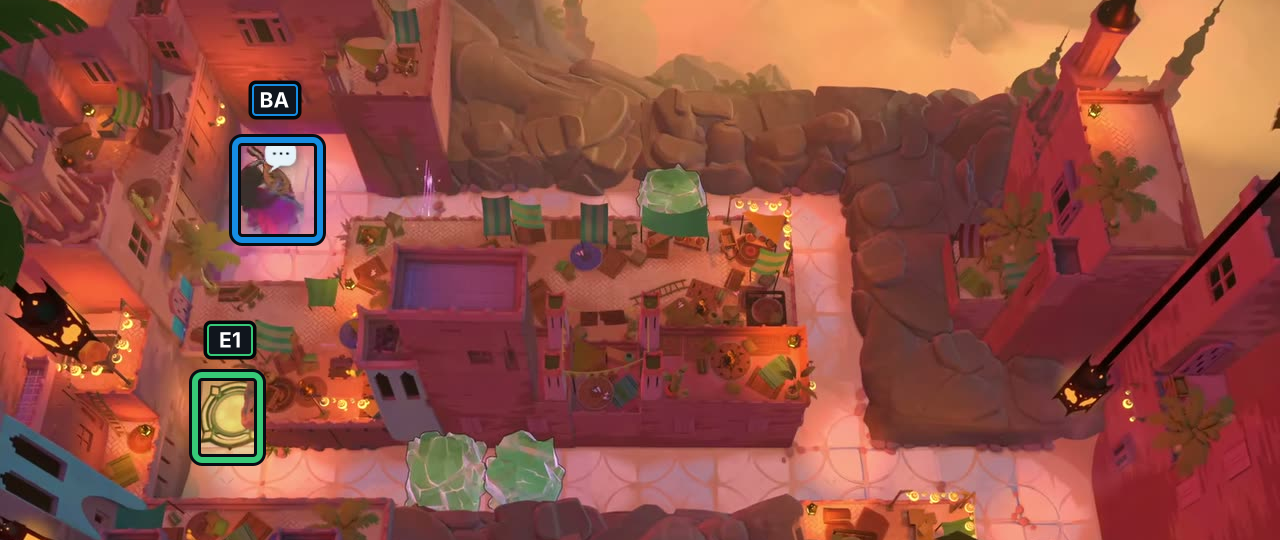
At 15:18, the selected frame shows Bard in the room’s starting layout.
Check: The markers identify the visible heroes and exits; no input sequence or later state is inferred.
Open full-size image in a new tabFull direction sequence
- BA Bard
→ → → → → → → ← ← ← ← ← ← ↑ ← ↓ → → → → → → → → ↓ ↓ ↓ ↓ ← ← → → → → ↓ ↑ ← ← ← ← ← → → → → → ↓ ↑ ← ← ← ← ← ← ← ← ← ← ↑
Bard: open the monster gate
Section titled “Bard: open the monster gate”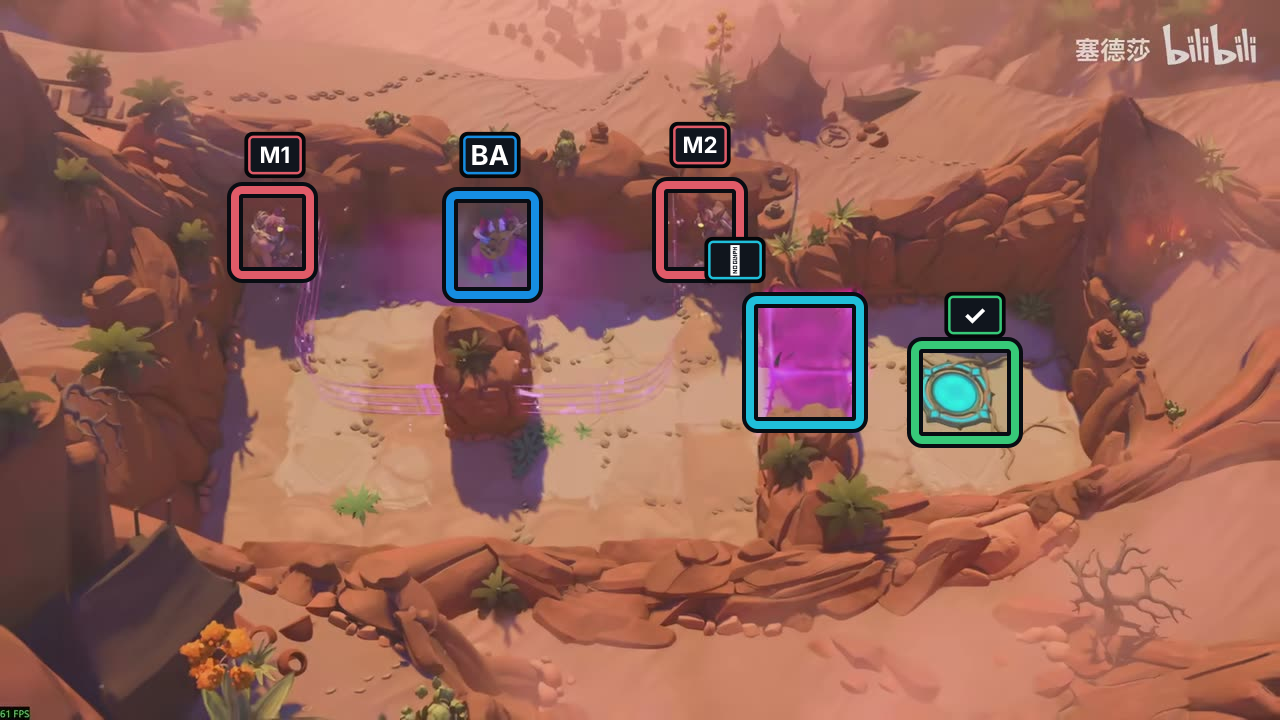
- Gate
- Exit
- BA Bard
- Goblins M1–M2
Hint
Use the lower bends to guide M1 and M2 into each other’s path. Keep moving after the gate opens so the Bard can reach the exit.
Solution
- Follow
↓ ← ↓ ↓ → → ↑ → ↓ ↓ ← ↑ ↑(steps 1–13) around the middle lanes. - Move
→ →(14–15). Both Goblins clear on step 15, opening the monster gate. - Continue right three times:
→ → →(16–18) through the gate and to the exit.
If the gate has not opened after step 15, Undo to before the last two rightward inputs and realign the Goblins before finishing them.
Images show selected video checkpoints; the first frame is the starting position.
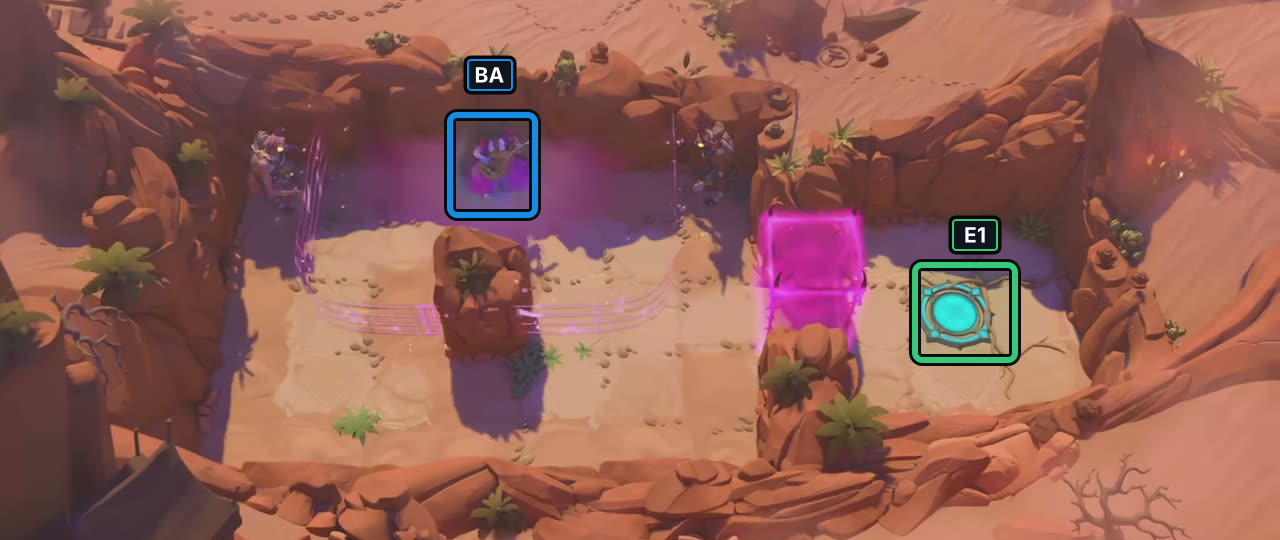
At 16:04, the selected frame shows Bard in the room’s starting layout.
Check: The markers identify the visible heroes and exits; no input sequence or later state is inferred.
Open full-size image in a new tabFull direction sequence
- BA Bard
↓ ← ↓ ↓ → → ↑ → ↓ ↓ ← ↑ ↑ → → → → →
Bard: bring the Dragon to the Goblin lane
Section titled “Bard: bring the Dragon to the Goblin lane”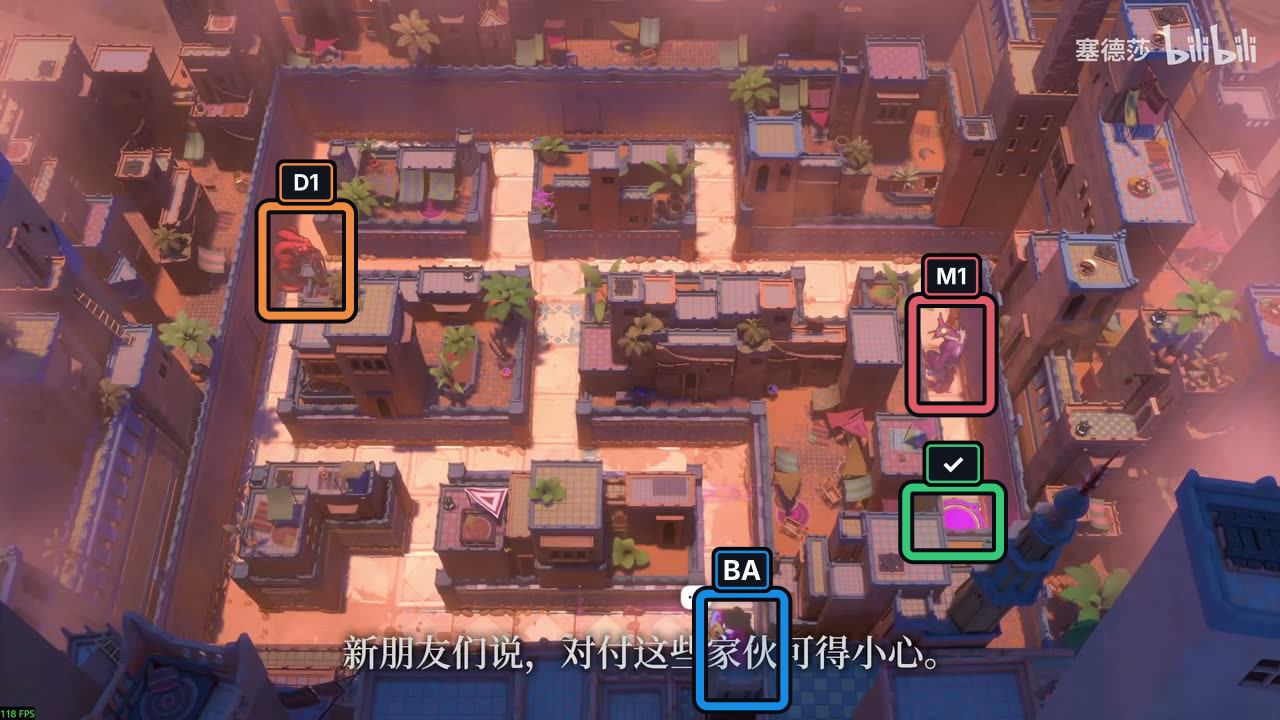
- Exit
- BA Bard
- Goblin M1
- Dragon D1
The selected P18 still is attributed to 100% Guides. Its linked 13:44 time is a first-move cue, not the still’s exact PTS. The frame records the visible layout only; it does not verify the modeled route below.
Images show selected video checkpoints; the first frame is the starting position.
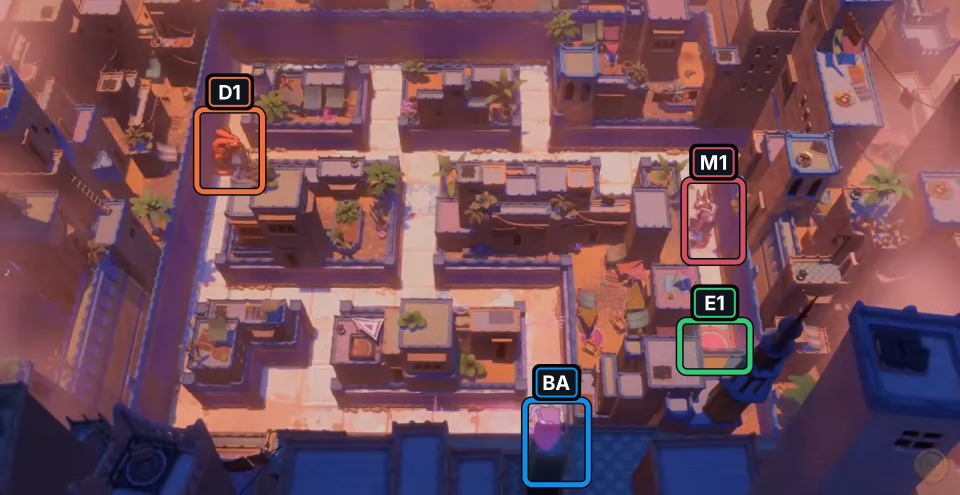
P18 selected still (13:44 video cue): D1 is left of the upper street, M1 is in the right shaft, and the Bard is beside the lower exit.
Check: The layout matches the local board. The article does not state this still's exact PTS; no input route or clear is claimed.
Open full-size image in a new tabHint
Use the upper street to get beyond the turn into M1’s narrow column before heading down. This leaves room for the Dragon to follow behind and line up with M1. If M1 still blocks the column at the checkpoint, undo to the upper approach instead of trying to pass it in the shaft.
Solution
- Reach the inner alley. Go up three steps from the start to reach the right-side alley.
- Take the central junction to the upper street. Move left three, then up four to the junction and upper street at step 10.
- Line up with D1. Continue left four steps, stopping just right of D1 at step 14.
- Go past the shaft turn. Follow the upper street right twelve steps, ending one tile beyond the turn into M1’s narrow column. At step 26, D1 is at the top of M1’s column and M1 clears; confirm the column is clear before turning down.
- Guide D1 left. Step left once at step 27 to guide the Dragon one tile left and open the column.
- Take the exit. Go down five steps through the cleared column to the exit at step 32.
If M1 still blocks the column before the descent, undo to the upper-street approach and finish the rightward run before turning down.
Full direction sequence
- BA Bard
↑ ↑ ↑ ← ← ← ↑ ↑ ↑ ↑ ← ← ← ← → → → → → → → → → → → → ← ↓ ↓ ↓ ↓ ↓
Sources and credits
Room layouts and entity labels: PC r67121 game files. The official PlayStation hands-on report introduces the Bard’s charm; the community PuzzleScript port describes its two-tile reach. The 32-step Dragon route uses a downward-facing projection in a scoped model. Selected P4 frames show the matching layout, screen-down fire in the left and right lanes, and the late exit transition; they do not establish the exact 32 inputs or a native fixed Dragon facing. P18 still: Sinking Star Walkthrough links the source video’s first move at 13:44; this is not the still’s exact PTS. Video: 塞德莎, Heroes 3, part 4. Board artwork: Thekla, Inc.
- Selected Heroes 3 layouts and bounded player-action traces (PC r67121) — Extracted data
- Four additional source-only Heroes 3 room layouts (PC r67121) — Extracted data
- Supplemental Heroes 3 Dragon-maze check (bounded model) — Documentation · heroes3-maze-bounded-checks-2026-10-17
- PlayStation Blog hands-on report — Documentation · published-2026-07-21
- Joric's PuzzleScript movement-rule port — Documentation · commit-4e6e0784727d95c7337d50f6d5b3ef912aa0e8ae
- [North] Heroes 3: Bard and Druid + Energy Gate Direction + Heroes Assemble [North 4 + North 3 West 1 + North 1 supplement 1 puzzle] / 【北】英雄3:吟游诗人与德鲁伊+能量门方向+英雄齐聚[北4+北3西1+北1补1题] — Observed in-game
- Heroes 3 Puzzle 18 alternate source still for heroes3_8_v4_alt — Observed in-game · screenshots-reviewed-2026-10-22
- 100% Guides Heroes 3: Bard, Druid video — Observed in-game · puzzle18-cue-reviewed-2026-10-22
- Character portraits and selected puzzle-board images (PC r67121) — Extracted data
- Heroes 3 heroes3_1_v3 selected P4 starting-layout screenshot — Observed in-game · screenshots-reviewed-2026-10-21
- Heroes 3 heroes3_3_v2 selected P4 starting-layout screenshot — Observed in-game · screenshots-reviewed-2026-10-21
- Heroes 3 heroes3_4 selected P4 starting-layout screenshot — Observed in-game · screenshots-reviewed-2026-10-21
- Heroes 3 heroes3_2_v4 P11 selected still and native texture match — Observed in-game · screenshots-reviewed-2026-10-22
- Heroes 3 shipped-candidate classification and screenshot limits — Documentation · candidate-classification-review-2026-10-22
Unofficial fan wiki, not affiliated with Thekla, Inc. / Arc Games / Gamirror Games. Game content belongs to its owners.
Comments & feedback
Share a tip or suggest a correction. Comments are public. Guest names are unverified; verified accounts show their account username. All language pages share this discussion. Please keep personal information private.