
 Order of the Sinking Star
Heroes 2: final puzzles

These six late-set rooms bring together  Wizard swaps,
 Thief pulls, the
 Priestess’s protection and the
 Warrior’s pushes. M labels mark Goblins, D labels mark Dragons, numbers identify crystals, and exit badges show the destinations. Arrows follow each displayed board; use the movement controls currently bound in your game.
The screenshot viewers below show selected P3 checkpoints; they are not recovered input sequences. Their first cards show source-matched starts. The canonical TeamRoute replays remain separate bounded model evidence.
Wizard and Priestess: cross the crystal-packed room
Section titled “Wizard and Priestess: cross the crystal-packed room”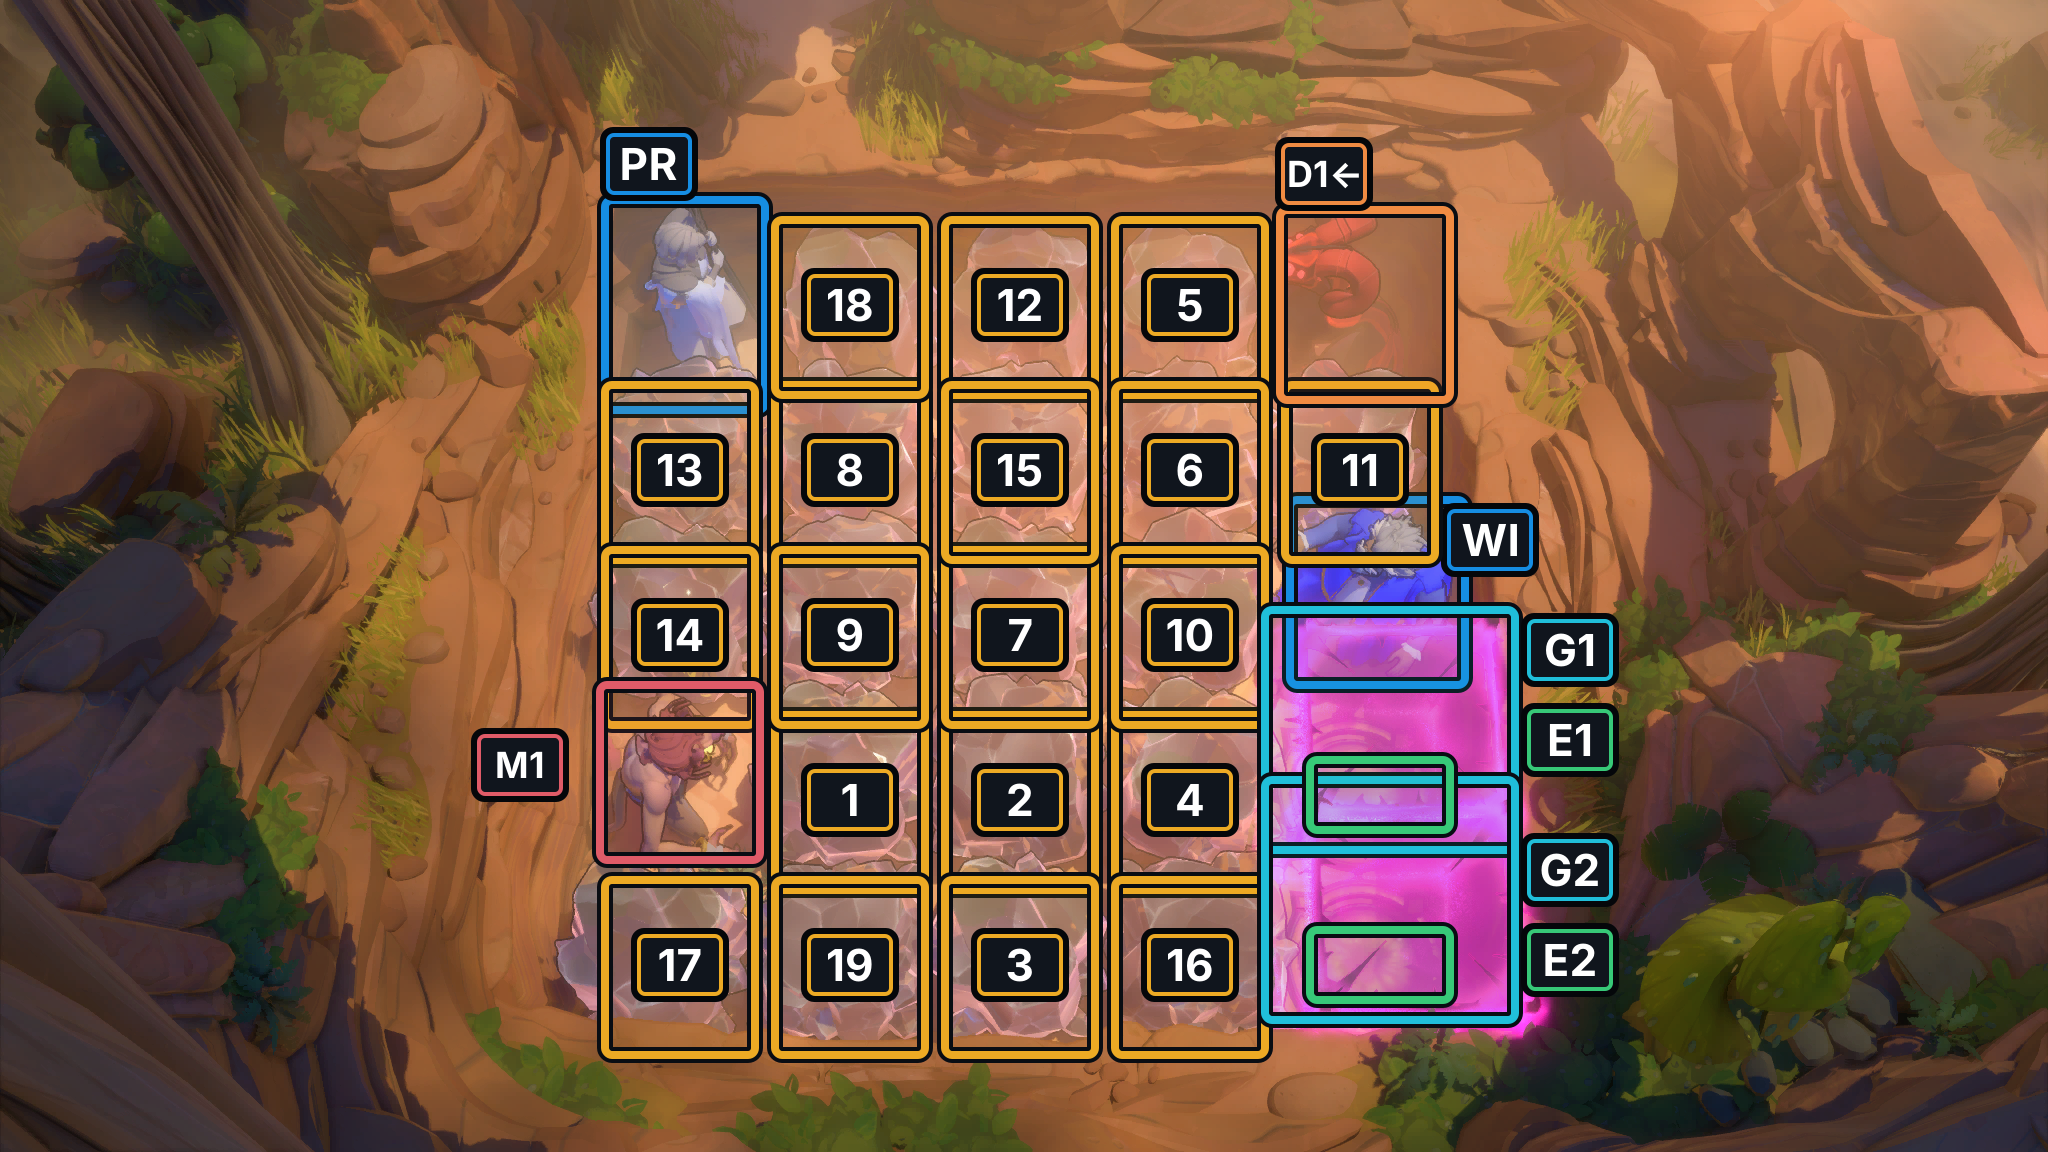
- Crystals 1–19
- Gates G1–G2
- Exits E1–E2
- WI Wizard
- PR Priestess
- Goblin M1
- Dragon D1; arrow shows initial fire direction
Hint
The route uses the Wizard to thread through the crystal field rather than clearing every crystal. The first upward move swaps with C11, the crystal directly above the Wizard. Keep the two stacked gate-and-exit tiles in mind for the final approach.
Solution
- Start the Wizard
↑ ↑ ← ← ← ←, then weave down and right through the crystal lanes. The first move swaps with C11; use the numbered badges to keep track of the pieces as the route crosses the crowded middle. - At step 39, the Wizard’s upward swap clears M1 and D1 together, opening both gates. Continue along the cleared central route to the upper exit tile.
- Bring the Priestess into the upper exit tile and the Wizard into the lower exit tile. The two exit markers sit on the same tiles as the gates; both are occupied at step 47.
If the Wizard’s final approach is blocked, Undo to the last clear crystal lane before trying to cross the stacked gate markers.
Images show selected video checkpoints; the first frame is the starting position.
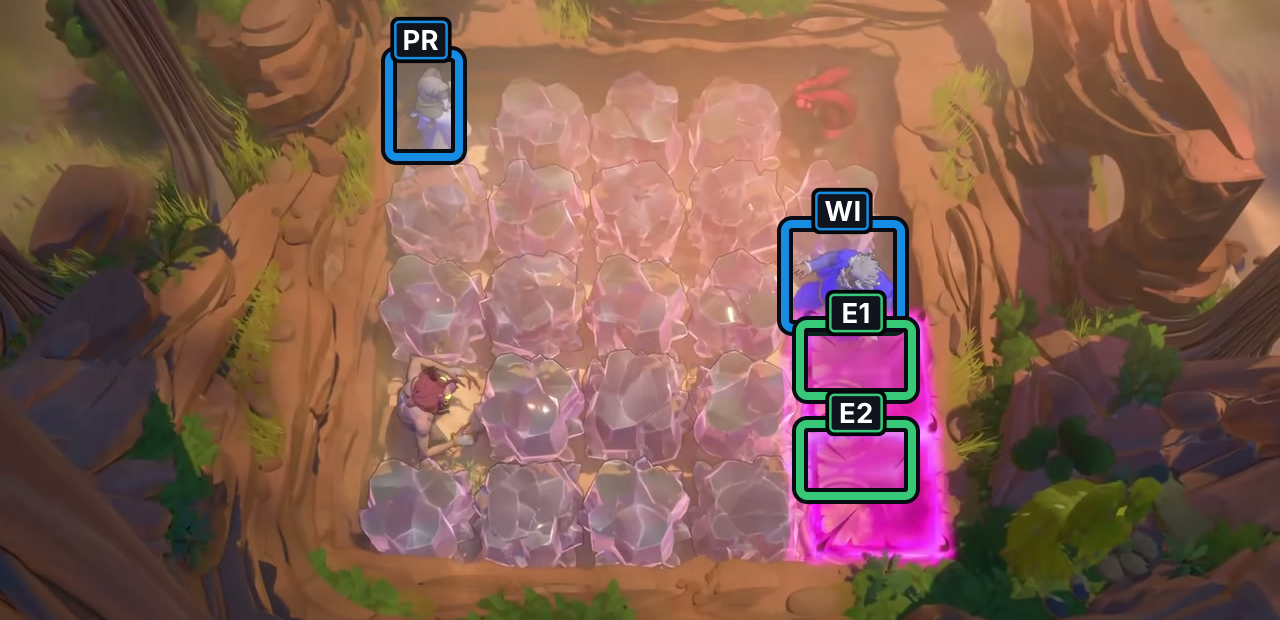
At 18:29, the Wizard and Priestess still match the native room starts.
Check: A brief pink gate effect appears at the right; the frame does not show inputs or a completed crossing.
Open full-size image in a new tab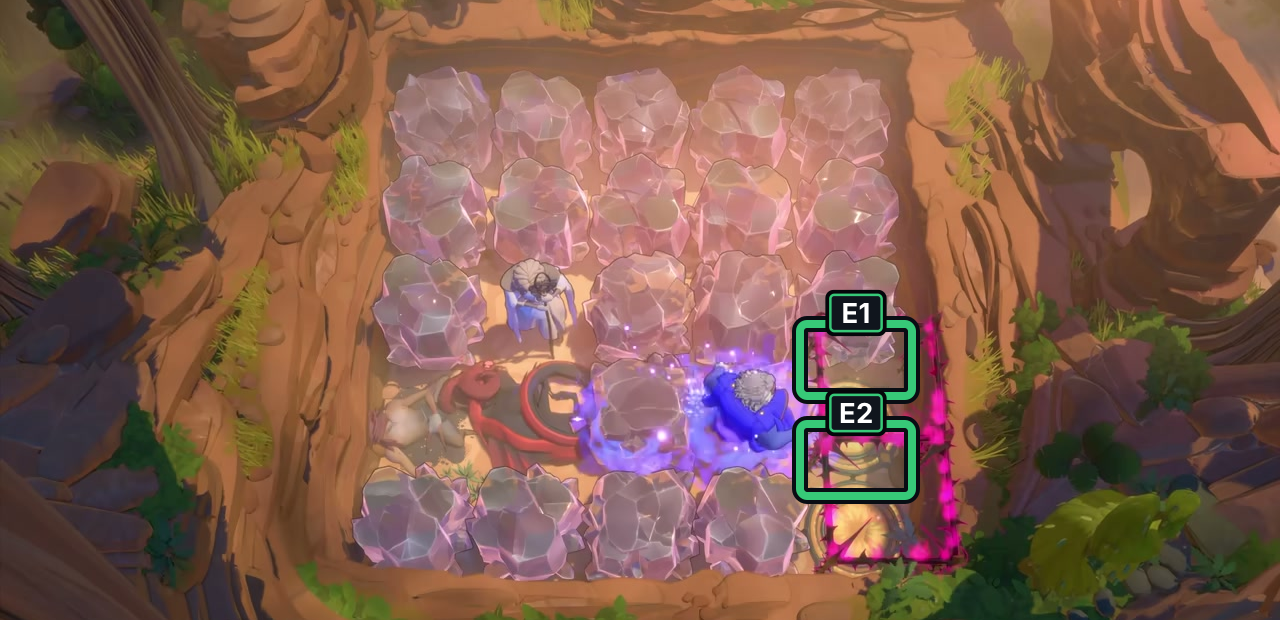
At 20:00, a late combat state is visible.
Check: The Goblin and Dragon appear prone; overlapping gate/exit frames look empty. The footage does not establish why.
Open full-size image in a new tabFull direction sequence
- WI Wizard
↑ ↑ ← ← ← ← ↓ → → ↑ ← ↓ → ↑ → ↓ → ↓ ← ↑ ↑ ← ← ↓ ↓ → ↑ ← ↓ → → ↓ ← ← ↑ → ↓ ← ↑ ↓ → → ↑ → - PR Priestess
→ - WI Wizard
↓ - PR Priestess
→
Wizard and Priestess: clear the four-Goblin gate
Section titled “Wizard and Priestess: clear the four-Goblin gate”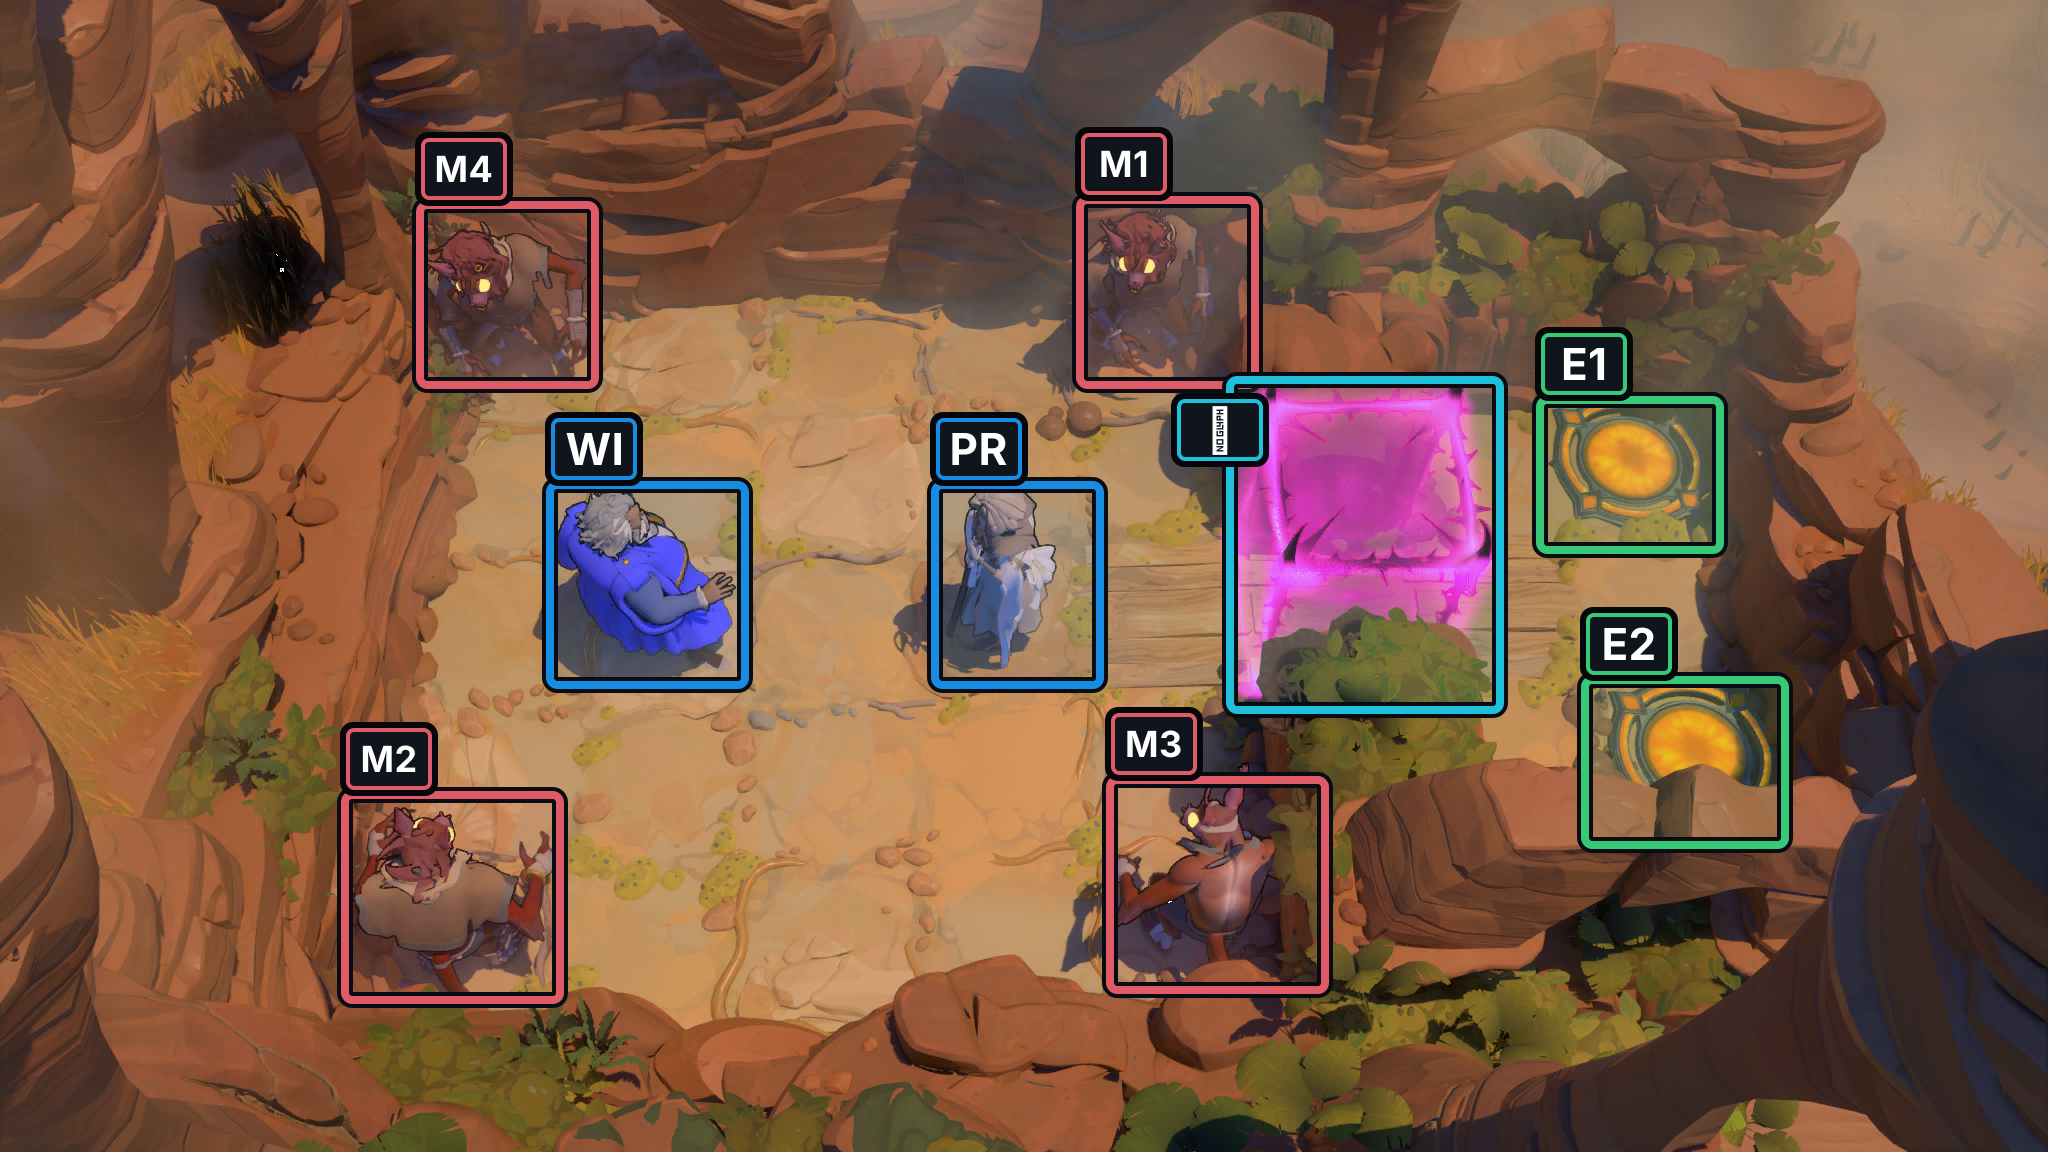
- Gate
- Exits E1–E2
- WI Wizard
- PR Priestess
- Goblins M1–M4
Hint
Use the Priestess to reach the left-side approach while the Wizard works through the Goblin lanes. Two Goblins clear on the Wizard’s down-swap at step 7; the other two clear on the second down-swap at step 18, opening the gate.
Solution
- Move the Wizard
↑. Take the Priestess← ← ← ↑; then route the Wizard around the lower-left passage and across the middle lane. - The Wizard’s down-swap at step 7 clears M2 and M4. Continue the upper and right-hand loop; the Wizard’s next down-swap at step 18 clears M1 and M3, and the gate opens.
- Send the Wizard through the upper passage to the upper exit, then guide the Priestess along the lower lane to the lower exit. The 30-action route ends with both exits occupied.
If either Goblin remains after the step-18 swap, Undo to the preceding approach and realign the Wizard before continuing through the gate.
Images show selected video checkpoints; the first frame is the starting position.
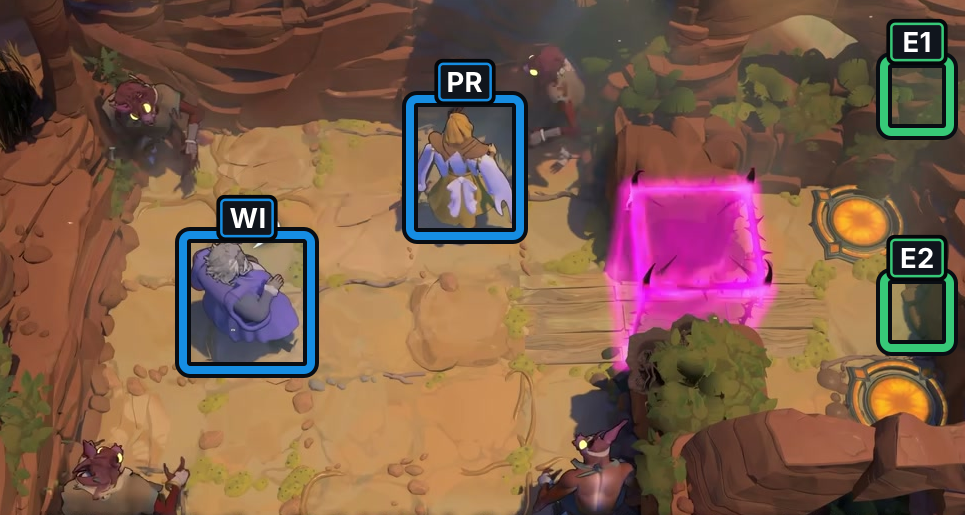
At 20:20, the Wizard and Priestess share the left passage at the four-Goblin start.
Check: Four Goblins, a right-side gate and two exits are visible; later similar footage is ambiguous.
Open full-size image in a new tabFull direction sequence
- WI Wizard
↑ - PR Priestess
← ← ← ↑ - WI Wizard
← ↓ ↑ ↑ → → → - PR Priestess
→ → → - WI Wizard
↑ → ↓ ↑ ↑ → → ↑ → - PR Priestess
↓ → → → ↓ →
Wizard and Priestess: open the three-Goblin route
Section titled “Wizard and Priestess: open the three-Goblin route”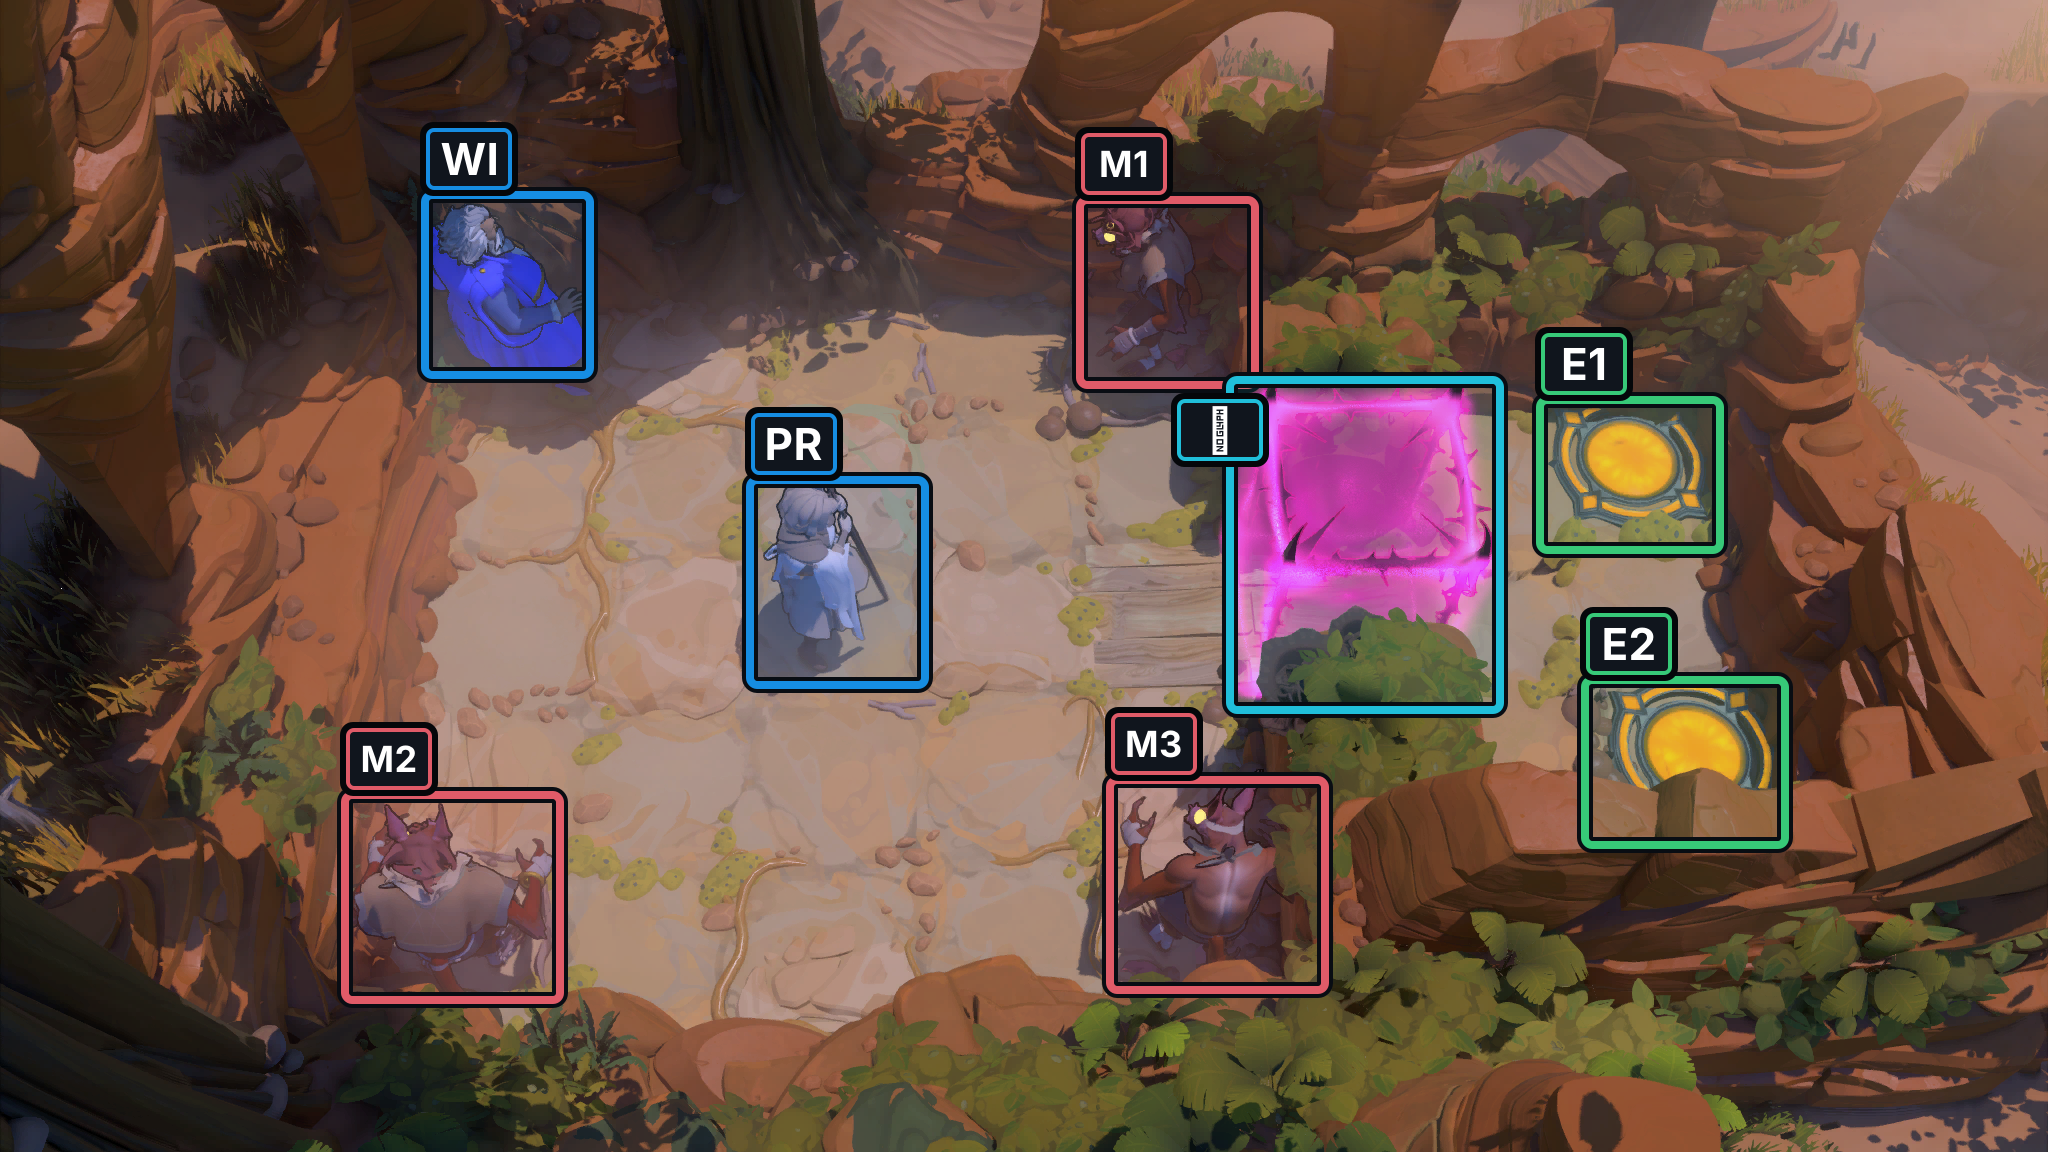
- Gate
- Exits E1–E2
- WI Wizard
- PR Priestess
- Goblins M1–M3
Selected source view for visual comparison.
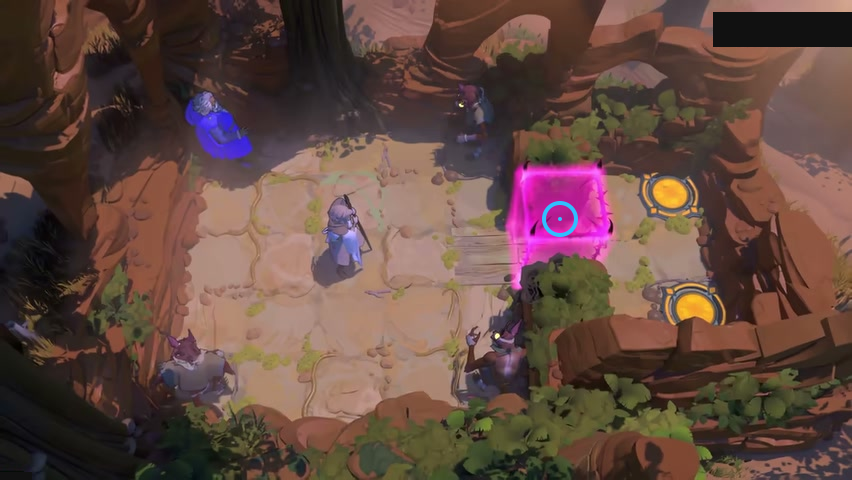
Locate the monster gate between the arena and the exits.
Check: Ring marks The pink monster gate.
Open full-size image in a new tabHint
The Priestess first climbs into the upper lane. Let the Wizard work across the opposing Goblin lanes; the final rightward swap at step 27 clears all three Goblins and opens the gate.
Solution
- Move the Priestess
↑ ↑, then guide the Wizard through the right-side swaps and back across the center. Keep the Priestess on her upper approach while the Wizard changes lanes. - The Wizard’s rightward swap at step 27 clears M1, M2 and M3 together. The gate opens; the Wizard reaches the upper exit at step 32.
- Bring the Priestess through the right corridor to the lower exit at step 38. Both exits are occupied at the end of the route.
If the three Goblins are not cleared at the final swap, Undo before taking the exit corridor and restore the Wizard’s approach from the center lane.
The pink gate separates the arena from the two exits on the right.
Full direction sequence
- PR Priestess
↑ ↑ - WI Wizard
→ → - PR Priestess
↓ → → → → - WI Wizard
↓ ↓ ← ↑ ↑ → ↑ → ↓ ← ↑ ↑ ← - PR Priestess
← ↓ ← - WI Wizard
↑ → ↓ → → ↑ → - PR Priestess
→ → → → ↓ →
Thief, Wizard and Priestess: clear four Goblins
Section titled “Thief, Wizard and Priestess: clear four Goblins”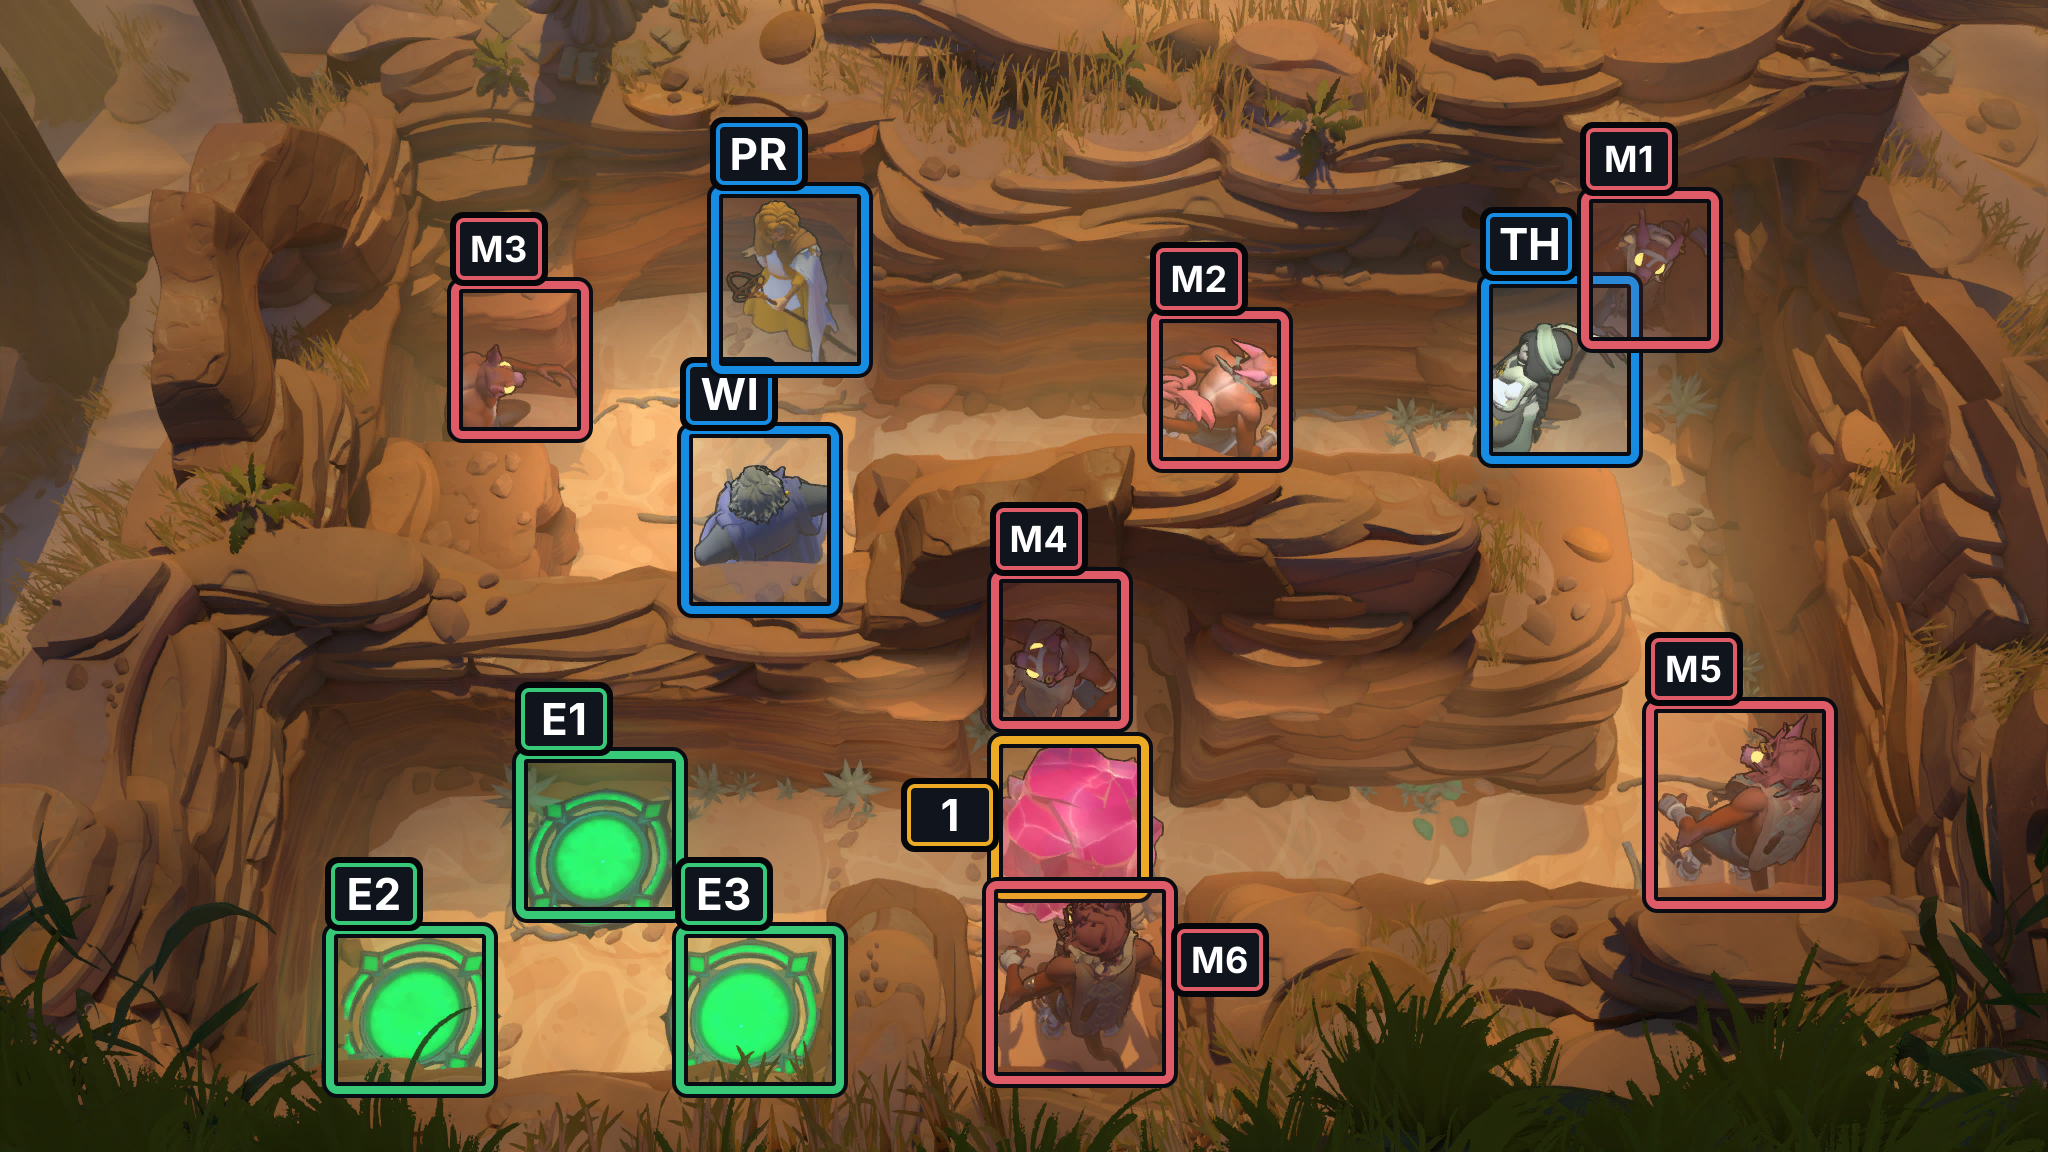
- Crystal 1
- Exits E1–E3
- TH Thief
- WI Wizard
- PR Priestess
- Goblins M1–M6
Hint
Use the Wizard’s swaps to clear M2 and M3 at step 5, then M1 and M5 at step 22. The Thief’s pulls carry C1 through the right-side lanes while the Priestess and Wizard take the other routes. M4 and M6 remain in the room.
Solution
- Use the opening handoffs to bring the Wizard into the first Goblin line. The step-5 swap clears M2 and M3; continue repositioning the three heroes through the center passages.
- At step 22, the Wizard’s next swap clears M1 and M5. Keep the Thief on the outer-right route: the pulls at steps 33–35 carry C1 along that passage before the heroes loop back toward the exits.
- Finish the lower-left approach with Thief, Wizard and Priestess on the three marked exits at step 79. M4 and M6 survive, and C1 remains on the board.
If the Wizard’s swap misses one of its two targets, Undo to the previous handoff and restore the alignment before continuing the Thief’s longer loop.
Images show selected video checkpoints; the first frame is the starting position.
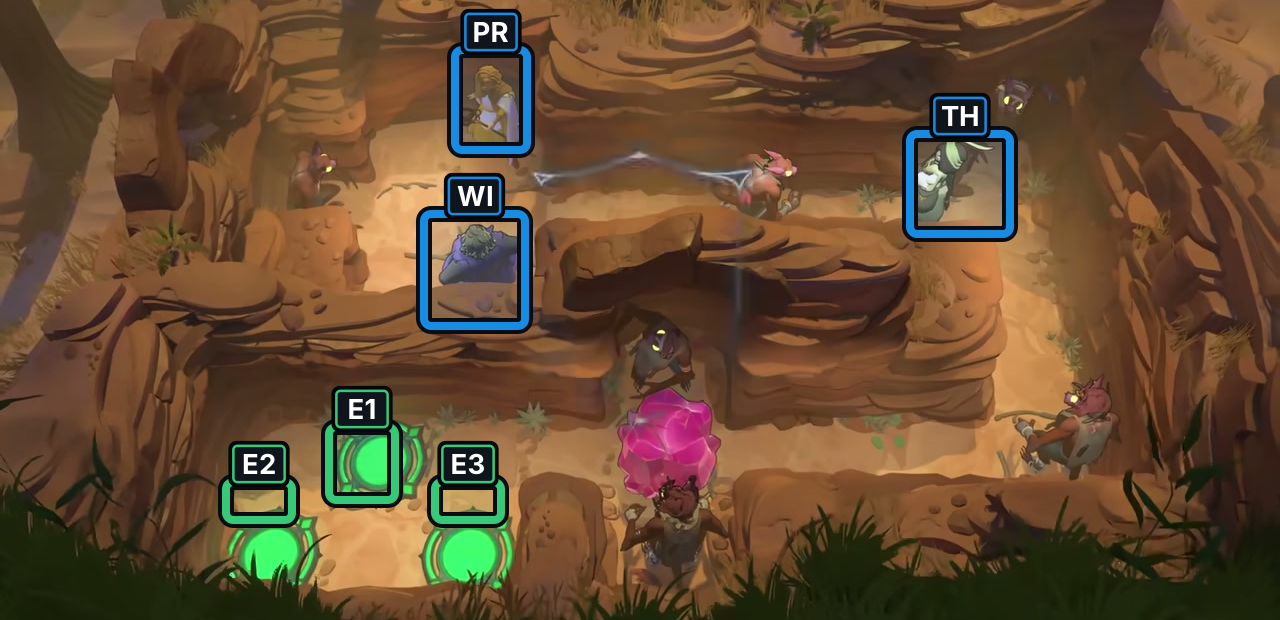
At 22:57, the Thief, Wizard and Priestess match the native starts.
Check: A brief beam crosses the upper lane; this still does not reveal inputs or a complete route.
Open full-size image in a new tab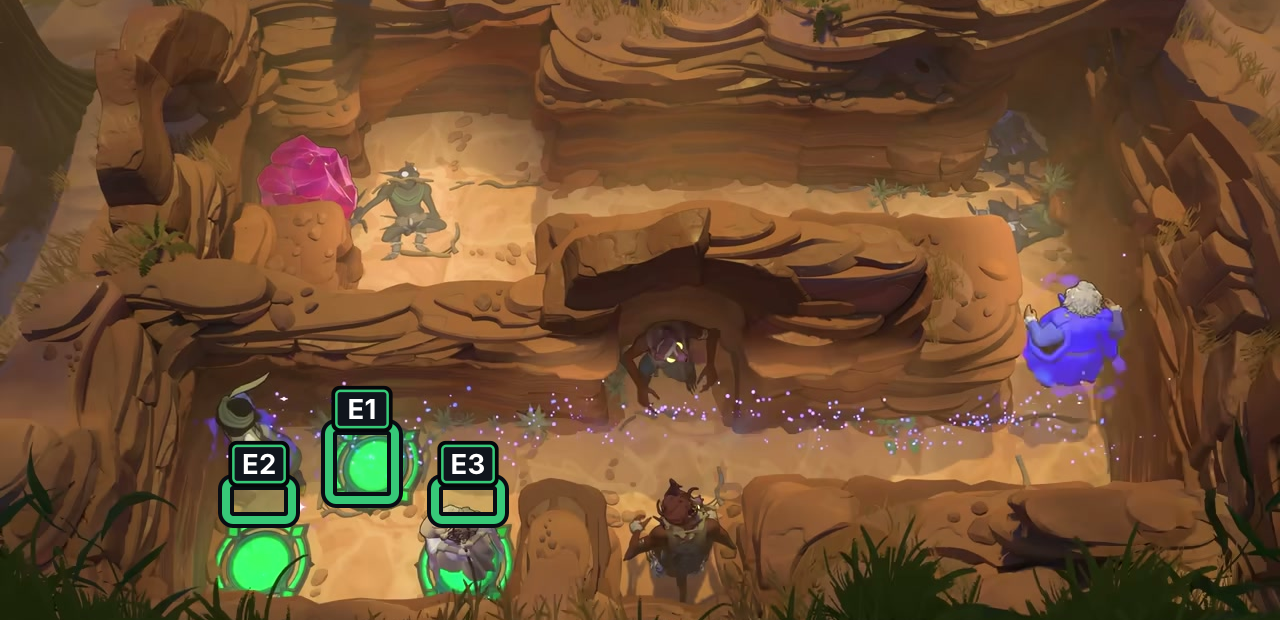
At 24:40, the video shows another late canyon state.
Check: The frame does not show all three exit pads occupied together; no exact finish or route is recovered.
Open full-size image in a new tabFull direction sequence
- PR Priestess
↓ - WI Wizard
← - PR Priestess
← - WI Wizard
↑ → - PR Priestess
↑ - WI Wizard
→ - TH Thief
← ← ← ↑ - WI Wizard
← - TH Thief
↓ → → → → - PR Priestess
→ - TH Thief
→ - WI Wizard
→ → ↓ - PR Priestess
→ - TH Thief
→ - PR Priestess
↑ - TH Thief
→ - WI Wizard
↑ - TH Thief
← - WI Wizard
↓ ↓ - TH Thief
← ← → → → - WI Wizard
↓ ← - TH Thief
↑ - WI Wizard
→ - TH Thief
↑ ← - WI Wizard
↑ ↑ - PR Priestess
↑ - TH Thief
← - WI Wizard
↓ - PR Priestess
→ - WI Wizard
↑ - PR Priestess
← - WI Wizard
← - TH Thief
↓ - WI Wizard
→ - TH Thief
↓ ↓ - PR Priestess
← - TH Thief
← - WI Wizard
↓ - PR Priestess
← - TH Thief
← - PR Priestess
← - TH Thief
← - PR Priestess
← - TH Thief
← - WI Wizard
← ← ← - PR Priestess
← - WI Wizard
← - PR Priestess
← - WI Wizard
→ → - TH Thief
↓ - WI Wizard
← - PR Priestess
← ← ← - WI Wizard
↓ - PR Priestess
← - WI Wizard
←
Thief, Wizard and Priestess: route through three switches
Section titled “Thief, Wizard and Priestess: route through three switches”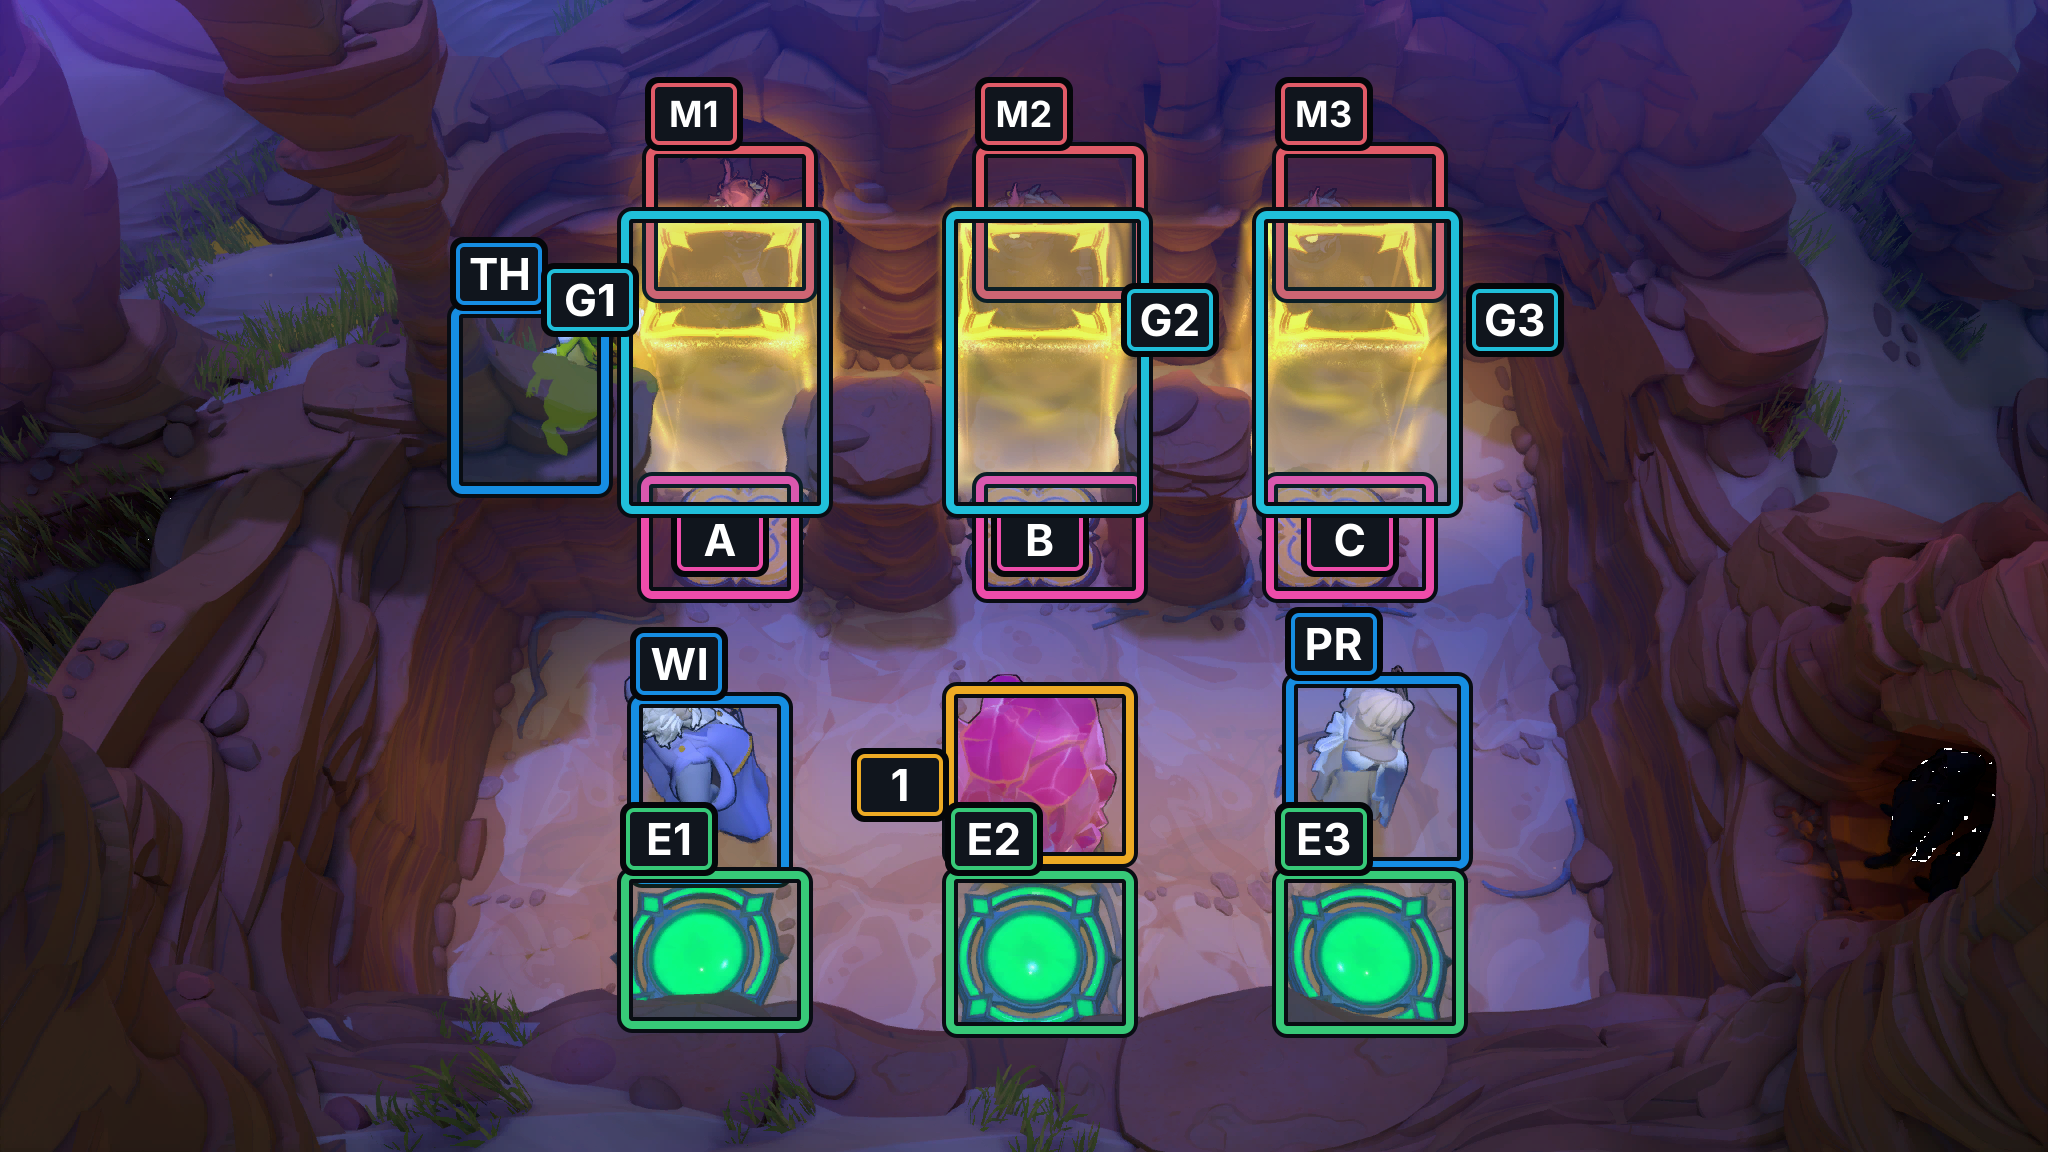
- Crystal 1
- Switches A–C
- Gates G1–G3
- Exits E1–E3
- TH Thief
- WI Wizard
- PR Priestess
- Goblins M1–M3
Hint
Weight all three switches together to open the gates, then use the routes between pads to get the heroes through. Some switches are freed and the gates close during the route; that is expected once the team has passed the gated passage. The last move does not require all three switches to stay weighted.
Solution
- Reposition the heroes and C1 to put a weight on each of the three switches. All are occupied and the gates open at step 14.
- Follow the handoffs through the passages. The gates close when a switch is freed at step 17, reopen when the team restores the three-pad arrangement at steps 21 and 47, and may close again as the heroes leave the switches behind.
- Finish at the three bottom exits: Wizard on E1, Priestess on E2 and Thief on E3. At step 60, the gates are closed and only one switch remains occupied; neither condition prevents the completed exit arrangement.
If the gates close before the team has crossed the gated passage, Undo to the last three-switch setup and take the crossing while it is open.
Images show selected video checkpoints; the first frame is the starting position.
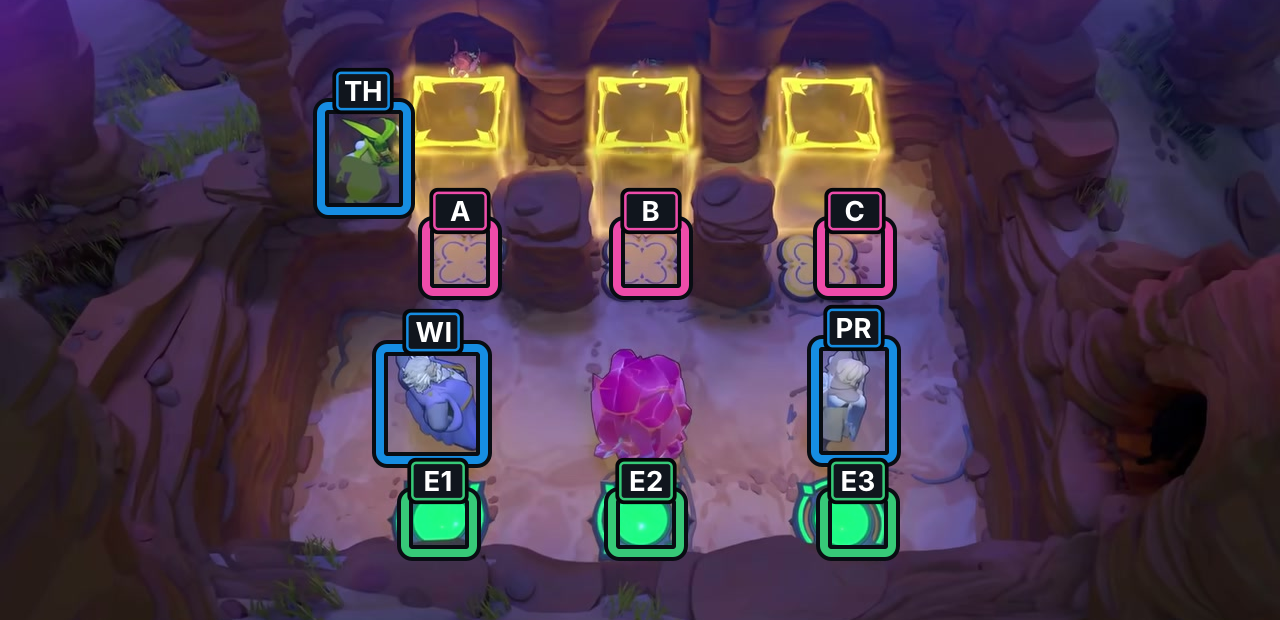
At 25:16, all three heroes and the Crystal match the source-verified start arrangement.
Check: Three gate lanes, three pads and all lower exits are visible; no route is shown.
Open full-size image in a new tabThe P3 cards show this room’s three-pad appearances only; they do not establish a universal gate rule or exact passability timing.
Full direction sequence
- WI Wizard
→ - PR Priestess
↑ - WI Wizard
→ → ← ↑ → ↑ ↓ - PR Priestess
↑ - WI Wizard
← ↑ ← ↑ - TH Thief
→ → - WI Wizard
↓ - PR Priestess
↓ - WI Wizard
← ↑ - PR Priestess
↑ - TH Thief
→ → - WI Wizard
↓ ↓ → → → → ↑ → ↓ ← ← ← ↓ - PR Priestess
↓ - WI Wizard
→ ↑ ← ↑ ↓ ← ← - PR Priestess
↑ - WI Wizard
↑ ↑ - TH Thief
→ → ↓ ↓ ← ↓ ↓ - PR Priestess
← ← - WI Wizard
↓ ↓ ↓ - PR Priestess
↓
Warrior, Thief, Wizard and Priestess: clear the eight-Dragon room
Section titled “Warrior, Thief, Wizard and Priestess: clear the eight-Dragon room”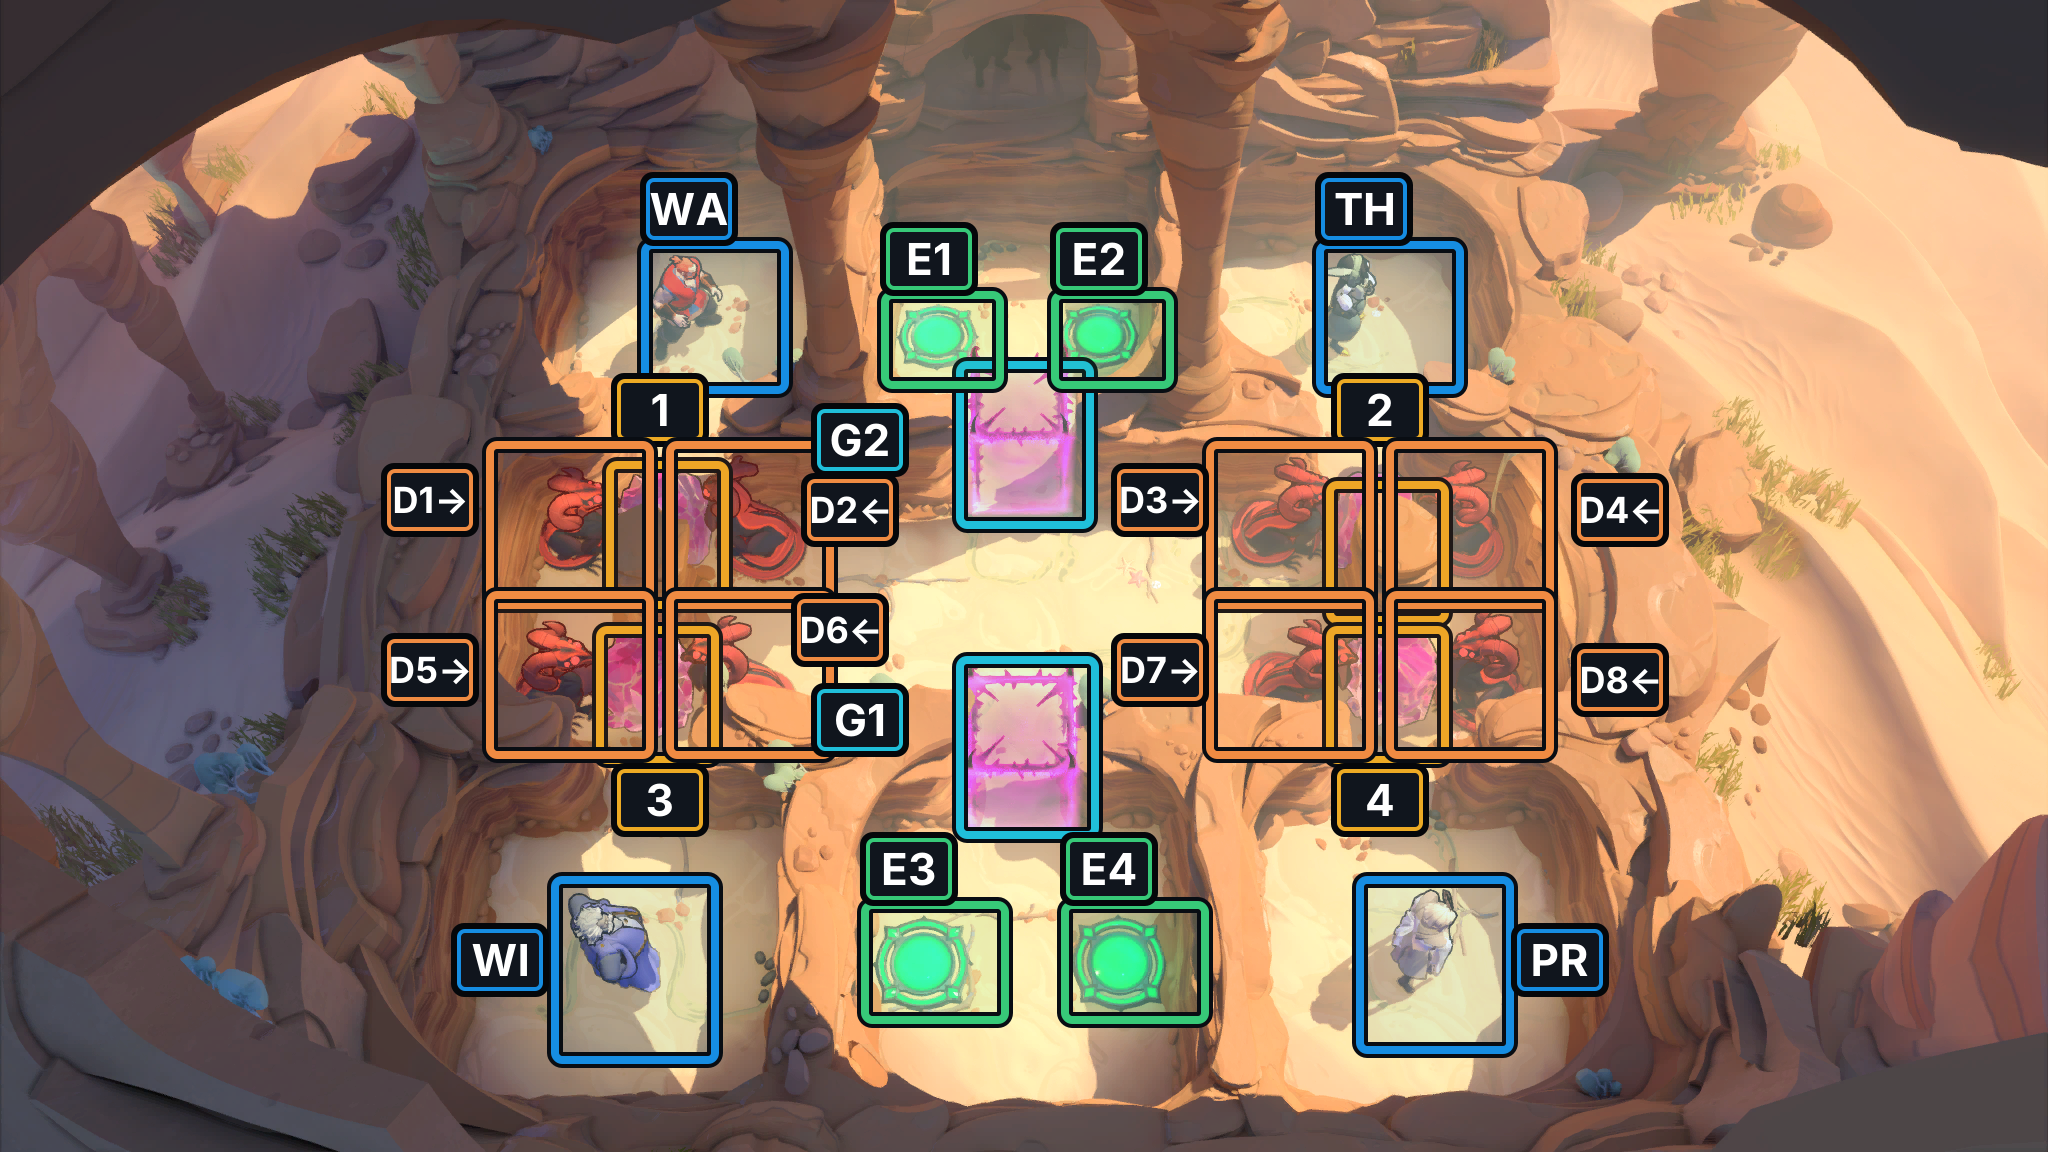
- Crystals 1–4
- Gates G1–G2
- Exits E1–E4
- WA Warrior
- TH Thief
- WI Wizard
- PR Priestess
- Dragons D1–D8; arrows show initial fire direction
Hint
Work one Dragon pair at a time. The Thief’s opening pull clears the first pair; later, use the Priestess to cover the crossing, let the Wizard swap through a Dragon lane to free the Warrior, and line up the final pair before the Warrior pushes.
Solution
- The Thief starts with
↓ ↓ ↑; the pull on step 3 clears the right-side pair. Keep following the route around the outer lanes as the heroes trade places. - The Wizard’s upward swap at step 43 clears another Dragon. The Priestess’s move into the upper lane clears two more at step 47; the Wizard’s upward swap at step 50 frees the Warrior for the final pushes.
- After the Wizard frees him at step 50, the Warrior goes
→ →at steps 51–52, moving the Priestess and D2 right. The Thief goes→ ↓at steps 53–54 to pull D2 down, then← ←at steps 55–56 to draw C4 left as a screen. The Warrior goes→ → ↓at steps 57–59, pushing D2 into D8’s fire and clearing it. He then goes→ → ↑ → ↓at steps 60–64, lining D7 up with D8; both clear, all eight Dragons are gone, and both gates open. - Guide the Warrior to E2 and the Priestess to E1 along the upper exits; send the Wizard and Thief through the lower passages to E3 and E4. All four exits are occupied by step 92.
If the last Dragon is not lined up before the Warrior’s final push, Undo to the setup before step 59 and re-form the lane before continuing to the exits.
Images show selected video checkpoints; the first frame is the starting position.
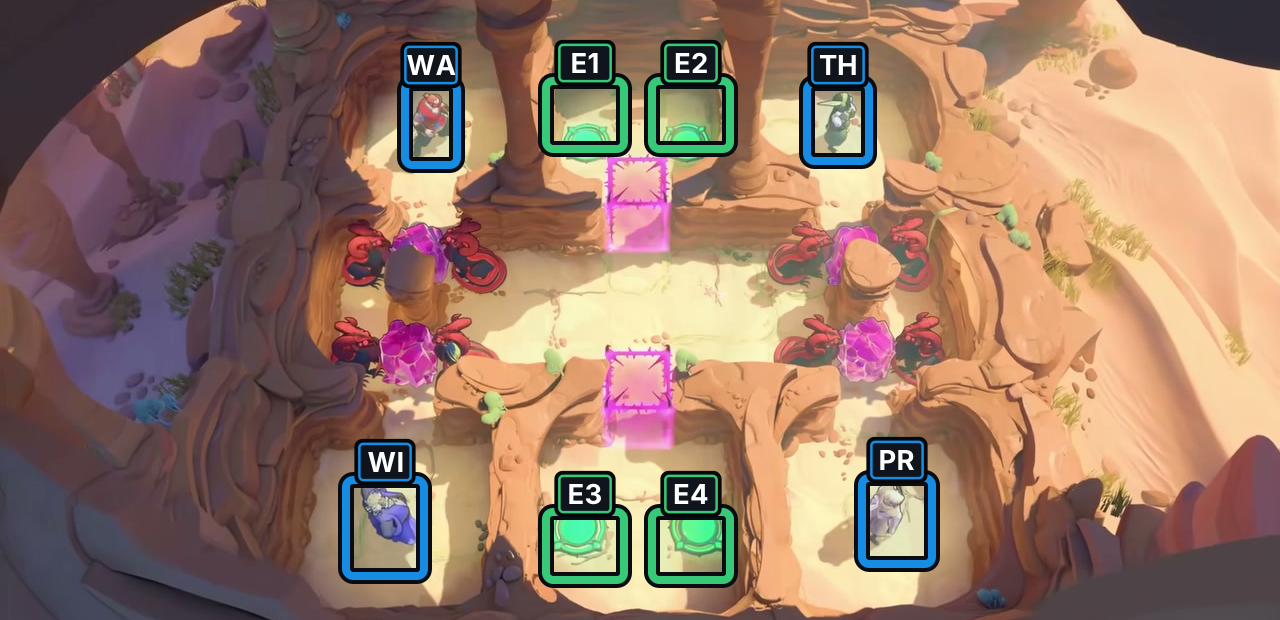
At 26:17, the four heroes match the native room starts.
Check: Eight Dragons, four Crystals and four exits are visible across two lanes.
Open full-size image in a new tab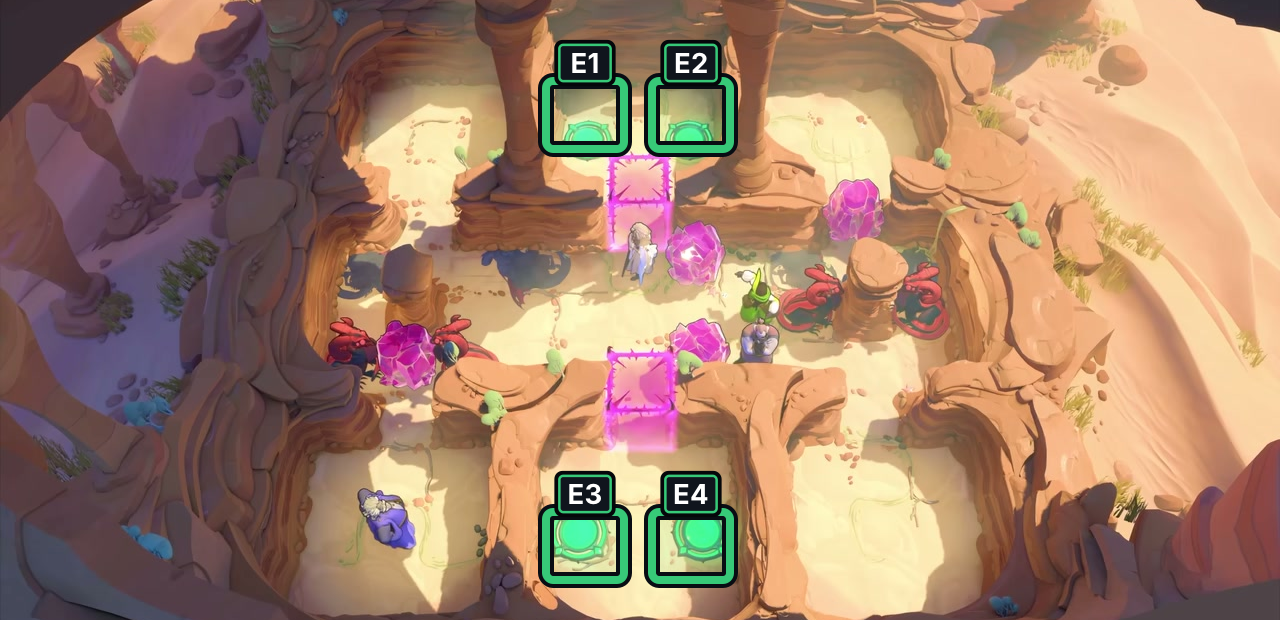
At 27:20, both Dragon lanes show a later selected room state.
Check: Several Dragons remain visible; this frame is not a finish.
Open full-size image in a new tab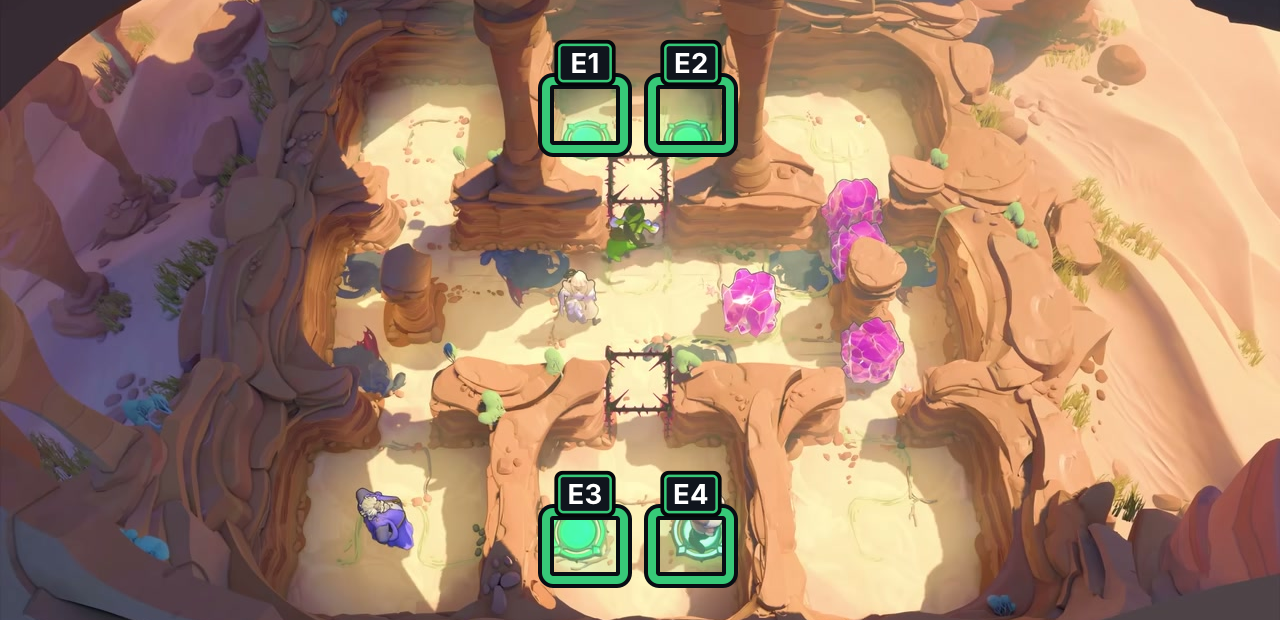
At 28:00, no upright Dragons are apparent and both gate frames look hollow.
Check: Heroes approach the exits, but no frame proves every Dragon was defeated or all four exits occupied at once.
Open full-size image in a new tabThe P3 cards do not show an exact complete finish; the four-exit sequence above belongs to the bounded helper route, not the video.
Full direction sequence
- TH Thief
↓ ↓ ↑ ↑ ↑ → ↓ ↓ ← ↓ ↓ ← ↓ ↑ ← ↓ ↓ → ← ← ← - PR Priestess
↑ ↑ ↑ ← ← ↑ - TH Thief
↑ ← ↓ ← → ↑ ↑ - PR Priestess
← ← ← ← ← ↓ - WI Wizard
↑ ← ↑ - TH Thief
← → ↓ - PR Priestess
↑ ↑ - WI Wizard
→ ↑ - WA Warrior
→ → - TH Thief
→ ↓ ← ← - WA Warrior
→ → ↓ → → ↑ → ↓ - WI Wizard
↓ - PR Priestess
← - WA Warrior
← ← ← ↑ ↑ ↑ - PR Priestess
← - WI Wizard
↓ ↓ → → → ↓ → ↓ ↓ ← - WA Warrior
↑ → - TH Thief
→ → ↓ ↓ - WI Wizard
↓ - TH Thief
→ ↓
Sources and credits
Room layouts and entity names: PC r67121 game files. Selected room footage: 塞德莎, Heroes 2: Monsters, part 3. Board artwork: Thekla, Inc.
- Selected Heroes 2 monster-room layouts and player-action traces (PC r67121) — Extracted data
- Joric's PuzzleScript movement-rule port — Documentation · commit-4e6e0784727d95c7337d50f6d5b3ef912aa0e8ae
- Joric's PuzzleScript Goblin interaction rules — Documentation · commit-4e6e0784727d95c7337d50f6d5b3ef912aa0e8ae
- Character portraits and selected puzzle-board images (PC r67121) — Extracted data
- [North] Hero 2: Monster [North 3] / 【北】英雄2:怪物[北3] — Observed in-game
- Heroes 2 finale mosh_pit_small selected P3 screenshots — Observed in-game · screenshots-reviewed-2026-10-21
- Heroes 2 finale heroes2_17_intro selected P3 screenshots — Observed in-game · screenshots-reviewed-2026-10-21
- Heroes 2 finale heroes2_20 selected P3 screenshots — Observed in-game · screenshots-reviewed-2026-10-21
- Heroes 2 finale heroes2_21b selected P3 screenshots — Observed in-game · screenshots-reviewed-2026-10-21
- Heroes 2 finale heroes2_22_v2 selected P3 screenshots — Observed in-game · screenshots-reviewed-2026-10-21
- PlayStation Blog hands-on report — Documentation · published-2026-07-21
- 塞德莎 Bilibili playlist part 4 selected-view encoding — Observed in-game · playlist-part-4-cid-42570156291-selected-frames-2026-10-24
- Gamer Guru Heroes 2 transition context for the three-Goblin layout — Observed in-game · heroes2-17-transition-context-reviewed-2026-10-24
- Twelve room-display and three legacy source-view observations — Observed in-game · twelve-plus-three-video-frame-observations-2026-10-24
- Selected video views beside legacy model layouts — Observed in-game · legacy-source-views-2026-10-24-selected-third-view
Unofficial fan wiki, not affiliated with Thekla, Inc. / Arc Games / Gamirror Games. Game content belongs to its owners.
Comments & feedback
Share a tip or suggest a correction. Comments are public. Guest names are unverified; verified accounts show their account username. All language pages share this discussion. Please keep personal information private.