
 Order of the Sinking Star
Monster tactics

Blue marks heroes, amber numbers mark crystals, red M labels mark Goblins, orange D labels mark Dragons, and green E labels mark exits. Use crystals as screens between heroes and Goblins, and watch each Dragon’s firing direction. Route arrows follow the displayed board, including rotated maps.
 Warrior: use crystals to screen a Dragon
Section titled “Warrior: use crystals to screen a Dragon”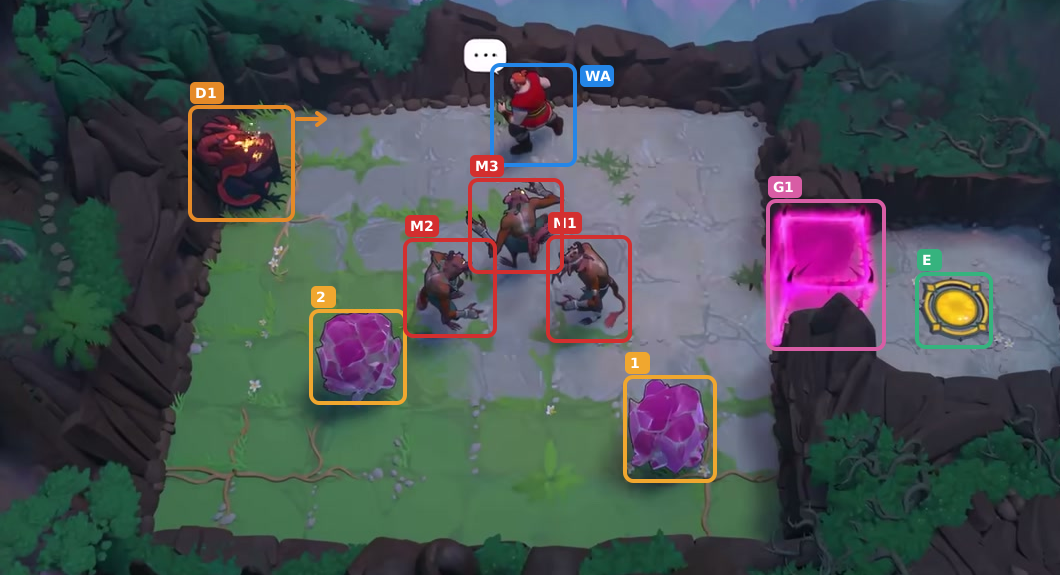
- Crystals 1–2
- Gate
- Exit
- WA Warrior
- Goblins M1–M3
- Dragon D1; arrow shows initial fire direction
Hint
Use Crystal 2 to screen the Dragon while Crystal 1 steers M1 into line. Crystal 2 stays in its left-side starting tile; finish with Crystal 1 directly above it.
Step-by-step solution
Images show selected video checkpoints; the first frame is the starting position.
Start on the stone ledge above the three goblins; the Dragon is to your left.
Check: All three goblins, the Dragon, both crystals, the closed gate, and empty exit are visible.
Open full-size image in a new tab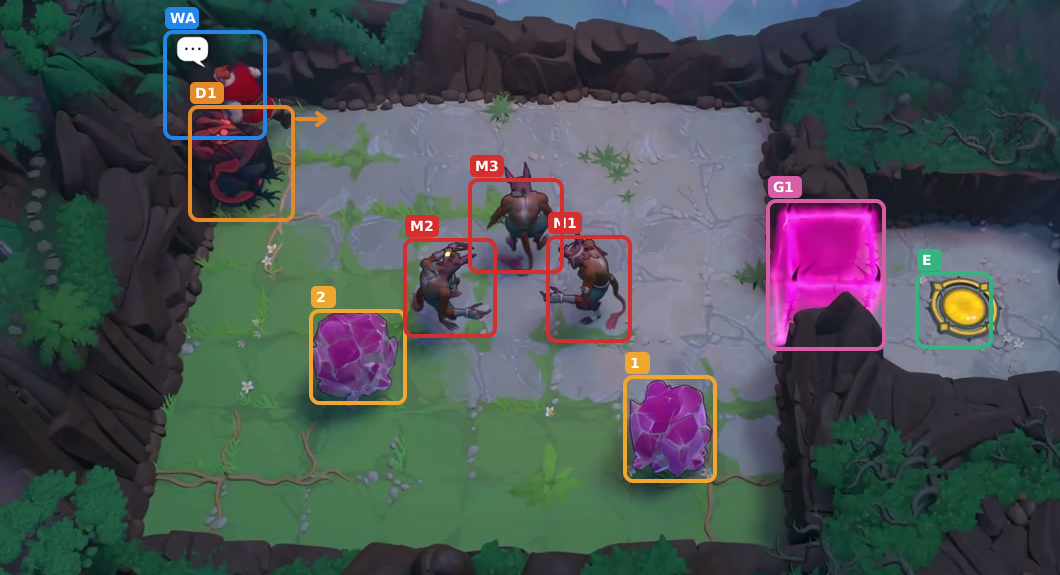
Warrior: left 4.
Check: Warrior reaches the Dragon’s side; all three goblins remain, with the gate closed.
Open full-size image in a new tab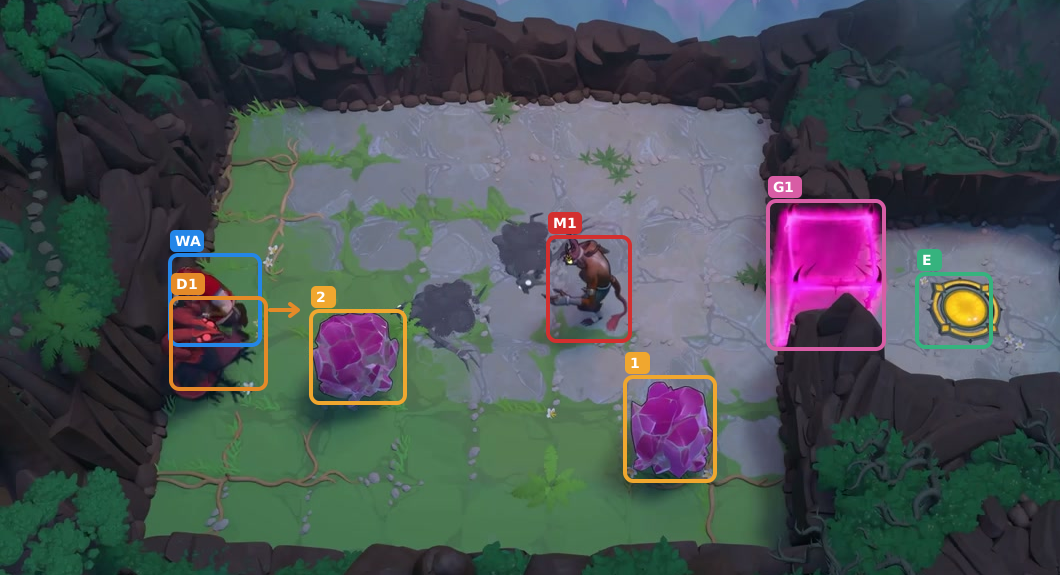
Warrior: down 3.
Check: Two goblins are defeated; one goblin and the Dragon remain. The gate is closed.
Open full-size image in a new tab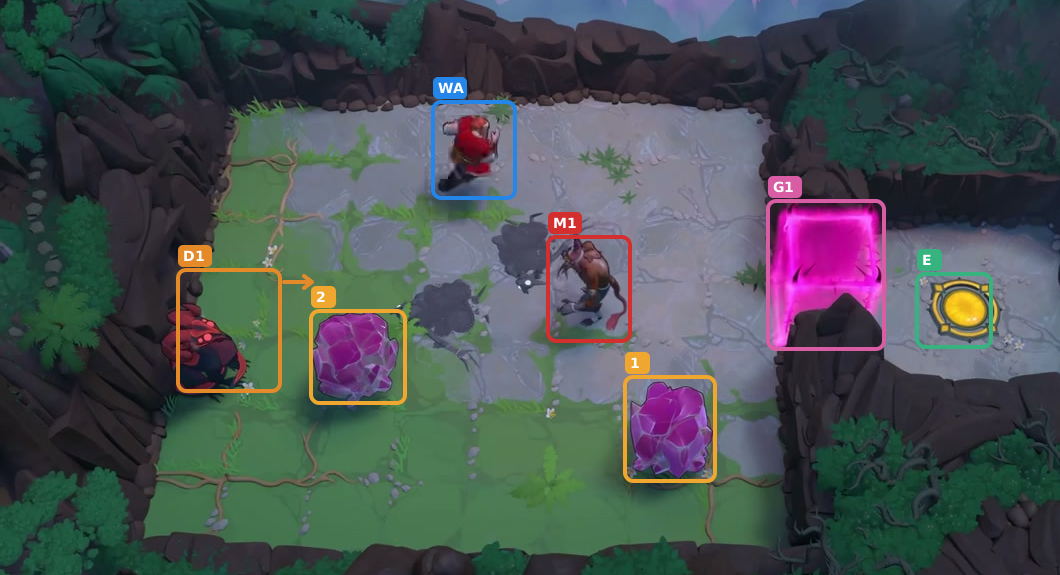
Warrior: up 3, then right 4.
Check: One goblin and the Dragon remain; both crystals and the closed gate are visible.
Open full-size image in a new tab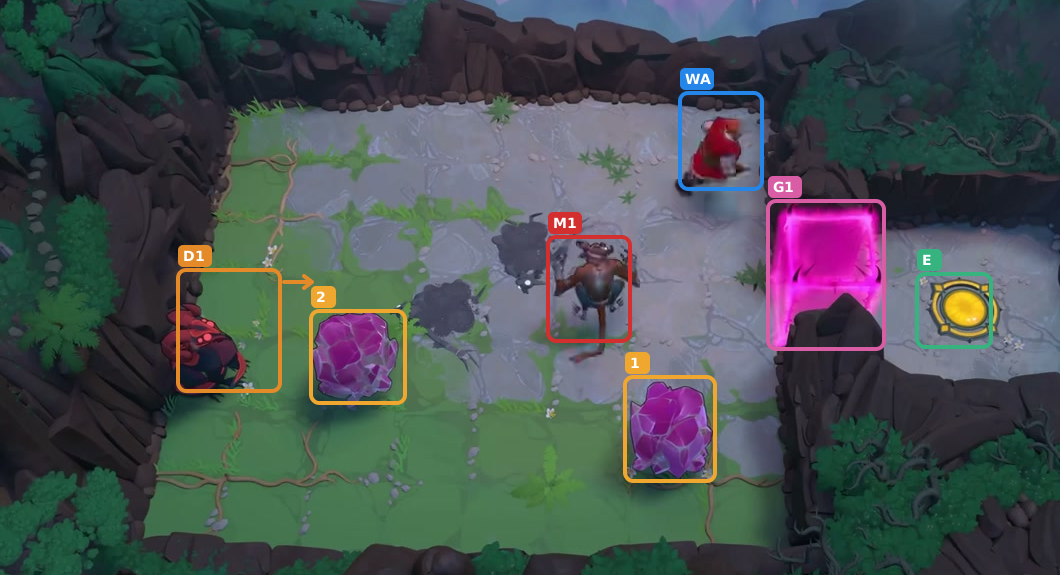
Warrior: right 3.
Check: Warrior reaches the upper path; the last goblin and Dragon remain.
Open full-size image in a new tab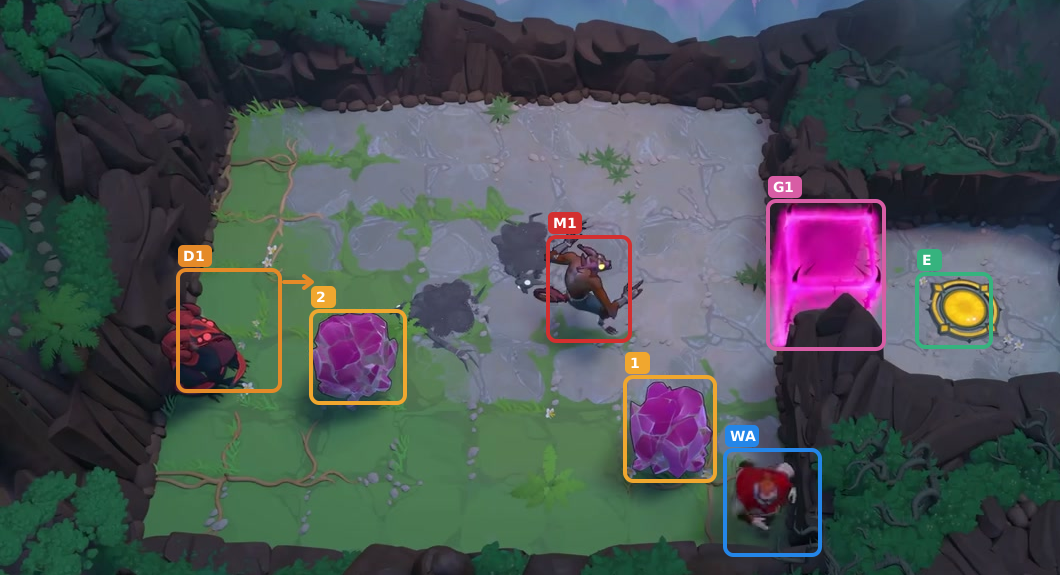
Warrior: down 6.
Check: Warrior reaches the lower-right lane; the last goblin, Dragon, and closed gate remain.
Open full-size image in a new tab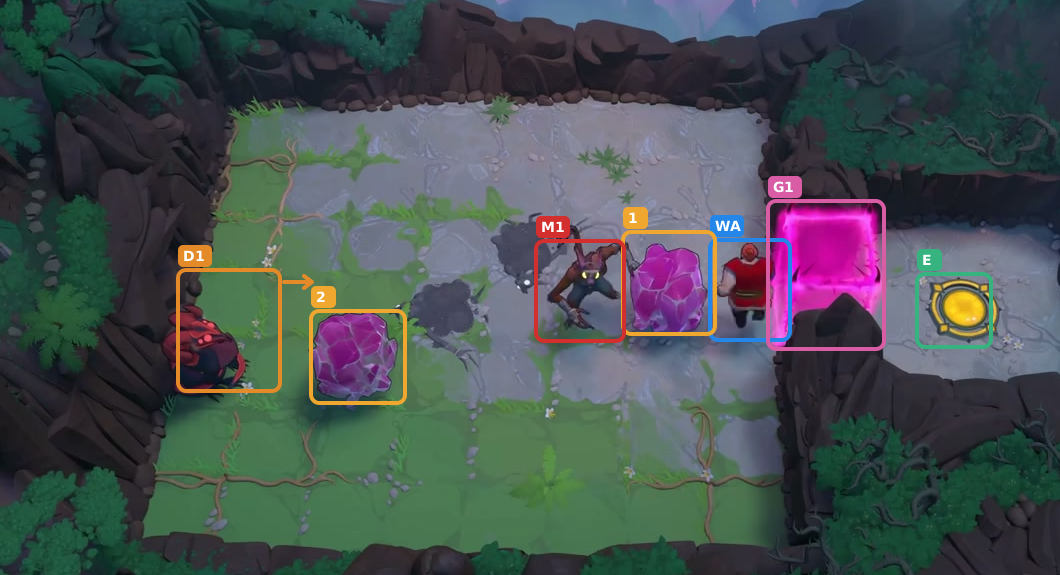
Warrior: left 1, up 2, right 1, then up 1.
Check: Crystal 1 moves into the inner lane; one goblin and the Dragon remain.
Open full-size image in a new tab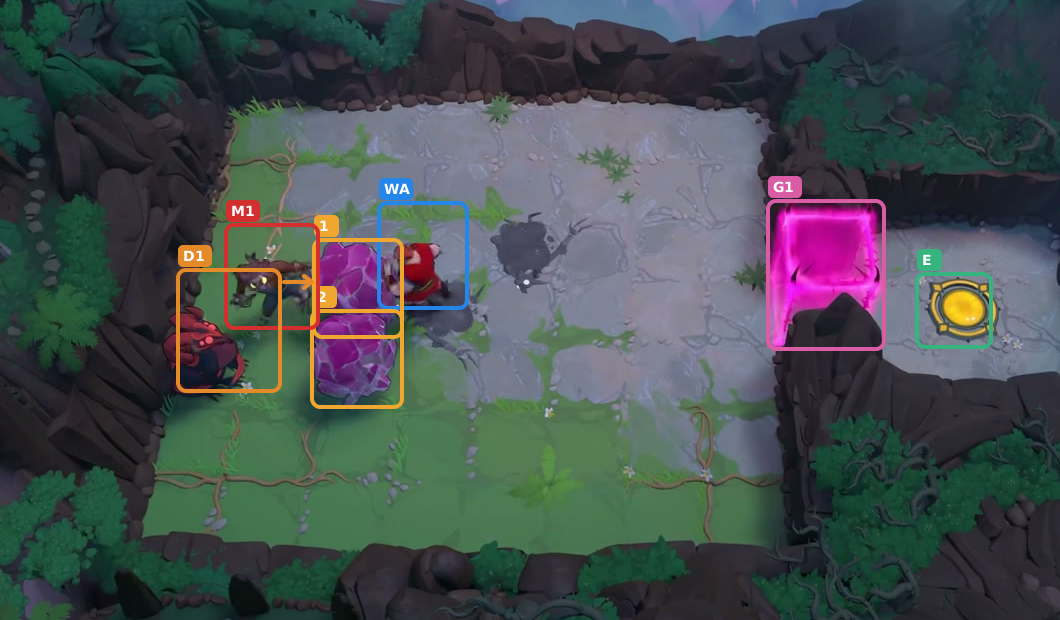
Warrior: left 4.
Check: Crystal 1 is directly above Crystal 2, with the last Goblin to their left; the Dragon remains.
Open full-size image in a new tab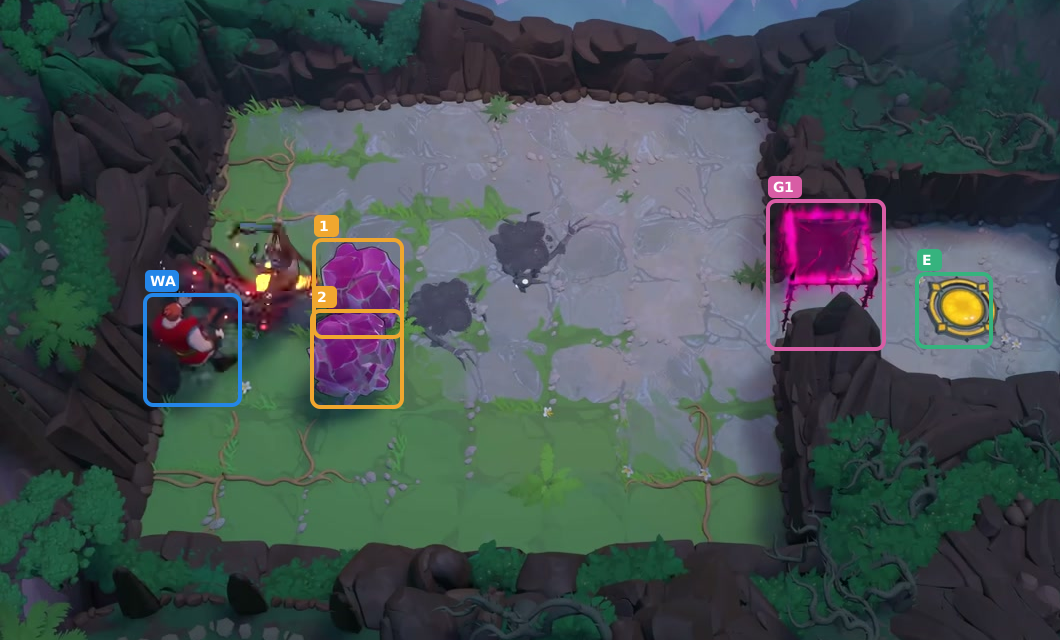
Warrior: right 1, down 2, left 4, then up 1.
Check: The last Goblin and Dragon fall; the Monster gate opens.
Open full-size image in a new tab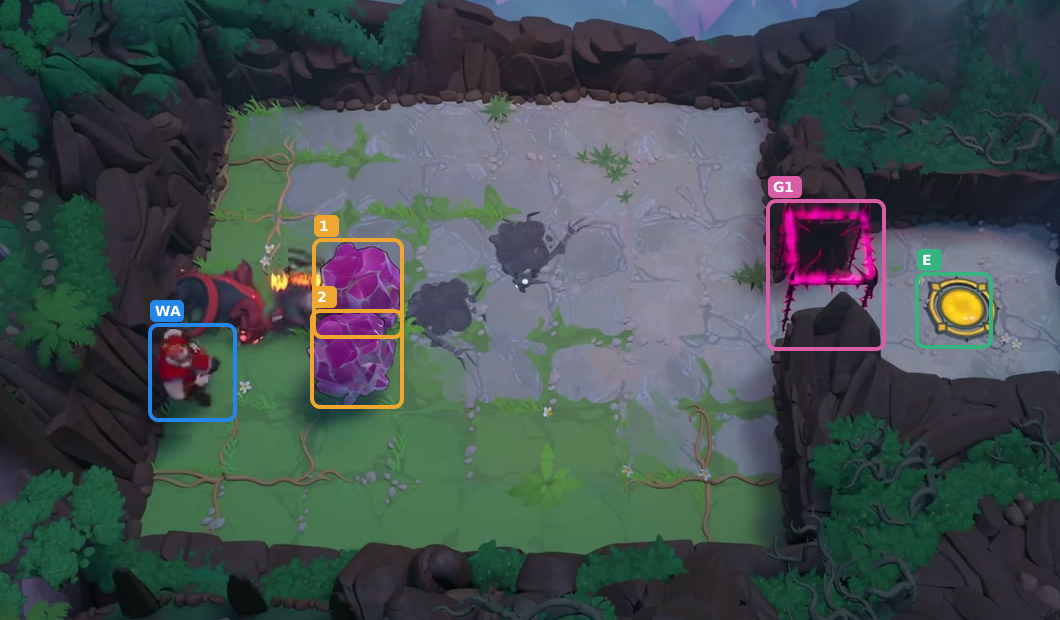
Warrior: down 1.
Check: Warrior steps below the defeated Dragon; the gate stays open.
Open full-size image in a new tab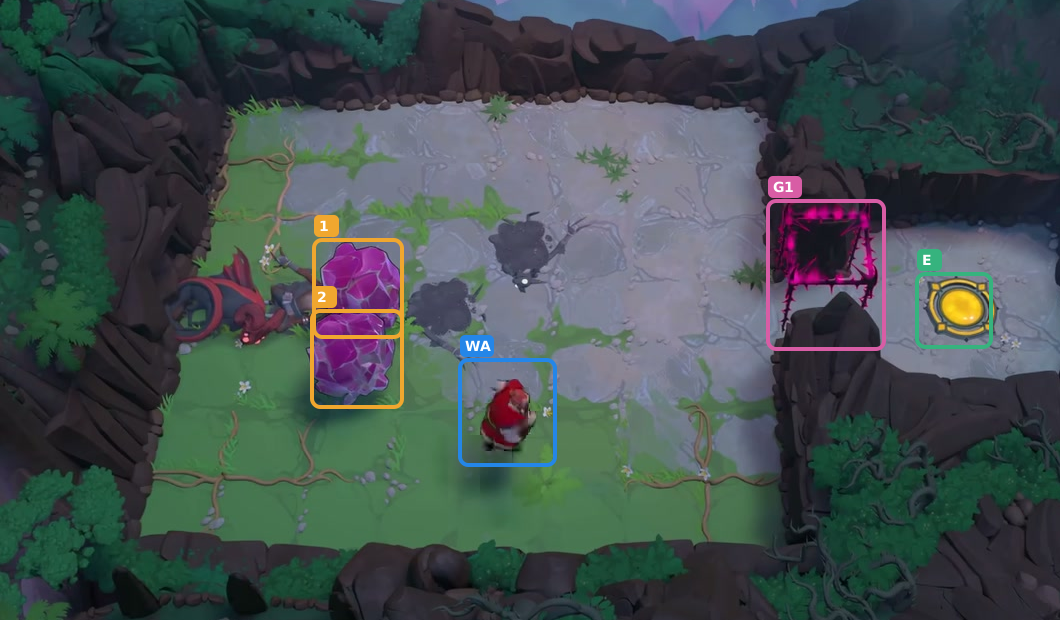
Warrior: right 5.
Check: Warrior crosses the cleared room; the gate remains open.
Open full-size image in a new tab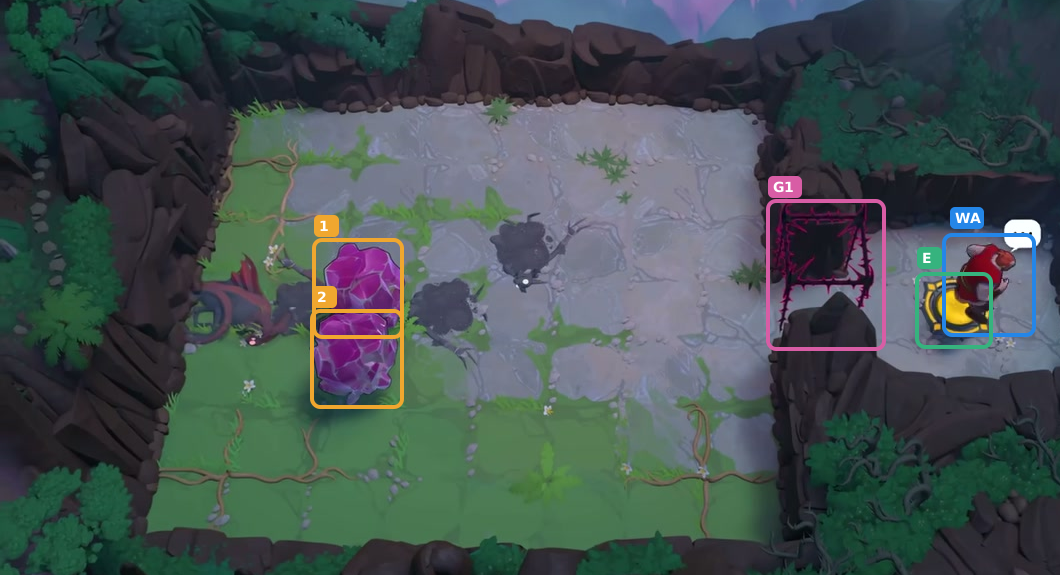
Warrior: right 2, up 2, then right 3.
Check: Warrior stands on the exit with the gate open.
Open full-size image in a new tabActor-by-actor direction route
Full direction sequence
- WA Warrior
← ← ← ← ↓ ↓ ↓ ↑ ↑ ↑ → → → → → → → ↓ ↓ ↓ ↓ ↓ ↓ ← ↑ ↑ → ↑ ← ← ← ← → ↓ ↓ ← ← ← ← ↑ ↓ → → → → → → → ↑ ↑ → → →
 Wizard: relay Goblin fire screens
Section titled “Wizard: relay Goblin fire screens”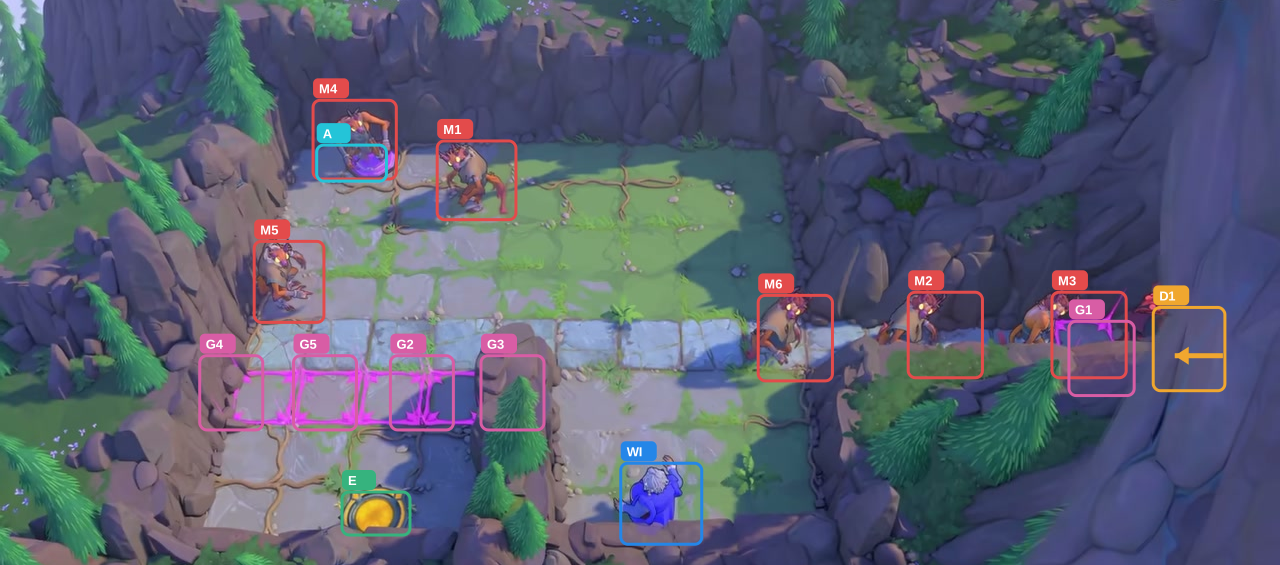
- Switch A
- Gates G1–G5
- Exit
- WI Wizard
- Goblins M1–M6
- Dragon D1; arrow shows initial fire direction
Hint
Place M4 and M1 on the Dragon’s right bridge, with M5 above G5 in the left lane. The final swap puts M5 on Pad A.
Step-by-step solution
Images show selected video checkpoints; the first frame is the starting position.
Start with Wizard at the lower entrance.
Check: Wizard starts below; M4 occupies Pad A and all five gates are open.
Open full-size image in a new tab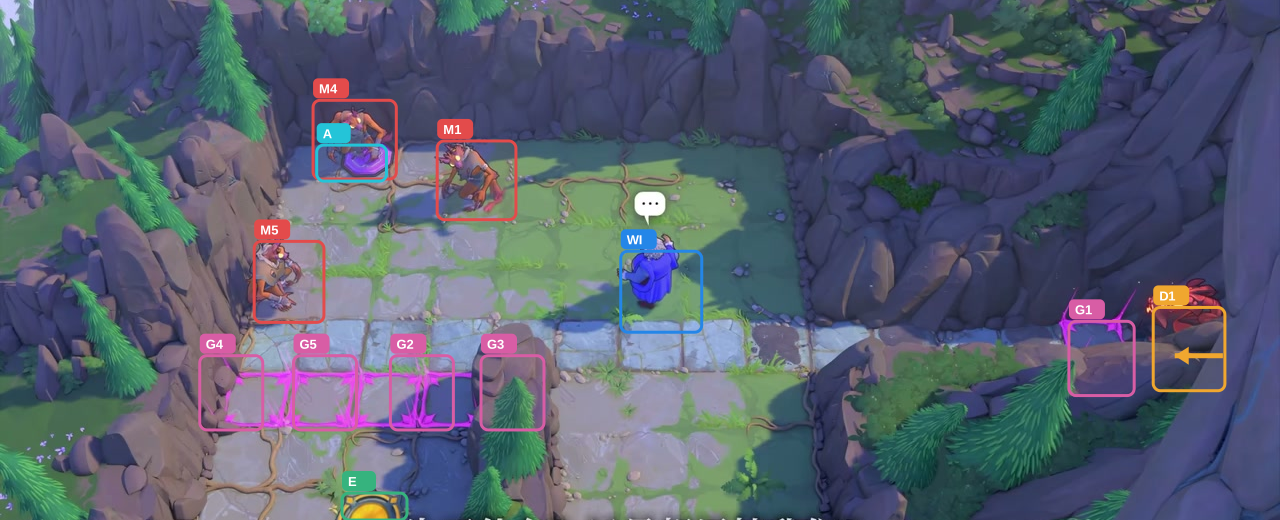
Wizard: up 4 times.
Check: Wizard reaches the upper lane; M4 still holds Pad A and the gates stay open.
Open full-size image in a new tab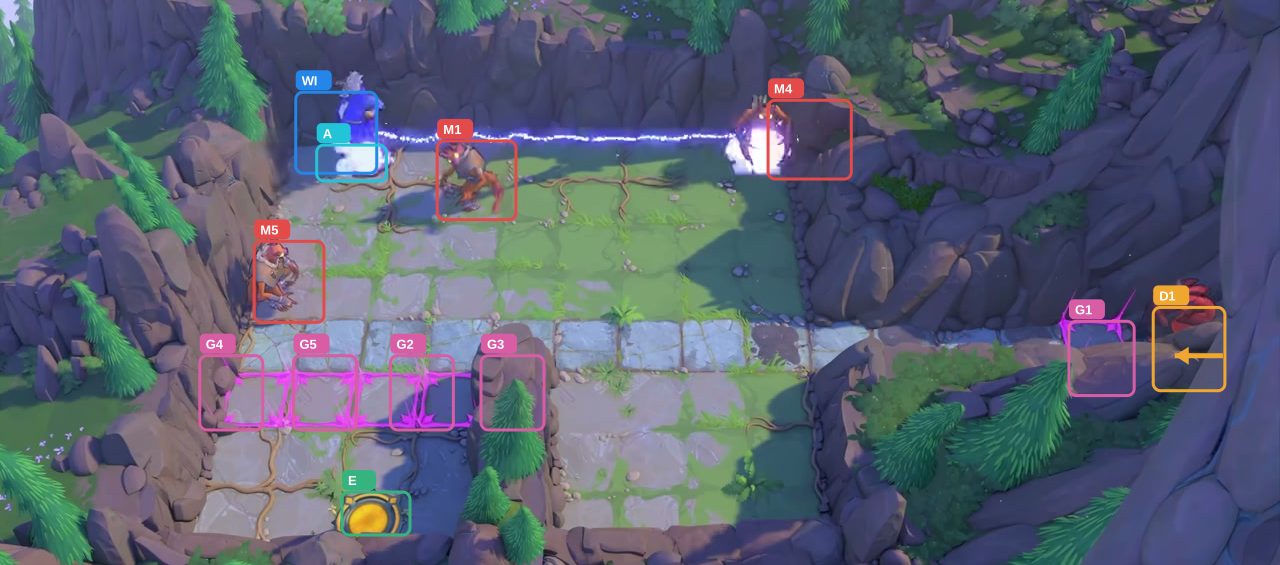
Wizard: right twice, up 3 times, left once.
Check: Wizard swaps with M4 and takes Pad A.
Open full-size image in a new tab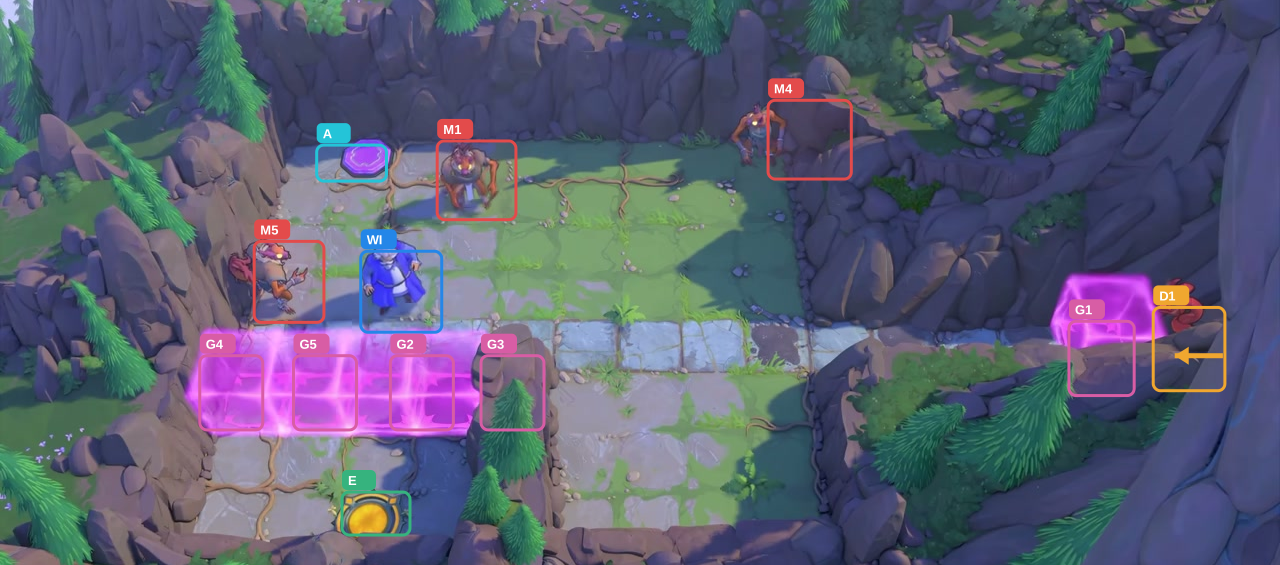
Wizard: down twice, right once, down once.
Check: Pad A empties and all five gates close.
Open full-size image in a new tab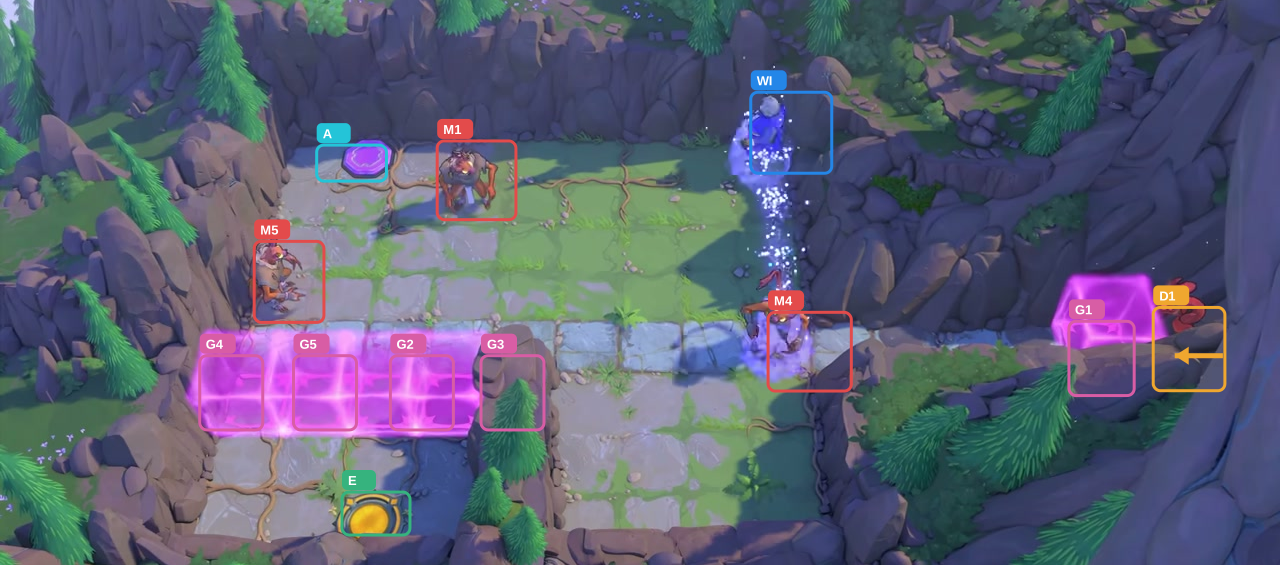
Wizard: right 6 times, down once, up once.
Check: Wizard reaches the right lane; M4 moves to the lower-right lane.
Open full-size image in a new tab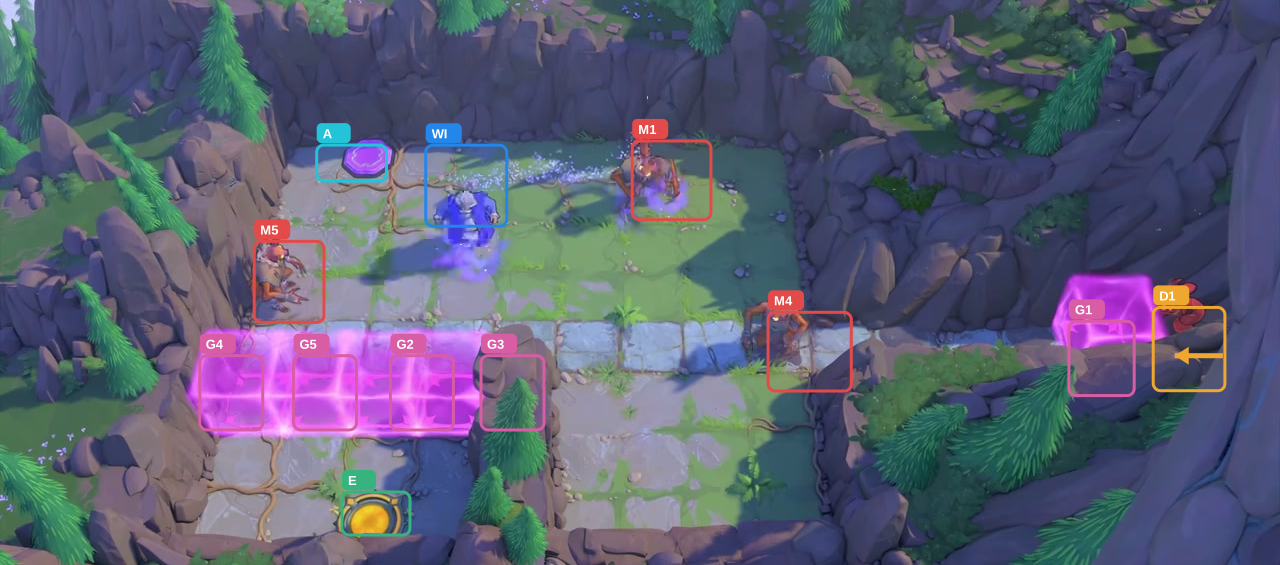
Wizard: left twice, down once, left once.
Check: M1 swaps to the right side of the upper platform.
Open full-size image in a new tab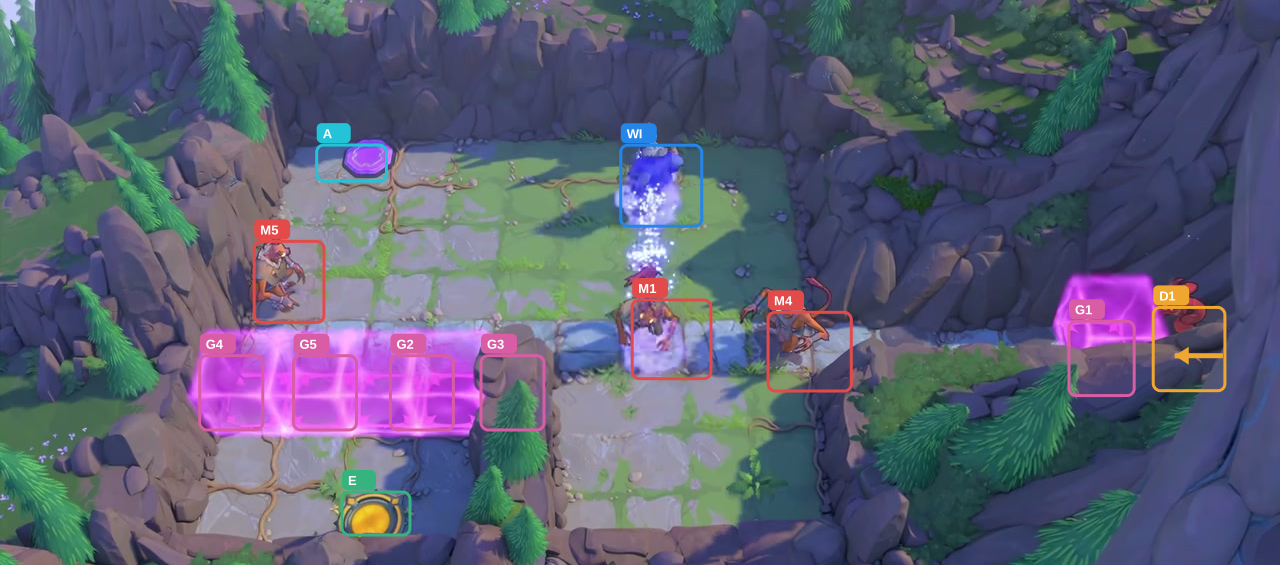
Wizard: down once, right twice, down once, right once, down once, up once.
Check: M1 now screens the Dragon on the bridge; Wizard stands above it.
Open full-size image in a new tab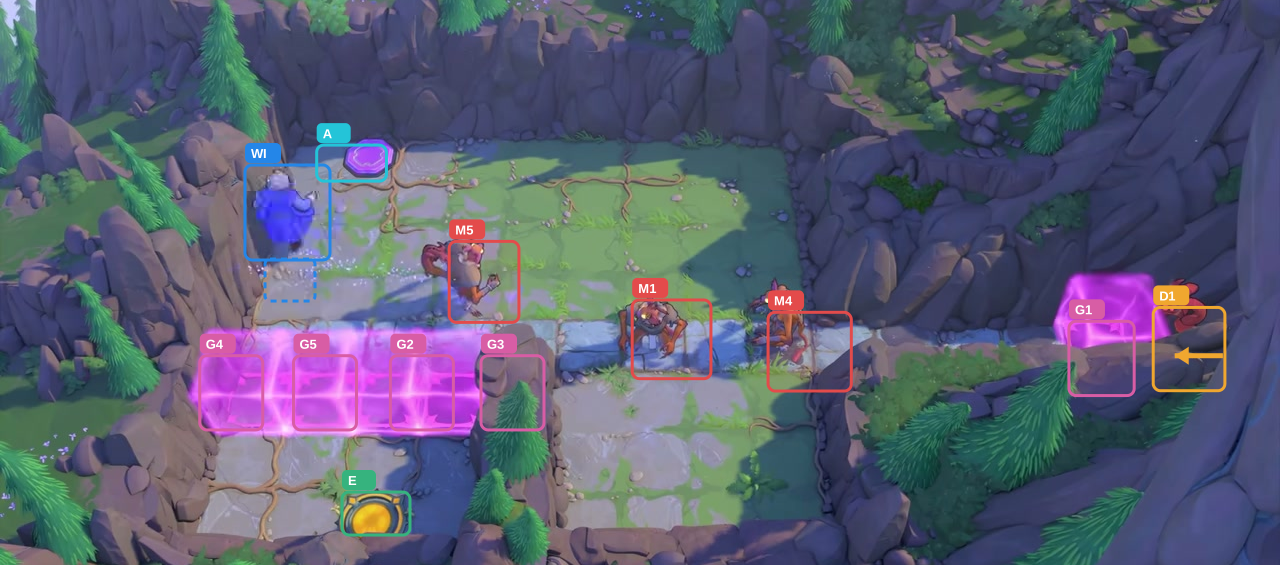
Wizard: left 3 times, down twice, left once.
Check: Wizard returns to the left lane; M5 moves to the center.
Open full-size image in a new tab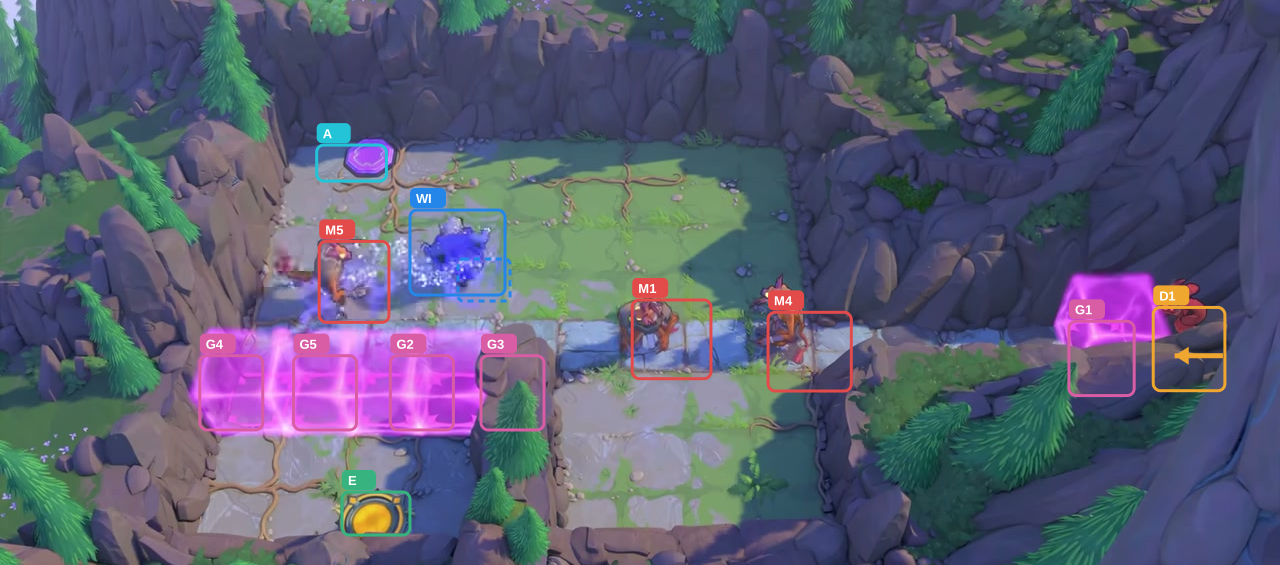
Wizard: up once, right once, down once, right once.
Check: Wizard stands to the right of M5 in the left lane.
Open full-size image in a new tab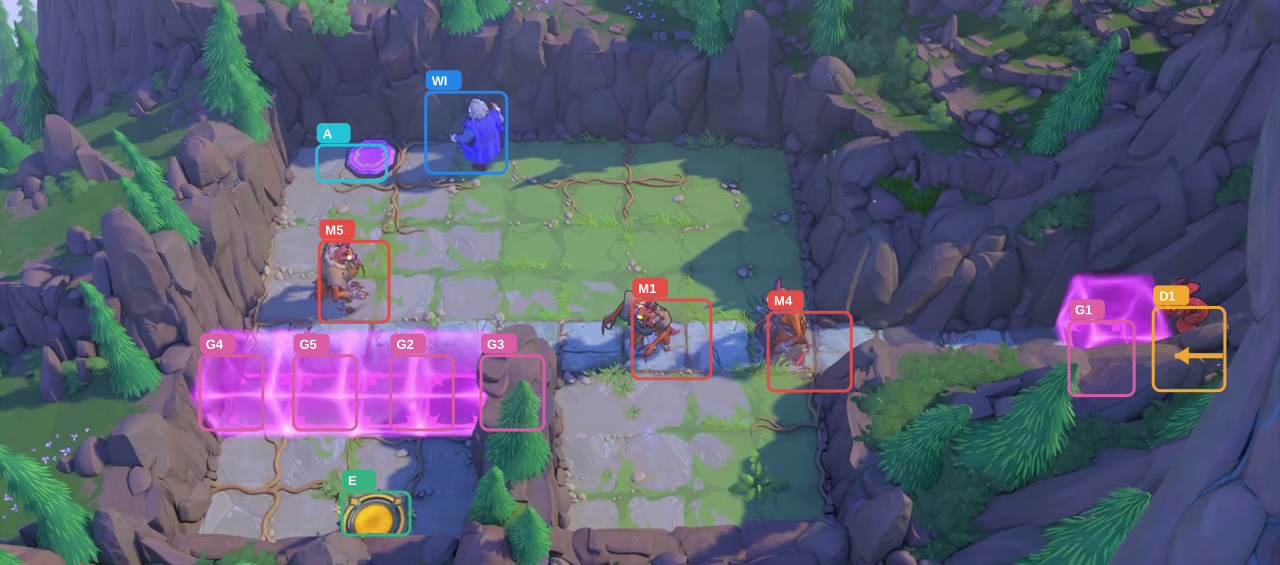
Wizard: up 3 times.
Check: Wizard reaches the upper row; M5 remains in the left lane.
Open full-size image in a new tab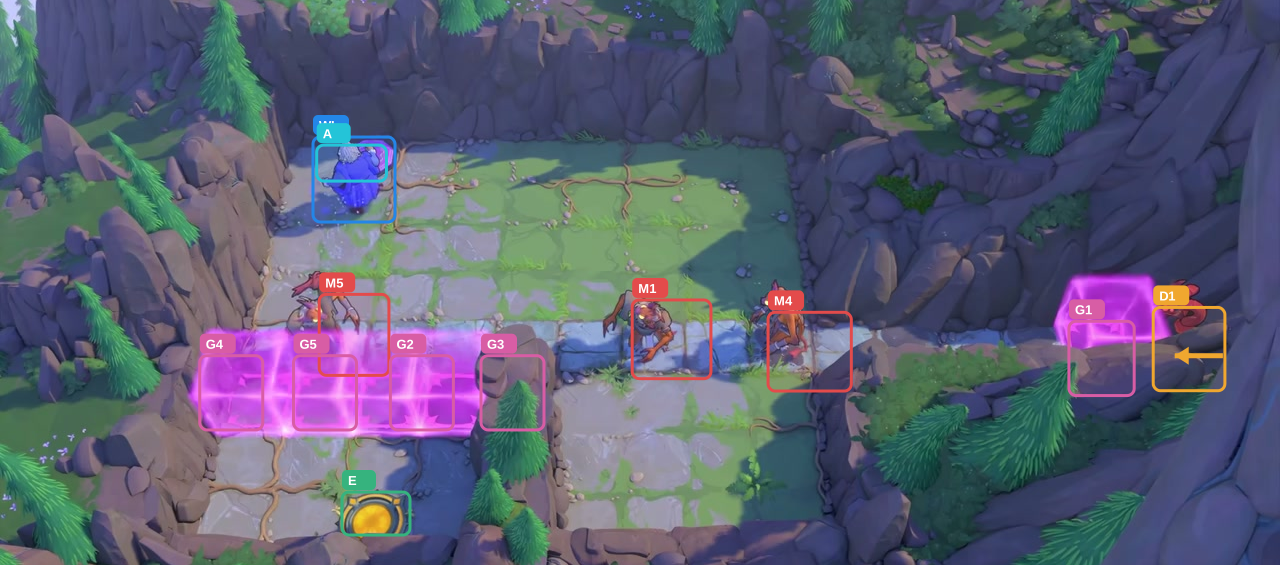
Wizard: down once, left twice, down twice, up once.
Check: M5 moves onto the bridge row while Wizard holds position.
Open full-size image in a new tab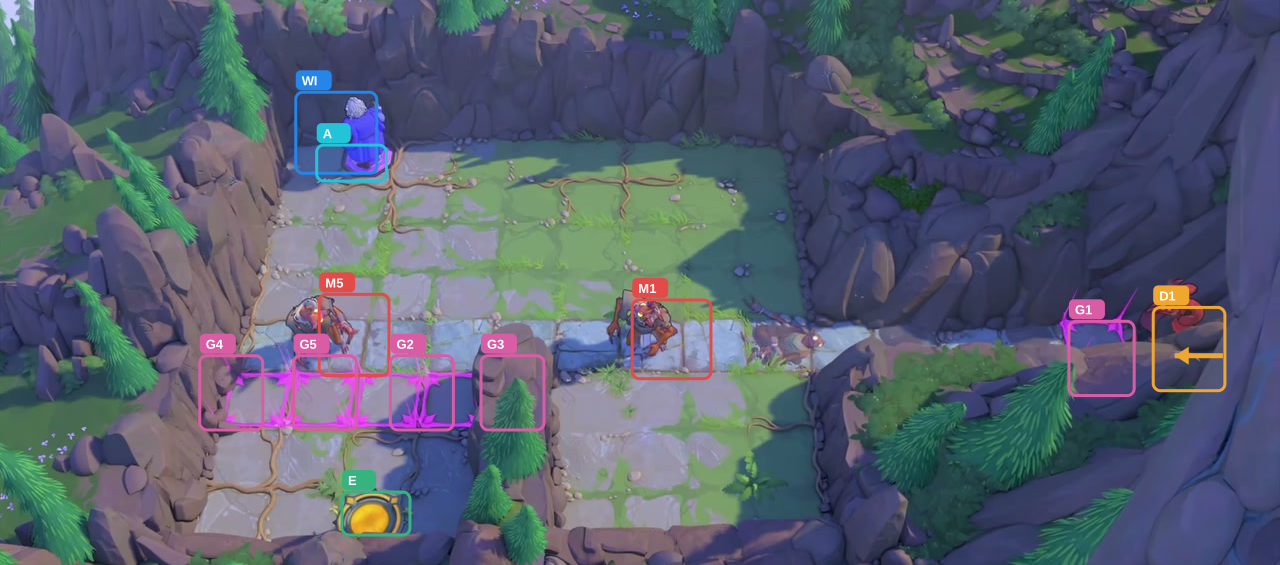
Wizard: up once.
Check: M4 is defeated on the right bridge; Wizard occupies Pad A.
Open full-size image in a new tab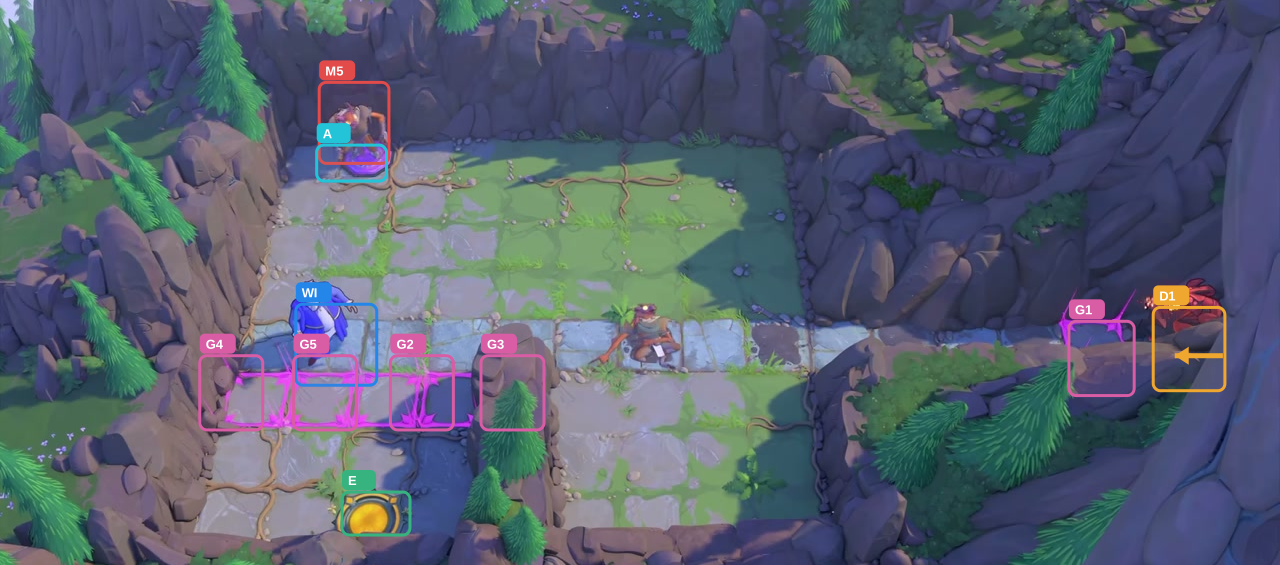
Wizard: down once.
Check: M1 is defeated; M5 moves onto Pad A.
Open full-size image in a new tab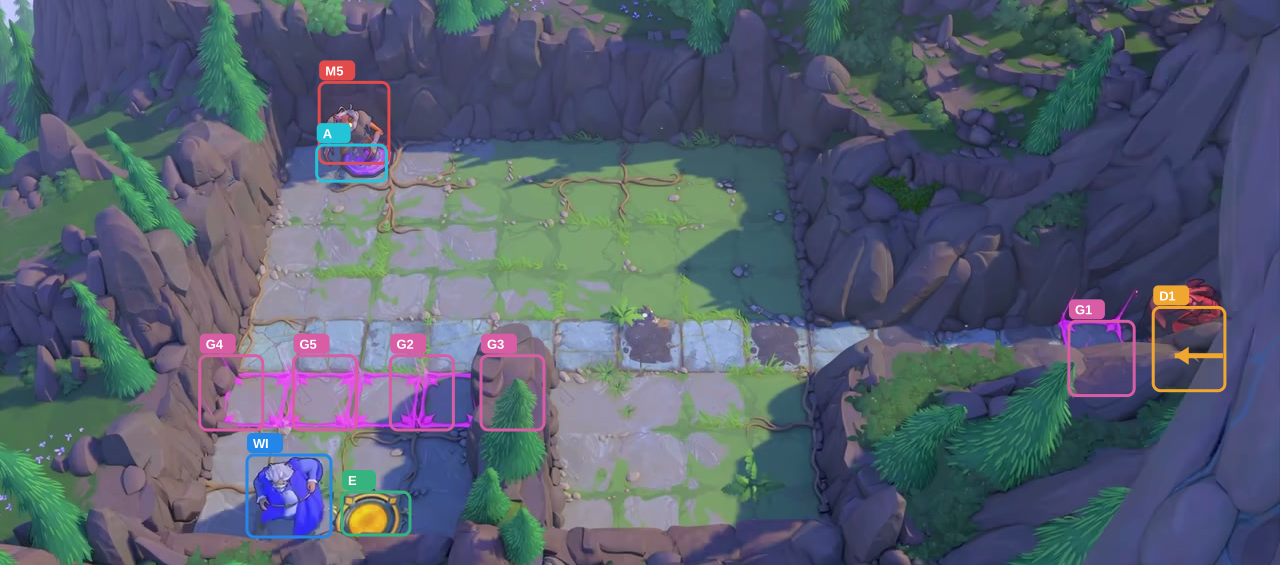
Wizard: down 3 times.
Check: Wizard reaches the tile left of the exit; M5 remains on Pad A.
Open full-size image in a new tab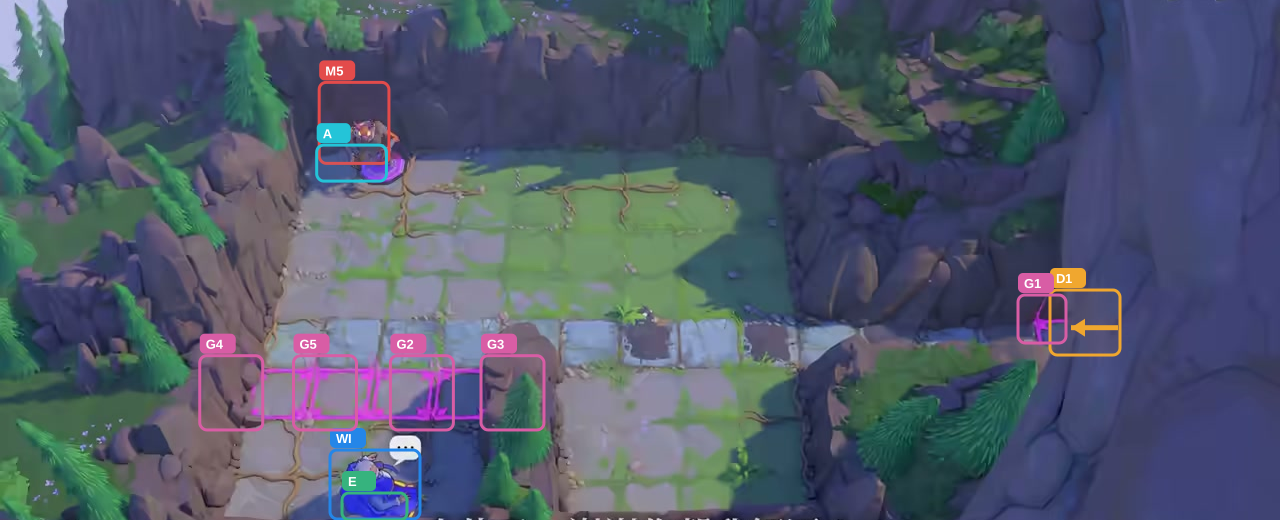
Wizard: right once.
Check: Wizard reaches the exit; M5 remains on Pad A.
Open full-size image in a new tabActor-by-actor direction route
Full direction sequence
- WI Wizard
↑ ↑ ↑ ↑ → → ↑ ↑ ↑ ← ↓ ↓ → ↓ → → → → → → ↓ ↑ ← ← ↓ ← ↓ → → ↓ → ↓ ↑ ← ← ← ↓ ↓ ← ↑ → ↓ → ↑ ↑ ↑ ↓ ← ← ↓ ↓ ↑ ↑ ↓ ↓ ↓ ↓ →
Two heroes: protect one Goblin from the Dragon
Section titled “Two heroes: protect one Goblin from the Dragon”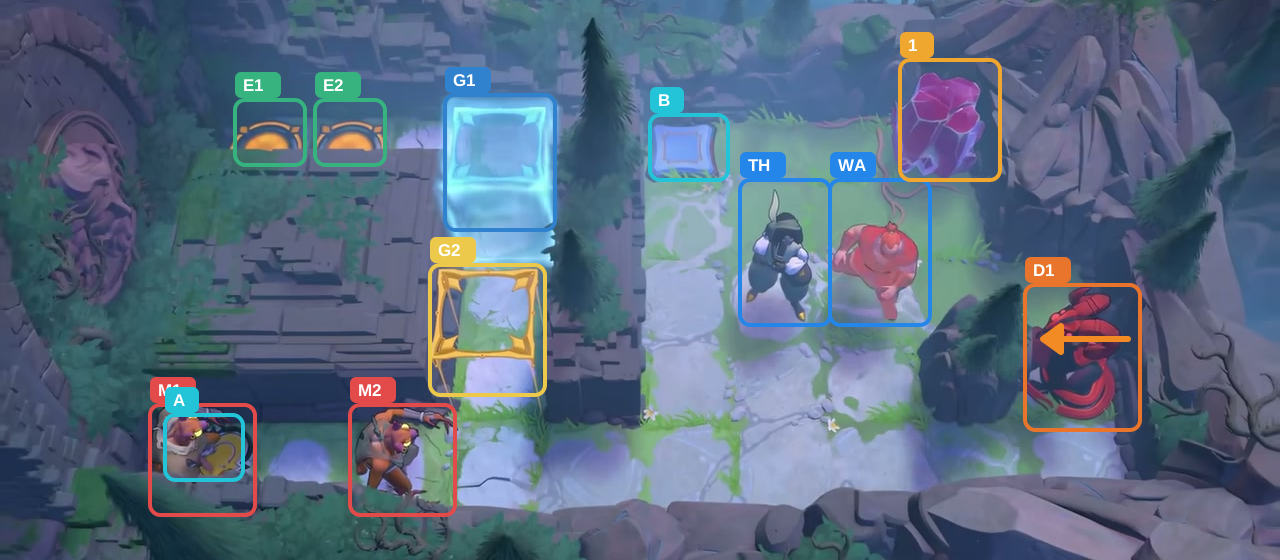
- Crystal 1
- Switches A–B
- Gates G1–G2
- Exits E1–E2
- TH Thief
- WA Warrior
- Goblins M1–M2
- Dragon D1; arrow shows initial fire direction
Hint
Use the 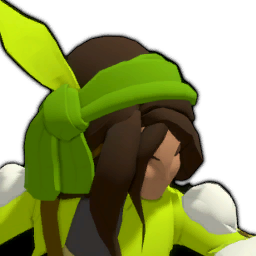 Thief’s pull to expose M2 to the Dragon for one action, then switch to the Warrior and immediately push the Thief and Crystal 1 back into the firing lane together. Finish with M1 on A and Crystal 1 on B; the later pull returns the Dragon to the tile where the rock wall blocks its ray.
Step-by-step solution
Images show selected video checkpoints; the first frame is the starting position.
Start with Thief and Warrior at their marked positions.
Check: M1 holds A; blue G1 is closed and yellow G2 is open.
Open full-size image in a new tab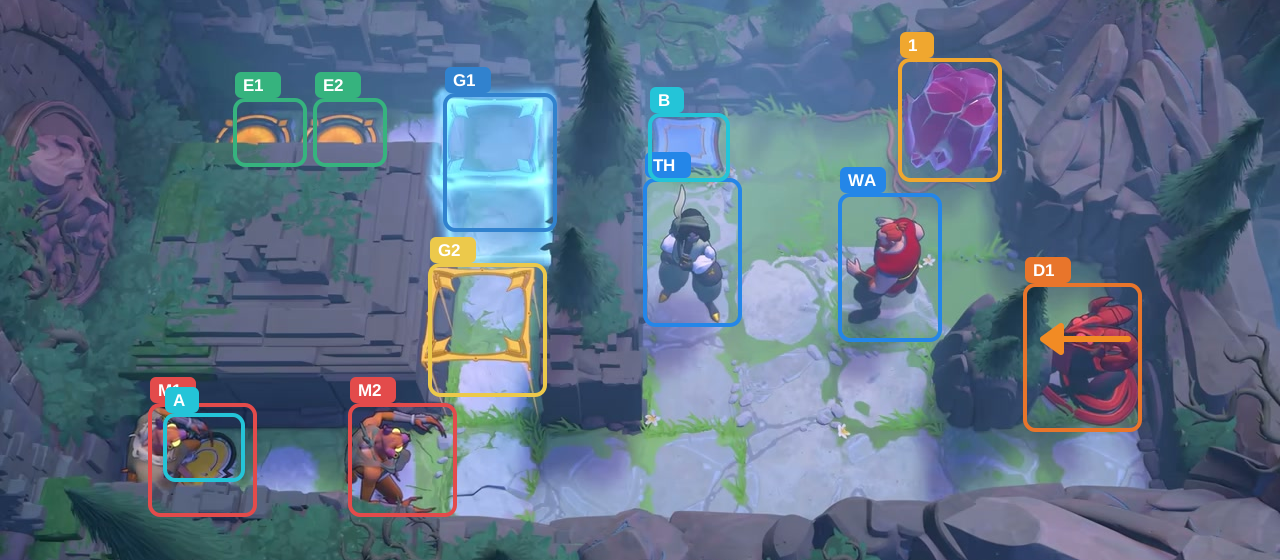
Move Warrior: left once, right once.
Check: The Thief is one tile farther left; the crystal stays at the upper right.
Open full-size image in a new tab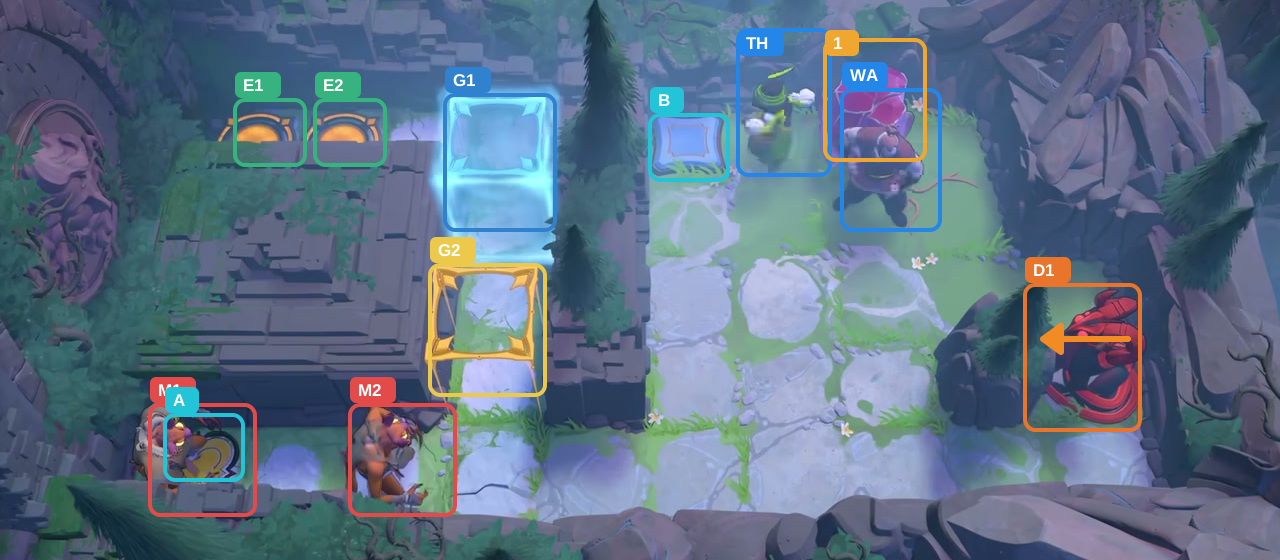
Move Warrior: up once; then Thief: up twice, right twice, left once.
Check: Crystal 1 has moved left once; the Warrior waits below it.
Open full-size image in a new tab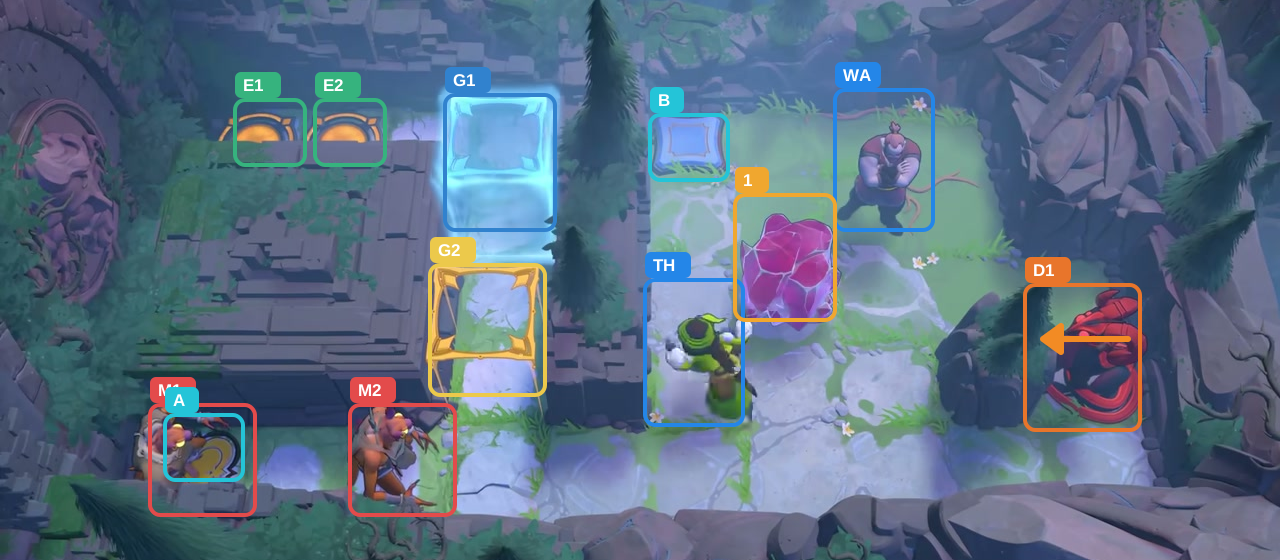
Move Thief: left once, down once, right once, down twice, left once.
Check: Crystal 1 is in the center lane; the Thief is to its left.
Open full-size image in a new tab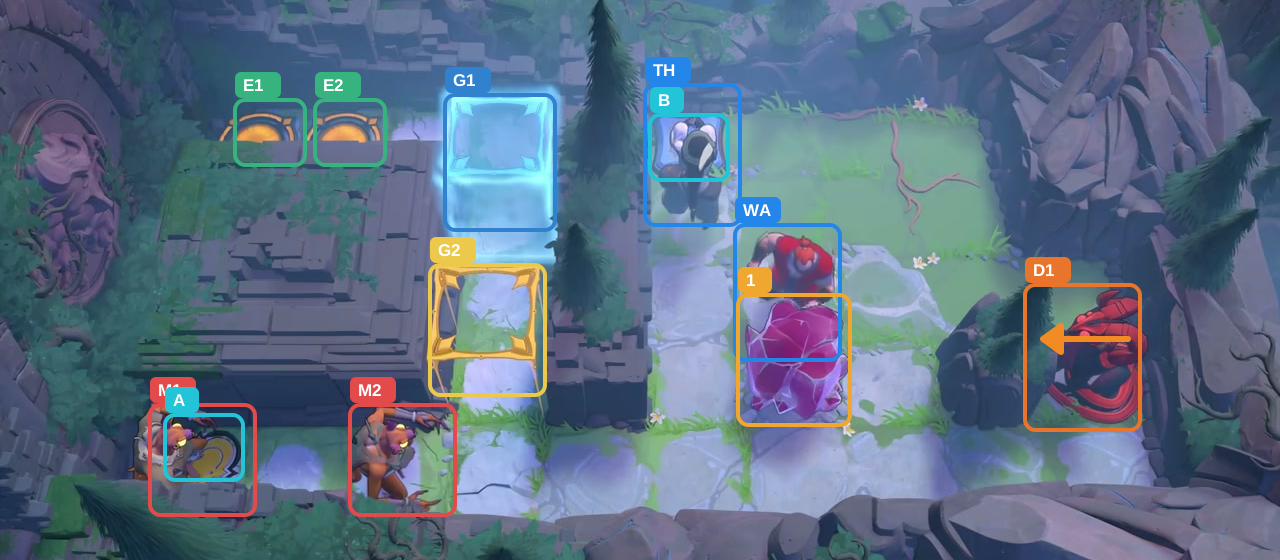
Move Thief: up 3; then Warrior: left once, down once.
Check: The Warrior has pushed Crystal 1 down once.
Open full-size image in a new tab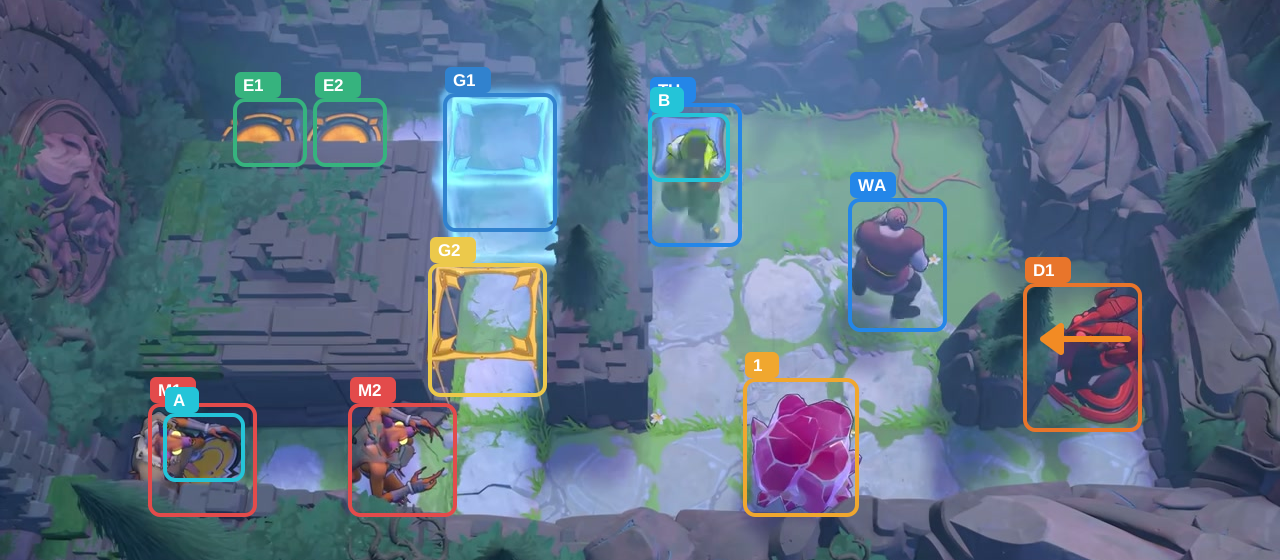
Move Warrior: down once, up once, right twice.
Check: Crystal 1 is in the bottom lane.
Open full-size image in a new tab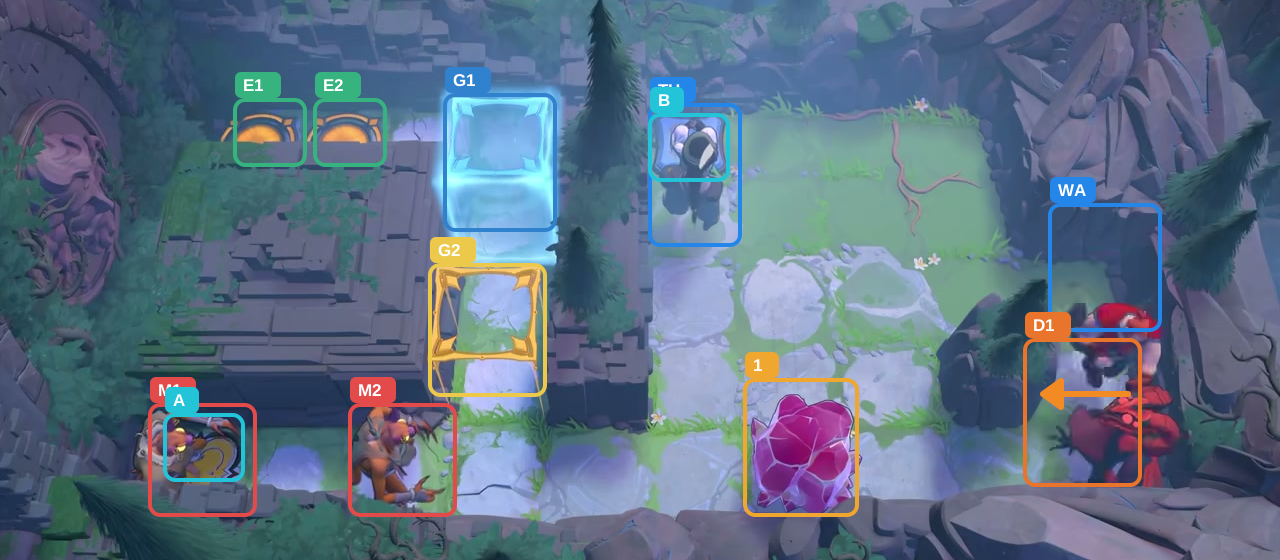
Move Warrior: right once, down once.
Check: The Dragon is one row lower; Crystal 1 blocks its fire.
Open full-size image in a new tab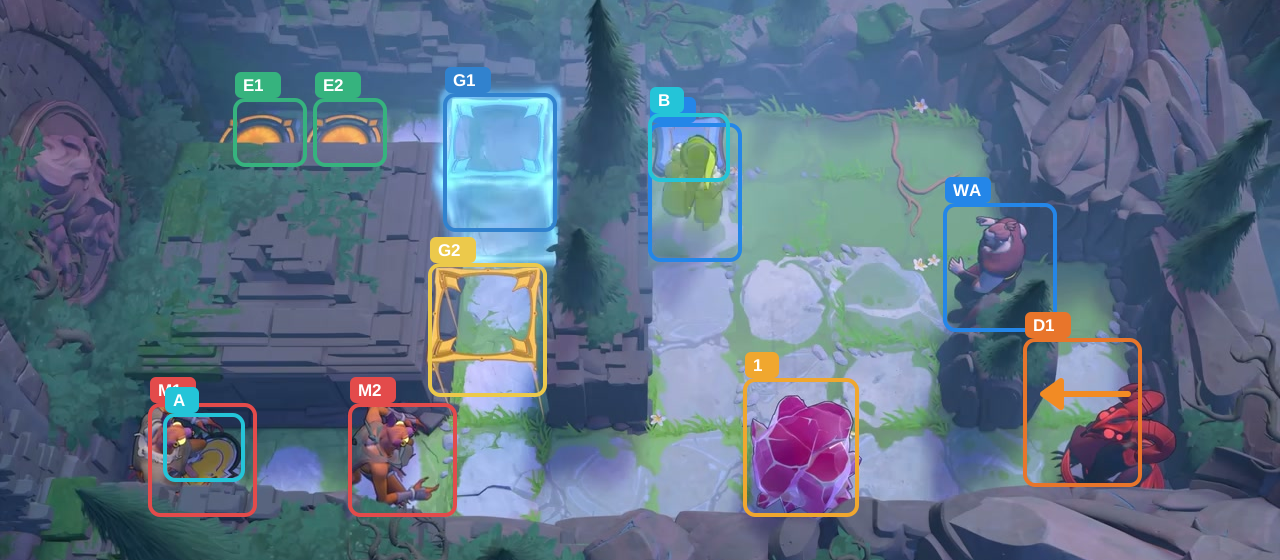
Move Warrior: up once, left once.
Check: The Warrior has stepped back; both Goblins remain alive.
Open full-size image in a new tab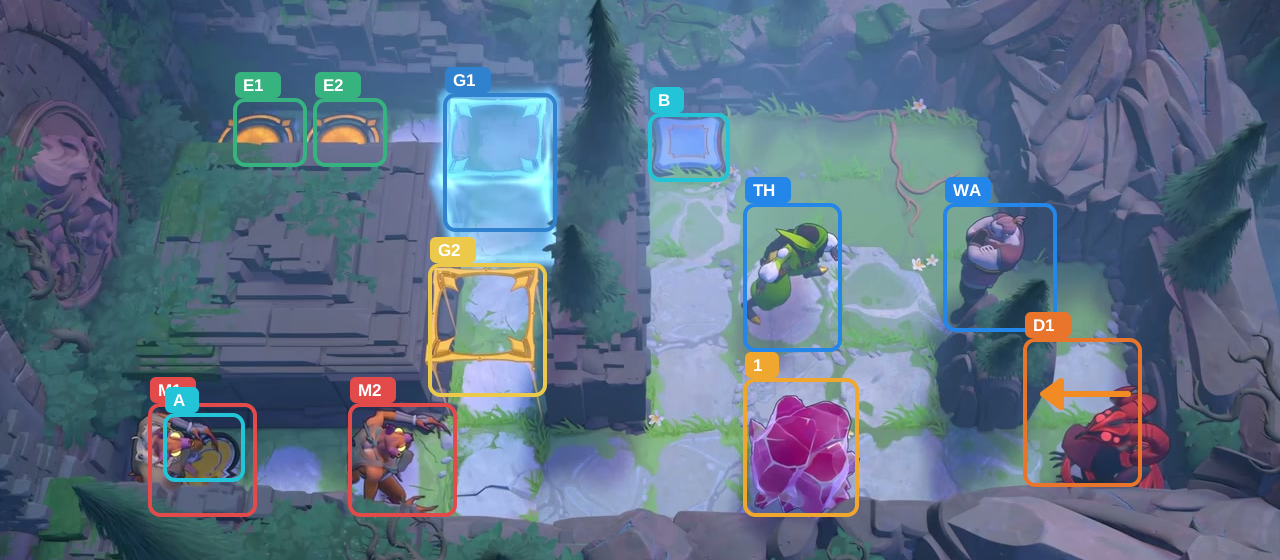
Move Thief: down twice, right once.
Check: The Thief stands above Crystal 1; the Warrior waits to the right.
Open full-size image in a new tab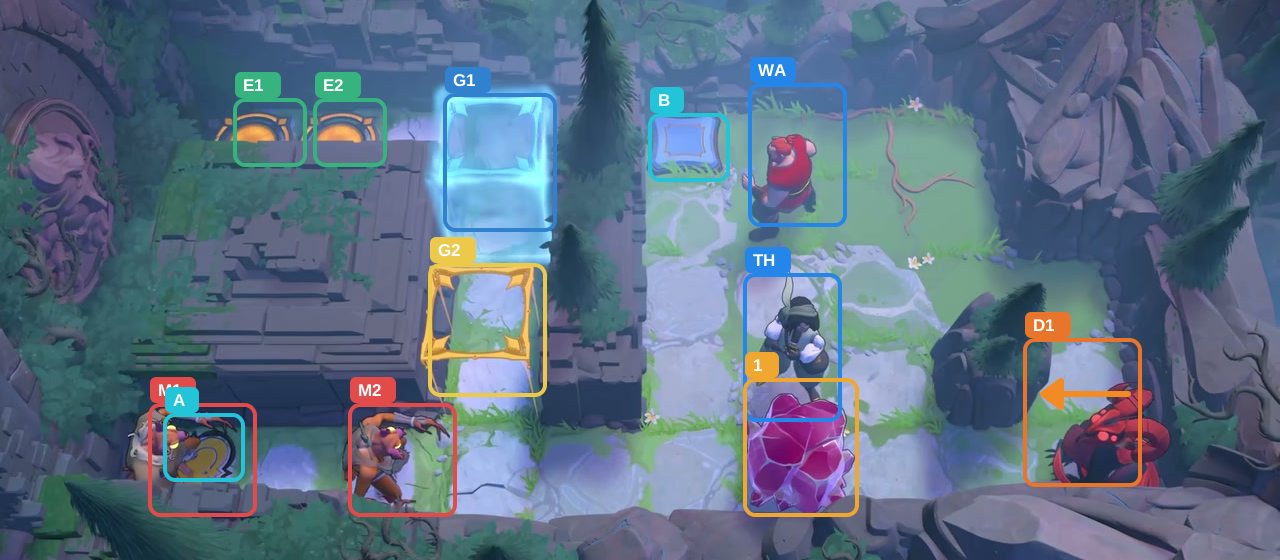
Move Thief: down once; then Warrior: left once, up once, left once.
Check: The Warrior waits above the Thief and Crystal 1.
Open full-size image in a new tab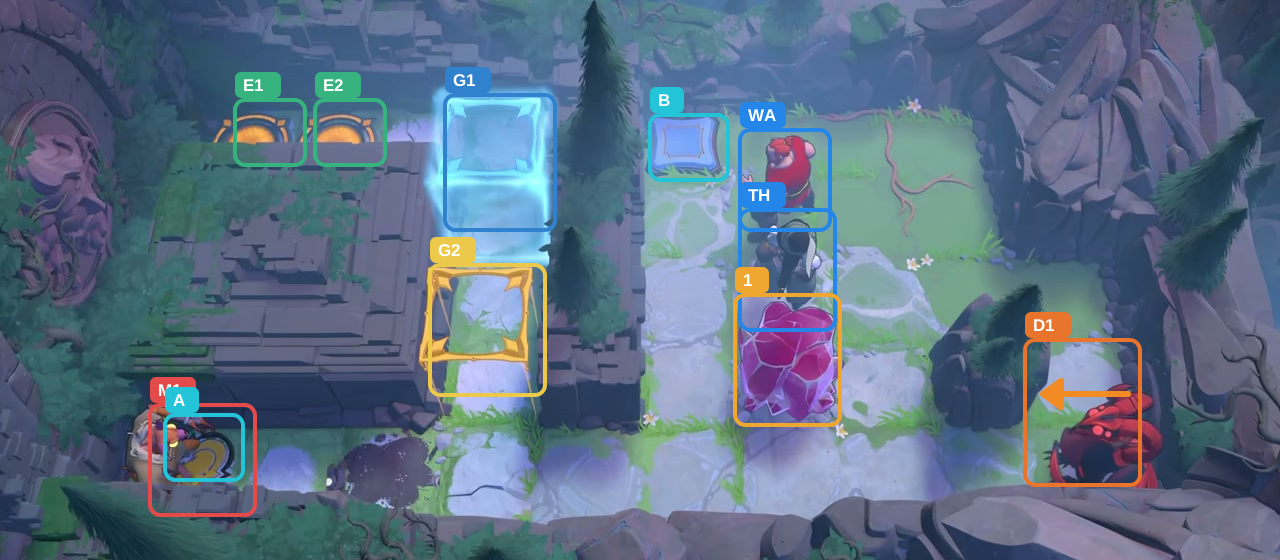
Move Thief: up once.
Check: M2 has fallen; M1 still holds A.
Open full-size image in a new tab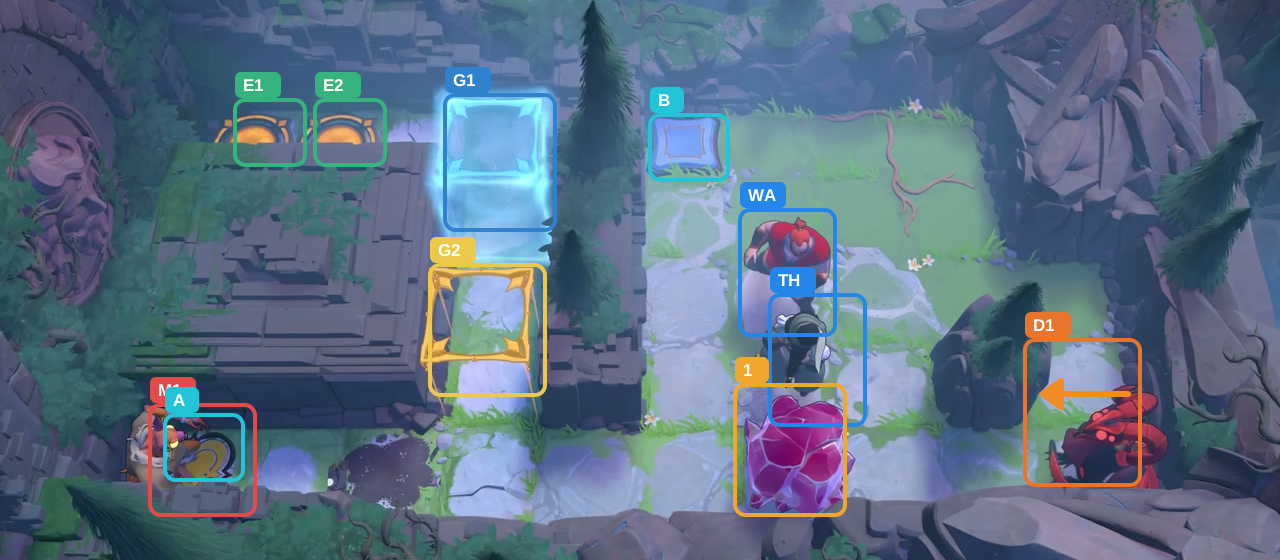
Move Warrior: down once.
Check: Crystal 1 blocks the fire again, with the Thief above it.
Open full-size image in a new tab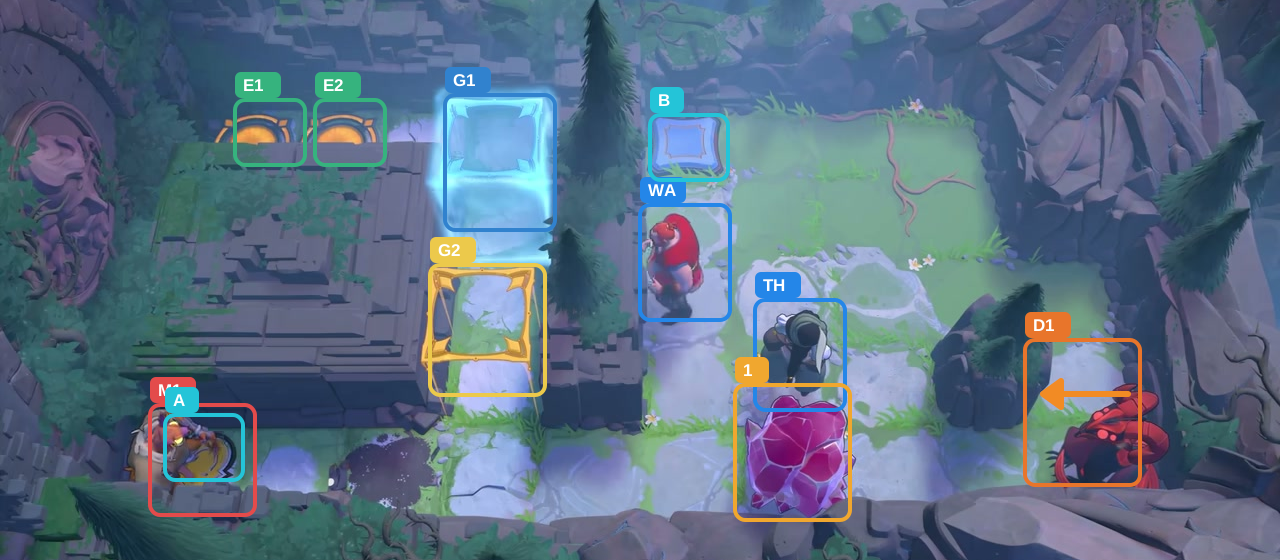
Move Warrior: left once.
Check: The Warrior waits on the left; the Thief remains above Crystal 1.
Open full-size image in a new tab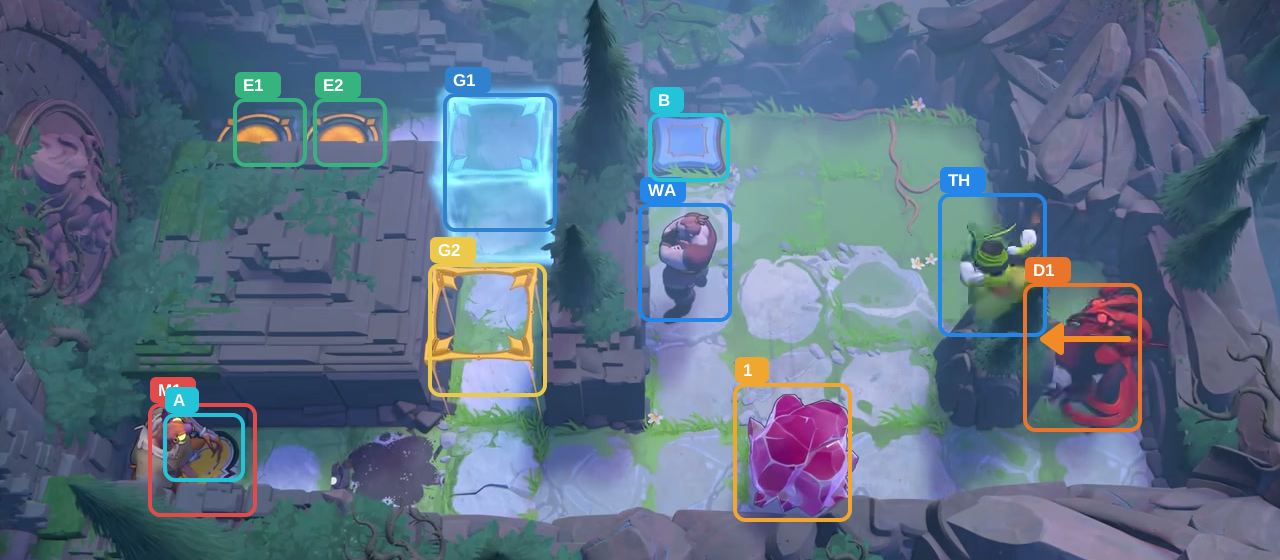
Move Thief: right once, up once, right twice, down once, up once.
Check: The Dragon is back in its upper row, behind the rock wall.
Open full-size image in a new tab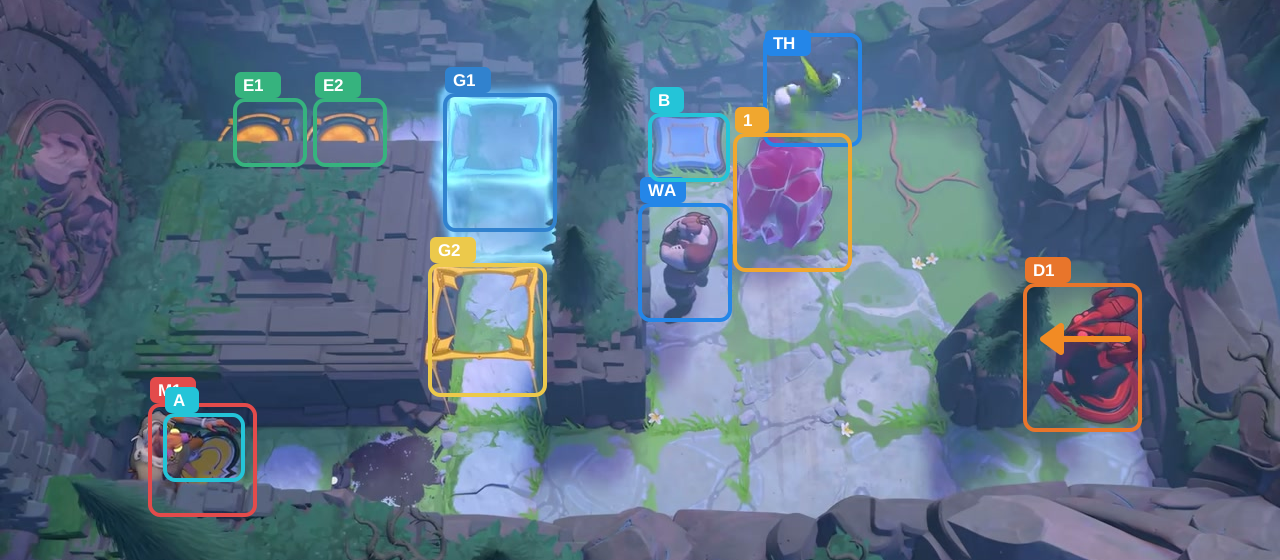
Move Thief: left twice, down once, left once, up 3.
Check: Crystal 1 is one tile below the top row; the Thief is above it.
Open full-size image in a new tab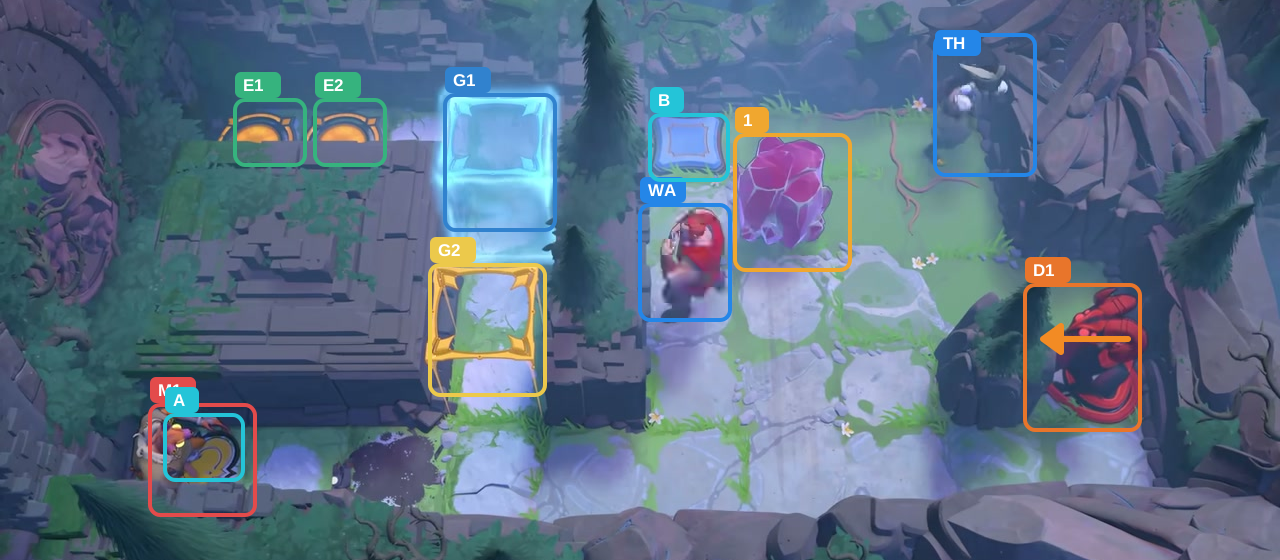
Move Thief: right twice.
Check: The Thief has moved to the upper-right corner, leaving the crystal clear.
Open full-size image in a new tab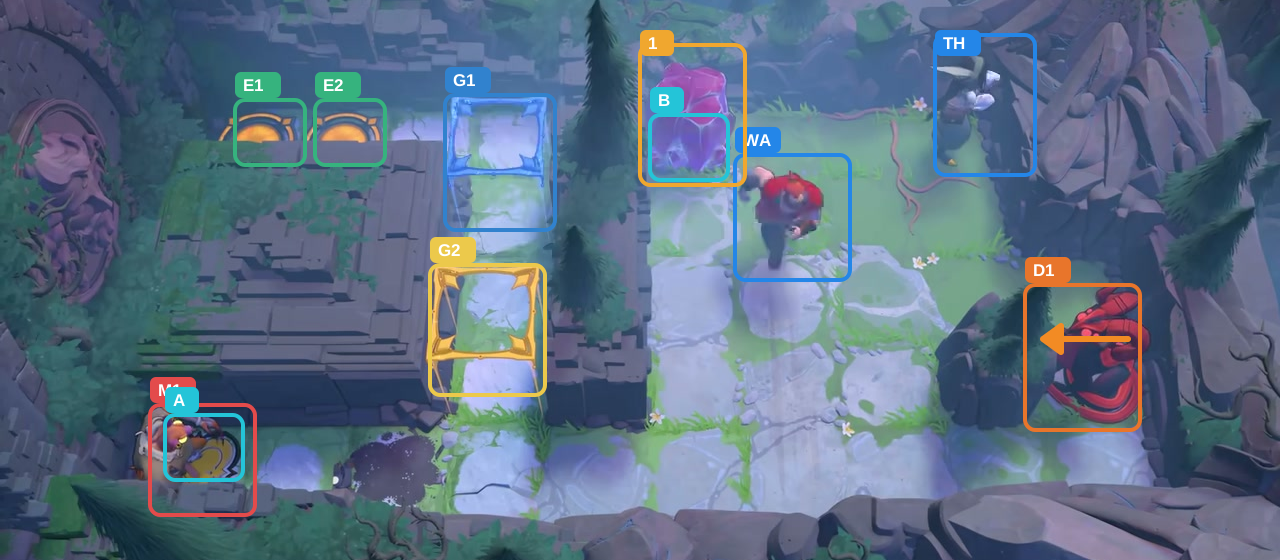
Move Warrior: right once, up once, right once, up once, left once, down once.
Check: Crystal 1 holds B; M1 holds A and both gates are open.
Open full-size image in a new tab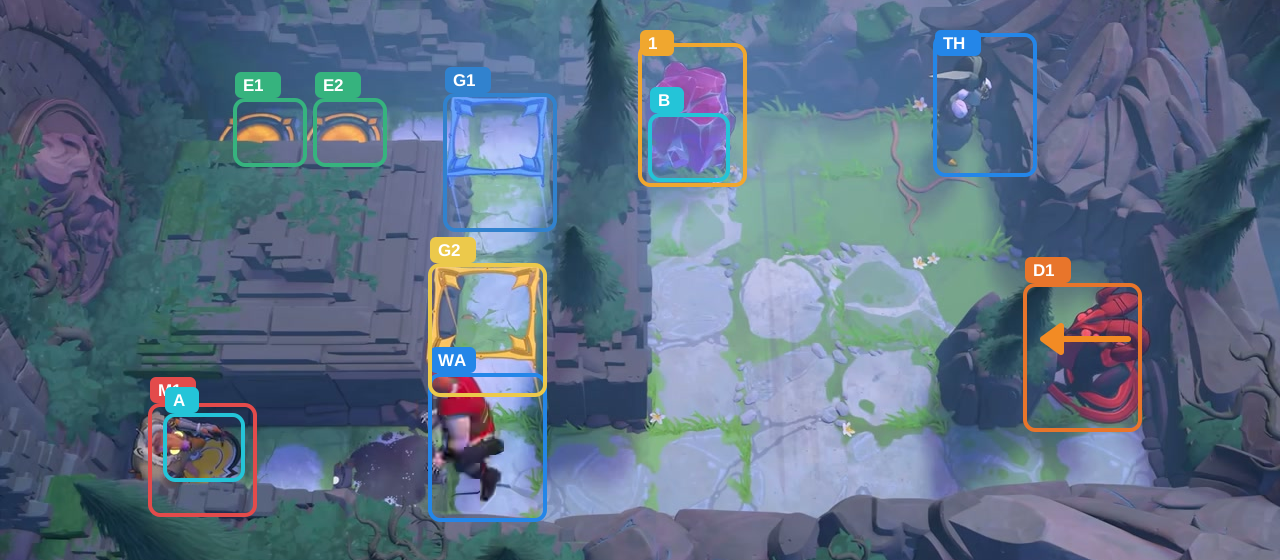
Move Warrior: down once, left once, down twice, left twice.
Check: The Warrior has entered the left corridor below G2.
Open full-size image in a new tab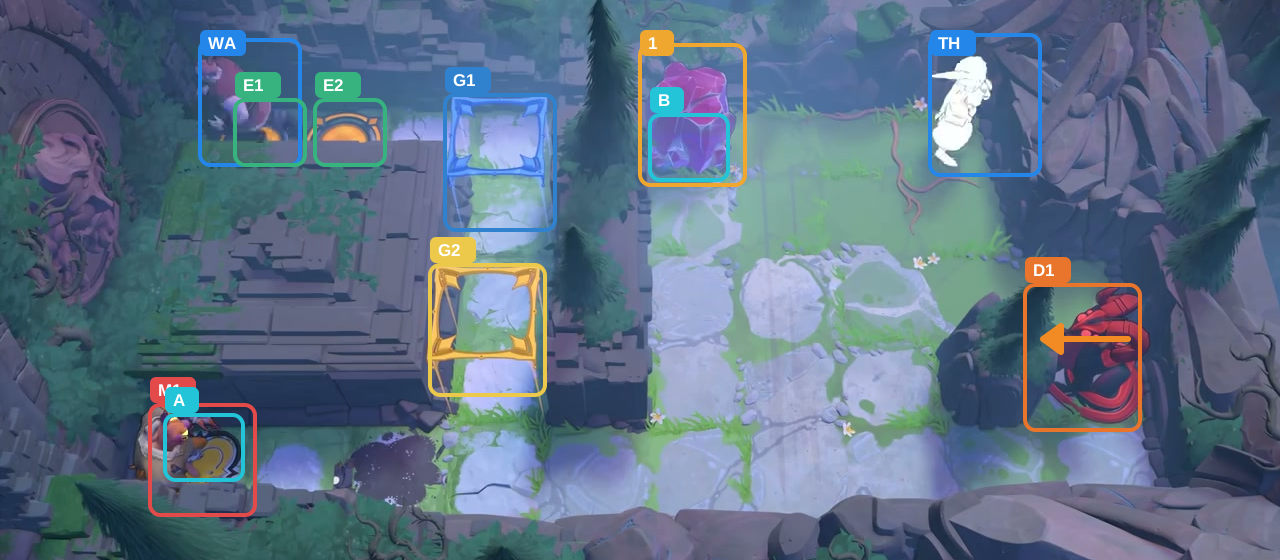
Move Warrior: up 4, left 3.
Check: The Warrior is on E1; the Thief waits at the upper right.
Open full-size image in a new tab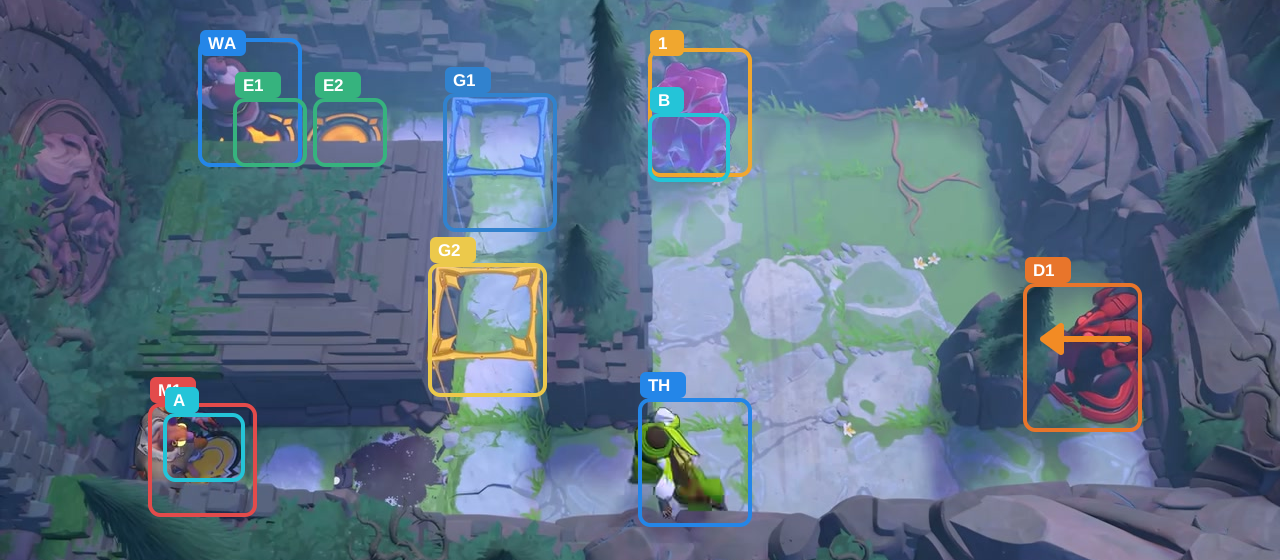
Move Thief: down once, left twice, down once, left once, down twice.
Check: The Thief reaches the bottom lane; both gate pads remain occupied.
Open full-size image in a new tab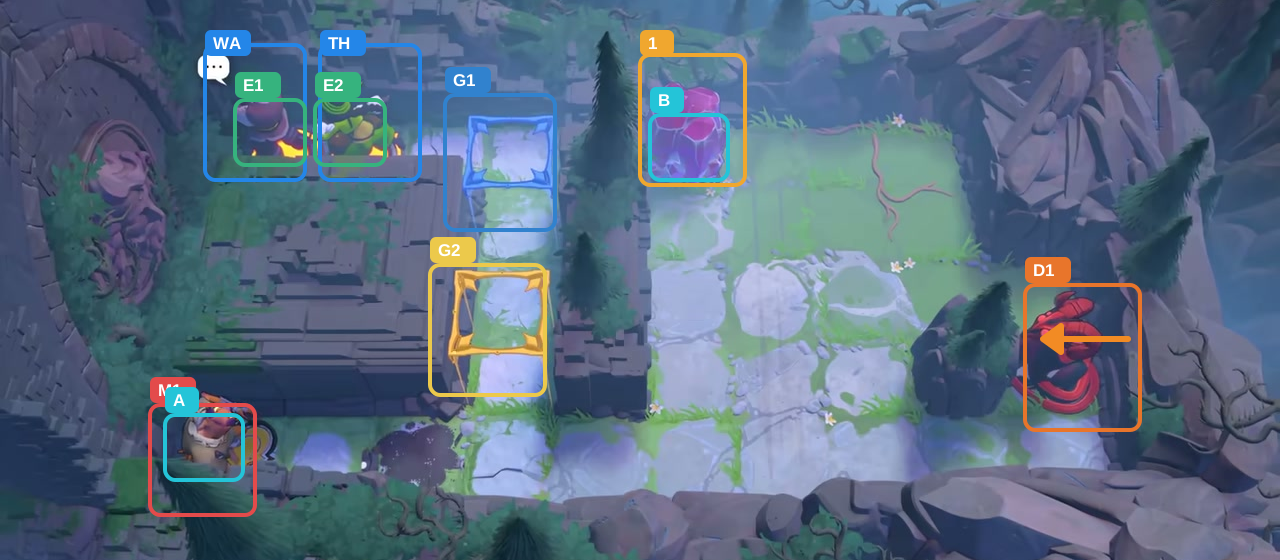
Move Thief: left twice, up 4, left twice.
Check: Both heroes occupy their exits. M1 and the Dragon remain alive.
Open full-size image in a new tabActor-by-actor direction route
Full direction sequence
- WA Warrior
← → ↑ - TH Thief
↑ ↑ → → ← ← ↓ → ↓ ↓ ← ↑ ↑ ↑ - WA Warrior
← ↓ ↓ ↑ → → → ↓ ↑ ← - TH Thief
↓ ↓ → ↓ - WA Warrior
← ↑ ← - TH Thief
↑ - WA Warrior
↓ ← - TH Thief
→ ↑ → → ↓ ↑ ← ← ↓ ← ↑ ↑ ↑ → → - WA Warrior
→ ↑ → ↑ ← ↓ ↓ ← ↓ ↓ ← ← ↑ ↑ ↑ ↑ ← ← ← - TH Thief
↓ ← ← ↓ ← ↓ ↓ ← ← ↑ ↑ ↑ ↑ ← ←
Sources and credits
Selected room layouts and entity names: PC r67121 game files. The PlayStation Blog hands-on report describes the Goblin contact hazard. Screenshots and illustrated routes: 塞德莎, Heroes 2: Monsters, part 3. Board artwork: Thekla, Inc.
- Selected Heroes 2 monster-room layouts and player-action traces (PC r67121) — Extracted data
- [North] Hero 2: Monster [North 3] / 【北】英雄2:怪物[北3] — Observed in-game
- Character portraits and selected puzzle-board images (PC r67121) — Extracted data
- PlayStation Blog hands-on report — Documentation · published-2026-07-21
- Warrior Dragon-screen screenshot walkthrough — Observed in-game · screenshots-reviewed-2026-10-21
- Wizard Dragon-fire-screen screenshot walkthrough — Observed in-game · screenshots-reviewed-2026-10-21
- Two-hero Dragon-fire screenshot walkthrough — Observed in-game · screenshots-reviewed-2026-10-21
Unofficial fan wiki, not affiliated with Thekla, Inc. / Arc Games / Gamirror Games. Game content belongs to its owners.
Comments & feedback
Share a tip or suggest a correction. Comments are public. Guest names are unverified; verified accounts show their account username. All language pages share this discussion. Please keep personal information private.