
 Order of the Sinking Star
Heroes and Water: selected room layouts

The 34 numbered main-area article rooms have source/native matches. Four of the six separately labelled North rooms also have cross-family matches; North 5–6 remain unassigned. Five separate Overworld puzzle scenes remain unresolved by local target ID. Article numbers and the internal heroes_and_water positions are recorded separately. Each colored ring marks one visible layout landmark, not an input step. The short ideas are summarized from the article. The article’s part labels are not exact PTS; no video was decoded, no route was independently replayed, and no finish is claimed. Exact Steam depot mapping remains unverified.
Puzzle 1 — dipping_your_toes_in
Section titled “Puzzle 1 — dipping_your_toes_in”Article still from series part P10; internal heroes_and_water set position: 1. Buttons can make blocks appear as well as disappear.
Selected article still only; the colored ring marks a visible layout landmark, not an input step.
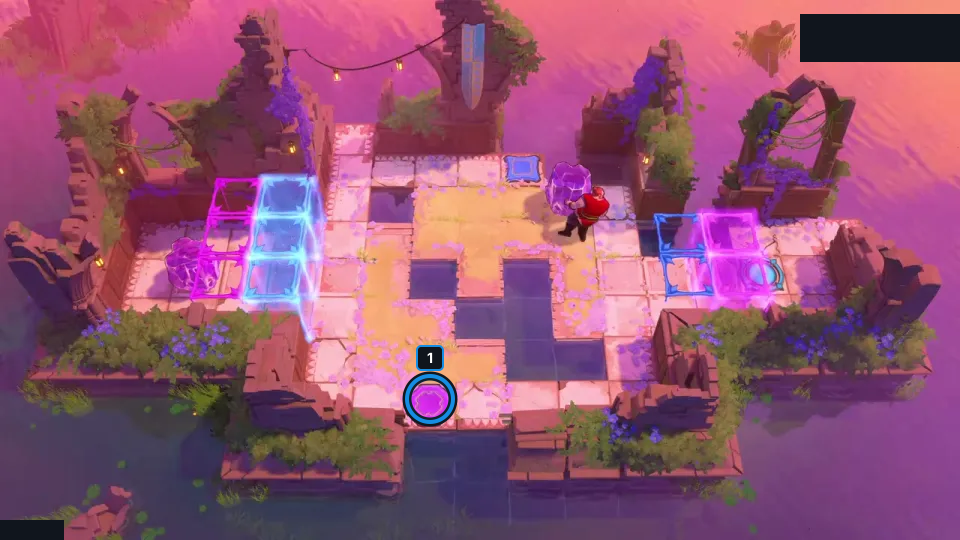
Buttons can make blocks appear as well as disappear.
Check: The article still visually matches dipping_your_toes_in; this card records the article’s short key idea, not a route trace. It is not exact PTS; no route replay or finish claim is made, and exact Steam depot mapping is unverified.
Open full-size image in a new tabPuzzle 2 — crystal_bridges
Section titled “Puzzle 2 — crystal_bridges”Article still from series part P10; internal heroes_and_water set position: 2. Open the way to the lower-right crystals before taking the route across the top.
Selected article still only; the colored ring marks a visible layout landmark, not an input step.
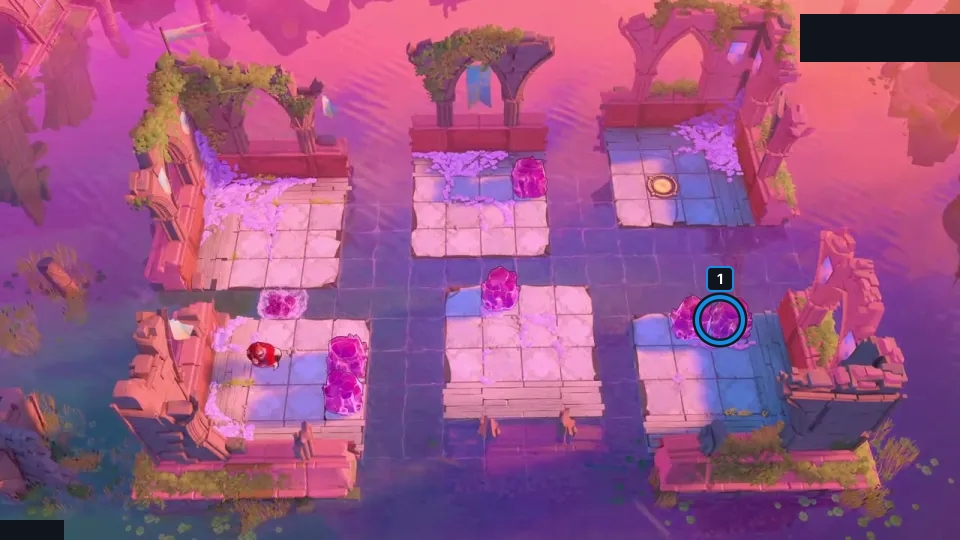
Open the way to the lower-right crystals before taking the route across the top.
Check: The article still visually matches crystal_bridges; this card records the article’s short key idea, not a route trace. It is not exact PTS; no route replay or finish claim is made, and exact Steam depot mapping is unverified.
Open full-size image in a new tabPuzzle 3 — push_and_pull_zach
Section titled “Puzzle 3 — push_and_pull_zach”Article still from series part P10; internal heroes_and_water set position: 3.
Use five crystals as footholds to line up the  Warrior’s and
 Thief’s orange pads.
Selected article still only; the colored ring marks a visible layout landmark, not an input step.
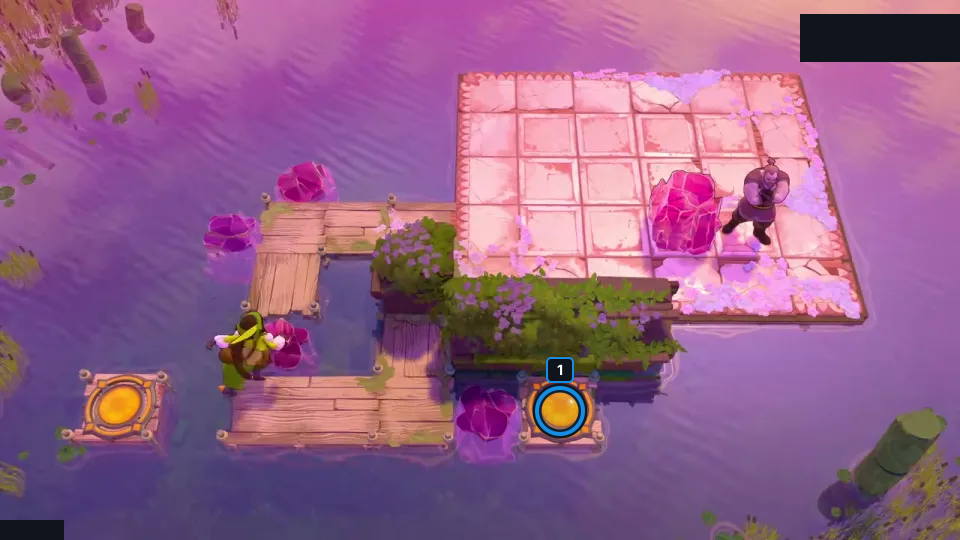
Use five crystals as footholds to line up the Warrior’s and Thief’s orange pads.
Check: The article still visually matches push_and_pull_zach; this card records the article’s short key idea, not a route trace. It is not exact PTS; no route replay or finish claim is made, and exact Steam depot mapping is unverified.
Open full-size image in a new tabPuzzle 4 — drowner
Section titled “Puzzle 4 — drowner”Article still from series part P10; internal heroes_and_water set position: 6. Use two Goblins against each other when the crystal-blocked water hole rules out a push.
Selected article still only; the colored ring marks a visible layout landmark, not an input step.
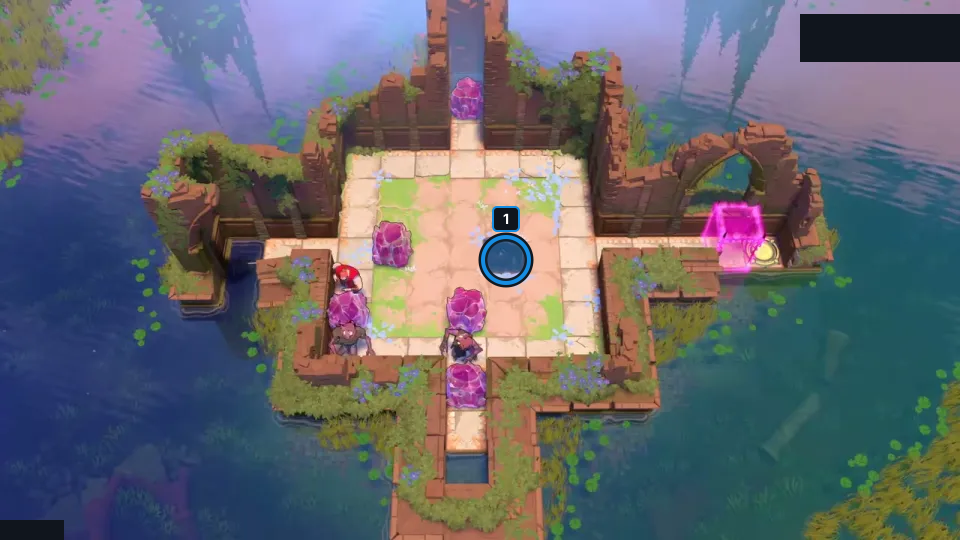
Use two Goblins against each other when the crystal-blocked water hole rules out a push.
Check: The article still visually matches drowner; this card records the article’s short key idea, not a route trace. It is not exact PTS; no route replay or finish claim is made, and exact Steam depot mapping is unverified.
Open full-size image in a new tabPuzzle 5 — surrounded
Section titled “Puzzle 5 — surrounded”Article still from series part P10; internal heroes_and_water set position: 7. Turn the four dragons so they burn every Goblin before waking the heroes below.
Selected article still only; the colored ring marks a visible layout landmark, not an input step.
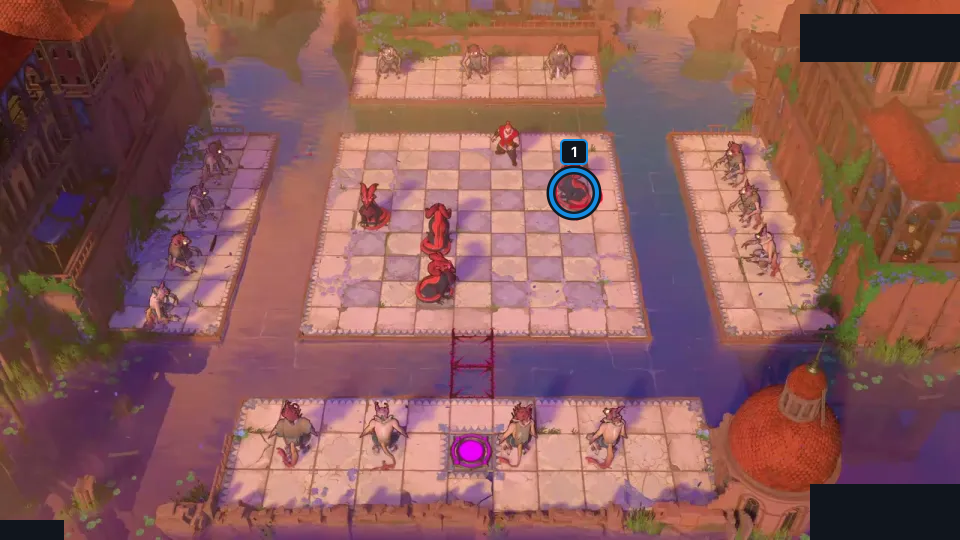
Turn the four dragons so they burn every Goblin before waking the heroes below.
Check: The article still visually matches surrounded; this card records the article’s short key idea, not a route trace. It is not exact PTS; no route replay or finish claim is made, and exact Steam depot mapping is unverified.
Open full-size image in a new tabPuzzle 6 — quadrants_follow_up
Section titled “Puzzle 6 — quadrants_follow_up”Article still from series part P10; internal heroes_and_water set position: 4. Pull crystals onto pink blocks and switch them off to make stepping stones; do not turn a block back on over a sunken crystal.
Selected article still only; the colored ring marks a visible layout landmark, not an input step.
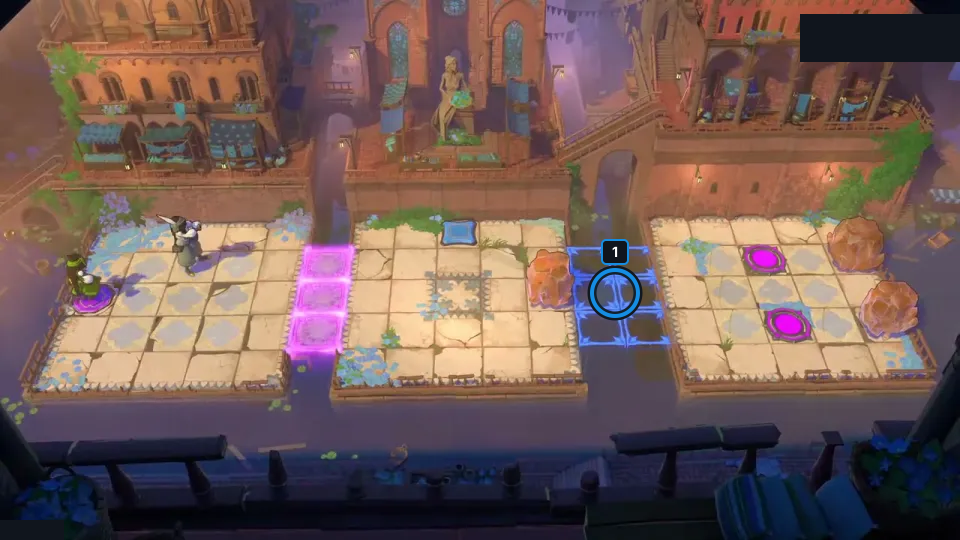
Pull crystals onto pink blocks and switch them off to make stepping stones; do not turn a block back on over a sunken crystal.
Check: The article still visually matches quadrants_follow_up; this card records the article’s short key idea, not a route trace. It is not exact PTS; no route replay or finish claim is made, and exact Steam depot mapping is unverified.
Open full-size image in a new tabPuzzle 7 — quadrants
Section titled “Puzzle 7 — quadrants”Article still from series part P10; internal heroes_and_water set position: 5. Swaps cannot change how many objects are on each half; open the link and carry one across.
Selected article still only; the colored ring marks a visible layout landmark, not an input step.
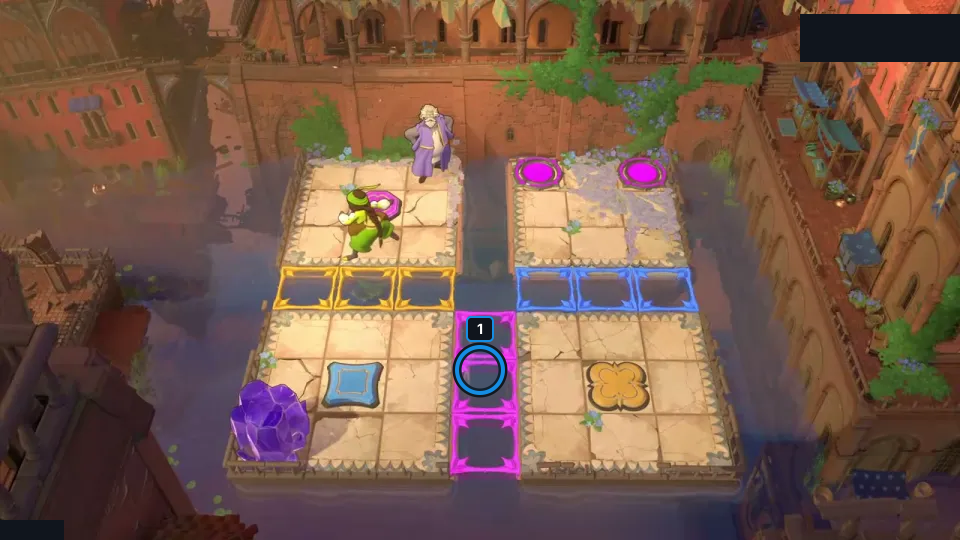
Swaps cannot change how many objects are on each half; open the link and carry one across.
Check: The article still visually matches quadrants; this card records the article’s short key idea, not a route trace. It is not exact PTS; no route replay or finish claim is made, and exact Steam depot mapping is unverified.
Open full-size image in a new tabPuzzle 8 — dont_push_the_button
Section titled “Puzzle 8 — dont_push_the_button”Article still from series part P10; internal heroes_and_water set position: 8. Sink the first crystal on the purple tile, which the later button presses will not destroy.
Selected article still only; the colored ring marks a visible layout landmark, not an input step.
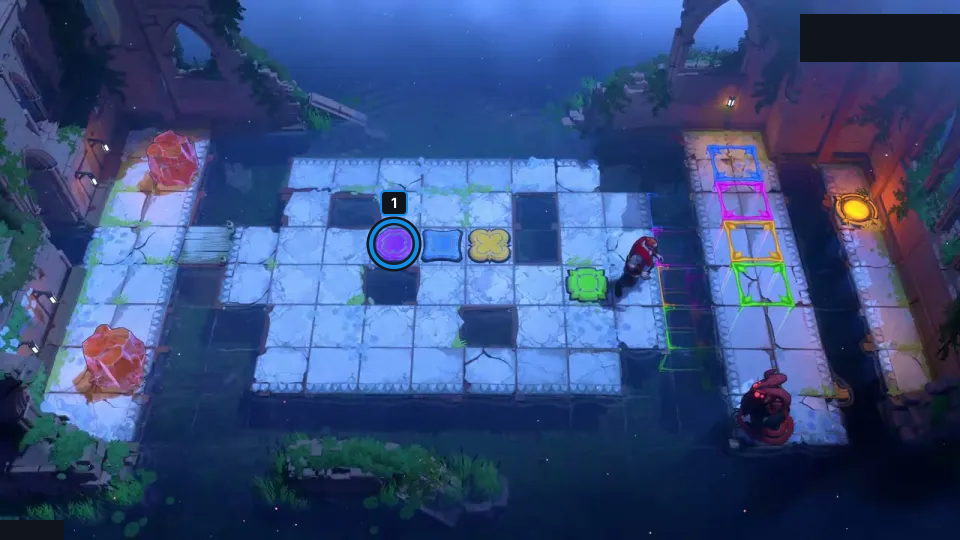
Sink the first crystal on the purple tile, which the later button presses will not destroy.
Check: The article still visually matches dont_push_the_button; this card records the article’s short key idea, not a route trace. It is not exact PTS; no route replay or finish claim is made, and exact Steam depot mapping is unverified.
Open full-size image in a new tabPuzzle 9 — detonator
Section titled “Puzzle 9 — detonator”Article still from series part P10; internal heroes_and_water set position: 9. Both heroes need the lower-right exit; use a remote switch to remove the bridge crystal that blocks the dragon’s fire.
Selected article still only; the colored ring marks a visible layout landmark, not an input step.
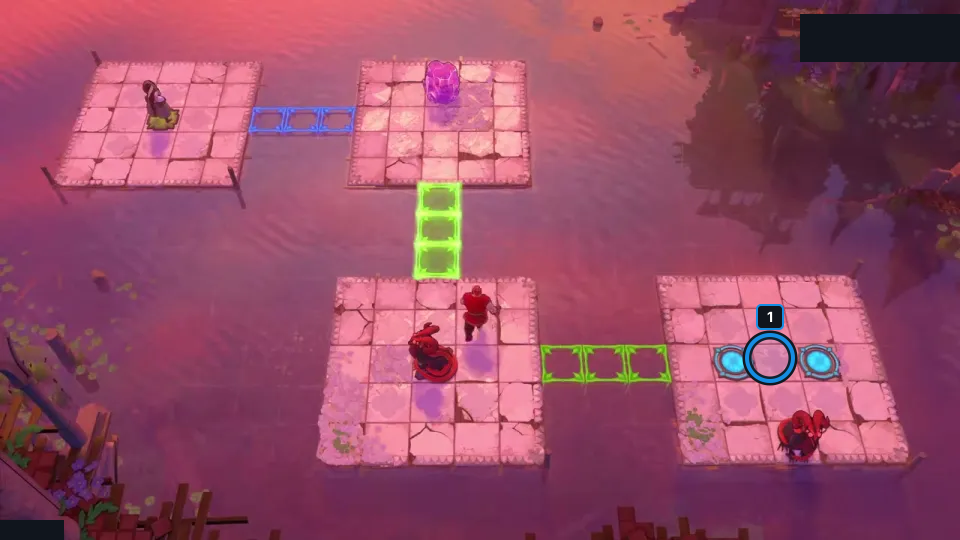
Both heroes need the lower-right exit; use a remote switch to remove the bridge crystal that blocks the dragon’s fire.
Check: The article still visually matches detonator; this card records the article’s short key idea, not a route trace. It is not exact PTS; no route replay or finish claim is made, and exact Steam depot mapping is unverified.
Open full-size image in a new tabPuzzle 10 — a_wiz_out_of_water
Section titled “Puzzle 10 — a_wiz_out_of_water”Article still from series part P10; internal heroes_and_water set position: 10. Many shuffles work, but keep a crystal off the line needed for a swap.
Selected article still only; the colored ring marks a visible layout landmark, not an input step.
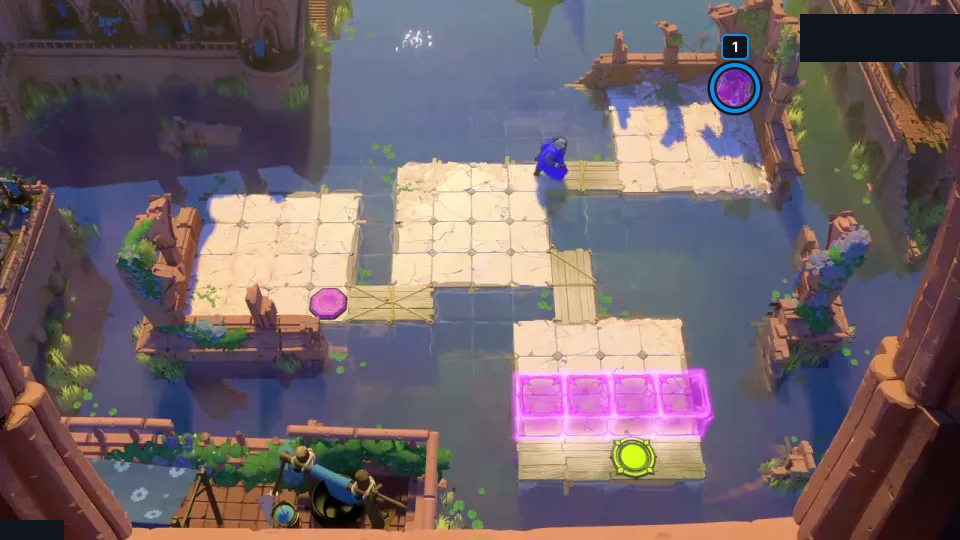
Many shuffles work, but keep a crystal off the line needed for a swap.
Check: The article still visually matches a_wiz_out_of_water; this card records the article’s short key idea, not a route trace. It is not exact PTS; no route replay or finish claim is made, and exact Steam depot mapping is unverified.
Open full-size image in a new tabPuzzle 11 — island_hopping
Section titled “Puzzle 11 — island_hopping”Article still from series part P10; internal heroes_and_water set position: 11. Swaps cannot move objects between islands; make the transfer at the top right with a push and a walk.
Selected article still only; the colored ring marks a visible layout landmark, not an input step.
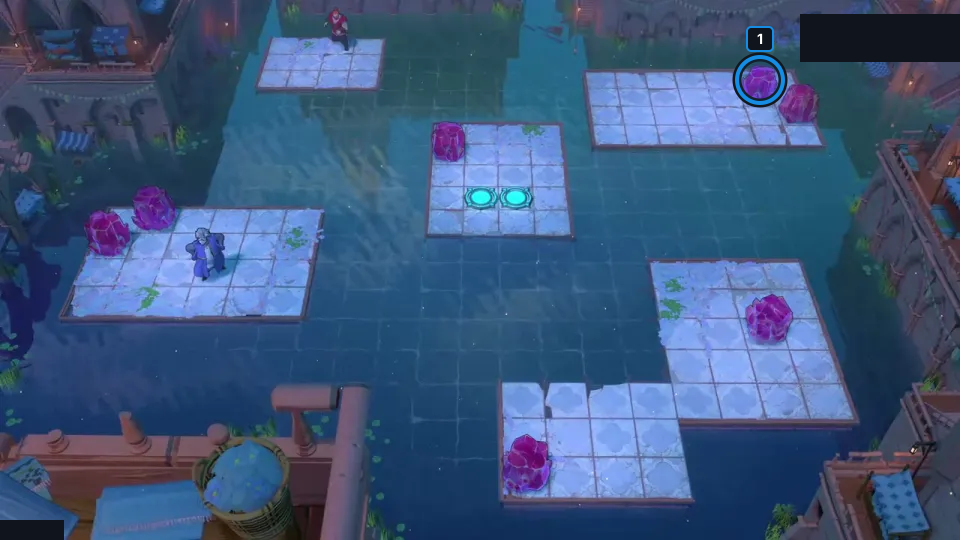
Swaps cannot move objects between islands; make the transfer at the top right with a push and a walk.
Check: The article still visually matches island_hopping; this card records the article’s short key idea, not a route trace. It is not exact PTS; no route replay or finish claim is made, and exact Steam depot mapping is unverified.
Open full-size image in a new tabPuzzle 12 — dunk_tank_alt
Section titled “Puzzle 12 — dunk_tank_alt”Article still from series part P10; internal heroes_and_water set position: 12. Drop the dragon onto the purple block, then switch the block off so it falls into the water.
Selected article still only; the colored ring marks a visible layout landmark, not an input step.
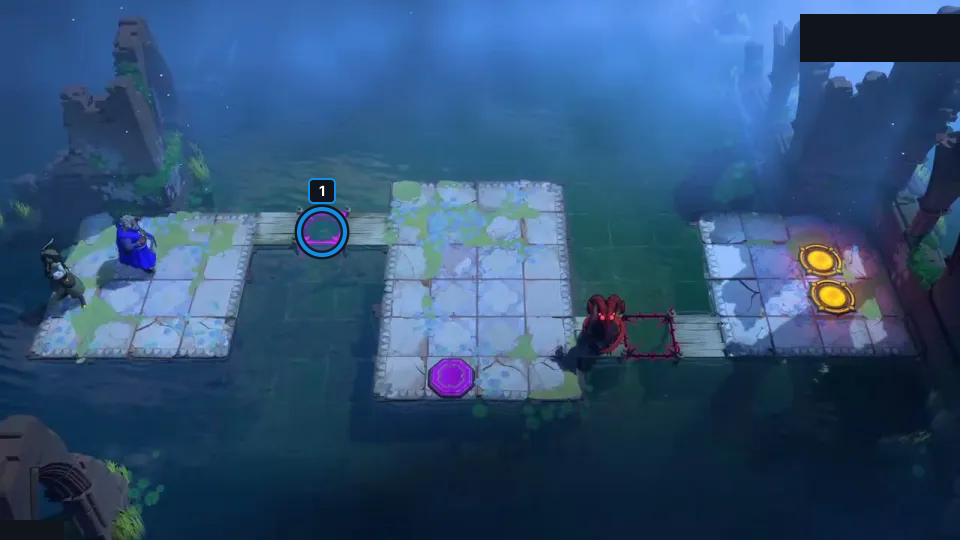
Drop the dragon onto the purple block, then switch the block off so it falls into the water.
Check: The article still visually matches dunk_tank_alt; this card records the article’s short key idea, not a route trace. It is not exact PTS; no route replay or finish claim is made, and exact Steam depot mapping is unverified.
Open full-size image in a new tabPuzzle 13 — new_cleric_fly
Section titled “Puzzle 13 — new_cleric_fly”Article still from series part P10; internal heroes_and_water set position: 18. The Cleric floats across water while walking through a dragon’s fire line.
Selected article still only; the colored ring marks a visible layout landmark, not an input step.
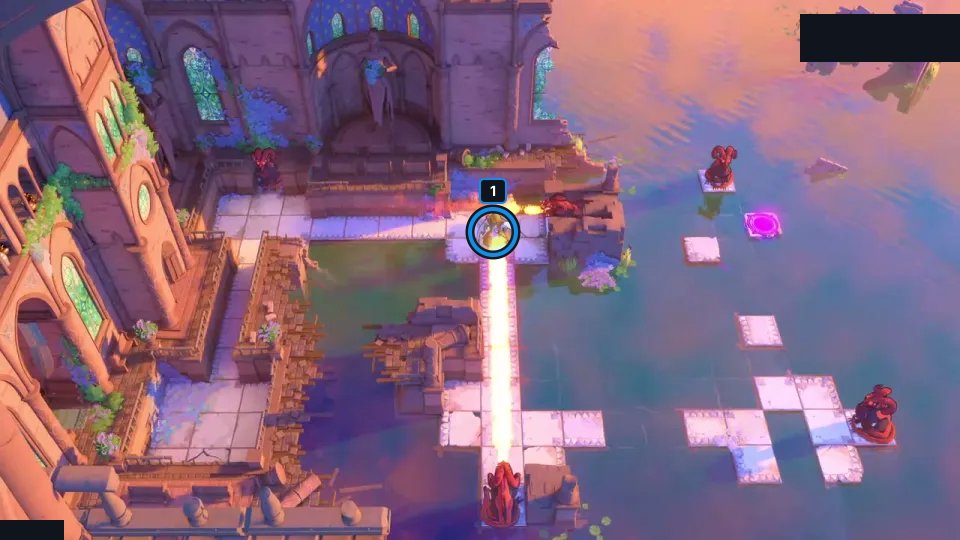
The Cleric floats across water while walking through a dragon’s fire line.
Check: The article still visually matches new_cleric_fly; this card records the article’s short key idea, not a route trace. It is not exact PTS; no route replay or finish claim is made, and exact Steam depot mapping is unverified.
Open full-size image in a new tabPuzzle 14 — little_faith_alt
Section titled “Puzzle 14 — little_faith_alt”Article still from series part P10; internal heroes_and_water set position: 19. A Goblin attacking the Cleric keeps it afloat; plan the approach through Goblins and fire lines.
Selected article still only; the colored ring marks a visible layout landmark, not an input step.
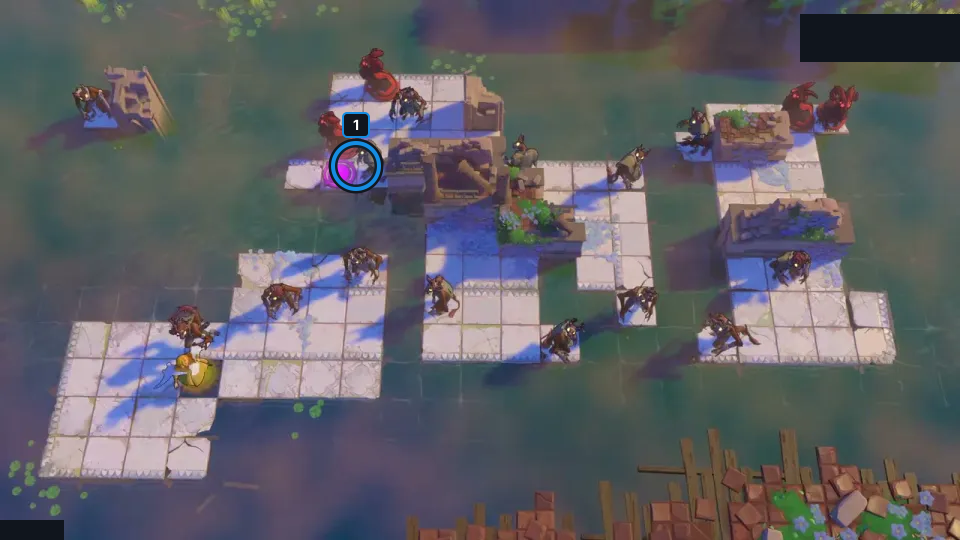
A Goblin attacking the Cleric keeps it afloat; plan the approach through Goblins and fire lines.
Check: The article still visually matches little_faith_alt; this card records the article’s short key idea, not a route trace. It is not exact PTS; no route replay or finish claim is made, and exact Steam depot mapping is unverified.
Open full-size image in a new tabPuzzle 15 — both_ways
Section titled “Puzzle 15 — both_ways”Article still from series part P10; internal heroes_and_water set position: 20. A hero beside the shielded Cleric also floats in the fire; move them across together.
Selected article still only; the colored ring marks a visible layout landmark, not an input step.
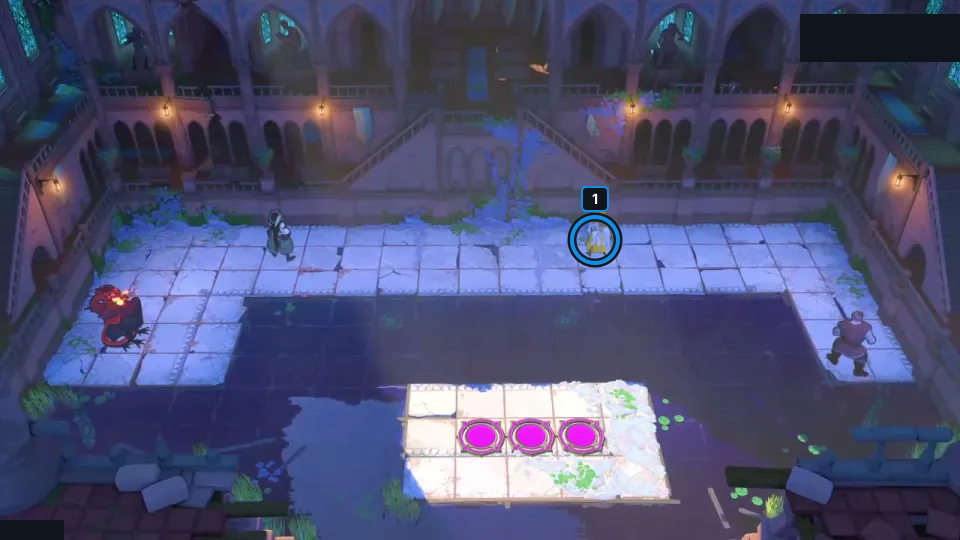
A hero beside the shielded Cleric also floats in the fire; move them across together.
Check: The article still visually matches both_ways; this card records the article’s short key idea, not a route trace. It is not exact PTS; no route replay or finish claim is made, and exact Steam depot mapping is unverified.
Open full-size image in a new tabPuzzle 16 — flamethrower
Section titled “Puzzle 16 — flamethrower”Article still from series part P10; internal heroes_and_water set position: 21. Move the dragon so its fire line stays beneath the Cleric’s path across the water.
Selected article still only; the colored ring marks a visible layout landmark, not an input step.
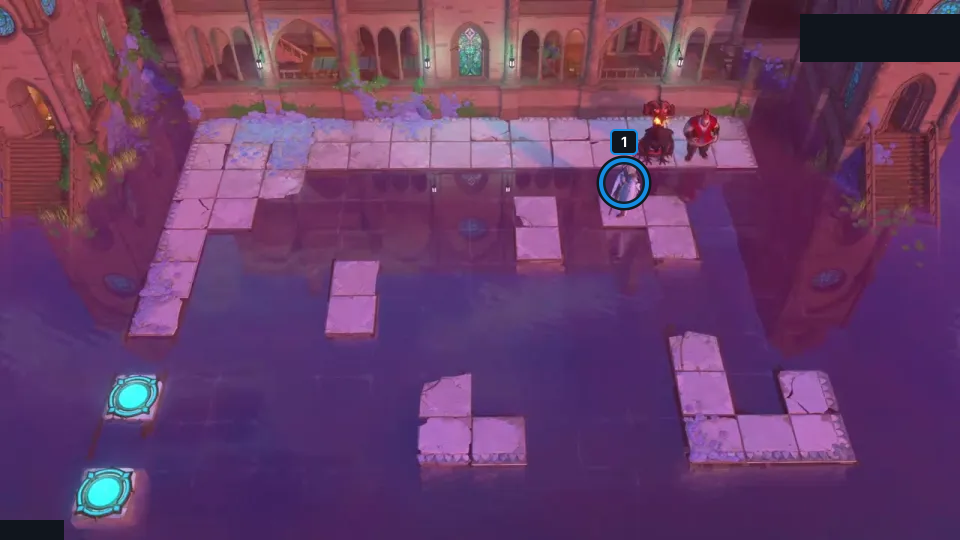
Move the dragon so its fire line stays beneath the Cleric’s path across the water.
Check: The article still visually matches flamethrower; this card records the article’s short key idea, not a route trace. It is not exact PTS; no route replay or finish claim is made, and exact Steam depot mapping is unverified.
Open full-size image in a new tabPuzzle 17 — killer_wizard
Section titled “Puzzle 17 — killer_wizard”Article still from series part P10; internal heroes_and_water set position: 22.
Use the dragon and floating Cleric as a path; the  Wizard can swap with the dragon over water to drop it.
Selected article still only; the colored ring marks a visible layout landmark, not an input step.
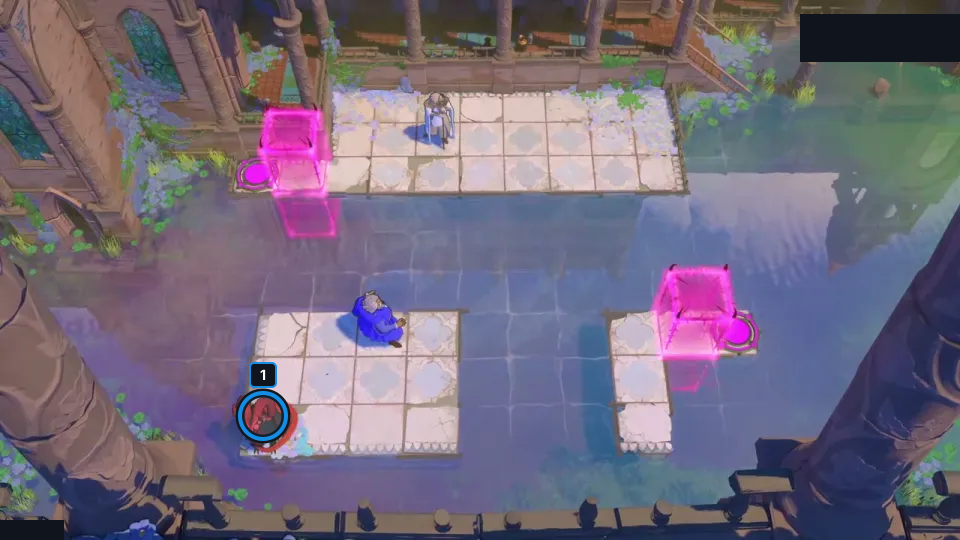
Use the dragon and floating Cleric as a path; the Wizard can swap with the dragon over water to drop it.
Check: The article still visually matches killer_wizard; this card records the article’s short key idea, not a route trace. It is not exact PTS; no route replay or finish claim is made, and exact Steam depot mapping is unverified.
Open full-size image in a new tabPuzzle 18 — partial_pull
Section titled “Puzzle 18 — partial_pull”Article still from series part P10; internal heroes_and_water set position: 23. Break the Thief’s pull with a vertical step so the lower dragon stops one tile short; the Cleric covers the water step.
Selected article still only; the colored ring marks a visible layout landmark, not an input step.
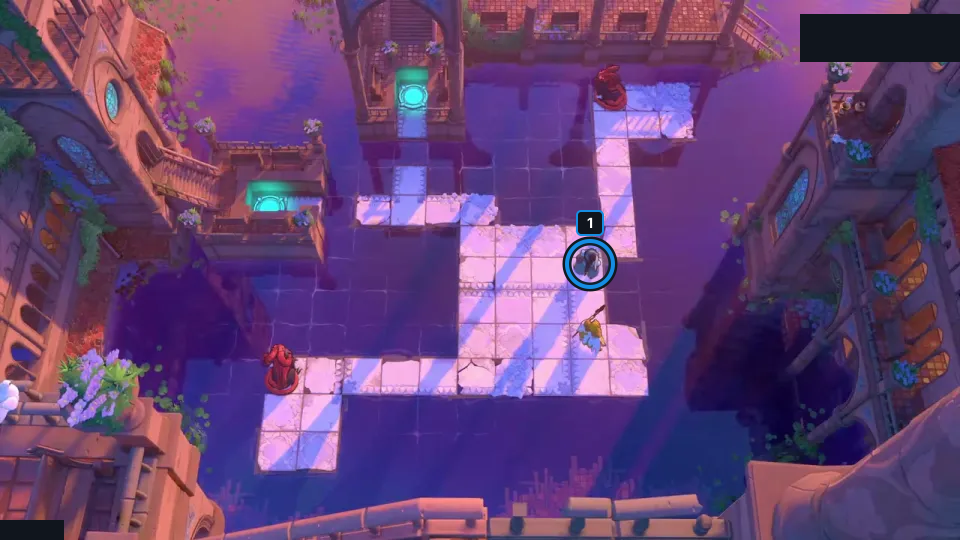
Break the Thief’s pull with a vertical step so the lower dragon stops one tile short; the Cleric covers the water step.
Check: The article still visually matches partial_pull; this card records the article’s short key idea, not a route trace. It is not exact PTS; no route replay or finish claim is made, and exact Steam depot mapping is unverified.
Open full-size image in a new tabPuzzle 19 — cleric_fly_intro3_v2
Section titled “Puzzle 19 — cleric_fly_intro3_v2”Article still from series part P10; internal heroes_and_water set position: 24. Follow the dragon’s fire line with the Thief and Cleric, then slip the Cleric ahead as the dragon moves.
Selected article still only; the colored ring marks a visible layout landmark, not an input step.
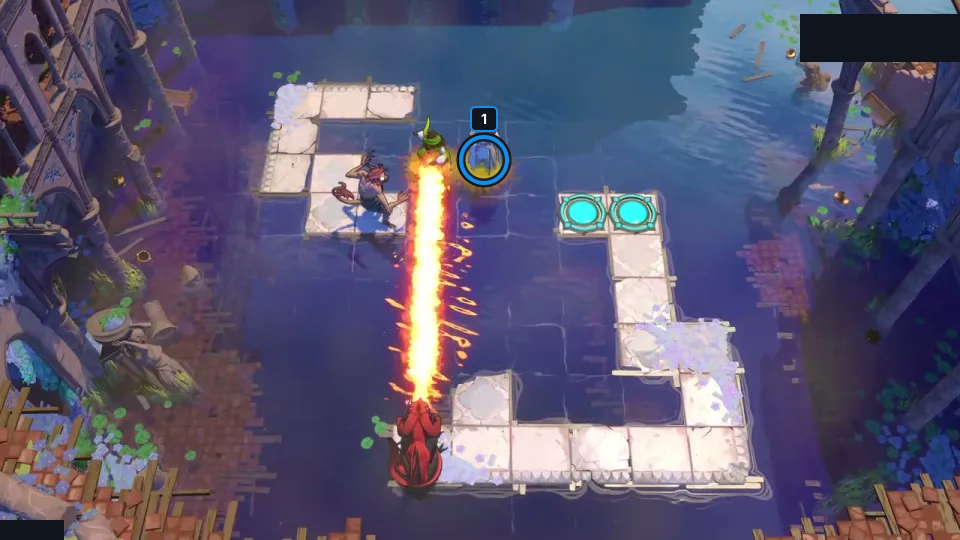
Follow the dragon’s fire line with the Thief and Cleric, then slip the Cleric ahead as the dragon moves.
Check: The article still visually matches cleric_fly_intro3_v2; this card records the article’s short key idea, not a route trace. It is not exact PTS; no route replay or finish claim is made, and exact Steam depot mapping is unverified.
Open full-size image in a new tabPuzzle 20 — monster_mover
Section titled “Puzzle 20 — monster_mover”Article still from series part P10; internal heroes_and_water set position: 25. The Warrior floats only while a Goblin attacks; plan each crossing around a nearby Goblin.
Selected article still only; the colored ring marks a visible layout landmark, not an input step.
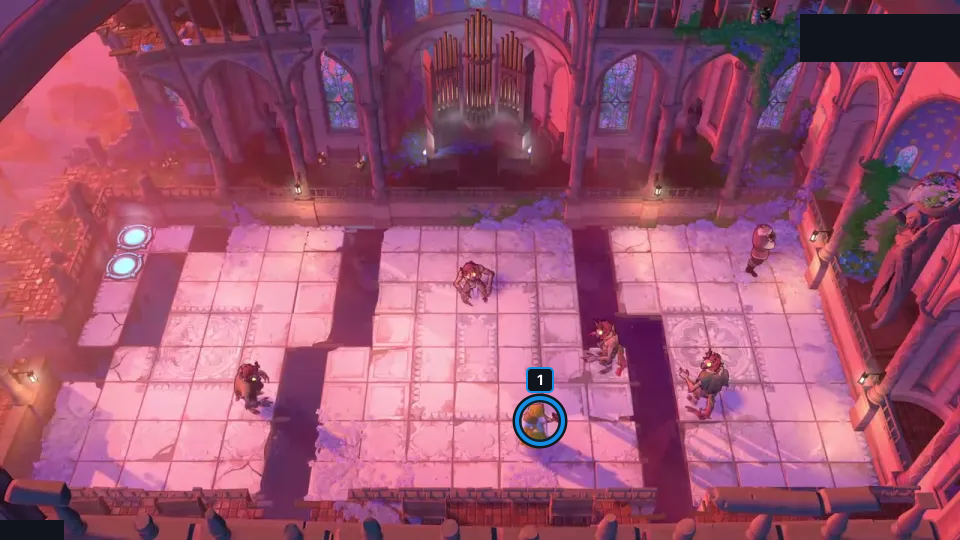
The Warrior floats only while a Goblin attacks; plan each crossing around a nearby Goblin.
Check: The article still visually matches monster_mover; this card records the article’s short key idea, not a route trace. It is not exact PTS; no route replay or finish claim is made, and exact Steam depot mapping is unverified.
Open full-size image in a new tabPuzzle 21 — tug_boat
Section titled “Puzzle 21 — tug_boat”Article still from series part P10; internal heroes_and_water set position: 27. Use two dragons, fill the middle water with a crystal, and protect the Thief so it can pull.
Selected article still only; the colored ring marks a visible layout landmark, not an input step.
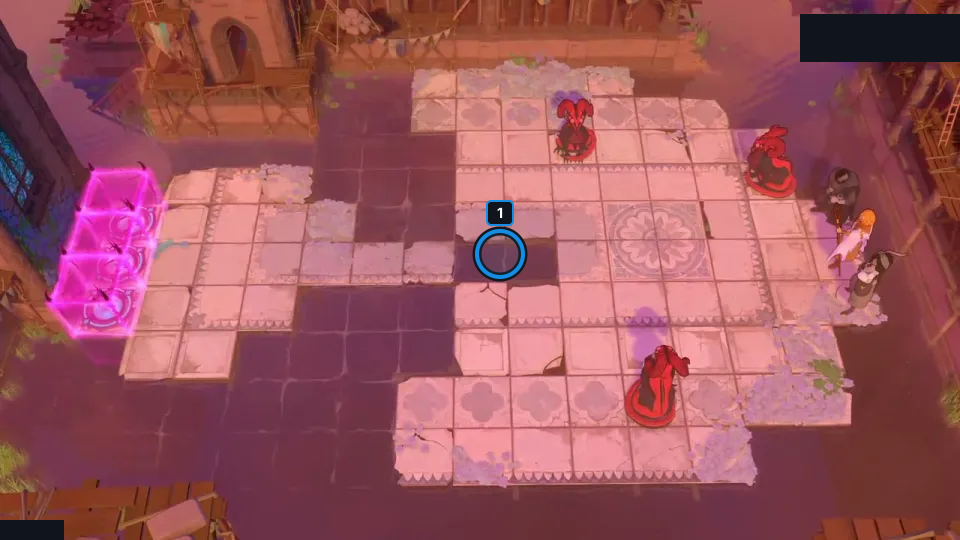
Use two dragons, fill the middle water with a crystal, and protect the Thief so it can pull.
Check: The article still visually matches tug_boat; this card records the article’s short key idea, not a route trace. It is not exact PTS; no route replay or finish claim is made, and exact Steam depot mapping is unverified.
Open full-size image in a new tabPuzzle 22 — on_command
Section titled “Puzzle 22 — on_command”Article still from series part P10; internal heroes_and_water set position: 28. Free both green buttons at once by turning the two dragons into one row so they burn each other.
Selected article still only; the colored ring marks a visible layout landmark, not an input step.
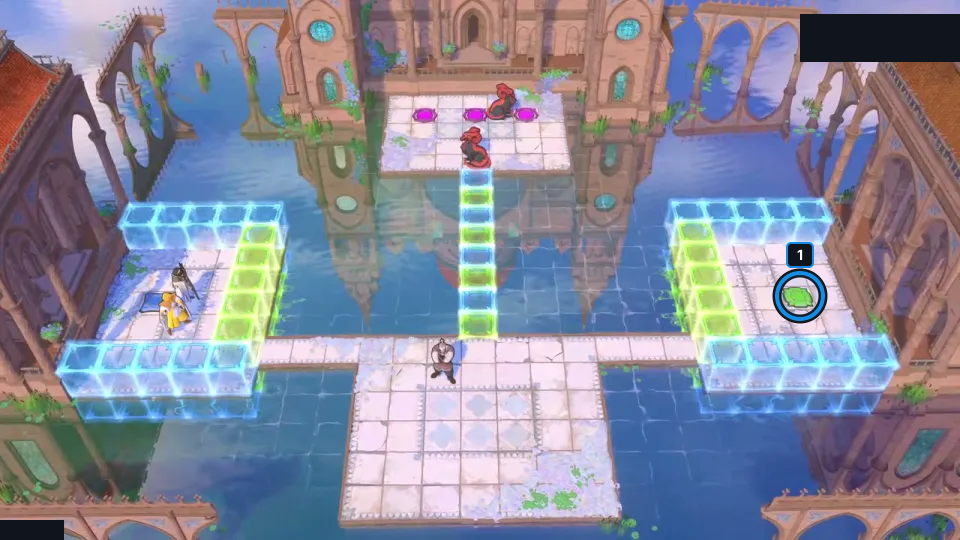
Free both green buttons at once by turning the two dragons into one row so they burn each other.
Check: The article still visually matches on_command; this card records the article’s short key idea, not a route trace. It is not exact PTS; no route replay or finish claim is made, and exact Steam depot mapping is unverified.
Open full-size image in a new tabPuzzle 23 — team_building_exercise
Section titled “Puzzle 23 — team_building_exercise”Article still from series part P10; internal heroes_and_water set position: 26. Swaps alone cannot cross the separated islands; build a floating corridor for someone to walk across.
Selected article still only; the colored ring marks a visible layout landmark, not an input step.
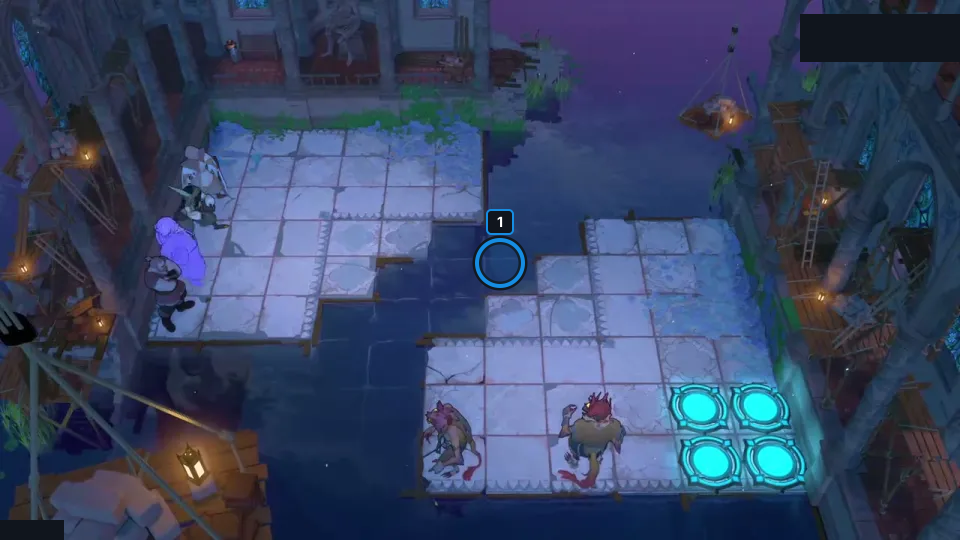
Swaps alone cannot cross the separated islands; build a floating corridor for someone to walk across.
Check: The article still visually matches team_building_exercise; this card records the article’s short key idea, not a route trace. It is not exact PTS; no route replay or finish claim is made, and exact Steam depot mapping is unverified.
Open full-size image in a new tabPuzzle 24 — one_vs_three
Section titled “Puzzle 24 — one_vs_three”Article still from series part P10; internal heroes_and_water set position: 15.
Carry the crystal through the water with the  Bard instead of trying to swap it across the islands.
Selected article still only; the colored ring marks a visible layout landmark, not an input step.
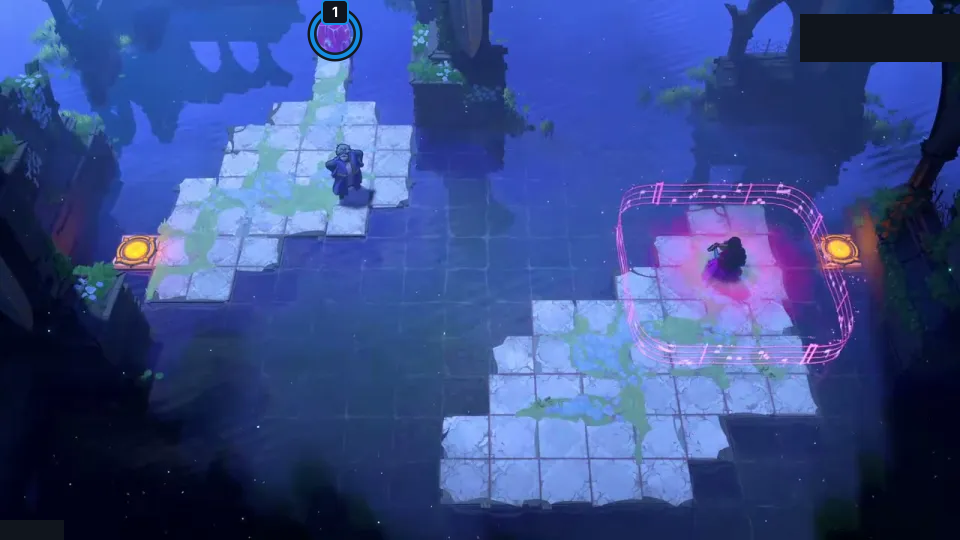
Carry the crystal through the water with the Bard instead of trying to swap it across the islands.
Check: The article still visually matches one_vs_three; this card records the article’s short key idea, not a route trace. It is not exact PTS; no route replay or finish claim is made, and exact Steam depot mapping is unverified.
Open full-size image in a new tabPuzzle 25 — synchronized_swimmers
Section titled “Puzzle 25 — synchronized_swimmers”Article still from series part P10; internal heroes_and_water set position: 16. Use the Cleric as a wall to put a Goblin directly above the Bard, then cross the water.
Selected article still only; the colored ring marks a visible layout landmark, not an input step.
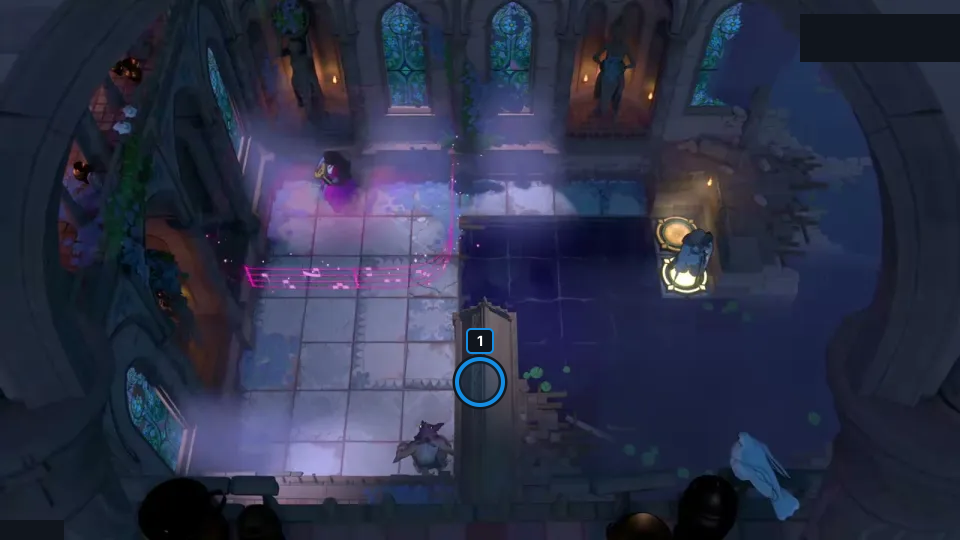
Use the Cleric as a wall to put a Goblin directly above the Bard, then cross the water.
Check: The article still visually matches synchronized_swimmers; this card records the article’s short key idea, not a route trace. It is not exact PTS; no route replay or finish claim is made, and exact Steam depot mapping is unverified.
Open full-size image in a new tabPuzzle 26 — dragon_compass
Section titled “Puzzle 26 — dragon_compass”Article still from series part P10; internal heroes_and_water set position: 17. Catch the first dragon from above, pull it to face down, follow its fire line, then pull it into the water.
Selected article still only; the colored ring marks a visible layout landmark, not an input step.
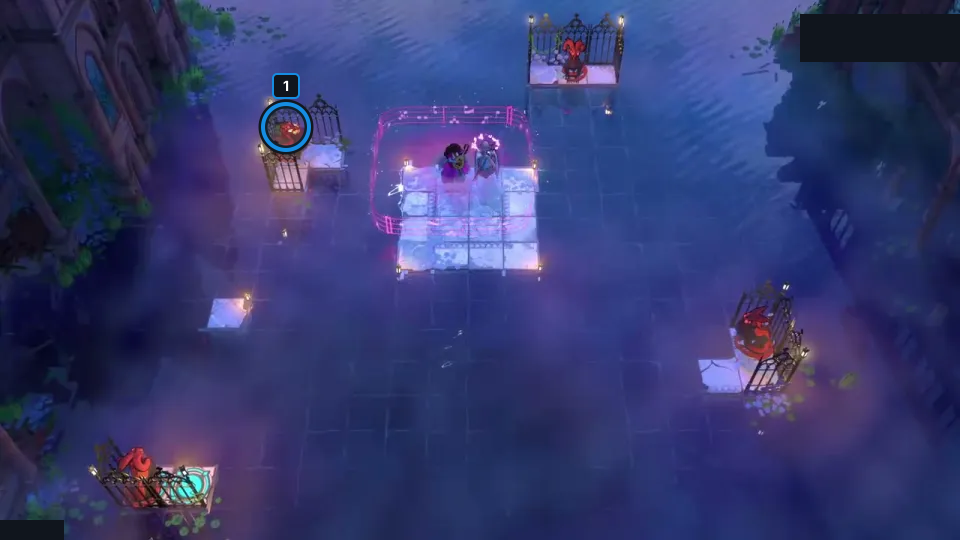
Catch the first dragon from above, pull it to face down, follow its fire line, then pull it into the water.
Check: The article still visually matches dragon_compass; this card records the article’s short key idea, not a route trace. It is not exact PTS; no route replay or finish claim is made, and exact Steam depot mapping is unverified.
Open full-size image in a new tabPuzzle 27 — gully_alt
Section titled “Puzzle 27 — gully_alt”Article still from series part P10; internal heroes_and_water set position: 13. The crystal stops at maze walls while the Bard keeps moving; use the walls to line it up with each gap.
Selected article still only; the colored ring marks a visible layout landmark, not an input step.
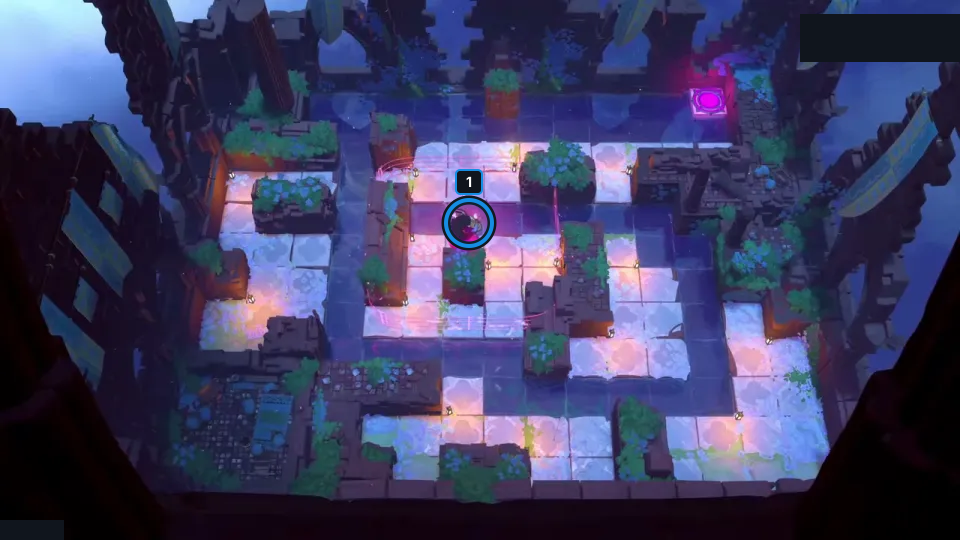
The crystal stops at maze walls while the Bard keeps moving; use the walls to line it up with each gap.
Check: The article still visually matches gully_alt; this card records the article’s short key idea, not a route trace. It is not exact PTS; no route replay or finish claim is made, and exact Steam depot mapping is unverified.
Open full-size image in a new tabPuzzle 28 — easy_situation_v2
Section titled “Puzzle 28 — easy_situation_v2”Article still from series part P10; internal heroes_and_water set position: 14. The Bard cannot step onto her exit while holding the crystal; have the Warrior push her onto it.
Selected article still only; the colored ring marks a visible layout landmark, not an input step.
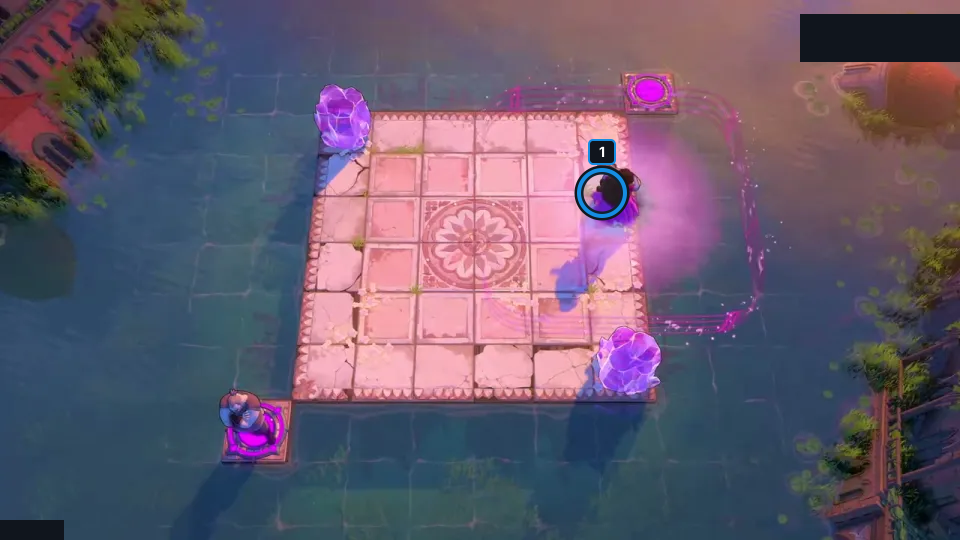
The Bard cannot step onto her exit while holding the crystal; have the Warrior push her onto it.
Check: The article still visually matches easy_situation_v2; this card records the article’s short key idea, not a route trace. It is not exact PTS; no route replay or finish claim is made, and exact Steam depot mapping is unverified.
Open full-size image in a new tabPuzzle 29 — prisoners_dilemma_alt
Section titled “Puzzle 29 — prisoners_dilemma_alt”Article section: Puzzle 29; internal set position: 16.
The ring marks a visible landmark, not an action step.
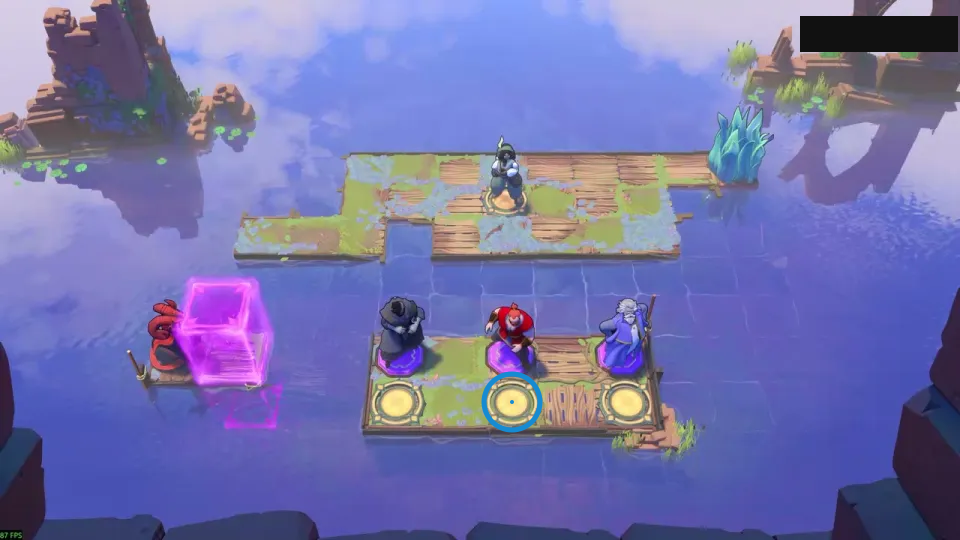
Sink a crystal above the dragon to block its fire.
Check: Ring marks middle yellow circular pad on the lower platform.
Open full-size image in a new tabPuzzle 30 — bard_stack_intro
Section titled “Puzzle 30 — bard_stack_intro”Article still from series part P29; internal heroes_and_water set position: 29. Put the Warrior on the crystal so a pull moves it two tiles; the Bard can then use the same stack.
Selected article still only; the colored ring marks a visible layout landmark, not an input step.
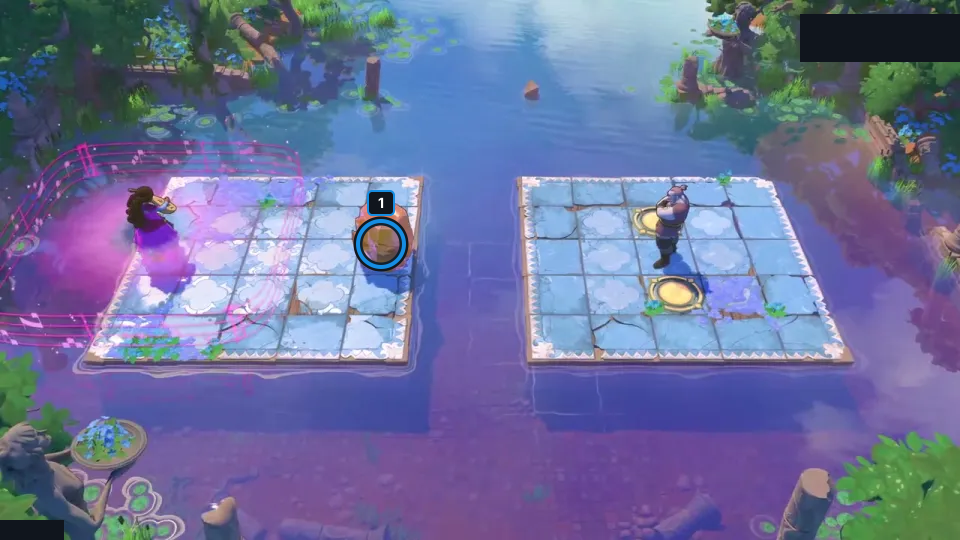
Put the Warrior on the crystal so a pull moves it two tiles; the Bard can then use the same stack.
Check: The article still visually matches bard_stack_intro; this card records the article’s short key idea, not a route trace. It is not exact PTS; no route replay or finish claim is made, and exact Steam depot mapping is unverified.
Open full-size image in a new tabPuzzle 31 — goblin_express
Section titled “Puzzle 31 — goblin_express”Article still from series part P29; internal heroes_and_water set position: 30. Stack each Goblin on a crystal so it can travel two tiles per pull toward its target.
Selected article still only; the colored ring marks a visible layout landmark, not an input step.
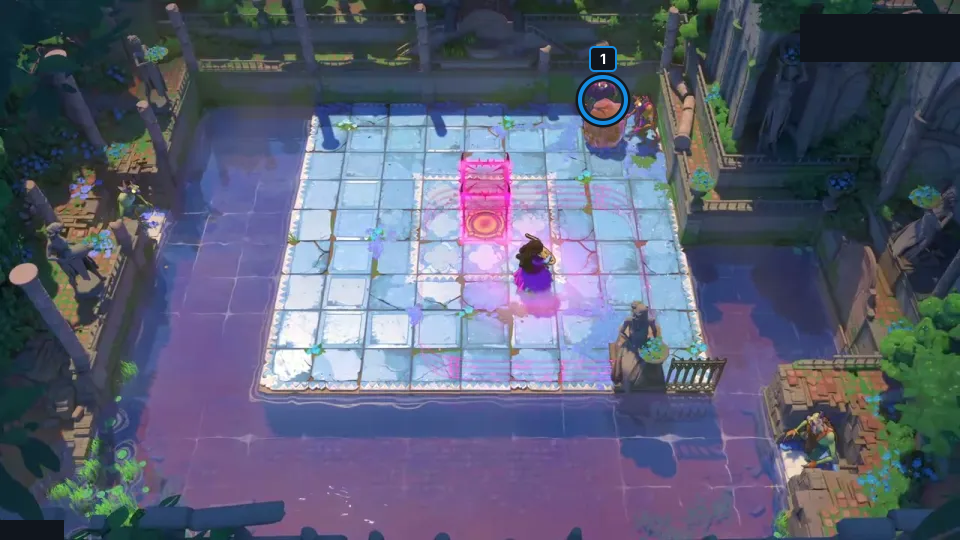
Stack each Goblin on a crystal so it can travel two tiles per pull toward its target.
Check: The article still visually matches goblin_express; this card records the article’s short key idea, not a route trace. It is not exact PTS; no route replay or finish claim is made, and exact Steam depot mapping is unverified.
Open full-size image in a new tabPuzzle 32 — baby_steps_line
Section titled “Puzzle 32 — baby_steps_line”Article still from series part P29; internal heroes_and_water set position: 31. Use the Cleric to hold the button for the first crossing; later an uncontrolled crystal can block the gate.
Selected article still only; the colored ring marks a visible layout landmark, not an input step.
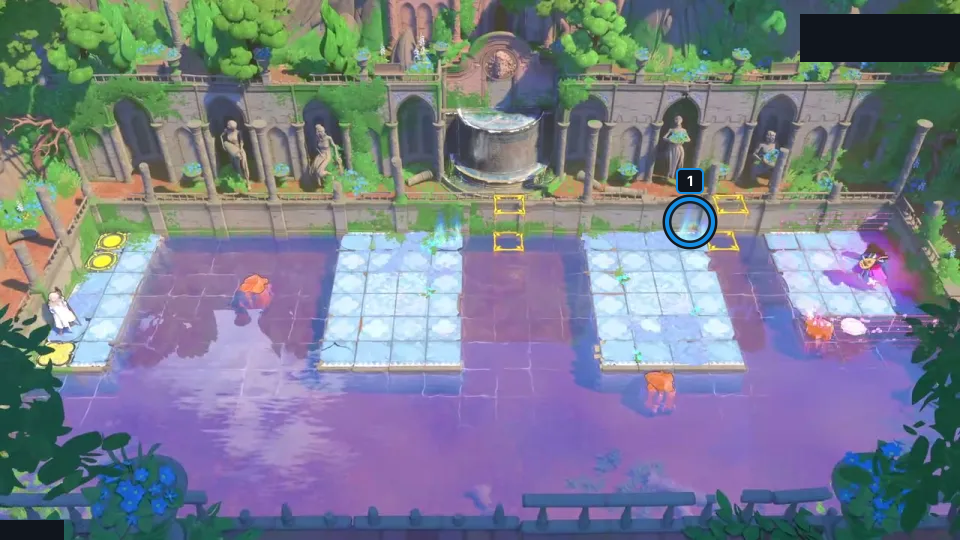
Use the Cleric to hold the button for the first crossing; later an uncontrolled crystal can block the gate.
Check: The article still visually matches baby_steps_line; this card records the article’s short key idea, not a route trace. It is not exact PTS; no route replay or finish claim is made, and exact Steam depot mapping is unverified.
Open full-size image in a new tabPuzzle 33 — surfing_lesson_alt
Section titled “Puzzle 33 — surfing_lesson_alt”Article still from series part P29; internal heroes_and_water set position: 32. Park a crystal between statues so it stops in a place the Bard can ride.
Selected article still only; the colored ring marks a visible layout landmark, not an input step.
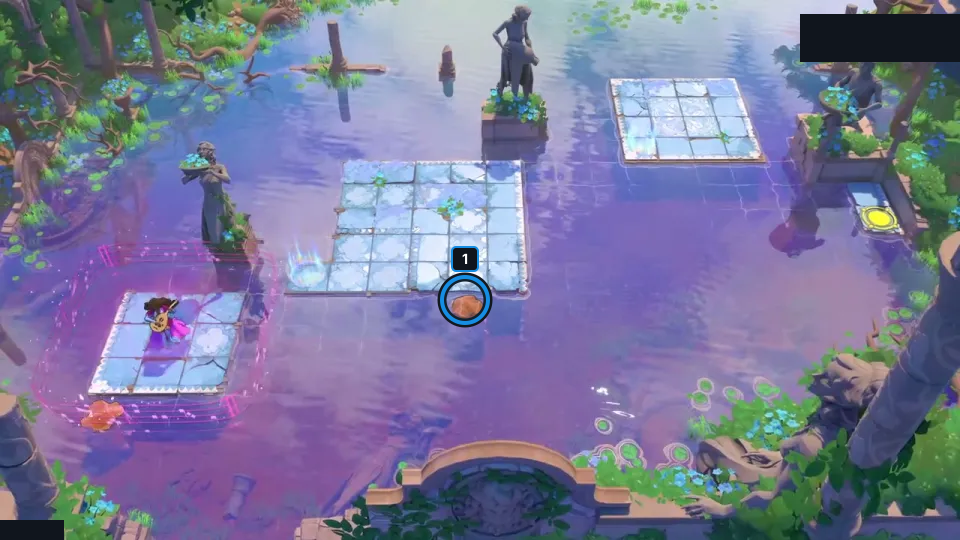
Park a crystal between statues so it stops in a place the Bard can ride.
Check: The article still visually matches surfing_lesson_alt; this card records the article’s short key idea, not a route trace. It is not exact PTS; no route replay or finish claim is made, and exact Steam depot mapping is unverified.
Open full-size image in a new tabPuzzle 34 — bard_range3_with_intro
Section titled “Puzzle 34 — bard_range3_with_intro”Article still from series part P29; internal heroes_and_water set position: 33. Build a crystal staircase for the Bard’s two-tile steps, working backward from the far exit.
Selected article still only; the colored ring marks a visible layout landmark, not an input step.
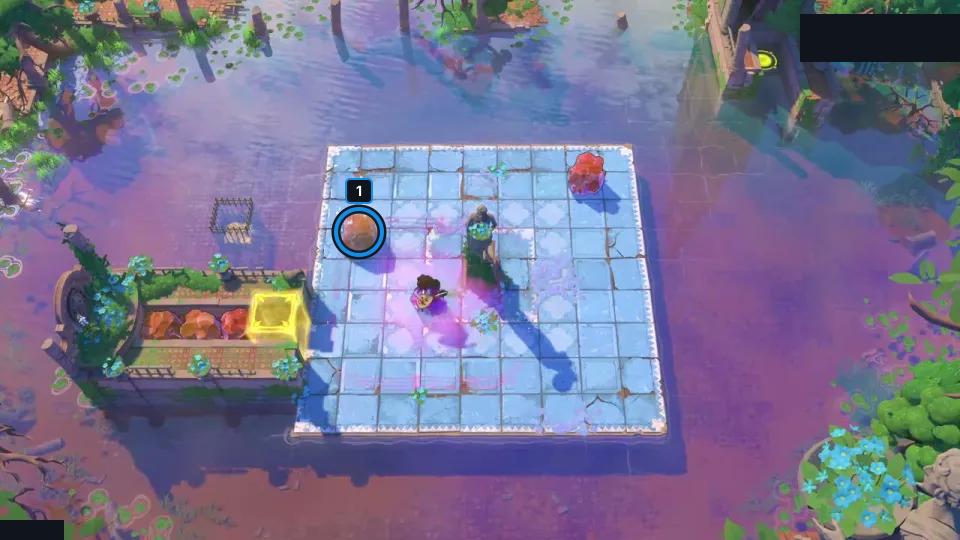
Build a crystal staircase for the Bard’s two-tile steps, working backward from the far exit.
Check: The article still visually matches bard_range3_with_intro; this card records the article’s short key idea, not a route trace. It is not exact PTS; no route replay or finish claim is made, and exact Steam depot mapping is unverified.
Open full-size image in a new tabUnassigned article material
Section titled “Unassigned article material”Main puzzle 29 and North puzzles 1–6 have no candidate assignment in this crosswalk. The five separate Overworld scenes also remain unresolved by local target ID.
North puzzle 1 — floating_gardens
Section titled “North puzzle 1 — floating_gardens”Article section: North puzzle 1; internal set position: 13.
The ring marks a visible landmark, not an action step.
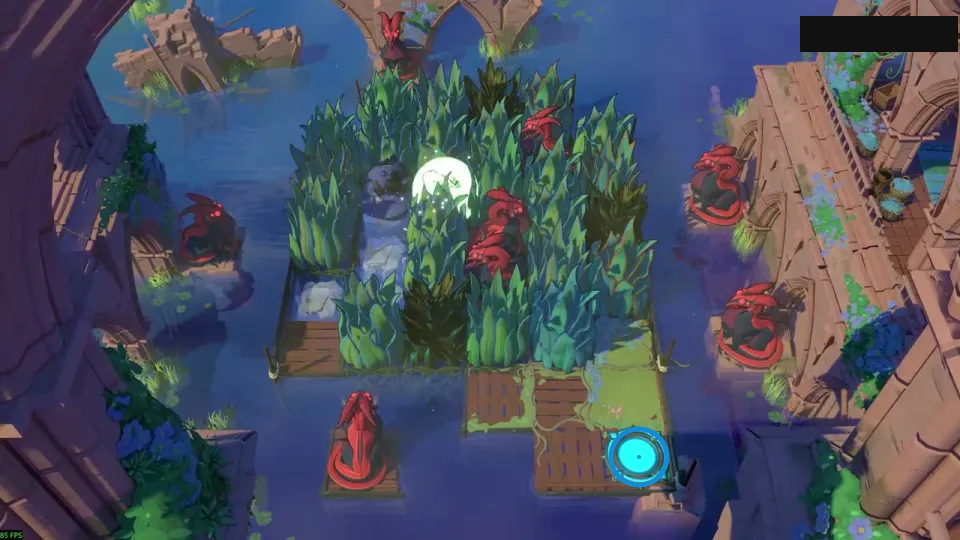
Keep space before each dragon and crystallize as you pass.
Check: Ring marks cyan circular pad on the lower-right landing.
Open full-size image in a new tabNorth puzzle 2 — four_horsemen
Section titled “North puzzle 2 — four_horsemen”Article section: North puzzle 2; internal set position: 14.
The ring marks a visible landmark, not an action step.
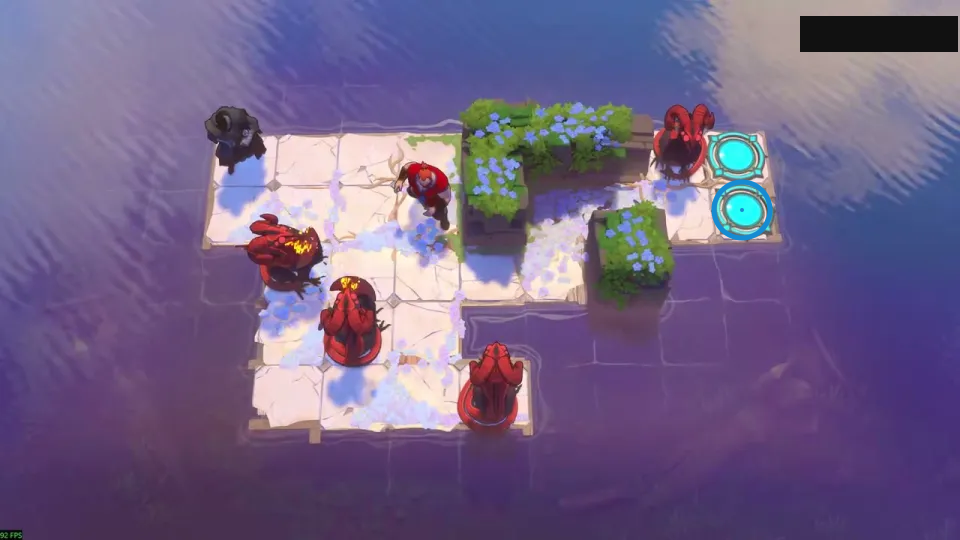
Extend the lower channel, then push the upward-facing dragon.
Check: Ring marks lower cyan circular pad on the right island.
Open full-size image in a new tabNorth puzzle 3 — put_down_roots_v3
Section titled “North puzzle 3 — put_down_roots_v3”Article section: North puzzle 3; internal set position: 15.
The ring marks a visible landmark, not an action step.
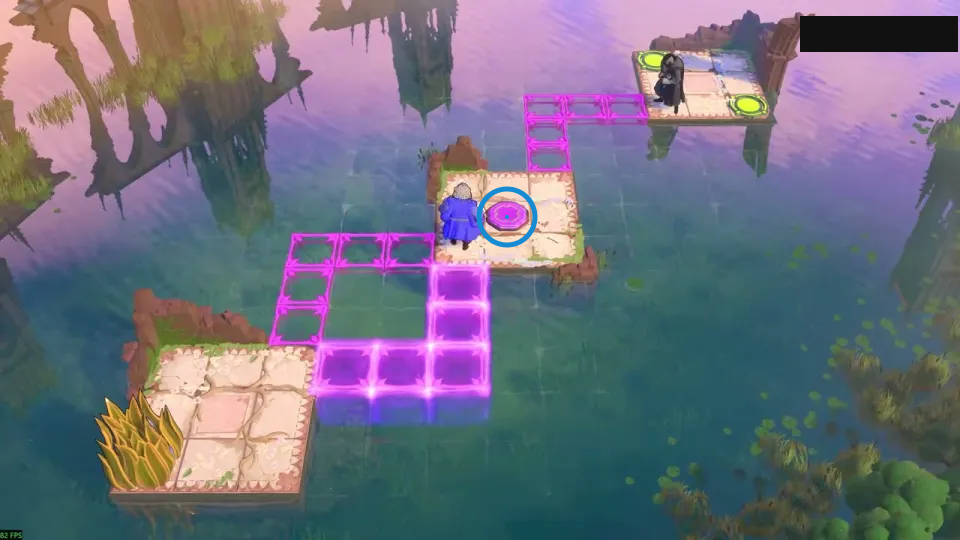
Turn the crystal into a plant above the water.
Check: Ring marks pink circular pad on the middle island.
Open full-size image in a new tabNorth puzzle 4 — dragon_garden
Section titled “North puzzle 4 — dragon_garden”Article section: North puzzle 4; internal set position: 17.
The ring marks a visible landmark, not an action step.
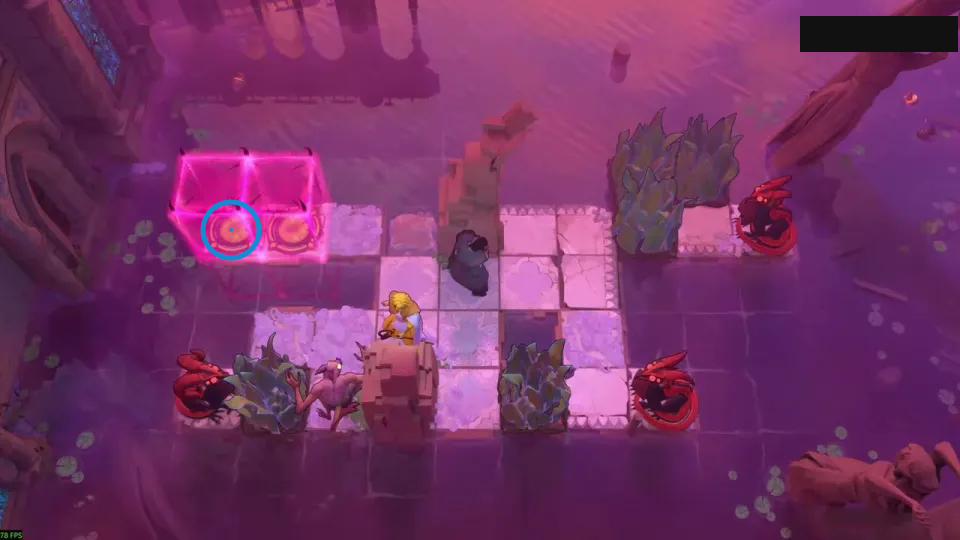
Use the Priestess’s shield to approach each dragon.
Check: Ring marks left yellow circular pad inside the pink blocks.
Open full-size image in a new tabSources and credits
Article stills and key ideas: Heroes and Water walkthrough. Video: 塞德莎, Order of the Sinking Star narrated series. The cards show selected article stills, not exact PTS; ideas are source-reported, no route was independently replayed, and no finish or exact Steam depot mapping is claimed. Game art: Thekla, Inc.- Full puzzle candidate inventory (PC r67121) — Extracted data
- Heroes and Water walkthrough — Documentation · walkthrough-reviewed-2026-10-22
- 塞德莎 Heroes and Water narrated walkthrough series — Observed in-game · article-parts-reviewed-2026-10-22
- Heroes and Water candidate shipping classification — Documentation · heroes-and-water-candidate-review-2026-10-22;remaining-source-candidates-2026-10-24
- Heroes and Water bilingual selected-layout cards — Extracted data · heroes-and-water-selected-layouts-2026-10-22
- Remaining approved source/native candidate crosswalk — Extracted data · remaining-source-candidates-2026-10-25-29-video-display-upgrades
- Heroes And Water bilingual selected-layout evidence — Extracted data · remaining-source-layouts-heroes-and-water-2026-10-24
- Sinking Star Walkthrough article: heroes and water solutions — Documentation · walkthrough-heroes-and-water-solutions
Unofficial fan wiki, not affiliated with Thekla, Inc. / Arc Games / Gamirror Games. Game content belongs to its owners.
Comments & feedback
Share a tip or suggest a correction. Comments are public. Guest names are unverified; verified accounts show their account username. All language pages share this discussion. Please keep personal information private.