
 Order of the Sinking Star
Mirror Isles (East): selected room layouts

All 27 article rooms match distinct native textures. Selected views now support 27 bilingual layout cards. Puzzle 17 is a cropped detail that omits the captioned lower island edge.
Article puzzle numbers differ from mirror-set positions. Blue rings mark targets or plates, not route steps. Ideas summarize the article; cues are not exact PTS, routes were not independently replayed, and no finish is claimed.
Puzzle 1 — mirror_1
Section titled “Puzzle 1 — mirror_1”Article puzzle 1; internal mirror-set position: 1. Article cue 0:16; not exact PTS. Use the mirror for two swaps: first reach the small islet, then swap to the large island.
Blue numbered rings identify layout landmarks in the original article still; they are not route steps.
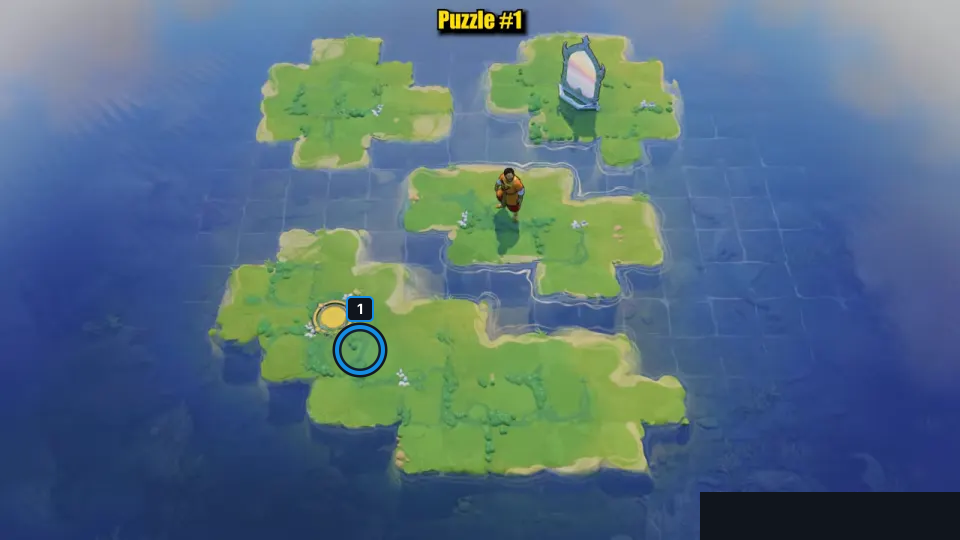
Use the mirror for two swaps: first reach the small islet, then swap to the large island.
Check: The source still distinctly matches mirror_1 at mirror-set position 1; blue markers identify exit island. The idea is summarized from the article, not a replay. Article cues are not exact PTS; no route was independently replayed, no finish is claimed, and exact Steam depot mapping is unverified.
Open full-size image in a new tabPuzzle 2 — mirror_2
Section titled “Puzzle 2 — mirror_2”Article puzzle 2; internal mirror-set position: 2. Article cue 0:32; not exact PTS. Clean video frame: Gamer Guru at 00:37 (37 s). Move the lower mirror until its beam reaches the exit island.
Blue numbered rings identify layout landmarks; they are not route steps.
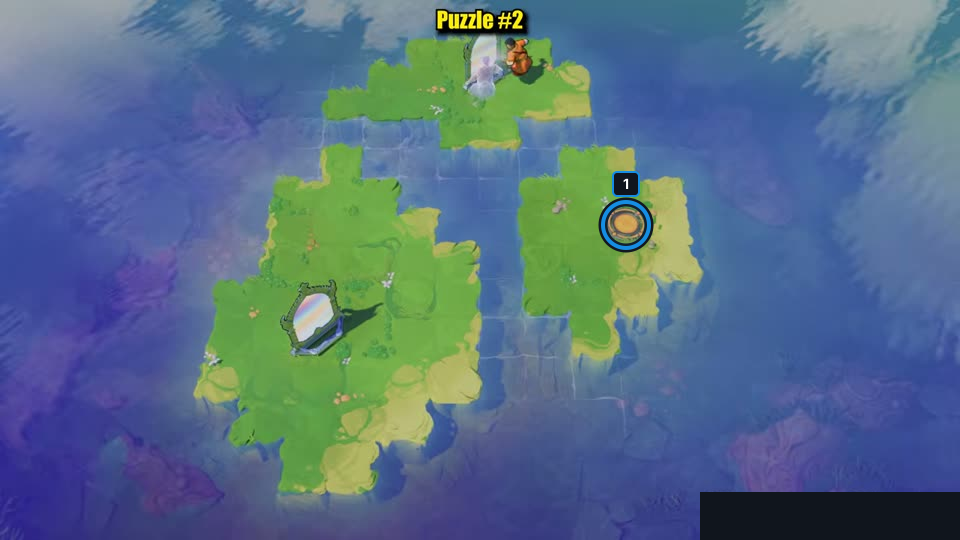
Move the lower mirror until its beam reaches the exit island.
Check: The clean Gamer Guru frame at 00:37 shows article puzzle 2 matched to mirror_2 at mirror-set position 2; blue markers identify exit tile, not route steps. The short idea is summarized from the article. Article cues are not exact PTS; no route was independently replayed, no finish is claimed, and Steam depot mapping is unverified. The lower-right watermark is masked in empty water; the mask does not cover a board element.
Open full-size image in a new tabPuzzle 3 — mirror_3
Section titled “Puzzle 3 — mirror_3”Article puzzle 3; internal mirror-set position: 3. Article cue 0:51; not exact PTS. Clean video frame: Gamer Guru at 01:14 (74 s). Sink a boulder to bridge the first gap, then reposition the mirror to reach the exit.
Blue numbered rings identify layout landmarks; they are not route steps.
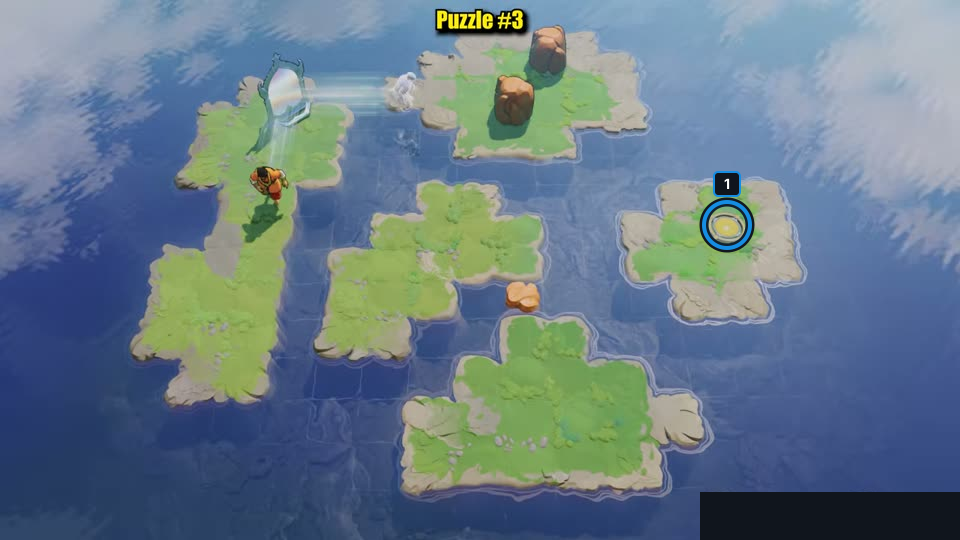
Sink a boulder to bridge the first gap, then reposition the mirror to reach the exit.
Check: The clean Gamer Guru frame at 01:14 shows article puzzle 3 matched to mirror_3 at mirror-set position 3; blue markers identify exit plate, not route steps. The short idea is summarized from the article. Article cues are not exact PTS; no route was independently replayed, no finish is claimed, and Steam depot mapping is unverified. The lower-right watermark is masked in empty water; the mask does not cover a board element.
Open full-size image in a new tabPuzzle 4 — mirror_4
Section titled “Puzzle 4 — mirror_4”Article puzzle 4; internal mirror-set position: 4. Article cue 1:58; not exact PTS. Clean video frame: Gamer Guru at 02:18 (138 s). Clear the boulder blocking the beam endpoint, then swap to the exit.
Blue numbered rings identify layout landmarks; they are not route steps.
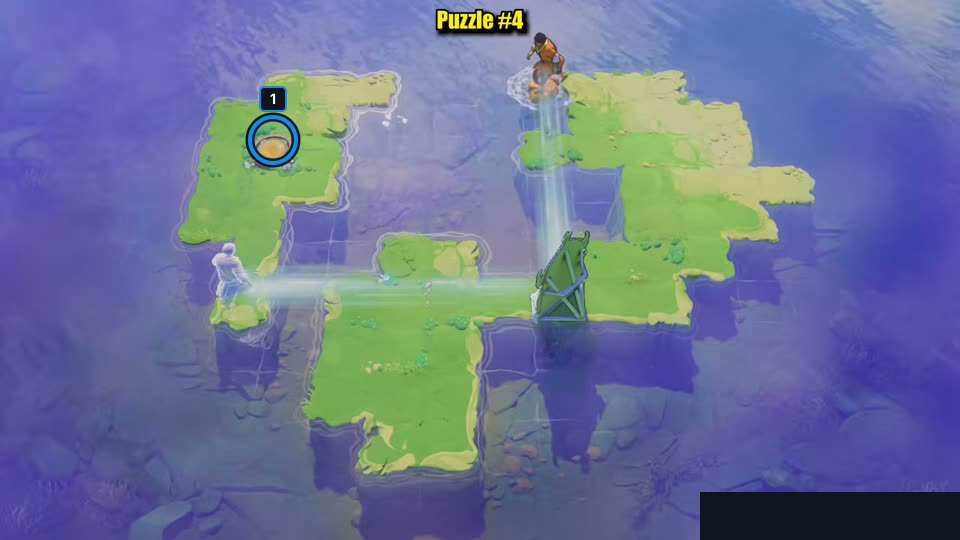
Clear the boulder blocking the beam endpoint, then swap to the exit.
Check: The clean Gamer Guru frame at 02:18 shows article puzzle 4 matched to mirror_4 at mirror-set position 4; blue markers identify exit plate, not route steps. The short idea is summarized from the article. Article cues are not exact PTS; no route was independently replayed, no finish is claimed, and Steam depot mapping is unverified. The lower-right watermark is masked in empty water; the mask does not cover a board element.
Open full-size image in a new tabPuzzle 5 — mirror_5
Section titled “Puzzle 5 — mirror_5”Article puzzle 5; internal mirror-set position: 5. Article cue 2:46; not exact PTS. Sink boulders to make a path the mirror can follow, then reflect to the exit.
Blue numbered rings identify layout landmarks in the original article still; they are not route steps.
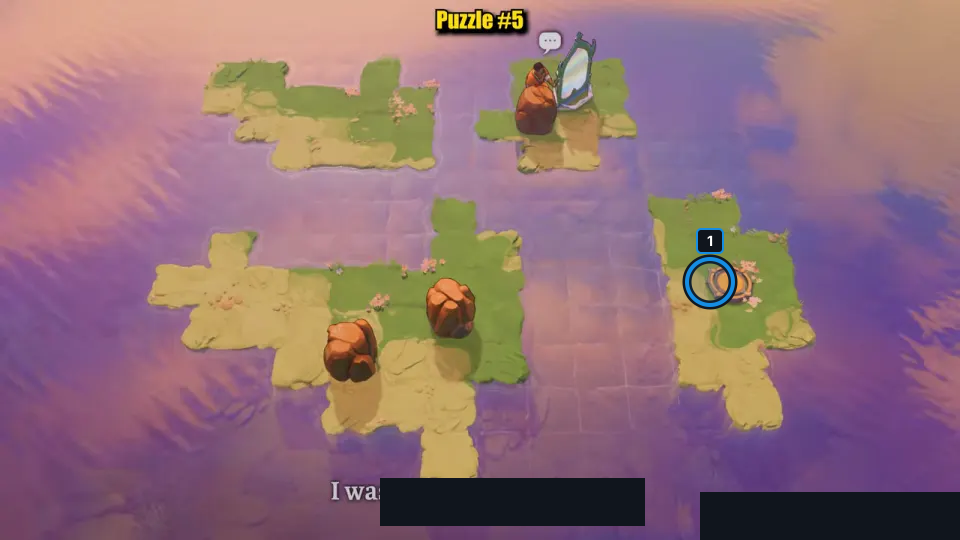
Sink boulders to make a path the mirror can follow, then reflect to the exit.
Check: The source still distinctly matches mirror_5 at mirror-set position 5; blue markers identify exit island. The idea is summarized from the article, not a replay. Article cues are not exact PTS; no route was independently replayed, no finish is claimed, and exact Steam depot mapping is unverified. The dialogue caption is masked in empty water and does not cover the island layout.
Open full-size image in a new tabPuzzle 6 — mirror_6_alt
Section titled “Puzzle 6 — mirror_6_alt”Article puzzle 6; internal mirror-set position: 6. Article cue 3:35; not exact PTS. Clean video frame: Gamer Guru at 04:14 (254 s). Place a sunken boulder on the mirror’s beam line and extend the lower island.
Blue numbered rings identify layout landmarks; they are not route steps.
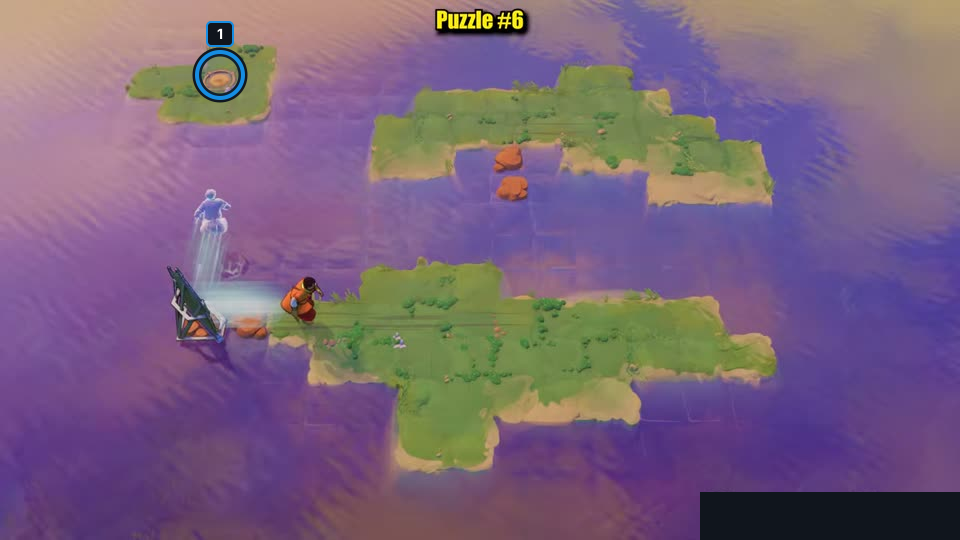
Place a sunken boulder on the mirror’s beam line and extend the lower island.
Check: The clean Gamer Guru frame at 04:14 shows article puzzle 6 matched to mirror_6_alt at mirror-set position 6; blue markers identify goal plate, not route steps. The short idea is summarized from the article. Article cues are not exact PTS; no route was independently replayed, no finish is claimed, and Steam depot mapping is unverified. The lower-right watermark is masked in empty water; the mask does not cover a board element.
Open full-size image in a new tabPuzzle 7 — mirror_7
Section titled “Puzzle 7 — mirror_7”Article puzzle 7; internal mirror-set position: 7. Article cue 4:41; not exact PTS. Swap behind the boulder, then push it across the gap toward the exit.
Blue numbered rings identify layout landmarks in the original article still; they are not route steps.
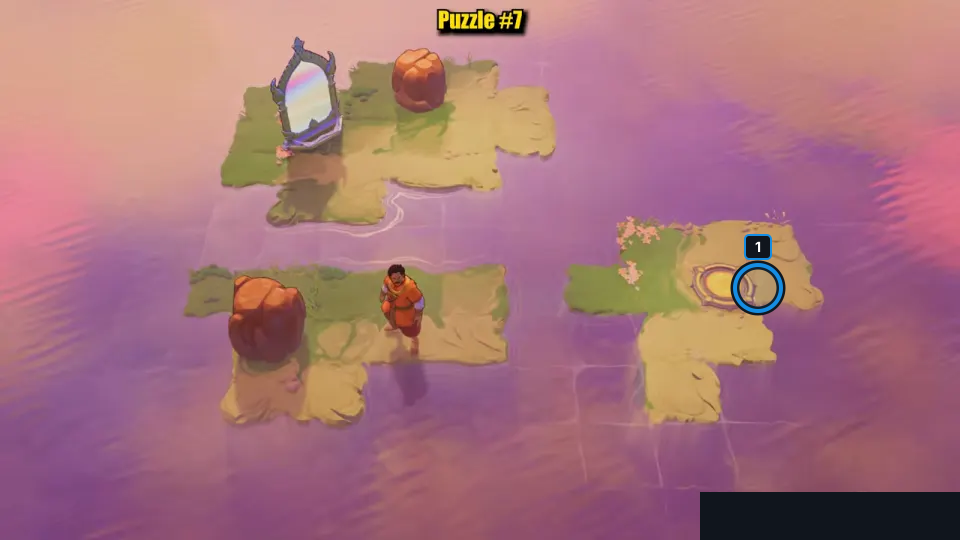
Swap behind the boulder, then push it across the gap toward the exit.
Check: The source still distinctly matches mirror_7 at mirror-set position 7; blue markers identify exit island. The idea is summarized from the article, not a replay. Article cues are not exact PTS; no route was independently replayed, no finish is claimed, and exact Steam depot mapping is unverified.
Open full-size image in a new tabPuzzle 8 — mirror_8_v5
Section titled “Puzzle 8 — mirror_8_v5”Article puzzle 8; internal mirror-set position: 8. Article cue 5:14; not exact PTS. Clear the ridge and guide the mirror around its zigzag path.
Blue numbered rings identify layout landmarks in the original article still; they are not route steps.
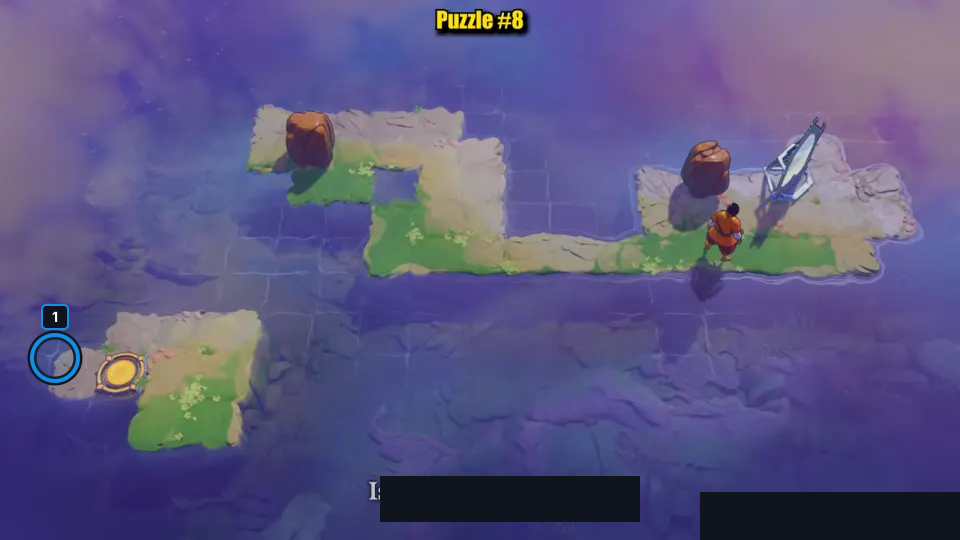
Clear the ridge and guide the mirror around its zigzag path.
Check: The source still distinctly matches mirror_8_v5 at mirror-set position 8; blue markers identify exit islet. The idea is summarized from the article, not a replay. Article cues are not exact PTS; no route was independently replayed, no finish is claimed, and exact Steam depot mapping is unverified. The dialogue caption is masked in empty water and does not cover the island layout.
Open full-size image in a new tabPuzzle 9 — mirror_11
Section titled “Puzzle 9 — mirror_11”Article puzzle 9; internal mirror-set position: 9. Article cue 6:28; not exact PTS. Use facing mirrors to split into two Traders and reach both plates.
Blue numbered rings identify layout landmarks in the original article still; they are not route steps.
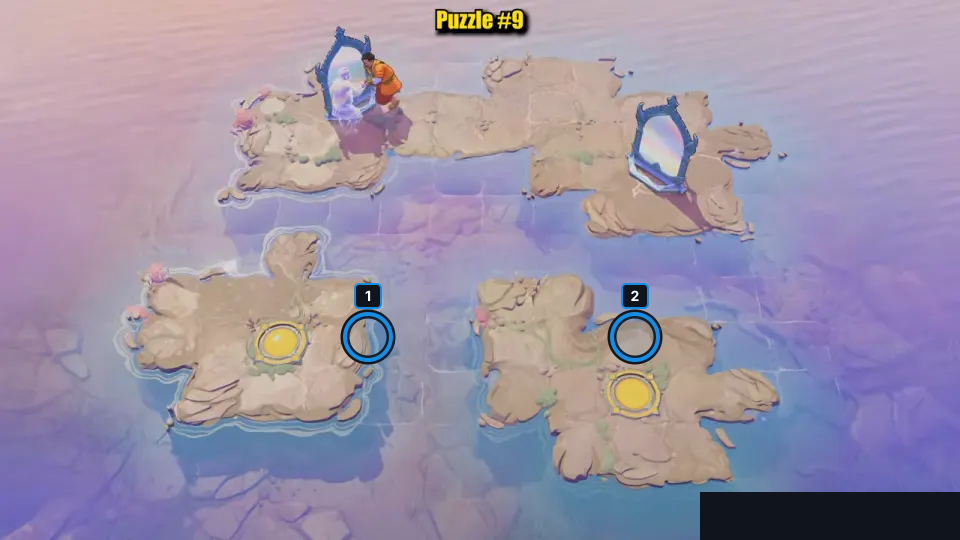
Use facing mirrors to split into two Traders and reach both plates.
Check: The source still distinctly matches mirror_11 at mirror-set position 9; blue markers identify west plate, east plate. The idea is summarized from the article, not a replay. Article cues are not exact PTS; no route was independently replayed, no finish is claimed, and exact Steam depot mapping is unverified.
Open full-size image in a new tabPuzzle 10 — mirror_12
Section titled “Puzzle 10 — mirror_12”Article puzzle 10; internal mirror-set position: 10. Article cue 6:55; not exact PTS. Split until three Traders can move together onto all three plates.
Blue numbered rings identify layout landmarks in the original article still; they are not route steps.
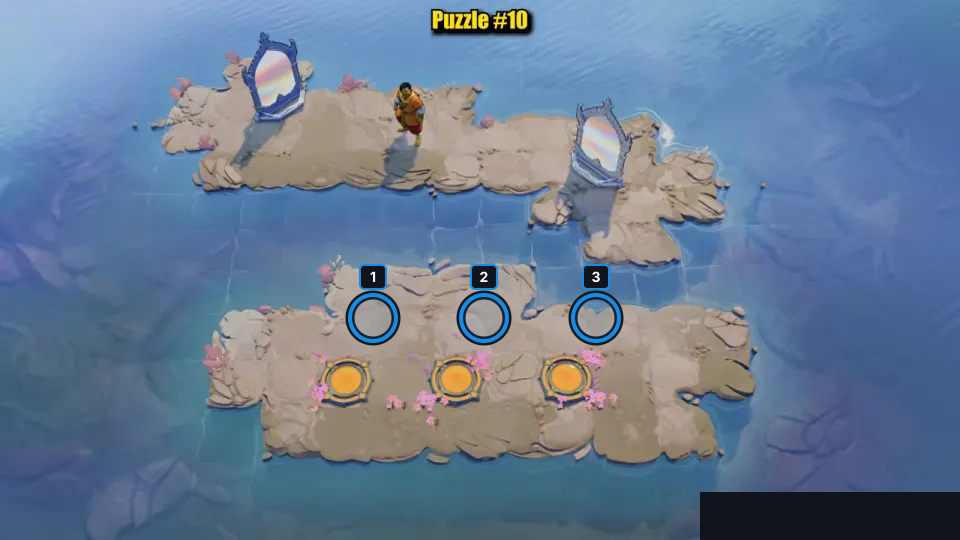
Split until three Traders can move together onto all three plates.
Check: The source still distinctly matches mirror_12 at mirror-set position 10; blue markers identify plate 1, plate 2, plate 3. The idea is summarized from the article, not a replay. Article cues are not exact PTS; no route was independently replayed, no finish is claimed, and exact Steam depot mapping is unverified.
Open full-size image in a new tabPuzzle 11 — mirror_15
Section titled “Puzzle 11 — mirror_15”Article puzzle 11; internal mirror-set position: 13. Article cue 7:55; not exact PTS. The article says the puzzle itself appears around 8:06. Clean video frame: Gamer Guru at 08:42 (522 s). Move the crystal with the mirror, then sink it to bridge the gap.
Blue numbered rings identify layout landmarks; they are not route steps.
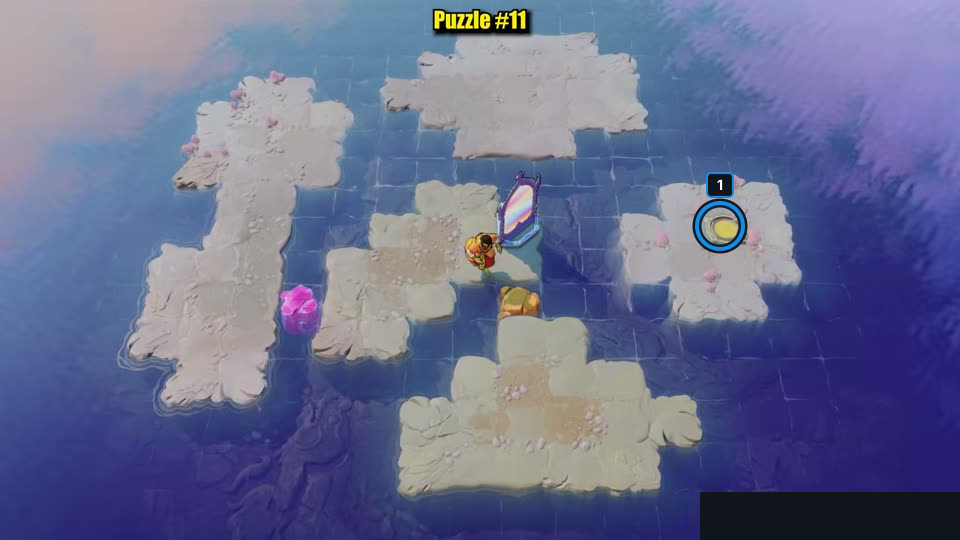
Move the crystal with the mirror, then sink it to bridge the gap.
Check: The clean Gamer Guru frame at 08:42 shows article puzzle 11 matched to mirror_15 at mirror-set position 13; blue markers identify goal plate, not route steps. The short idea is summarized from the article. Article cues are not exact PTS; no route was independently replayed, no finish is claimed, and Steam depot mapping is unverified. The lower-right watermark is masked in empty water; the mask does not cover a board element.
Open full-size image in a new tabPuzzle 12 — mirror_19
Section titled “Puzzle 12 — mirror_19”Article puzzle 12; internal mirror-set position: 14. Article cue 8:46; not exact PTS. Reflect the crystal to the upper island, then use it as a stepping stone.
Blue numbered rings identify layout landmarks in the original article still; they are not route steps.
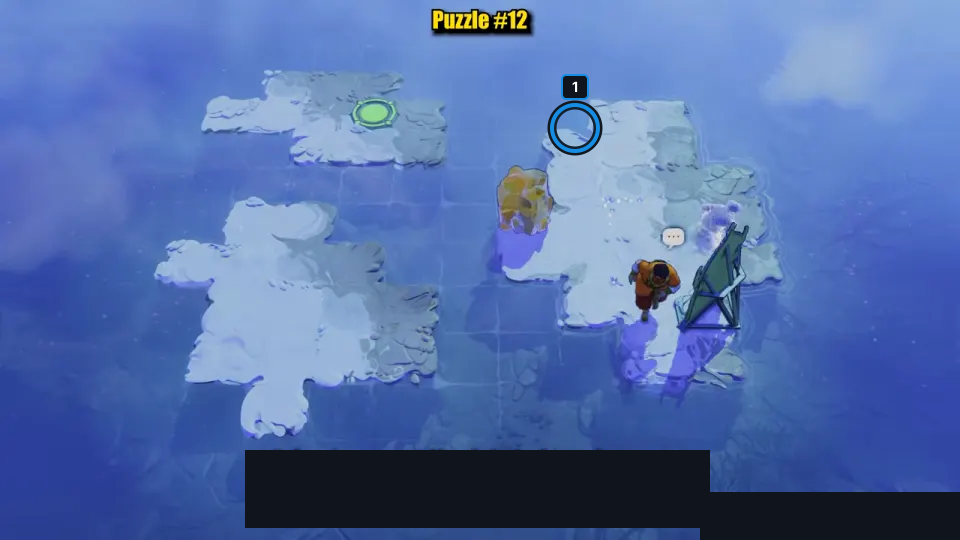
Reflect the crystal to the upper island, then use it as a stepping stone.
Check: The source still distinctly matches mirror_19 at mirror-set position 14; blue markers identify green exit. The idea is summarized from the article, not a replay. Article cues are not exact PTS; no route was independently replayed, no finish is claimed, and exact Steam depot mapping is unverified. The dialogue caption is masked in empty water and does not cover the island layout.
Open full-size image in a new tabPuzzle 13 — mirror_17
Section titled “Puzzle 13 — mirror_17”Article puzzle 13; internal mirror-set position: 15. Article cue 9:13; not exact PTS. The pillar blocks the beam; move the crystal around it before reflecting.
Blue numbered rings identify layout landmarks in the original article still; they are not route steps.
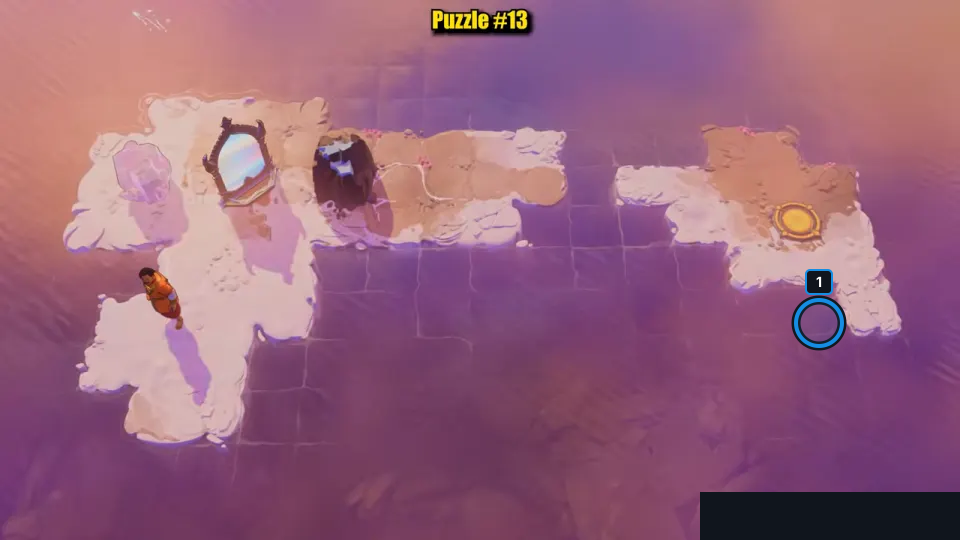
The pillar blocks the beam; move the crystal around it before reflecting.
Check: The source still distinctly matches mirror_17 at mirror-set position 15; blue markers identify goal tile. The idea is summarized from the article, not a replay. Article cues are not exact PTS; no route was independently replayed, no finish is claimed, and exact Steam depot mapping is unverified.
Open full-size image in a new tabPuzzle 14 — mirror_sink
Section titled “Puzzle 14 — mirror_sink”Article puzzle 14; internal mirror-set position: 16. Article cue 10:13; not exact PTS. Reflect the crystal past both pillars into the gap by the exit.
Blue numbered rings identify layout landmarks in the original article still; they are not route steps.
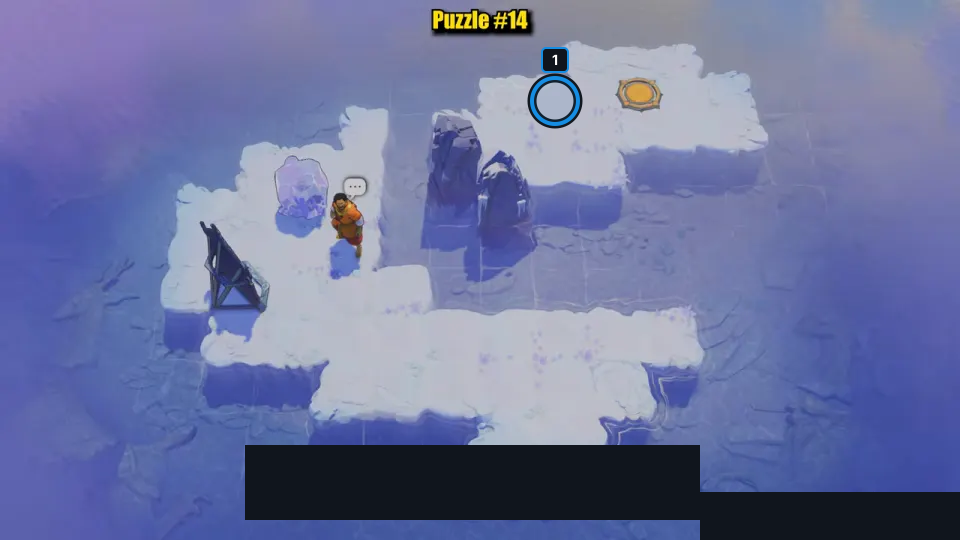
Reflect the crystal past both pillars into the gap by the exit.
Check: The source still distinctly matches mirror_sink at mirror-set position 16; blue markers identify exit tile. The idea is summarized from the article, not a replay. Article cues are not exact PTS; no route was independently replayed, no finish is claimed, and exact Steam depot mapping is unverified. The dialogue caption is masked in empty water and does not cover the island layout.
Open full-size image in a new tabPuzzle 15 — mirror_20
Section titled “Puzzle 15 — mirror_20”Article puzzle 15; internal mirror-set position: 17. Article cue 10:42; not exact PTS. Sink one crystal for the mirror to stand on, then reflect the other as a landing step.
Blue numbered rings identify layout landmarks in the original article still; they are not route steps.
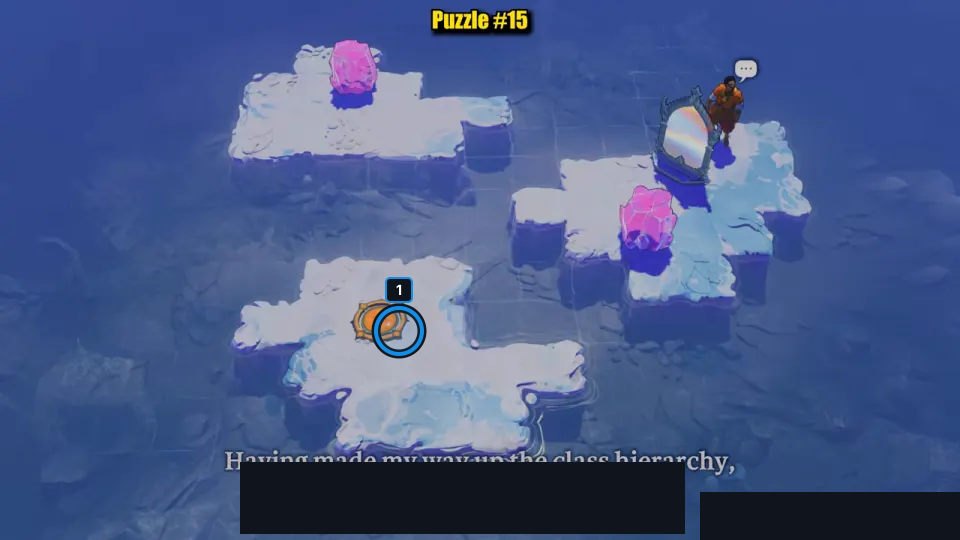
Sink one crystal for the mirror to stand on, then reflect the other as a landing step.
Check: The source still distinctly matches mirror_20 at mirror-set position 17; blue markers identify exit island. The idea is summarized from the article, not a replay. Article cues are not exact PTS; no route was independently replayed, no finish is claimed, and exact Steam depot mapping is unverified. The dialogue caption is masked in empty water and does not cover the island layout.
Open full-size image in a new tabPuzzle 16 — mirror_18
Section titled “Puzzle 16 — mirror_18”Article puzzle 16; internal mirror-set position: 18. Article cue 11:10; not exact PTS. Clean video frame: Gamer Guru at 12:04 (724 s). Sink boulders to pave the water row, then push the mirror across.
Blue numbered rings identify layout landmarks; they are not route steps.
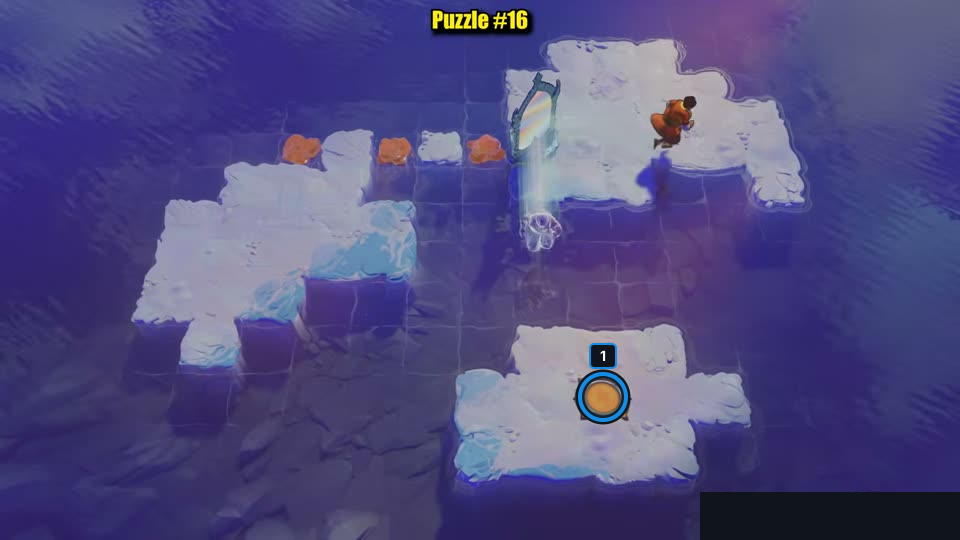
Sink boulders to pave the water row, then push the mirror across.
Check: The clean Gamer Guru frame at 12:04 shows article puzzle 16 matched to mirror_18 at mirror-set position 18; blue markers identify goal plate, not route steps. The article idea: Sink boulders to pave the water row, then push the mirror across. Article cues are not exact PTS; no route was independently replayed, no finish is claimed, and Steam depot mapping is unverified. The lower-right watermark is masked in empty water; the mask does not cover a board element.
Open full-size image in a new tabPuzzle 17 — mirror_10_alt2
Section titled “Puzzle 17 — mirror_10_alt2”Source-reported hint: Line up the two mirrors so a swap bends through both toward the goal.
Selected room detail.
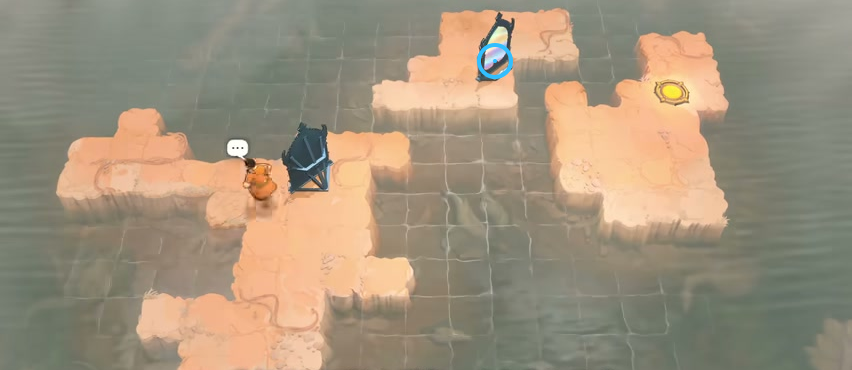
Find the mirror on the upper island.
Check: The blue ring marks the mirror on the upper island.
Open full-size image in a new tabPuzzle 18 — mundane_mirror
Section titled “Puzzle 18 — mundane_mirror”Article puzzle 18; internal mirror-set position: 25. Article cue 13:29; not exact PTS. Clean video frame: Gamer Guru at 14:36 (876 s). Gather the mirrors, then place one at the west edge in line with the pink exit.
Blue numbered rings identify layout landmarks; they are not route steps.
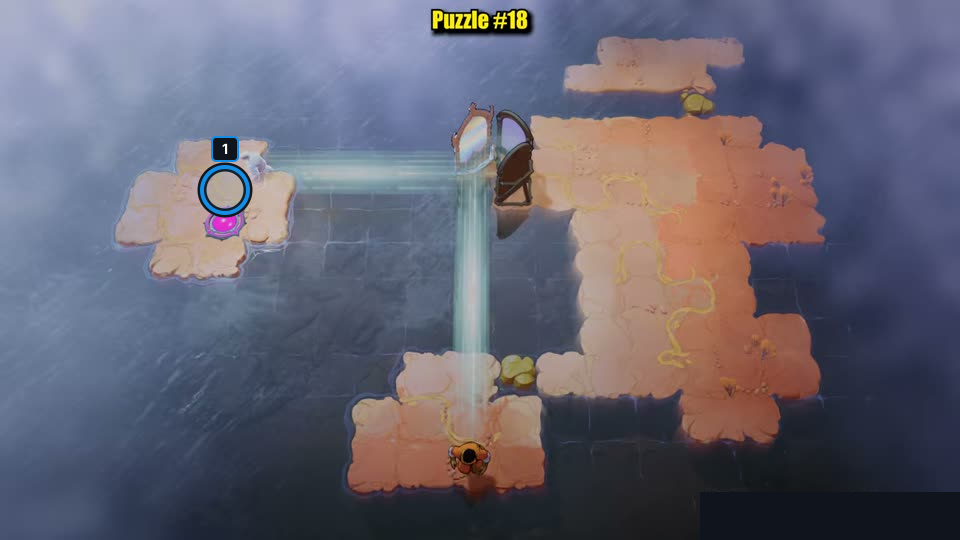
Gather the mirrors, then place one at the west edge in line with the pink exit.
Check: The clean Gamer Guru frame at 14:36 shows article puzzle 18 matched to mundane_mirror at mirror-set position 25; blue markers identify pink exit plate, not route steps. The short idea is summarized from the article. Article cues are not exact PTS; no route was independently replayed, no finish is claimed, and Steam depot mapping is unverified. The lower-right watermark is masked in empty water; the mask does not cover a board element.
Open full-size image in a new tabPuzzle 19 — mirror_10_b_v2
Section titled “Puzzle 19 — mirror_10_b_v2”Article puzzle 19; internal mirror-set position: 26. Article cue 14:39; not exact PTS. Line up the west mirrors so a swap from the top strip reaches the exit row.
Blue numbered rings identify layout landmarks in the original article still; they are not route steps.
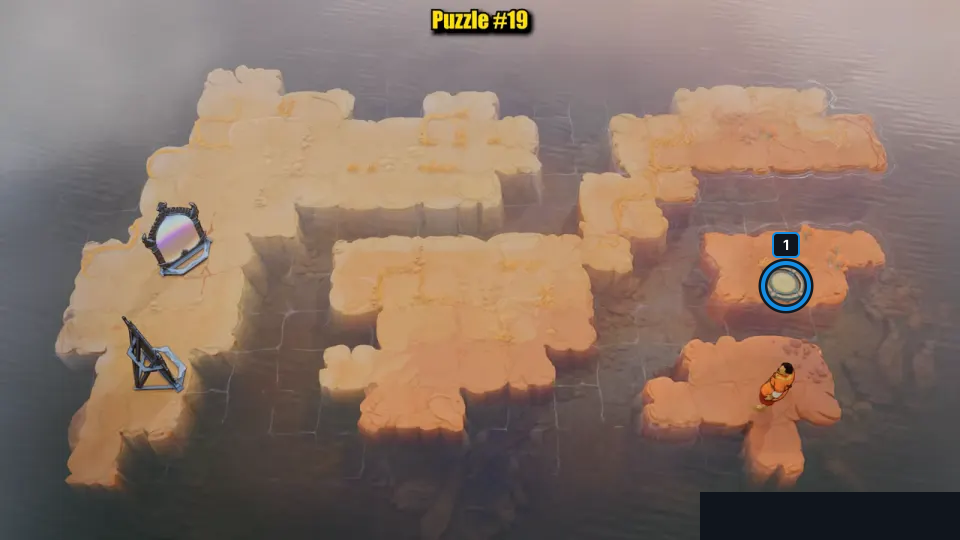
Line up the west mirrors so a swap from the top strip reaches the exit row.
Check: The source still distinctly matches mirror_10_b_v2 at mirror-set position 26; blue markers identify exit tile. The idea is summarized from the article, not a replay. Article cues are not exact PTS; no route was independently replayed, no finish is claimed, and exact Steam depot mapping is unverified.
Open full-size image in a new tabPuzzle 20 — mirror_10_d
Section titled “Puzzle 20 — mirror_10_d”Article puzzle 20; internal mirror-set position: 27. Article cue 15:15; not exact PTS. Reflect the purple crystal toward the exit, then follow it across.
Blue numbered rings identify layout landmarks in the original article still; they are not route steps.
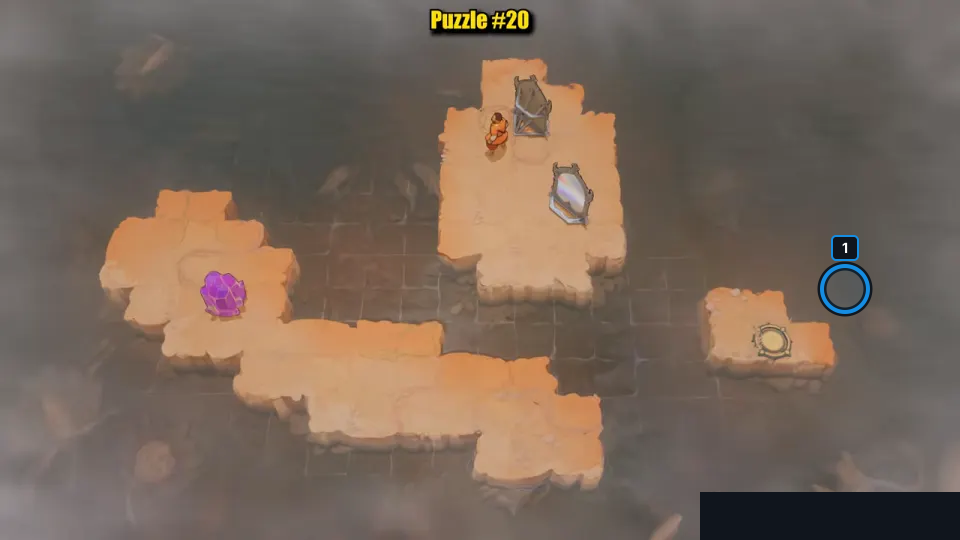
Reflect the purple crystal toward the exit, then follow it across.
Check: The source still distinctly matches mirror_10_d at mirror-set position 27; blue markers identify exit islet. The idea is summarized from the article, not a replay. Article cues are not exact PTS; no route was independently replayed, no finish is claimed, and exact Steam depot mapping is unverified.
Open full-size image in a new tabPuzzle 21 — mirror_pals
Section titled “Puzzle 21 — mirror_pals”Article puzzle 21; internal mirror-set position: 22. Article cue 16:54; not exact PTS. Park one Trader over the water, then move the mirror to swap onto the far exit.
Blue numbered rings identify layout landmarks in the original article still; they are not route steps.
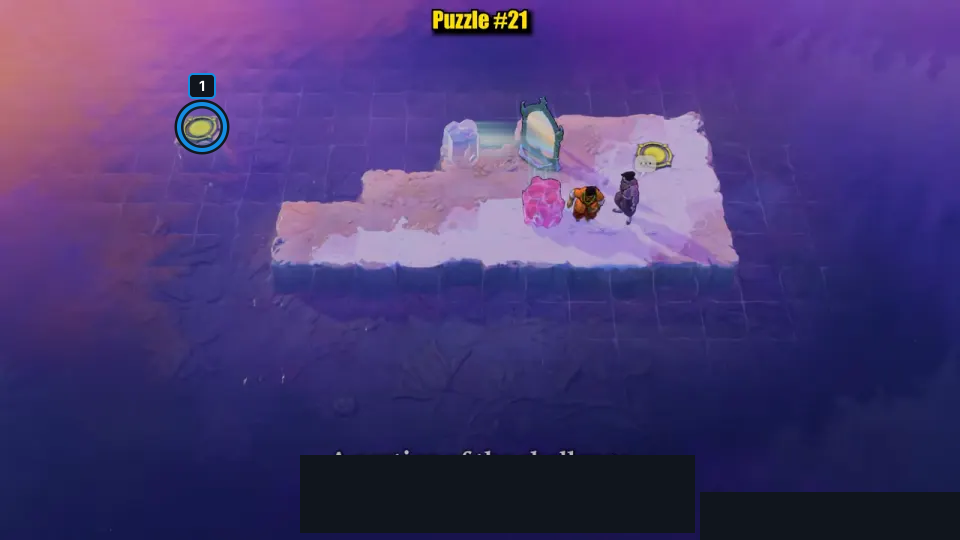
Park one Trader over the water, then move the mirror to swap onto the far exit.
Check: The source still distinctly matches mirror_pals at mirror-set position 22; blue markers identify far exit. The idea is summarized from the article, not a replay. Article cues are not exact PTS; no route was independently replayed, no finish is claimed, and exact Steam depot mapping is unverified. The dialogue caption is masked in empty water and does not cover the island layout.
Open full-size image in a new tabPuzzle 22 — walk_it_over
Section titled “Puzzle 22 — walk_it_over”Article puzzle 22; internal mirror-set position: 23. Article cue 17:22; not exact PTS. Sink four crystals into pads, then move the mirror to adjust each swap’s reach.
Blue numbered rings identify layout landmarks in the original article still; they are not route steps.
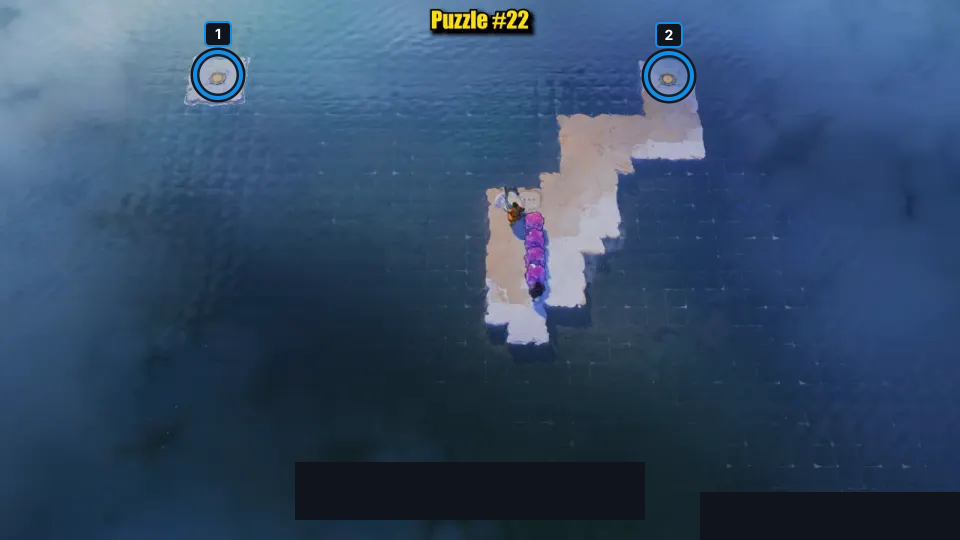
Sink four crystals into pads, then move the mirror to adjust each swap’s reach.
Check: The source still distinctly matches walk_it_over at mirror-set position 23; blue markers identify west exit, northeast exit. The idea is summarized from the article, not a replay. Article cues are not exact PTS; no route was independently replayed, no finish is claimed, and exact Steam depot mapping is unverified. The dialogue caption is masked in empty water and does not cover the island layout.
Open full-size image in a new tabPuzzle 23 — mirror_21
Section titled “Puzzle 23 — mirror_21”Article puzzle 23; internal mirror-set position: 19. Article cue 19:41; not exact PTS. Clean video frame: Gamer Guru at 20:30 (1230 s). Reflect the crystal farther along the west beam by standing farther down the south beam.
Blue numbered rings identify layout landmarks; they are not route steps.
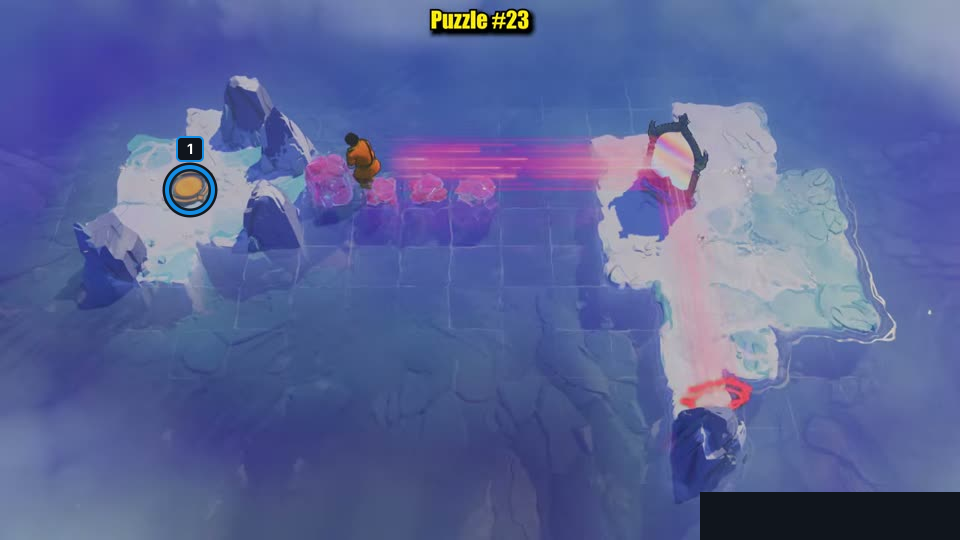
Reflect the crystal farther along the west beam by standing farther down the south beam.
Check: The clean Gamer Guru frame at 20:30 shows article puzzle 23 matched to mirror_21 at mirror-set position 19; blue markers identify west goal plate, not route steps. The short idea is summarized from the article. Article cues are not exact PTS; no route was independently replayed, no finish is claimed, and Steam depot mapping is unverified. The lower-right watermark is masked in empty water; the mask does not cover a board element.
Open full-size image in a new tabPuzzle 24 — mirror_22_v2
Section titled “Puzzle 24 — mirror_22_v2”Article puzzle 24; internal mirror-set position: 20. Article cue 20:41; not exact PTS. Reflect two bushes into the water as stepping stones to the exit.
Blue numbered rings identify layout landmarks in the original article still; they are not route steps.
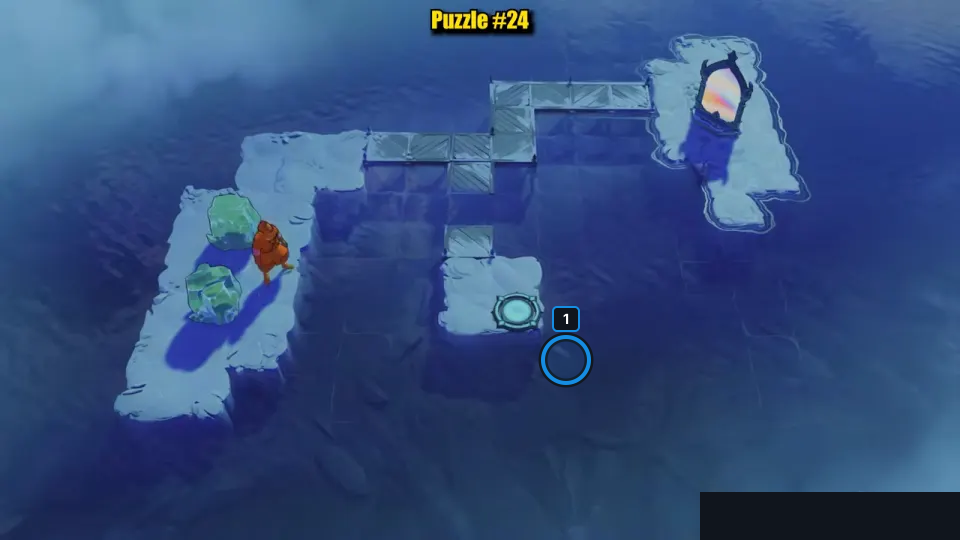
Reflect two bushes into the water as stepping stones to the exit.
Check: The source still distinctly matches mirror_22_v2 at mirror-set position 20; blue markers identify cyan exit. The idea is summarized from the article, not a replay. Article cues are not exact PTS; no route was independently replayed, no finish is claimed, and exact Steam depot mapping is unverified.
Open full-size image in a new tabPuzzle 25 — mirror_factory_v2
Section titled “Puzzle 25 — mirror_factory_v2”Article puzzle 25; internal mirror-set position: 21. Article cue 21:40; not exact PTS. Move the red crystals one by one to sink them into a bridge to the exit.
Blue numbered rings identify layout landmarks in the original article still; they are not route steps.
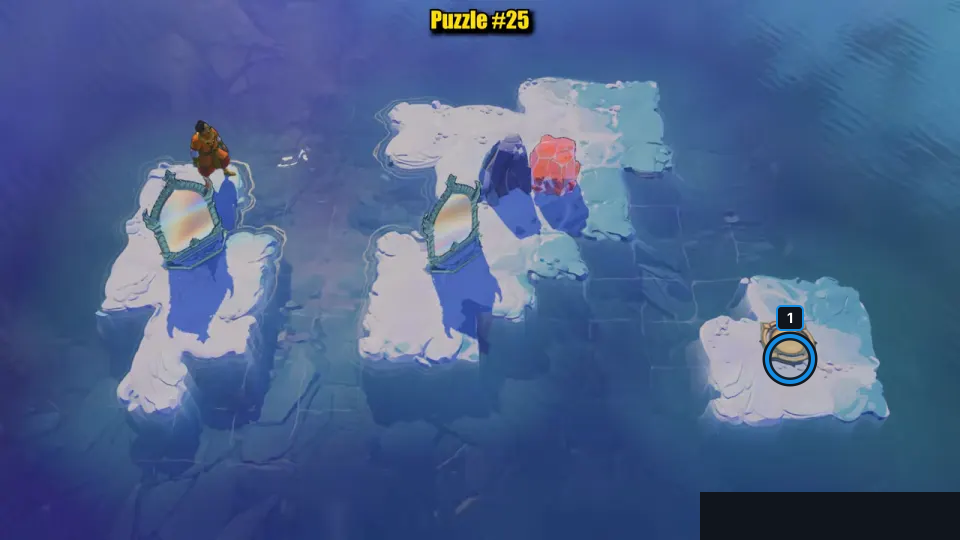
Move the red crystals one by one to sink them into a bridge to the exit.
Check: The source still distinctly matches mirror_factory_v2 at mirror-set position 21; blue markers identify exit island. The idea is summarized from the article, not a replay. Article cues are not exact PTS; no route was independently replayed, no finish is claimed, and exact Steam depot mapping is unverified.
Open full-size image in a new tabPuzzle 26 — mirror_13
Section titled “Puzzle 26 — mirror_13”Article puzzle 26; internal mirror-set position: 11. Article cue 22:50; not exact PTS. Split the Trader, use both mirrors to reach the boulder, then sink it into a bridge.
Blue numbered rings identify layout landmarks in the original article still; they are not route steps.
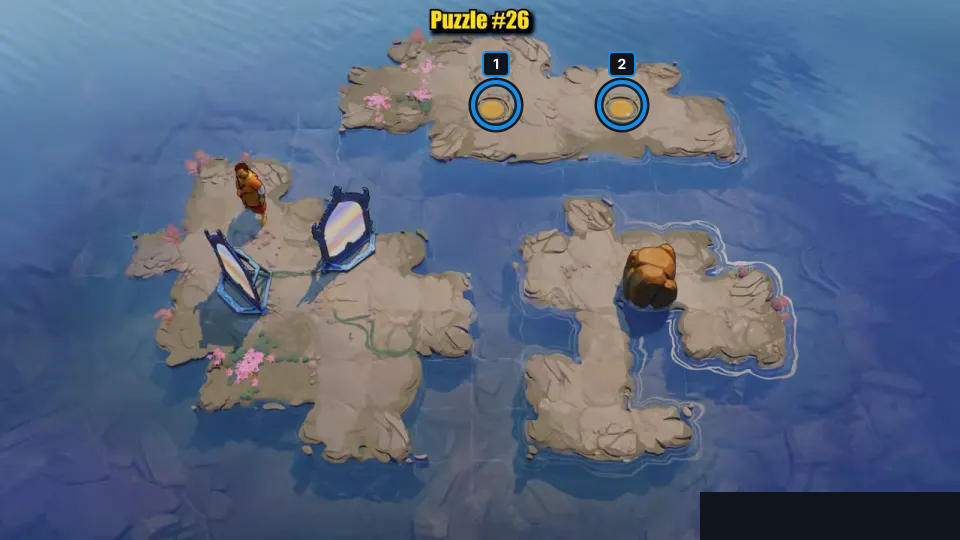
Split the Trader, use both mirrors to reach the boulder, then sink it into a bridge.
Check: The source still distinctly matches mirror_13 at mirror-set position 11; blue markers identify west plate, east plate. The idea is summarized from the article, not a replay. Article cues are not exact PTS; no route was independently replayed, no finish is claimed, and exact Steam depot mapping is unverified.
Open full-size image in a new tabPuzzle 27 — mirror_14
Section titled “Puzzle 27 — mirror_14”Article puzzle 27; internal mirror-set position: 12. Article cue 23:34; not exact PTS. Bring the two Traders together through the mirror, then merge them on the way to the plate.
Blue numbered rings identify layout landmarks in the original article still; they are not route steps.
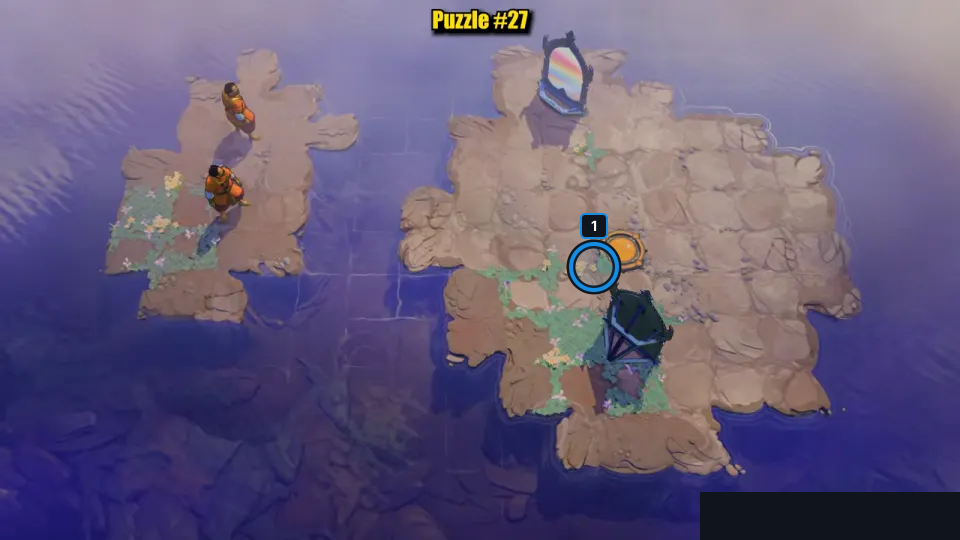
Bring the two Traders together through the mirror, then merge them on the way to the plate.
Check: The source still distinctly matches mirror_14 at mirror-set position 12; blue markers identify goal plate. The idea is summarized from the article, not a replay. Article cues are not exact PTS; no route was independently replayed, no finish is claimed, and exact Steam depot mapping is unverified.
Open full-size image in a new tabSources
Sources: Sinking Star Walkthrough article; Gamer Guru video reference; Puzzle 17 selected detail: 塞德莎.- Full puzzle candidate inventory (PC r67121) — Extracted data
- Mirror Isles (East) walkthrough — Documentation · walkthrough-updated-2026-10-21
- Gamer Guru Mirror Isles solution video — Observed in-game · cited-by-walkthrough-2026-10-22
- Mirror Isles uncovered candidate shipping crosswalk — Documentation · mirror-isles-candidate-review-2026-10-22-remaining29-display-upgrades-2026-10-25
- Mirror Isles bilingual selected-layout cards — Extracted data · mirror-isles-selected-layouts-2026-10-22-remaining29-display-upgrades-2026-10-25
- Twenty-nine selected video frames for previously confirmed room identities — Observed in-game · remaining29-selected-video-frame-observations-2026-10-25
- Display-only coverage delta for29 existing confirmed identities — Extracted data · remaining29-display-coverage-delta-2026-10-25
Unofficial fan wiki, not affiliated with Thekla, Inc. / Arc Games / Gamirror Games. Game content belongs to its owners.
Comments & feedback
Share a tip or suggest a correction. Comments are public. Guest names are unverified; verified accounts show their account username. All language pages share this discussion. Please keep personal information private.