 GameWikiStation
 Probably Stolen
BloomBerry winemaking — choosing fruit, fermenting & aging

Choose good fruit and water before spending on expensive  yeast. Following a basic recipe can still produce very different bottles. The useful question is which ingredient to change next.
This is the practical expansion of the in-game  BloomBerry Wine Fermenting Guide.
1. Unlock winemaking and make a small batch
Section titled “1. Unlock winemaking and make a small batch”Unlock winemaking through the upgrade menu and collect the booklet and starter equipment. Prepare a  Wine Bottle, wine fruit, ordinary Wine Yeast and water. Learn one complete fermentation cycle before scaling up.
The booklet shows 750 ml of water, one or two fruits and yeast. If you filter the water, check its actual volume afterward: filtering can leave the bottle short. Top it up before starting. Bottle capacity is not the same as the amount currently inside.
Insert the ingredients, start fermentation and inspect the finished wine. Note which fruit and water you used. Change one ingredient in the next trial so you can identify what improved the result.
2. Inspect fruit instead of paying for its appearance
Section titled “2. Inspect fruit instead of paying for its appearance”
For demo 049-Rev3-L, inspect the berries rather than assuming larger is better. The inspection screen’s healthy small berry contributes more quality points than the normal-sized healthy berry. The older video’s size recommendation does not match this build’s scoring code.
| Berry condition | Quality points per berry |
|---|---|
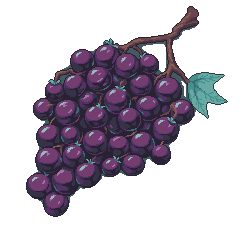 Healthy small berry Healthy small berry |
2 |
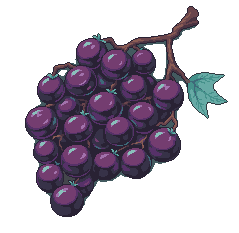 Healthy normal-sized berry Healthy normal-sized berry |
1 |
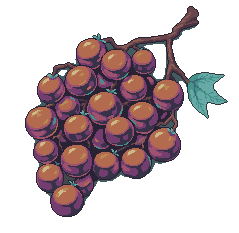 Underripe or overripe berry Underripe or overripe berry |
0 |
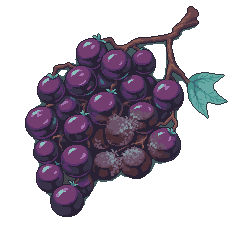 Moldy berry Moldy berry |
-1 |
For a fresh batch, add the berry points, +1 for two or more berries, +1 if yeast is present, and the water bonus. Ordinary and stronger yeast give the same one-point quality bonus; yeast power affects fermentation speed. Yeast is optional for starting a fruit batch, but omitting it loses that point.
Water bonus: Pure Water +1; High-Quality Water +1; Basewater 0; Ghostwater −1; Rustwater −2; Gutterflow −3. Use a full 750 ml recipe measure; the demo’s start check accepts at least 749 ml. One berry is enough to start ordinary fermentation.
| Quality score | Finished grade |
|---|---|
| ≤ 0 |  Undrinkable Undrinkable |
| 1 |  Bucket Brew Bucket Brew |
| 2 |  Homebrew Homebrew |
| 3–4 |  Production Wine Production Wine |
| 5 |  Reserve Reserve |
| ≥ 6 |  Master Vintage Master Vintage |
The chart below gives the finished grade of a batch with yeast: find your berries, then read the grade under your water. Without yeast, read one row down; the last row is then Undrinkable with any water. More points inside the same band do not create another grade.
| Pure Water / High-Quality Water | Basewater | Ghostwater | Rustwater | Gutterflow |
|---|---|---|---|---|
| ||||
| Master Vintage | Master Vintage | Reserve | Production Wine | Production Wine |
| ||||
| Master Vintage | Reserve | Production Wine | Production Wine | Homebrew |
| ||||
| Reserve | Production Wine | Production Wine | Homebrew | Bucket Brew |
| ||||
| Production Wine | Production Wine | Homebrew | Bucket Brew | Undrinkable |
| ||||
| Production Wine | Homebrew | Bucket Brew | Undrinkable | Undrinkable |
| ||||
| Homebrew | Bucket Brew | Undrinkable | Undrinkable | Undrinkable |
| ||||
| Bucket Brew | Undrinkable | Undrinkable | Undrinkable | Undrinkable |
These bands describe ordinary BloomBerry Wine. Illegal yeast instead produces contraband  GloomBerry Wine and resets its score to 3. Its initial value is 44 Credits; ordinary finished wine starts at 100 before quality, aging and trade modifiers. Neither amount is a guaranteed sale offer.
3. Improve water to High Quality before chasing Pure Water
Section titled “3. Improve water to High Quality before chasing Pure Water”In the video’s comparisons, High Quality Water improves the finished tier over Basewater, while Pure Water adds no further tier improvement. For winemaking, testing the move from Basewater to High Quality Water is more useful than blindly pursuing the highest purity reading.
If you have no suitable supply, use the water-trading and treatment guide to prepare a small batch. The creator also mentions ice-harvester supplies and ration-station water for an eligible starting setup. Treat these as additional sources, not guaranteed daily stock.
4. Choose yeast for its role, not its price
Section titled “4. Choose yeast for its role, not its price”Ordinary and more expensive yeast do not separate the quality tiers in the creator’s corresponding comparison. First establish a workable fruit-and-water combination with ordinary yeast, then decide whether a different yeast is worthwhile.
The yeast described as synthetic in the recording produces low-quality wine marked as contraband. Do not confuse it with a general-purpose upgrade. Inspect the description and the resulting bottle’s tags; names may differ between translations and versions.
The creator also points to the Doctor for a reusable yeast device. Whether it pays off depends on how many batches you intend to make and how much cash you can spare.
5. Age finished wine as a separate step
Section titled “5. Age finished wine as a separate step”Put finished wine in an AgeWell and check the change in its aging days. Aging comes after fermentation; it does not replace choosing appropriate ingredients.
Focus on Quality when fitting AgeWell modules. The creator compares aging speed after fitting modules; observe a night’s progress before investing further. Do not copy a different machine’s module setup without checking the result.
6. Restock before expanding
Section titled “6. Restock before expanding”- Bottles and ordinary yeast: the tutorial uses a household-goods buying sign to attract offers. Customer supplies are random.
- Fruit: watch food trades and farm-worker visitors, inspecting condition before purchasing.
- Good water: maintain a filtering process or a reserve of tested water instead of waiting until the bottles are empty.
Compare sale proceeds with ingredient costs after a batch, then choose which recipe to expand. Higher quality alone does not prove the highest profit.
Troubleshooting
Section titled “Troubleshooting”- Fermentation will not start: check the ingredients and water volume after filtering; refill to the recipe amount.
- Expensive yeast changes nothing: examine fruit and water before spending more on yeast.
- Glowing fruit produces disappointing wine: an unusual appearance is not a quality guarantee; inspect it.
- Pure Water costs more without improving the wine: compare a bottle made with High Quality Water.
- Aging is slow: inspect the AgeWell’s Quality setup and compare its progress after a night.
Related: Water trading · Machine modules
Credits
Section titled “Credits”Demo sources: WineHelper.StartFermentation, GetWaterQualityScore, GetWineQualityTier and FinishFermentation; ItemFeatureList.CreateWineQualityFeature; InsBerryUI.OnInit; demo 049-Rev3-L. The video below remains practical context for its own, unidentified build.
This walkthrough follows Yijing Jinhua de Baban Suan’s five-minute winemaking tutorial. Its exact build and patch setup are unconfirmed. Use the comparisons to plan small trial batches rather than assuming every version gives identical results.
Unofficial fan wiki, not affiliated with Questing Goose Studio or tinyBuild. Game content belongs to its owners.
Traffic measurement
Anonymous page and tool counts help improve this wiki. Return-visit measurement is optional. Do Not Track and Global Privacy Control disable measurement.
Comments & feedback
Share a tip or suggest a correction. Comments appear publicly right away; display names are unverified. All language pages share this discussion. Please keep personal information private.